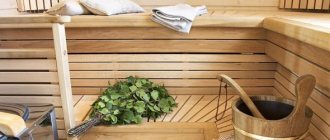
It is difficult to imagine a bathhouse without a stove, because in addition to heating the room, it is also the key to comfort and pleasure from the bathing procedure.
It is easy to make a stove for a bathhouse with your own hands; it will function well and will not require a lot of money and time investment. The simplest model is a sauna stove made from a pipe with a large diameter. Its production does not require special experience and knowledge in this area.
Pros and cons of such ovens
The required properties for the material used in the manufacture of the furnace are heat resistance, strength, durability, and corrosion resistance. In addition, it must withstand sudden temperature changes and have good thermal conductivity.
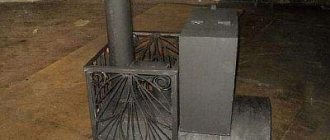
The ferrous metal from which a thick-walled pipe with a diameter of 500-600 mm is made cannot be called completely corrosion-resistant. But it is precisely this type that is optimally suited for the independent production of a sauna stove, as it meets almost all of the requirements listed above.
Having a wall thickness of at least 8 mm, it makes the stove in the bathhouse quite heat-intensive, in which heat is retained when the fuel has already burned out. And the round cross-section inside it allows heat to spread efficiently.
The use of a round-shaped pipe for a stove in a bathhouse reduces the length of welding seams - these are the very first places for corrosion to form , and it is through them that carbon monoxide escapes. In addition, this option remains the cheapest, although prices for ferrous metal are rising.
Cooking, maybe not building, but it requires quite a bit of knowledge
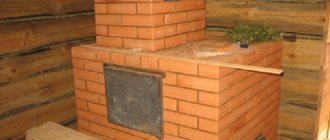
The only way out of the situation is to look for those terribly respected aksakal-masters still living on this planet called Earth, who preserve for us this art of building brick stoves for the bathhouse. Therefore, after all, we cook, observing certain conditions.
Prerequisites
Among the prerequisites that must be kept in mind:
- Providing a reliable foundation for the sauna stove, no matter what material it consists of. Here you cannot do without examining the soil under the bathhouse. In any case, the foundation under the stove requires additional strengthening.
The bathhouse itself is made of logs, but pay attention to the foundation and the part of the wall adjacent to the stove - they are extremely reinforced and made of brick and reinforced concrete
- Ensuring protection of bathhouse walls from exposure to elevated temperatures. A bathhouse is always wood, in the form of a log house or lining on the walls, which means an increased fire hazard in any case. This danger is significantly increased by the installation of a stove, so you cannot do without protective equipment in any case.
- Preparing the roof for the chimney wire, because a stove is not only a firebox, a vent and a heater. A stove also means a reliable draft, which means a serviceable chimney with an outward pipe made according to all the rules.
When deciding how to properly weld a sauna stove, it is very important to determine the convenient location of the heater - in the photo it is on top, but this is not the only possible option
- Hence the conclusion - there is an urgent requirement to create a detailed diagram of both the furnace itself and its installation location. Moreover, collecting material and preparing a detailed algorithm for all actions. Only this will bring success.
Helpful advice! We advise you to pay close attention to the soil under your bathhouse. If the soil is prone to collecting moisture, so-called heaving, then it needs to be strengthened. Often it consists of simply excavating the soil to a depth of one and a half meters and replacing it with a well-compacted sand and gravel mixture. Moreover, it is necessary to install additional reinforcement under the furnace in the form of a reinforced concrete slab, which is at least 30% larger in horizontal dimensions than the dimensions of the furnace itself.
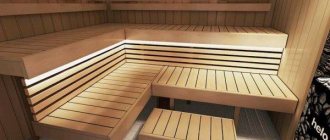
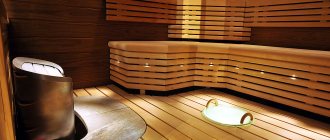
Types of furnaces - horizontal and vertical, features of choice, pros and cons
A self-assembled stove for a bathhouse made from a pipe, although it looks unpretentious, does an excellent job of heating the steam room. Available in vertical or horizontal form. The choice directly depends on the area of the steam room and on the desires of the owner.
Vertical
Externally, such a stove resembles a common potbelly stove, but differs in its design features. In addition to the firebox and the compartment where the stones are placed, there is a special tank where the water is heated. This type is ideal for a small bath.
The firebox and grate are located one above the other in steps, which makes it possible to save space. Therefore, this model is gaining popularity for installation in bathhouses.
However, it is worth noting that it is less effective, since the heat goes up and the walls do not have time to warm up. In addition, fuel burns faster in a vertical design. And the main disadvantage is the presence of a firebox and a compartment to enhance traction in the steam room of the bath.
Horizontal
The horizontal shape is recommended for bath rooms with a large area. Equipped with a compartment where stones are placed and a water tank. The firebox is more voluminous, and its doors and the vent are located at the end of the pipe; they often open into the room in front of the steam room, which speeds up the heating process. In addition, this arrangement is more convenient, since when lighting, there is no need to enter the steam room, and it does not cool down.
Unlike the vertical type, this type of heater requires more space, but since the firebox is longer and located at the bottom, this significantly increases the heating area and improves the natural exchange of warm air in the bathhouse. Therefore, experts recommend this particular model, if the bath area allows.
Preliminary metal preparation
When making iron stoves for a bath, during preliminary preparation of the material, those parts that heat up more than others (sides, top and door) should be released. To do this, we take the material for the parts of the firebox and heat it until red (for heating, you can use any method convenient for you).
Cool and trim the sheets with a hammer (they may bend after heating and cooling) and double-check the dimensions. If they have changed a little, they need to be straightened. We will avoid this effect (warping of the metal) directly during operation.
Design features of a metal furnace firebox
The next task that worries many: how to make sure that the temperature is maintained evenly and the stove does not produce maximum heat at the very beginning, when the wood burns best? Often you need to constantly add new firewood to raise the temperature again to the desired level. Otherwise, it will be very hot at first, and then it will become completely cool in the bathhouse.
Grate bars are most often installed in the furnace. These grates allow air to pass through well and are designed to heat up the oven quickly. They are made in different ways: by welding metal rods or drilling holes in a sheet of metal.
Firewood is placed on the grate, air draft increases and the combustion process noticeably accelerates. Due to this, the heat is also distributed unevenly. As mentioned above, the top, door and sides of the stove heat up the most. At the same time, the bottom of the structure and the rear wall do not heat up so much.
Often you have to manually regulate the heat - either fill the fire with water, or add wood. And instead of resting, we constantly run back and forth.
What solution? It is simple - place the firewood not on the grate, but on the bottom of the stove. High-quality sealing with mineral wool will also help. You can also make several holes in the firebox door, which will be closed with an additional damper. This way we will regulate the flow of air that gets inside.
One stack of firewood is enough for an hour of heating, plus we get the opportunity to independently regulate the heating level of the stove surface. In this case, there is no need to make grates and an ash pan.
What we need - tools and materials
Before you start making your own sauna stove from a 530 pipe, you should prepare a place to work and stock up on the necessary tools:
- welding machine;
- grinder with different attachments;
- electric drill;
- metalworking tools;
- door handles;
- mortise tap;
- asbestos cord.
In addition to tools, you will need the following material:
- Thick-walled metal pipes for fireboxes and water tanks, having a diameter of 500 to 650, a wall thickness of 8-16 mm, and a length of 1.2 to 1.5 meters. Also the pipe through which carbon monoxide will escape, its diameter is 120 - 150, and the wall thickness is 2 - 4 mm.
- A steel pipe where the stones will be placed. The thickness of its walls is 5-8 mm, and the diameter is 350.
- Sheet metal, size 600 by 800 mm, having a thickness of 8 - 12.
- Hinged steel hinges.
- Water pipe - a small piece, suitable diameter ½ or ¾ inch, length 50 - 80 mm, and a ball valve with a similar thread.
- Metal reinforcing bars - 500 mm, diameter 12 - 18.
- Cement.
- Brick.
- Sand.
A little history
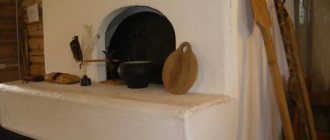
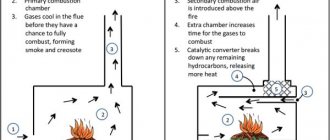
Previously, firewood was burned on a blind hearth - combustion air was supplied through a slightly open fire door. This method has a fire hazard - coals may fall out of the firebox. It is also difficult to accurately select the optimal combustion mode - the regulator is very rough. The ash that covered the coals over time also did not contribute to the normal combustion of fuel - it is an excellent heat insulator (in the combustion chamber of a Russian stove, this is exactly how coals were stored in the ash for the next kindling). Therefore, they began to install a grate - a grate on the hearth through which oxygen enters the combustion zone. The ash is also removed through the grate - nothing interferes with the combustion processes.
The absence of a grate or its damage is not critical - the stove operates without it. True, the efficiency is somewhat lower. And the zone of intense heating of the masonry moves below the hearth - now the base of the ash chamber is also heated. And here you need to be careful if the stove is installed on a wooden base.
Schemes and dimensions of vertical and horizontal furnaces
After choosing a model, before making a sauna stove with your own hands, a drawing is drawn; it must reflect all the parameters and configuration of the stove. A correctly drawn up drawing will not only facilitate the installation process, but also eliminate operational problems.
The diagram should show the main parts of the furnace. If this is your first time making a stove for a bathhouse, then it is better to use a ready-made diagram.
Horizontal model diagrams
It is the model in which the horizontal pipe is most often installed in bathhouses, if space allows.
Vertical furnace diagrams
As with a horizontal stove, a pipe with a diameter of 530 is also ideal for a vertical model.
An example of a drawing of a stove for a vertical bathhouse, which is easy to install yourself.
Recommendations for selection
When choosing a specific model, you should take into account the type of fuel that you plan to use. Take note of the size chart above. The grate must be taken in such a way that the rods can easily support the maximum possible weight of one fuel portion. This information can be clarified with a store consultant or specialist.
To clear ash, it is better that the gaps occupy at least 40% of the area of the entire structure. If there are fewer of them, the combustion chamber will not function as efficiently, because the volume of incoming air will be small for good combustion. If ventilation is poor, gases may accumulate. In the case of large gaps, fuel that has not had time to burn out will fall into the gaps along with the ash.
Assembling a horizontal model
The stove is made from a horizontal pipe for a bath, has a heater located on the outside, and the tank is mounted. The advantage of this device is that it has a compact size and a large firebox depth. In it, the fuel burns completely and, therefore, more heat enters the bathhouse.
The instructions for independently producing a horizontal stove for a bathhouse are as follows:
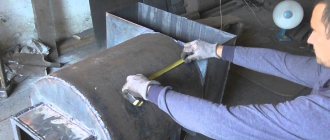
- You will need a 2-meter pipe with a diameter of 500 mm, which has thick walls; marks must be placed on it. To do this, it lies on a flat surface on its side, is fixed and, making an indentation of 1/3 of the diameter from the bottom, two lines are drawn on it in the horizontal direction, located parallel.
- A base for a round firebox is cut out of metal, the size equal to the length of the pipe, and the width corresponding to the distance between the lines.
A rectangular or square window is made in the middle of the circle, into which a grate must be mounted. Perhaps you can simply weld reinforcing bars in the form of a lattice to the bottom of the window.
- The base is inserted into the main pipe of the stove strictly according to the marks and fixed by welding inside it.
- Two blanks are made from a metal sheet with thick walls, so that their lower part serves as the legs of the device. And the width of the walls should be 20 mm greater than the diameter of the pipe. To give an aesthetic appearance, the front wall is rounded, but the back wall remains rectangular; a water tank will be mounted to it.
- On the front wall of the stove there is a window for the firebox and a compartment to enhance draft. The lower level of the firebox opening is located 0.03 meters up from the base of the firebox. And the upper edge of the blower is 0.01 meters lower than the container with stones.
- Doors are made from cut parts. They are welded to the front side of the stove with loops near the openings. Handles and latches are attached to them.
- Each end strip is attached to the base of the pipe and fixed with a weld seam over the entire area.
- To increase the heat transfer of the stove, it is recommended to install an additional chamber between the firebox windows and the chimney, in which the accumulated heat is transferred to the stone. You will need a 350 mm pipe, with a length of 0.35 - 0.45 meters. It needs to be cut in half horizontally. One edge is welded with a plug shaped like a semicircle.
- A hole is cut in the upper part of this device, slightly offset from the middle. The size of the opening should be equal to the diameter of the chimney. A 0.1 meter pipe is inserted into it to connect the chimney.
- At the top of the main structure, not far from the rear wall, a round hole measuring 150 mm is made. Next, the prepared dome is installed in the furnace pipe so that both openings are slightly offset in relation to each other. It is then welded to the main pipe.
- The final stage is a metal basket made from welded reinforcing bars around the additional chamber; it will hold the stones. And a water tank is attached to the wall at the back, and you can begin to test a sauna stove from a pipe that you assembled with your own hands.
Advice! Since the firebox and the window to enhance draft are brought into the room in front of the steam room, it is recommended to decorate the wall around the door with metal plates for protection.
Watch the video
eternal sauna stove
How to make a potbelly stove from steel
Potbelly stove of convection type.
If you need to heat a house in the country and cook food, you should definitely know how to weld a potbelly stove yourself from sheet steel. This design will not require a lot of fuel. This is achieved through the installation of partitions in the firebox, reliable fastening of the doors and the ability to adjust the air flow. To make such a device with your own hands, you will need to prepare the following elements:
- sheet metal 4 mm thick or more;
- metal 8-12 mm thick, from which the partitions will be made;
- lattice;
- chimney pipe;
- corners from which the legs will be constructed;
- welding device.
Sequence of manufacturing actions
From the steel sheet, the first thing you need to do is cut out elements for the body and several partitions that will be mounted in the upper part of the firebox. They will be able to create a labyrinth for the smoke, which will increase the efficiency of the stove. In the upper part you can make a recess for the chimney structure. The recommended recess diameter is 100 mm. Next, you will need to make a recess for the hob with a diameter of 140 mm.
Potbelly stove made of sheet steel.
Using a welding device, you need to attach the side elements to the bottom of the structure. You will need to attach thick strips of metal to the side walls. As a result, it will be possible to attach the grate. This can be a sheet of metal with recesses with a diameter of about 20 mm. The lattice can be made of reinforcing bars. At the next stage, you need to attach supporting elements from a metal strip to the side walls. After this, the partitions are installed.
Doors for the firebox and ash pan should be cut out of metal. They can be installed on ordinary hinges. However, a more reliable option is to use curtains made of steel pipes and rods. They can be secured to wedge latches. The elements are cut out of a stainless steel sheet and then secured with bolts. In order to be able to adjust the intensity of fuel combustion, a recess must be made on the door that closes the ash pan for mounting the damper.
A sleeve 200 mm high must be attached to the recess for the chimney structure, on which the pipe will be mounted. A damper in the tube will help retain heat. For it you will need to cut a circle from a metal sheet. One extreme part of the steel rod needs to be bent. After this, you will need to make several parallel holes in the tube. Next, the rod is mounted, after which a round damper is welded to it.
Diagram of a brick fence for a potbelly stove.
The chimney pipe should be installed at an angle of 45°. If it passes through a recess in the wall, the part must be wrapped in fiberglass in this place, and then secured with a cement mixture.
To prevent burns from touching a hot stove, you will need to build a steel protection screen on several sides and place it at a distance of 50 mm. If there is a desire to increase the thermal efficiency coefficient, the structure can be covered with brick. After the firebox is finished, the brick will continue to heat the house for some time. The laying should be done at a distance of 12 cm from the metal body.
A pillow of air can act as a heat protector.
To implement it, holes for ventilation must be made in the masonry at the top and bottom.
We make a long-burning stove with our own hands
The first step is to decide what the stove body will be made of. It is advisable to choose thick metal so that it does not burn out longer. Most often, such a potbelly stove is made from a gas cylinder with a volume of 50 liters. You can use a large-diameter thick-walled pipe or a 200-liter steel barrel, but its walls are thinner.
You will also need
:
- steel pipes;
- metal profile;
- tool for cutting metal (grinder, gas cutter, etc.);
- welding machine with electrodes;
- Sheet steel.
Let's take a closer look at how to make a potbelly stove with your own hands. It is first recommended to sketch out a design diagram and determine the dimensions of the elements.
Frame
. When making a body from a gas cylinder, it is necessary to carefully cut off the upper part (cut line 1 cm below the weld). If desired, the body can be extended by welding the cut-off part of another cylinder. The top part with the lid is also cut off from the barrel. And if a pipe is chosen for the body, a round or square bottom made of thick sheet metal should be welded to it.
Housing options
Lid. In the cut off top of the gas cylinder or in the lid of the barrel, a hole should be cut in the center, corresponding in size to the pipe from which the piston will be made
The lid is scalded with a steel strip - it is important that it fits tightly onto the body. For a pipe body, the lid will have to be specially made from sheet metal. Chimney pipe
On the side of the stove, a couple of centimeters below the lid, a hole is cut and the chimney pipe is welded
Chimney pipe. On the side of the stove, a couple of centimeters below the lid, a hole is cut and the chimney pipe is welded
It is important that the removable chimney elbow fits tightly, without gap
Chimney. The lower, horizontal section of the chimney should be longer than the diameter of the stove. The chimney pipe can be made broken to increase the surface area that transfers heat to the room
It is important that there are no angles less than 45°. A pipe with a diameter of 10-15 cm is suitable for installing a chimney.
Piston
. The length of the air duct must exceed the height of the housing by 100-150 mm. It is necessary to weld a steel circle with a hole in the center to its lower part and equip it with five to six blades on the lower side (arranged in a circle, with rays from the center).
The blades can be
:
- pieces of steel angle;
- U-shaped sections;
- wave-curved strips of metal (welded edgewise).
In the middle, a small steel circle with a hole in the center is welded onto the blade. If the platform with the blades is made of steel less than 6 mm thick, it will deform over time due to overheating. To prevent this from happening, stiffening ribs are welded on top - a triangle made up of angle segments. Attach a steel plate to the upper section of the pipe with a bolt to adjust the combustion intensity.
Assembly
. Install a top-burning stove, check the tightness of the chimney connection. Insert the piston into the stove, put on and close the lid. Make sure that the cap fits tightly and that the gap between the piston and the hole in the cap is minimal.
Commissioning
. Homemade long-burning potbelly stoves can be placed on an earthen or concrete floor. If the floor in the room is wooden, lay out a brick platform using stove mortar and cover it with a steel sheet. Instead of brick, you can lay a sheet of refractory material and also cover it with sheet metal. It is advisable to line the walls next to a self-made stove with bricks, which will accumulate heat and transfer it to the room.
Firewood is placed into the installed stove, filling the firebox approximately 2/3 or a little more. Place paper on top and set it on fire. After making sure that the firewood is occupied, you can install the piston and put on the lid. The next addition of firewood is possible only after all the fuel has burned out and the stove has cooled down.
Conclusion
“Bubafonya” is not the most effective long-lasting homemade stove. Craftsmen are developing various versions of a wood-burning “rocket” stove, but its manufacture requires precise calculations, hand-made drawings and good skills in working with various tools.
“Bubafonya” can also be modernized, for example, by installing a device that simplifies the unloading of ash.
Video on the topic
:
Features of the furnace design
A sauna stove must satisfy several requirements at once.
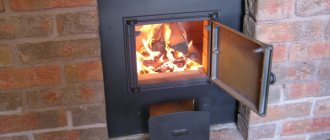
It must be compact, economical and efficient. In order to get the maximum benefit from fuel combustion, when constructing a furnace, it is necessary to provide for the possibility of heating the stones during combustion, as well as to ensure heating of water. Otherwise, the sauna stove will turn out to be just a heating stove. If it is made of metal, then it is necessary to provide a fence so as not to get burned on the hot metal by accidentally touching it.
Making a potbelly stove during mining
Diesel fuel and used engine oil are very high-calorie fuels. If you get it inexpensively, then there is no point in messing with wood and coal; it’s easier to make a reliable stove - a dripper. Its principle of operation is to burn waste dripping into a hot bowl. Moreover, along the way, the liquid fuel has time to warm up, as it passes through an oil line built inside the afterburner pipe. The design of a drip-type potbelly stove is shown in detail in the drawing.
For efficient oil combustion, air is forced into the stove using a fan, and waste flows naturally from a tank suspended from the wall next to the heater. Another option is the forced supply of fuel by creating pressure in the fuel tank (for example, with a hand pump).
The stove body can be either a pipe Ø219 mm or a propane cylinder with a diameter of 30 cm. Making an oil stove with your own hands is not a difficult task, the main thing is to correctly make the holes and slots in the afterburner and lay the fuel line to the bowl installed on the bottom. A complete assembly guide is provided in our other article. You can get a closer look at the operation of the heater from the video: