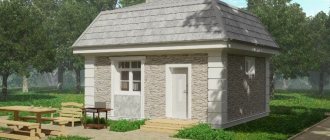
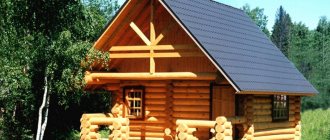
With the help of modern materials, almost any average resident of Russia or another country can realize the dream of having their own bathhouse. This could be a building on a summer cottage or near a private house. Naturally, no one will build a bathhouse from iron sheets. Today, a material with many positive properties is available to consumers - composite panels, so a sauna made of sandwich panels can be an interesting option.
Features of the material
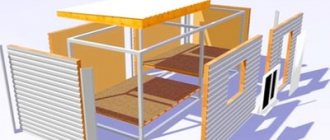
Sandwich panel is a ready-made construct that solves the problem of standard frame buildings. It is both easy to install and immediately contains insulation. Bathhouses made from sandwich panels and their projects are also not complicated. In fact, they can be assembled independently by anyone who has the skills for simple measurements and using power tools.
The sandwich panel is durable, can act as an element of structural rigidity, can withstand heavy loads, weighs little and is easy to process. It consists of several layers:
- outer covering. It can be a board of OSB, magnesite, metal, cement particle composition;
- internal insulation. Its role can be polystyrene foam (expanded polystyrene), mineral wool, high-density basalt wool;
- another layer of outer covering.
All layers of the composite are firmly connected to each other with a special polymer glue, during the hardening of which a pressure of several tons is applied to the slab. A bathhouse made of sandwich panels, if you choose the right materials and do not try to pay as little price as possible for them, will become a building that will serve for decades.
Construction of houses from SIP panels: pros and cons
Canadian technology for building houses from SIP panels is popular in many European countries. Such great popularity is due to a number of positive characteristics of housing, among which the following should be especially highlighted:
Short construction time - construction of houses from SIP panels is carried out in the shortest possible time. In just 4 months, a team of builders of 5 people is able to put into operation a house that is completely ready for living. At the same time, you do not need to spend money on renting expensive special equipment, since when building a Canadian house from SIP panels, it is simply not needed.
Light weight - due to the low weight of SIP panels, houses from them can be built on a lightweight foundation. In turn, this makes it possible not only to reduce the construction time of the facility, but also to save a decent amount of money (up to 40% than when pouring a monolithic foundation). A house made of SIP panels with a total area of 200 m² will weigh no more than 15 tons.
Low thermal conductivity of walls - houses built from SIP panels have low thermal conductivity of walls, thanks to modern building materials. The walls in such houses are able to retain heat inside for a long time, so in the winter season several times less energy resources are spent on heating.
Strength and reliability - the materials used to manufacture houses using Canadian technology are distinguished by their strength, reliability and durability. They withstand high vertical pressure and have good resistance to wind loads. Recent tests of SIP panels show that they can withstand loads of over 200 kg per 1 m². Thanks to this, houses made of SIP panels are earthquake-resistant and can withstand heavy loads.
Simplicity of finishing - the walls of “Canadian houses” do not require any leveling after construction. A huge advantage is that they can be finished with almost any material, be it siding, porcelain tiles or regular structural paint. Plus, houses made from SIP panels do not shrink, so finishing work can begin immediately after construction.
Affordable cost - thanks to all the above advantages of houses made of SIP panels, you can save significantly on the construction of your own home. The uselessness of special equipment during construction and a large team of builders, as well as the need for a powerful foundation, makes it possible to build houses much cheaper than “traditional” ones from brick or cinder block.
As you can see, houses made from SIP panels have many advantages. As for the downsides, no building material, unfortunately, is without them.
Disadvantages of houses made of SIP panels
On the Internet you can find a lot of negative reviews about the construction of houses from SIP panels
However, before taking them into account, you should understand that every year building materials, as well as construction technologies, are improved, new standards are introduced, etc.
All this is done with one goal, to minimize risks during the operation of housing.
The flammability of SIP panels is the main argument among opponents of building houses using Canadian technology. At the same time, few of them understand how the SIP panel is made and what it consists of inside. High-quality materials for manufacturing SIP panels do not support combustion and are absolutely safe to use. However, this only applies to products that have been certified and comply with all safety standards and requirements.
Bacteria and rodents - another topic among opponents of the construction of SIP houses, is the long-worn topic regarding damage to panels by rodents. It usually arises, again, due to a number of errors associated with construction. In this case, either the protection of walls and ceilings from rodents was not properly installed, or it was not carried out according to technology.
You can prevent rodents from entering a house made of SIP panels if you properly protect its structural elements using:
- Metal canopies over the foundation base;
- Metal grilles on ventilation openings;
- Durable decorative finishing in the lower part of the house that cannot be damaged by rodents.
As a rule, negative reviews about houses made of SIP panels are associated with mistakes made during their construction. In all other cases, when housing was built strictly according to existing technologies, no problems arise
That is why it is so important to contact only a trusted construction company that has a good reputation in the SIP house construction market
What panels are needed for a bath
It is worth noting that a bathhouse made of metal sandwich panels will seem like an unexpected idea to many people. However, it is precisely this material that shows the best ratio of price, speed of building assembly, and durability. The following dangerous factors are always present in the bathhouse:
- heat;
- non-zero danger of emission of coals and sparks where the bathhouse is heated with a wood-burning stove;
- high humidity.
Special metal sandwich panels with basalt or mineral wool are an excellent choice. They are designed not just to withstand moisture. The composite is designed to withstand even aggressive chemicals at high temperatures. In addition, this material is guaranteed non-flammable, which is important for any type of bathhouse.
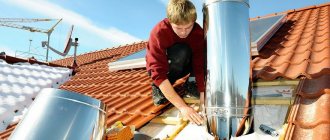
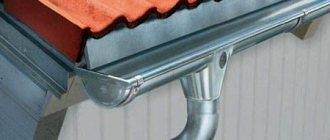
Installation of a sandwich chimney: an example of assembling a sandwich pipe with your own hands + step-by-step installation
Today, the sandwich design chimney is the most popular. Practical, aesthetic, functional... And most importantly, installing a sandwich chimney with your own hands is a fairly simple and safe undertaking if you have purchased really high-quality and certified materials in advance. Chimneys of this type really have many advantages: no condensation, negligible soot formation, high fire safety, simple maintenance, relatively light weight chimney, aesthetics. And finally, sandwich pipes are simply ideal for wooden buildings, which is traditionally the case with a bathhouse. And what to do, how and in what order - you will learn from this article.
How to make and assemble a sandwich pipe yourself?
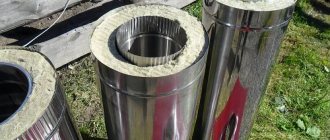
The finished “sandwich” chimney consists of segments, each of which is one meter long and is inserted into the other during installation. Now let’s figure out exactly how to assemble a sandwich chimney and from what materials.
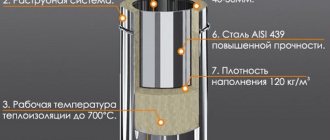
So, the design of a sandwich chimney is as follows: it is an inner and outer pipe, between which there is a layer of thermal insulation. The inner pipe is made of stainless steel, but the outer one can be made of a variety of materials, even copper and brass. But it is not recommended to take galvanized pipes for the chimney: in heating and cooling mode, it will change its diameter, whereas stainless steel practically does not.
Important! If the stove in the bathhouse is heated with solid fuel, then the sandwich pipe can only be used from high-quality stainless heat-resistant steel.
Most often, basalt fiber or mineral wool, which has good thermal insulation properties, is used as insulation. Experienced stove makers, for example, advise using Rockwool WIRED MAT 80 basalt wool as thermal insulation. Its thickness can vary from 25 to 60 mm.
Expanded clay and polyurethane are also used as internal insulation for such pipes. The only problem when laying thermal insulation between the outer and inner pipes is that the material has to be overlapped with an undercut of half the thickness and an overlap of 10 cm. Or you can even stuff it all by hand, if it works out neatly.
Sandwich pipes are also connected in different ways: by flange method, by bayonet method and by “cold bridge”, and also “under smoke” and “by condensate”. “By smoke” the chimney is assembled for the purpose of fully guaranteeing that no carbon monoxide will enter the house or bathhouse. And “condensate” - so that the condensate formed due to the temperature difference can freely flow down the pipe.
In the first case, the smoke does not encounter any obstacles and, under the influence of draft, quickly comes out, but condensation can get inside the sandwich if the joints are carelessly sealed. As a result, the internal insulation will suffer a lot. But in the second method, the inner pipe of the sandwich fits into the socket of the lower one, and moisture cannot get inside the pipe in any way. But the smoke, if it finds even the slightest crack, will find a way out. What to choose? Gas is harmful to human health, and condensation is harmful to the durability of the chimney. The only way out is to carefully seal all the cracks and joints with any method, and that’s it.
For the internal pipes of a sandwich chimney, we recommend installing it “on condensate” so that the condensate itself does not fall on the pipe seams and there is no leakage. And, despite their double layer, sandwich pipes still require high-quality insulation from those areas that are most fire-hazardous - from beams, roofing and ceilings. And the sandwich cannot be used as the first pipe that is connected directly to the stove.
So, knowing the technology, you can easily make a high-quality sandwich chimney with your own hands - from materials you personally purchased (preferably with quality certificates).
Installing a sandwich chimney in a bathhouse in stages
The installation of a sandwich pipe for a chimney itself is not difficult. Since sandwich pipes are as fireproof as possible, even a person who is very far from construction can connect and secure them correctly.
The “sandwich” chimney is installed from the bottom up - from the stove to the roof, and the outer pipe needs to be “put” on the inner one. In general, there are several important points for installing a sandwich. Let's go into more detail.
Stage I. Connecting the chimney elements
When installing a sandwich chimney, pay attention to the fact that one of the ends of the pipe is always narrowed with a slightly smaller radius. It just needs to be inserted into the previous pipe. Due to the fact that almost no soot accumulates in such a chimney, it is easy to remove condensate from it - and it is better to additionally install special tees for this.
Stage II. Option 1. We draw the chimney through the wall
If the chimney will exit through the wall, it will have to be dismantled and the mounting locations for the bracket reinforced. Next, we assemble the outer bracket and attach two corners to it like runners - so that you can move the tee without any problems during the installation of the chimney from sandwich pipes, and nothing gets stuck.
The wall itself can be covered with plywood one centimeter thick and an asbestos sheet secured with screws over its entire area. On top of that is a solid sheet of galvanized metal 2x1.20 cm. We cut a square hole in the sheet itself for the passage and secure it with screws. Finally, we coat the bracket with metal varnish to protect it from corrosion. Next, drill the required hole in the adapter and put the sandwich into it.
When building a chimney, they also use such a concept as a concession - this is the space that we specially leave between the smoke channel and the wall.
Important point: calculate the first connecting element of the chimney so that the first sandwich pipe connects to the next one above the ceiling cut. After all, visual inspection of the most fire-hazardous parts is important!
Stage II. Option 2. We draw the chimney through the roof
When running a sandwich pipe through the roof, you must first take a galvanized steel sheet, attach it to the hole from the inside, and remove the pipe. Only after this we attach the sheet to the roof. If necessary, it can be additionally placed under the edge of the roof.
Attention! If the bathhouse has a flat roof, then the chimney above it should rise at least one meter. If the height of the chimney from the roof to the deflector is more than 1.2 meters, then it is necessary to install guy wires with crimp clamps.
If the roof is made of combustible materials, it must be protected from fire. And to do this, we install a deflector with a spark arrestor mesh with small cells on the chimney, which rises above the wooden tiles or bitumen.
Stage III. We fix the chimney
We fasten all tees, elbows and other elements with clamps, and fasten the tee with a support bracket. If the upper part of the chimney remains unsecured, it is better to secure it. At least with the same 120 degree stretches. Here's how additionally you need to fasten the butt joints: sandwich pipes to each other - with crimp clamps, pipes with other elements, such as adapters and tees - with the same clamps, but on both sides.
By the way, you can make a support bracket for the chimney yourself: to do this you need to take two angles of 30 and 50 mm, and use an angle grinder, a drill and M10 and M8 bolts to build everything.
Stage IV. Completion of installation
After completing the assembly, be sure to remove the protective film from the pipes. The optimal length of the chimney is 5-6 m from the stove grate to the top - pay attention to this. And we seal all seams and gaps.
To do this, you will need a heat-resistant chimney sealant that is designed for temperatures of at least 1000˚C. You need to apply it like this:
- For internal pipes - on the outer surface of the upper internal pipe.
- For external pipes - along the outer surface.
- When switching from a single-walled to a double-walled pipe - from the outside, around the circumference.
- When connecting a single-wall pipe and other modules - as in the last version.
When everything is ready, be sure to check the most dangerous heating zones of the chimney for temperature. And so that later cleaning the chimney is simple and easy, it must include an inspection - this is a special removable part or hole with a door.
Installation of a sandwich chimney is very simple and easy due to the simplicity of the design and light weight - if you have already decided on the project and purchased the material, feel free to roll up your sleeves!
Advantages
There are many advantages to a self-built bathhouse made from sandwich panels. A short list of obvious advantages is as follows:
- warms up quickly, even from a small stove;
- retains heat well;
- assembles quickly;
- in most cases, the construction of a complex foundation is not required;
- In addition to sandwich panels, a summer cottage-type steam room being built near a country house will require simple materials (beams, self-tapping screws).
You can build a bathhouse with the help of a couple of people. This does not require complex tools and devices.
General information
Even a person ignorant of construction can voice the basic requirements for bathhouses of various designs:
- high thermal insulation;
- Fire safety;
- environmental cleanliness.
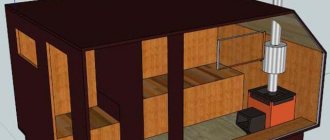
A sauna is not just a steam room. Traditional projects, depending on the type of bathhouse, may include a small dressing room, a separate room with a small pool, a room for gatherings at a table, etc. But it is the steam room that is the “heart” for which construction is started.
Flaws
Bathhouses made from sandwich panels also have disadvantages. They are clearly visible if you build a structure with your own hands.
- When working with standard sheets, cutting the necessary parts, a lot of garbage is generated.
- Calculating the optimal number of sheets needed for purchasing is quite difficult; losing money is almost inevitable.
Even when ordering a ready-made kit for assembly, extreme care and certain qualifications of those performing the work are required. If you have doubts about your own abilities, you should carefully search and buy a turnkey bathhouse made of sandwich panels, with construction on site.
Floor arrangement
The construction of the first floor floor is as follows: the sip panel is installed transversely on the basement floor along the short end of the foundation. The size of the element is selected in such a way that when placed at the end of the strapping board, the overall size coincides with the corresponding section of the foundation. It is possible to connect the panels to each other using a system of grooves and tenons. The usual length of a floor panel is up to 6 meters, but there are solutions with increased strength that allow 15 meters. For maximum strength, it is worth using an intermediate connecting rail.
After laying the sip panels, a strapping board is installed around the perimeter of the completely finished floor to increase strength. The panels are connected with self-tapping screws, the lower surface of the floor of houses with shockproof construction is sealed with bitumen mastic. If wooden planks are used, they are also screwed to the trim board.
Foundation
A sauna made from sandwich composites is an easy construction. It does not require a complex foundation. However, the specific type of design should be chosen extremely carefully.
- The classic strip foundation is chosen only for soils that do not freeze in winter. It is not suitable for loose soil. The foundation is deepened to the ice level to avoid splitting of the structure.
- A concrete pad is created on sandy and loose soils. Such a foundation is simple, but a lot of material is spent on its creation.
- A columnar foundation is the simplest for soils of medium and high hardness that do not freeze in winter. To place the bathhouse on the base points, a timber frame is created.
All of the above types of foundations are inconvenient if the terrain is uneven. To make a good foundation for construction, you cannot do without earthworks. A pile foundation allows you to get rid of this. By placing the upper ends of the pillars at different heights, it is easy to level out any differences in height on the site.
Companies offering turnkey construction of bathhouses most often use piles. They can become clogged or screwed into soft ground. This can also be a convenient option for self-construction. A modern pile can be screwed by one or two people using simple clamping devices and a lever.
Procedure for registering a constructed facility
The bathhouse requires mandatory state registration as a real estate property. Only in this case does the owner have ownership rights to the building.
The decision to register depends on the moment of construction. If there is a notification and an act from the administration, they are submitted along with other documents to Rosreestr.
If the bathhouse was built without permission without the permission of the local administration, it can be registered according to a simplified scheme in the form of a dacha amnesty. This opportunity is established in accordance with Federal Law No. 93 of June 30, 2006.
You can register a bathhouse in one of the following ways:
- in person through a multifunctional center or a territorial department of Rosreestr;
- online through the website of Rosreestr and State Services;
- by mail.
When submitting an application through the Rosreestr website, you must complete the following steps:
- Select the service “Submit an application for state registration of rights.”
- Go to the “Registration of Property Rights” section. Here you can select the appropriate section - registration of the right to the sole owner, common shared or joint ownership.
- Fill in the information about the building by selecting the “non-residential premises” field. Indicate the cadastral number and area of the property, location address. Enter the personal information of the owner and his contact address.
- Fill in information about the copyright holder and consent to data processing.
- At the next stage, attach electronic versions of documents.
At the final stage, documents are sent for registration online. This option is suitable for owners of an electronic digital signature.
This is a time saver and does not require you to go in person when submitting your application. If after the inspection no violations are identified, an extract from the Unified State Register of Entry of data into the register is provided.
When applying in person to Rosreestr or MFC, documents are submitted in copies. An employee will check the originals for consistency. A receipt for receipt of documents and applications is provided. The date of the return visit is indicated. During your next visit, you can receive an extract with registration information.
The package of documents for registration includes the following:
- application or declaration in the case of a non-permanent structure;
- owner's civil passport;
- title document for the land and an extract from the Unified State Register of Real Estate;
- boundary plan;
- technical plan;
- building permit (not required if the construction is not permanent);
- receipt of payment of state duty - 350 rubles for a light structure, 2000 for a bathhouse built with a permit.
An employee of Rosreestr will formalize the construction within 7-10 days. Based on the results of the work, the data is entered into the state register, about which the owner receives an extract from the Unified State Register.
Walls
The walls of the bathhouse are erected by attaching sandwich panels to the timber of the load-bearing structure. If we are talking about independent construction, parts of the required size are pre-cut, door and window openings, and ventilation holes are made.
For external walls, a panel with a thickness of 125 to 250 mm is used. Internal partitions are constructed from thinner material. To save money while maintaining strength, it is wise to use panels with a thickness of 75 mm. Upon completion of construction, a beam is attached to the top of the walls, forming a common frame.
Quantity calculation
To calculate the number of sandwich panels, the following factors must be taken into account :
- Bath dimensions: length, width and height.
- The span width, which must be a multiple of the panel sizes.
- Roof thickness.
- The area occupied by doors and windows.
For example, if the length of the bathhouse is 6 m and the height is 3 m, then for horizontal installation you will need 3 panels of 6 m each. If they are installed vertically, then purchase 6 panels of 3 m each.
To calculate the number of panels for the roof, you first need to find the length of the slope using the formula:
- a is the height of the slope;
- b is the distance from the greater height of the slope from the smaller plane.
When the length of the slope is calculated, the length of the roof overhang is added to it. If there is not enough experience in carrying out construction work, then it is better to seek help from specialists to perform the calculations. This will avoid unnecessary expenses on building materials.
Roof
If you order a turnkey bathhouse, you can get any roof configuration. The most popular is the gable roof. It is simple and allows, in some cases, to get a comfortable attic.
If you build a bathhouse yourself, a simple, sloping, flat pitched roof will simplify the work and reduce material consumption. Even a beginner can assemble such a structure.
Exterior of the bathhouse
The external decoration of the bath can be anything. For those who used magnesite board panels for walls, there will be no problems. The material is called artificial stone; walls made of it look neat and stylish even without finishing. The only thing you need to do is seal the joints.
Otherwise, there are no restrictions on exterior finishing. The choice of a specific option depends only on the wall material. For metal sandwich panels, you can resort to decorative stone finishing or build a ventilated façade.
Magnesite board, cement-bonded particleboard, OSB have a sufficiently high adhesive ability that allows the application of plaster. But vinyl and acrylic sidings are an ideal option for all composites. They look stylish, are durable, and are easy to install.
Decor
The final stage in the construction of steam rooms from SIP panels is their external and internal finishing. The building should fit harmoniously into the exterior of the suburban area, and also be comfortable and cozy from the inside. To decorate the interior of the premises, you can choose any style, it all depends on the personal preferences of the owner of the dacha. Designers recommend giving preference to the classic style, which is conducive to a relaxing holiday. It is undesirable to use too bright shades and many geometric shapes in design.
Interior
When designing steam rooms from SIP panels inside, it is important to take into account the design rule - the cladding in all rooms must be made of the same material. Otherwise, the interior will turn out to be too rich
The main emphasis should be on decor, decorating the premises with such traditional accessories as a samovar, brooms, and hats. Lamps in decorative frames look good in modern bathhouse interiors. It is best to line the rest room with clapboard in light shades, and tiled the floors. In such a room, several lamps are usually installed on the walls and ceiling.
Particular attention should be paid to the decorative design of the steam room itself, in which the walls are decorated with clapboards, and granite tiles are chosen for the floors. The main item in the interior of the steam room is the stove; it should look simple and beautiful at the same time.
Exterior
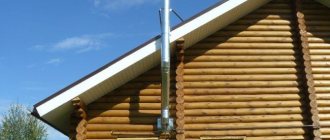
Steam rooms built from sandwich panels can have different architectural appearances. External finishing with logs or timber is considered the most popular. Light door and window openings, roof canopy and porches will be combined in an original way with the log facade. As for the chimney pipe and the base, they need to be lined with bricks. Buildings with plastered walls, the color of which can be different, as well as with finishing that imitates logs, look good.
Bathhouse projects
Bathhouse designs can be very diverse. It all depends on the depth of the future owner’s wallet and the available space on the site. For example, standard projects are represented by buildings 4x6, 6x6, 6x9 meters. However, it will not be a problem to order a bathhouse of large dimensions, one or two floors.
The choice of sizes when building with your own hands is done purely utilitarianly. The bath should have:
- indoor steam room;
- bathroom-shower;
- restroom;
- entrance vestibule-locker room.
All areas of the premises are selected according to the personal preferences of the future owner and the planned number of people who will use the bathhouse at the same time. The project can be roughly estimated even on a notebook sheet. Or - get acquainted with the offers of contracting companies, which always provide a turnkey price list with detailed construction plans.
Documentation
It is necessary to prepare the following set of documents:
- notification of the beginning and completion of construction (for an extension to a house);
- application in the prescribed form;
- document of title to land (sale and purchase agreement, gift, certificate of inheritance);
- extract from the Unified State Register of Real Estate;
- site plan;
- development plan with reference to the area and indicating the distance to the main objects on the site.
In the case of construction of a commercial bath complex, a permitting act is submitted instead of a notification. For this purpose, design documentation is prepared, including a diagram, explanatory note, description of building materials, heating systems, and drainage. drainage, septic tank. Approval is obtained from the local administration.
Documents are transmitted in the form of copies and originals. The receptionist will take copies and issue a receipt indicating the date of the next appearance.
Prices for finished projects and installation
For those who have made the final decision and will build a bathhouse from sandwich panels with their own hands, it will not be difficult to buy the necessary materials. Other people will be interested in getting acquainted with the average market offers. Turnkey baths with installation on the buyer's site differ in cost from different companies. The reason is in the materials used, foundations, type of finishing.
- The SIPbud company will offer a turnkey bathhouse made from panels with OSB. The design uses fire-resistant timber, special connectors, metal or bitumen shingles. The company produces plastering, installs electricity and sewerage, and installs interior doors. The foundation is strip-pile, insulated. The minimum cost of the project is 300 USD.
- Viva Haus approaches its work more thoroughly. Her bathhouse, measuring 6x6 m, has a decorated entrance with a porch, stairs and veranda, windows, a gable roof, and looks extremely stylish and modern. The cost of the project in a configuration with installation, for interior finishing “all inclusive” is 694,000 rubles.
- The Samara company, whose representative is the individual entrepreneur, “RiMar”, offers a variety of baths in compact format. From a house with an area of only 4 sq.m. to comfortable buildings of 35 sq.m. for any season, insulated, with an attic. Prices in the maximum version range from 189,000 to 716,000 rubles.
Without exception, all companies present on the market provide thorough insulation for all-season use of baths in any climate zone. Therefore, to specify the construction parameters (to obtain the necessary designs for a bathhouse made from sandwich panels), it is recommended to contact the managers. In addition to saving money, this step can help you get your new bathhouse much faster.
Assessment of the condition of the steam room
A Finnish bathhouse in the Leningrad region, created from structurally insulated panels (SIP) 10 years ago, when they had just begun to become widespread in the Russian Federation, was chosen as an object for assessing the physical condition. The building failed the strength test.
- The bathhouse was initially built with some violations of the general technology, since its construction was carried out by an amateur - the owner of the site. In particular, this led to regular freezing of joints during the cold season. By the way, home-grown Russian architects neglect technological standards in 80% of cases.
- As you know, when building baths, insulation is required. These are relatively soft substances - polyurethane foam, basalt fiber, etc. Due to the systematic influence of heat and the static effect of the structural mass, the insulation located inside the panel was deformed.
- The steam room was not equipped with additional thermal insulation. As a result, the polystyrene foam layer could not withstand 120-degree temperatures and gradually lost its original functional properties.
- In high latitudes, a common everyday phenomenon is excessive dampness. Therefore, the room began to bloom even with ventilation. It turned out that it was not powerful enough. The consequence was the gradual deterioration of the structures.
- Over time, the material was chosen by domestic rodents, noticeably damaging the internal surfaces.
- No matter how advertising tries to convince you that SIP panels are inert to fire, that is, fireproof, the fact remains that they are flammable, which was successfully confirmed during operation.
- There was always a foreign, unpleasant chemical smell in the steam room until it was lined with natural clapboard from the inside.
- Over the course of 10 years of service, many self-supporting insulated wires turned out to be mechanically damaged, and quite significantly.
- The room proved to be insufficiently warm, which is unacceptable for a good bathhouse.
However, suppliers who do not benefit from any kind of anti-advertising prefer to claim that all such things are nothing more than myths.
Domestic experts are increasingly inclined to believe that the frame method of constructing buildings is not the best option for constructing a modern bathhouse. The practicality and cost-effectiveness of the idea actually turns into early self-destruction of the structures.