Articles
All photos from the article
Projects for a bathhouse made of 4 by 4 timber are a common variant of buildings; everything else is either a slightly modified version of it, or the same thing, only presented from a different angle. For example, some decided to make the entrance from the south, others from the east - nominally the projects are different, but in reality? In fact - one and the same.
Construction is a responsible undertaking that must take into account many parameters.
Features of 4x4 m projects
Typical plan of a 4x4 m bathhouse
The design of a 4x4 m bathhouse is worthy of the attention of users for its good capacity. A standard one-story building includes the following layout:
steam room, washing room, bathroom, dressing room and relaxation room or terrace under a common roof. The design of a 4x4 m bathhouse can be one-story or with an attic. Upstairs there is a full-fledged room for guests or for relaxation. Due to its small size, the box can easily fit in a small summer cottage or near a private house.
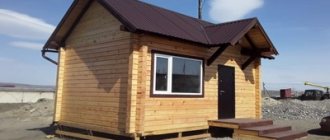
You can assemble a 4x4 m bathhouse from timber, plain or rounded logs, bricks or cinder blocks. The simplest option is made from timber, since the correct shape of the structure and timber allows you to easily assemble the box with your own hands.
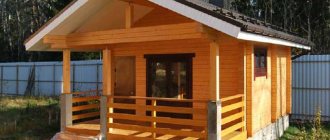
On a summer cottage, a project with an open or closed terrace is usually chosen. After taking the procedures, it’s nice to go out into the air and breathe. And the common roof makes the terrace protected from wind and rain.
Main characteristics of a typical 4x4 m bathhouse design:
- Foundation area – 21.60 m2.
- The area of the internal part is 11.50 m2 + 2.7 m2 terrace: steam room 4.14 m2, washing room 3.59 m2, terrace 2.7 m2, dressing room 3 m2. You can redesign the interior in your own way, so if you remove the terrace, the dressing room will become larger. Fit a full-fledged recreation room.
A 4x4 sauna can be purchased in a ready-made box or made independently. The easiest option is to buy turnkey, the price for this starts from 450,000 rubles. This is without finishing or insulation. For comparison, a ready-made box for assembly by yourself costs from 300,000 rubles. One of the 4x4 bathhouses can be seen in the video:
Roof arrangement
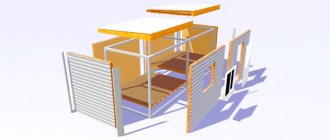
The roof of the bathhouse is made of the same boards with a cross-section of 150×50 mm. In this case, you can assemble the rafter system on the ground and install it ready-made on the top frame. But first, you will need to install and secure a special beam (mauerlat) over the frame, which is used as the load-bearing base of the roof being built.
Types of sheathing
After you install the rafter system, you can proceed to arranging the sheathing, made from boards 20 cm thick. Upon completion of laying the sheathing (which is usually carried out starting from the ridge), you can proceed to laying the roofing covering you have chosen.
Construction of a bathhouse
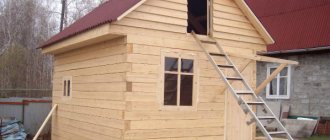
The construction of a 4x4 bathhouse is carried out according to the selected project. You can compose it yourself or take a standard one, for example, in this article. All stages of construction include:
- Installation and selection of foundation.
- Construction of the box.
- Roof.
- Interior decoration and landscaping.
Each of the stages can be done with your own hands. But if you don’t have the skill to assemble a bathhouse, you can reduce the cost of construction by preparing the foundation. In this case, the box is assembled by professionals. Let's consider all stages of assembly in more detail.
Foundation installation
The choice of foundation for a 4x4 bathhouse depends on the material from which it will be built:
- Beam - lightweight strip foundation, columnar or pile.
- Brick, blocks, logs - full-fledged strip foundation or monolithic.
Lightweight strip foundation for a bathhouse
The easiest way is to make a lightweight strip foundation. The choice of design depends on the groundwater level. If the bedding is high, then a pile or screw is used. We will look at a regular tape one.
To install it yourself, you need to choose a place for the bathhouse and make markings. A trench 50 cm deep will be dug along it, the bottom will be covered with a sand cushion. Formwork from unedged boards is mounted on top and a reinforced frame is attached for strength. Next, the foundation is poured and left to stand. Don’t forget about the foundation for the stove; it is made separately. It’s good if the finished foundation stands for more than 6 months, so it will fully mature and shrink.
Next, the foundation is waterproofed using bitumen mastic or roofing felt in 2 layers. At the installation stage, it is necessary to plan the septic tank for the bathhouse and communications.
Box assembly
Assembling a bathhouse box from timber
The bathhouse box is assembled according to the plan. We will look at timber.
The first link of the bathhouse is laid on top of the foundation. The first link should be of a slightly larger cross-section, made of moisture-resistant wood. Aspen or larch is suitable. The price of the timber will be higher, but over time the bathhouse will not begin to rot. The fact is that wood is hygroscopic and water from the foundation easily rises up the timber. And there’s no need to talk about the combination of wood and water again.
The walls are assembled in stages. It is easier to use profiled timber; it is easily connected using a lock - tongue and groove. A jute tape insulation is laid between each link.
The beams are connected to each other with wooden dowels. They can be made from scraps of building material or bought ready-made. We do not recommend using iron connecting elements; over time, the walls will dry out and the iron will become visible. The bathhouse will lose its aesthetic appearance.
If the bathhouse is assembled from ordinary timber or logs, then after assembling the box it is necessary to caulk the walls. Caulking is carried out along the perimeter of each row of logs. You can’t caulk first one wall and then the other, the bathhouse will warp.
Internal partitions are easier to assemble right away. Window and door openings do not need to be left; they are cut out at the very end of construction.
Bathhouse roof
You can assemble a gable roof with your own hands.
The roof assembly of a 4x4 m bathhouse can be made from any convenient material, even from spliced boards. The roof must be assembled clean or rough. A bathhouse assembled from chamber-drying material is immediately covered with a clean roof; natural humidity must be allowed to stand for 1 year.
The roof structure for a 4x4 m bathhouse is suitable for a single-pitch or gable roof. It’s easier to assemble a lean-to with your own hands. It all depends on the owner’s imagination. Let’s just say that the simpler the design, the more reliable the roof will be.
The top of the roof is covered with any material you like: corrugated sheets, slate, andulin, tiles. We have already talked about the advantages and disadvantages of these materials.
Interior decoration and landscaping.
A 4x4 m bathhouse can be easily decorated from the inside with any material you like. The square shape allows the use of all types: lining, imitation timber, ceramic tiles, etc. The main requirements for material for interior decoration:
- Environmentally friendly.
- Fire resistance.
- Easy to install.
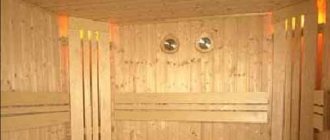
The lining in the bathhouse is attached to the counter lathing, with foil insulation on top.
It is optimal to use linden or aspen lining. The lining is attached with your own hands to a sheathing made of timber with a cross-section of 40x40 mm. But first it is necessary to thermally insulate the walls of the steam room. For thermal insulation, mineral wool and ecowool are used. The inside of the steam room is lined with foil insulation. It will reflect steam and the thermal insulation will be higher. The ceiling of the bathhouse also needs to be insulated using sawdust, expanded clay or mineral wool.
Next, the stove is installed and the chimney is removed. For a small bathhouse 4x4 m, you can make both an internal and external chimney. The choice depends on the perseverance and experience of the owner. A low-power stove of 3.5–5 kW or a wood stove is suitable.
Stage III. We lay and insulate floors
In short, to make floors in a frame bath, you need to nail bars with a section of 5x5 cm to the bottom of their logs in the relaxation room, the steam room, and the dressing room, and lay subfloor boards on top of them, then roofing felt, and finally - mineral wool 10 cm thick or expanded polystyrene. And already under the boards of the finished floor you should lay glassine for vapor barrier:
In the washing room, the floor needs to be done differently:
- Step 1. So, in order for it to always be warm in cold times and dry quickly, you need to make a separate foundation along its entire perimeter.
- Step 2. Next, remove a layer of soil by half a meter, and fill the resulting pit with gravel and sand to a 10 cm layer. If water gets into such a drainage well, it will go into the ground, and there will be no need to make a pit.
- Step 3. For the logs of such a floor, it is best to use asbestos-cement pipes with a diameter of 10 cm, which are placed directly on the foundation and filled with concrete so that it keeps them from moving.
- Step 4. Then, in the washing room, a 4-5 cm thick edged round board is laid over the pipes, but with a gap of 6-7 millimeters with rubber gaskets, which are nailed.
- Step 5. After all this, the floor can be pressed down with baseboards.
More details in the video:
Price for a sauna
The price for building a 4x4 bathhouse depends on what kind of work the owner is willing to do with his own hands. For our readers, we present the average cost of work and materials in the form of a table; using it, it is easy to calculate how much a bathhouse will cost on average.
| Bath installation | Price of materials, rub. | Price of work, rub. |
| Lightweight strip foundation | From 140,000 | From 100,000 |
| Timber box | From 300,000 | From 170,000 |
| Finish/rough roof | From 120,000/45,000 | From 110,000/70,000 |
| Insulation of walls, floors, ceilings | From 55 000 | From 30 000 |
| Finishing walls and ceilings with clapboard | From 60 000 | From 55 000 |
To save money, you can do some of the work yourself; the price will be significantly lower. You should not skimp on material and foundation. They must be reliable; if you do not have the skill to build a 4x4 m bathhouse with your own hands, we advise you to buy a ready-made box made of profiled timber. Even a beginner can assemble this with his own hands. But in general, the design of a 4x4 m bathhouse is quite budget-friendly and convenient for DIY construction.
Straight to the point: don’t confuse technologies!
If you think that a frame-panel bathhouse is the same as a frame bathhouse, just a more detailed and longer name, then carefully read the following sentences. A frame-panel building is built from ready-made panels, which are purchased from companies that professionally deal with them. A frame building can be built by any home craftsman with minimal construction skills and tools. The frame is erected, filled with insulation, sheathed and finishing work carried out. If you need such a frame bath, then go to the appropriate section. If you are still sure that you need information on panel buildings, then read on.
Photo: VIVA HAUS company
Materials
You can build a bathhouse from blocks, bricks or timber. The inside of the object can only be finished with materials made of wood.
It’s hard to think of anything better than wood; it perfectly meets sanitary standards in the actual existence of high humidity and high temperature:
- wood is “friendly” to humans and does not emit toxins;
- has excellent thermal conductivity;
- has a low expansion coefficient.
Paired rooms are most often lined with linden or cedar.
The tree releases beneficial components that have a beneficial effect on the human body. This statement especially applies to linden: it has healing properties. Linden does not lose its shape and color, which makes it possible to use it for a long time.
Nowadays it is fashionable to decorate with a special wood - abashi; lining made from this material optimally meets all requirements.
Abashi is a tree native to the tropics. Its distinctive qualities are its low thermal conductivity coefficient, which allows it to retain heat in the bathhouse for a long time. The material has a yellowish color and a dense texture; the decoration of the walls of the room from abashi looks very advantageous.
Cedar is another valuable material that can be effectively used for cladding a steam room. The essential oils released by wood have a beneficial effect on the human body, and at the same time they are an effective antiseptic.
The material behaves well in harsh temperature conditions. Cedar smells pleasant; when heated, it exudes beneficial essential oils. When buying forced cedar, you should keep in mind: the tree can release resin abundantly.
Larch is suitable for covering the ceiling in a steam room. It is better not to make ceilings from pine needles. If the heated resin in the steam room drips onto those present, it can cause burns.
It is advisable not to forget that a steam room involves extreme temperatures and high humidity, so finishing materials must be purchased of the highest quality; you should not skimp on this.
The boards are not painted with any “chemicals” or varnishes; at high temperatures, toxins can be released. When making a steam room, it is recommended to think about waterproofing; this is one of the surest ways to maintain the desired temperature for as long as possible.
It is good to use special material for these purposes: mineral wool and foil coating, which simultaneously contains the properties of insulation and an effective vapor barrier.
If you want to save money, then instead of using expensive materials, you can line the walls of the steam room with aspen.
Materials
A bathhouse is a structure with complex operational characteristics. To build it, you need to choose a material that can withstand sudden changes in temperature and high humidity without deformation or reduction in technical performance. In addition, when exposed to high temperature and moisture, this material must remain safe and environmentally friendly. It should not emit harmful substances and accumulate mold and fungi.
Of all the building materials that exist today, traditional wood is most suitable for the construction of bath complexes. Subject to proper preparation and high-quality treatment with special protective agents, wood as a building material has the following advantages:
- environmental friendliness;
- high resistance to moisture and high temperatures;
- light weight;
- Ease of use;
- vapor permeability;
- favorable indoor microclimate;
- low thermal conductivity coefficient.
In modern low-rise construction, two main wood materials are used - rounded or “wild” logs and profiled timber.
Timber and logs for a log houseSource pinterest.ru
Log
It has the correct cylindrical shape, which is given to the material when processed on special machines. In terms of the type of preparation, a rounded log is more similar to the wood that our ancestors used to build log houses. The log has low damage to the wood structure and is a fairly durable building material.
Log structures are put into operation no less than 6 months after completion of construction. This is due to the shrinkage caused by the log frame. It is approximately 10%, which is quite a lot for a modern structure.
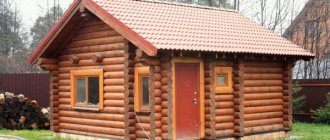
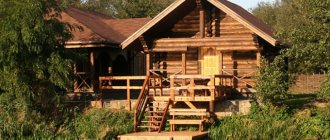
A log bathhouse does not need cladding, but the walls need to be caulked and sanded several times. With all this, bathhouses made of rounded logs are very popular. The main reason is the stylish, authentic appearance of such buildings. This material is often chosen for small structures - you won’t have to caulk as much, and the exterior will be very attractive and will build a modest size. For example, the 4 by 4 bathhouse layout is popular.
Sauna made of round logsSource domiki-stroy.ru
Floor
We insulated the floors in the bathhouse. The steam room and shower have tiled flooring, and the dressing room has laminate flooring. First, I’ll tell you about the steam room and shower; there are many more important nuances there.
Laying tiles
The tiles were purchased with a matte finish and rough so that they would not slip. We decided that tiles are much better than wooden floors - they don’t rot and are easy to clean. The glue was purchased with the best moisture resistance characteristics.
Waterproofing was laid on the subfloor, overlapping the walls. On top of the waterproofing, insulation was laid - EPPS (thickness 30 mm). For better adhesion of EPS to the waterproofing, assembly adhesive was used.
A screed was poured over the insulation along the beacons with a slope towards the drain funnel. Before pouring the solution, a reinforcing mesh and a set of beacons were laid. The photo shows that we attached the beacons not to the floor, but to an asbestos solution - we laid out piles and pressed profiles into them. The solution (cement with sand) was mixed in a rented concrete mixer, because
It was important to fill the entire floor in one day. The solution was laid out from the bucket with a trowel onto the grid between the beacons and leveled with a wooden plank - the rule
The floor was finally leveled with a wide trowel and grout.
The tiles were laid away from the drain gutter to make it easier to maintain the slope. Each one was pre-soaked in water. The glue was applied with a notched trowel onto the dried and primed screed. In this case, glue was not applied to the entire surface of the floor at once, but only to the space for laying 1-2 tiles. The glue hardens quickly and should not be used to cover a large area of the floor at once. The thickness of the adhesive layer was kept approximately equal to the thickness of the tile. I collected the excess glue around the laid elements with a simple narrow spatula.
First, all rows of whole tiles were laid out, then parts along the walls. We cut the tiles with a manual tile cutter. By the way, for precision masonry we pulled the fishing line and used crosses for the seams. And for better contact of the tile surface with the binder, immediately after laying, I lightly tapped each square of tile with a rubber mallet.
Laminate
The laminate flooring was installed very quickly. We covered the floor with film over the insulation, nailed down moisture-resistant plywood, and rolled out the backing.
I unpacked the package with a knife. He took out the first panel and laid it down, turning it with a small protrusion towards the wall. I inserted 2 plastic wedges between the wall and the board. I took the second strip and snapped it into the end groove of the first. I leveled it and placed the wedges again. When I reached the opposite wall, I used a circular saw to cut off the extra piece of the laminate panel. The next row began from the segment. The second row was assembled in the same way as the first, after which I lifted the entire floorboard at an angle of 45 degrees and carefully connected it to the latch of the first row, and then hammered it through the block with a mallet. The last row had to be sawed lengthwise, precisely measuring the cutting line.
Layout
The 4x6 sauna layout is not only a steam room and a washing room. It can be equipped with a closed veranda for comfortable spending time in the cold season, and an open terrace for relaxing in the summer.
If the bathhouse has a second floor with a bedroom where guests can spend the night, it turns into a real bathhouse complex. In addition to the bedroom, a swimming pool, billiards, and a recreation room can be located on the second floor. The first one is then allocated for the steam room and washing department.
When drawing up a drawing of the future building, it is necessary to think in advance about the location and size of the rooms. For example, the area of the dressing room, which prevents cold air from penetrating into the room, is measured at 1.3 m² per person plus the space where things and bath accessories will be stored.
For the steam room there are different standards. There should be at least 1 square meter of area per person, plus the distance between the stove and the walls, plus passages. The optimal height of this room is considered to be 2-2.1 m.
In general, the standard plan for a 4 by 6 meter bathhouse consists of:
- dressing room;
- steam rooms;
- washing department;
- rest rooms.
Veranda, terrace, attic - this is at the discretion of the owners. The dimensions of the building make it possible to “play” with the size and placement of rooms.
Whether the bathhouse is built with your own hands or to order - the project is necessary in any case. It will allow you to pre-distribute rooms, designate their sizes, figuratively imagine where everything will be located, and make the most efficient use of space.
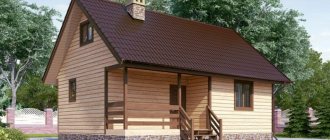
The roof can be single-pitch or gable. The second option looks more impressive and aesthetically pleasing. A bathhouse with a gable roof will also allow you to use the space to equip a recreation room or store things.
Planning
Any planning of premises begins with the designation and marking of the main rooms.
So, for a compact-sized bathhouse, it is necessary to take into account the location of the steam room, sink, dressing room and, if desired, a relaxation room. The material of manufacture also plays an important role in the design. If the bathhouse is built from the most popular material - logs, then it should be taken into account that the size of the internal rooms will be somewhat reduced. There are important points to consider.
- Proper division of the main rooms in the bathhouse. To do this, it is worth dividing the entire area into two large squares. One part is the dressing room or rest room, and the second is the place where the main actions take place. For further convenience, it is better to divide the second part into two compartments: a sink and a steam room separately.
- Dimensions of the main parts of the bath. As a rule, the dressing room is a small room in area where you can leave your things. If it is also used as a place to relax, this part should be expanded so that a table, benches or sofa can freely fit. The steam room and sink can be either the same size or different. This is determined by the desire of the owners and the number of people visiting the bathhouse at the same time. If there are 4 or more people in the company, then it is more convenient to make the steam room more spacious than the washing area.
- Furnace installation. Currently, it can be installed in any part of the bathhouse, not necessarily in the steam room. You just need to adhere to all fire safety standards and rules when constructing it and objectively evaluate the effectiveness of the placement.
- The main entrance to the bathhouse. In general, it can be located on any side at the request of the owners, but the most common and appropriate is the entrance to the dressing room. In this case, you should take into account the distance from the bathhouse to the house so that you can easily and quickly get to the living space.
Some more popular sizes
8 by 8
Pay attention to the photo of the layout of the 8 by 8 bathhouse - you can immediately see that there is a lot of useful space inside, which requires only one thing from you: use it wisely! It is obvious that such large baths today are rather an exception to the rule. Accordingly, the more possibilities, the more difficult it is to ultimately come to the only correct decision.
In this case, it is advisable to turn to professional specialists who can carry out the layout of such a bathhouse to the highest possible quality. However, you can get some good ideas from the photos below.
As a rule, in such large baths you can create a hammam: set aside a separate room for this purpose, equip it with the necessary sun loungers, and put a massage table. Women love the Turkish bath!
Recreation room: design and functionality
A relaxation room is an indispensable condition for building a comfortable bathhouse; both those who have already taken a steam bath and those who have just arrived can be in it, they can relax, make tea and communicate. If you combine a relaxation room with a balcony or veranda, you will have a wonderful opportunity to drink tea or fruit drink in the fresh air, contemplating the surrounding landscapes.
Bathhouse project with terrace
A beautiful mirror on the wall in a wooden or wrought-iron frame will allow you to comb your hair after bath procedures and perform the necessary cosmetic procedures, which is especially important for the female part of the bathhouse visitors.
Almost obligatory attributes of the rest room are birch, oak, linden, pine brooms and bundles of herbs for preparing infusions that are splashed on the heater.
Bathhouse with a relaxation room made of wood
If it is not possible to attach a full-fledged veranda, you can limit yourself to a canopy, under which you can place a table and a bench, or use portable furniture to enjoy a picturesque sunset on summer evenings.
In this video you will see an overview of a bathhouse with a terrace (veranda).
Bathhouse with steam room and sink in one room: advantages and disadvantages
A bathhouse with a combined sink and steam room is not so common at the moment. This option is chosen mainly if the area of the site does not allow for two separate rooms.
A compact bathhouse with combined rooms makes it possible to save not only space, but also money. The cost of such a building will be significantly cheaper than the price of a similar-sized bathhouse with a separate steam room and washing room.
Another advantage is that a bathhouse, where the steam room and washing room are combined, is much more pleasant to visit in winter: it heats up quickly and is quickly ventilated. In summer, on the contrary, it is quite difficult to cool the washing room.
A bathhouse with a combined sink and steam room has significant disadvantages. The first of them is due to the fact that with such a design it is much more difficult to maintain the necessary conditions in the steam room. In particular, if someone washes in the washing room, the humidity level in the room will increase, and the steam room will be less comfortable. And the smell of soap or shower gel also interferes with creating the desired atmosphere.
For this reason, everyone will have to steam first and only then wash, otherwise you will be forced to endure high humidity.
In addition, it is impossible to wash in a heated steam room, so you will have to wait until the room cools down.
Obviously, a bathhouse with a combined washing room and steam room is an option for a small company (up to 4 people). If you are going to relax with a larger group, then you definitely need to separate these rooms.
As already mentioned, a bathhouse with a steam room and a washing room in one room is less comfortable, since everyone has to either steam or wash, but in separate rooms there is no need to adapt to others.
Below are photos of a bathhouse with a steam room and a sink combined in one room:
Project of a 3x3 bathhouse with a combined steam room and washing room
A 3 by 3 bathhouse is quite small, so it is difficult to create a separate steam room and washing room here.
Below is a project of a small bathhouse, consisting of only two rooms: a steam room and a washing room, and a relaxation room.
This budget option is suitable for a small area. This bathhouse can accommodate 2-3 people, but no more.
Project of a 3x4 bathhouse with a combined steam room and washing room
This bathhouse is a little larger, but it also has only two rooms. The capacity of a 3 by 4 bathhouse is 2-3 people.
This project provides for a more spacious steam room and washing room, but the dressing room has a small area - only 6 square meters. m.