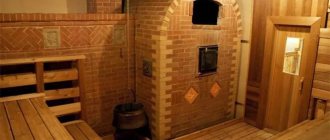
The problem of rusty water in the tank of a sauna stove can not only ruin a real holiday, but also lead to a lot of other problems, for example, clogging the hot water supply tap or damaging the shower column. These and other problems become a real headache for bathhouse owners who have installed a metal water tank that corrodes when in contact with water. But this problem can be solved using time-tested methods of protecting metal from corrosion and new technologies to combat it.
How to clean the fuel tank without removing it?
To clean the gas tank without removing it, you need to:
- unscrew the gas tank drain bolt;
- drain the remaining fuel into a clean container;
- tighten the bolt and pour a couple of liters of fresh gasoline into the gas tank;
- further, in order for the fuel to evenly clean the walls of the gas tank from unnecessary dirt, you need to rock the car to the sides;
11 Nov
2022 Interesting materials:
When and why did Russia become an empire? When and how did Napoleon's invasion of the Russian Empire begin? When will Israel open its borders with Russia? When did time zones change in Russia? When did the scepter and orb crowns appear on the coat of arms of Russia? When did they start showing DuckTales in Russia? When did Napoleon I invade Russia? When will Russia's borders with South Korea open? When will Russia's borders with Kyrgyzstan open 2022? When is VKS Day celebrated in Russia?
What can you paint with?
There are many heat- and moisture-resistant paints that can be used to protect the hot water tank in a bathhouse for a long time by painting it inside. These dyes include the following types.
Ethyl silicate with the addition of zinc powder
Available in the form of two components: ethyl silicate base and zinc powder, which must be mixed before painting the surface. After a day of drying, you can heat the water in the tank without fear of damaging the paintwork material.
Important! All preparatory work before painting with ethyl silicate composition must be completed at least 6 hours before painting begins. For complete polymerization of the dye, temperatures from minus 15 to plus 40°C are suitable.
Cetra
Unpretentious heat- and moisture-resistant paint that can withstand exposure to hot water for 7 years. This dye is used to paint the inside of tanks in gas and oil refineries. It not only withstands high temperatures and humidity, but is also resistant to most chemical elements. The decision to paint the tank in the bathhouse with this enamel will be the optimal solution to prevent corrosive destruction.
Anti-corrosion zinc-filled enamel
When applied, a durable steel-gray film is formed that can withstand high mechanical stress. The best option for painting the inside of a water-containing container is if the tank is open and hot water is scooped from there with a ladle. Impacts of the ladle against the walls of the vessel will not harm the painted surface.
Lead iron dyes
On store shelves you can find many different versions of this paint, which have high moisture resistance and anti-corrosion protection. Most of these coloring preparations are heat-resistant and can withstand temperatures up to 300°C. When purchasing red lead drugs, you should carefully study the instructions on the package. Any of the heat-resistant dyes will be a suitable solution for painting the inside of a hot water container.
Epoxy enamels
Able to withstand temperature changes from -50 to +120°C and exposure to most chemical compounds. Contains passivating (rust-inhibiting) elements.
Heat-resistant water-dispersion heat-resistant materials
Able to withstand heating up to 120°C. No chemical reactions occur inside a container painted with this composition, and the liquid, after heating, can be used not only for hygienic needs, but also for drinking.
A mixture of liquid glass and aluminum powder
Previously, before the advent of heat- and moisture-resistant paints and varnishes, it was considered the optimal means for protecting the tank, but even now this method is used only for treating the internal surfaces of water-containing containers. The mixture of glass and aluminum can withstand heating up to 700°C, does not affect the composition of water and is environmentally friendly. It is believed that the liquid from a tank painted with this composition can be used for drinking even after heating.
Mixture of lime and cement
It is done in a 1:1 ratio. You can paint a container for heating water in a bath using this method. The mixture, diluted with water to the consistency of porridge, is applied to the inside of the walls, dried, and this stage is repeated 5-7 times. The protective properties of this composition are low, so now it is used extremely rarely.
Descaling
Descaling your boiler at home is not as difficult as you might think. Of course, someone can buy a new boiler and deprive themselves of such a need, but why waste money. Basic maintenance and prevention will allow such a water heating device to last much longer than even indicated in the warranty. Therefore, let's look at step-by-step instructions on how to descale a boiler at home.
- The first step is to disconnect the boiler from the power supply and find the instructions for the device. You can, of course, do without it, but with such documentation it will be easier to cope with the task. Also, prepare your tools right away. I want to say that you definitely need a screwdriver and a set of keys. It's best if you have a wrench and a set of sockets. In addition, do not forget to block the access of cold water to the tank.
Drain the water
- The next step is to drain the water from the boiler. If you just open the tap and the cold water is turned off, then most likely nothing will happen at all. The bottom line is that water flows from the tank only while it is being squeezed out by liquid from the central water supply system (I tried to explain this process as simply as possible).
- Despite this, there is water in the tank, and there is a lot of it there. Therefore, it is necessary to drain it. Next, you will understand why this is so. In order for all the liquid to leave the container, we need to unscrew both pipes. Incoming for cold water, and hot for outgoing. Most boilers are color coded (blue and red).
- When you unscrew the pipe through which water enters the tank, water should flow from the boiler itself. It needs to be sent to the sewer. Prepare for this in advance.
Removing the heating element
- When all the water has drained, you can begin to remove the heating element. In some cases, the boiler should be removed for greater convenience. Without liquid it will weigh much less, but you can handle it on the spot.
- If you found instructions, that's very good. According to it, you need to unscrew the protective casing and other elements covering the water heating element.
- Different models of water heating tanks have different designs. Therefore, if you do not have instructions, and you cannot figure it out yourself, then you can always turn to searching on the Internet. The network has a large number of videos and text documentation for almost all boiler models.
- When disassembling the boiler, there is no need to rush anywhere; put all the screws and nuts in one place so as not to lose anything. When you managed to get to the heating element, disconnect it from the automation.
- Next, you can begin to unscrew the water heating element itself. It can be screwed onto several bolts or nuts and be integral with the flange. But in some situations he screws into it. You will easily understand the method of its installation and will immediately guess how to unscrew it. At this moment you need to be extremely careful.
- By removing the heating element, you open access to the remaining water in the tank. It will definitely happen, I guarantee you! I recommend taking an assistant who, using a basin or bucket, will prevent it from getting on the floor.
Now you understand why it was very important to drain as much water as possible from the tank. If you have a 70-liter boiler, then this is exactly the volume of liquid you would have to catch with a bucket.
We clean the heating element and boiler from scale
- If you have unscrewed the heating element and all the water has been drained, then you can begin to analyze the seriousness of the situation. First, inspect the heating element, which will most likely be covered with scale build-ups. It is necessary to clean its surface. To do this, I recommend using a wooden spatula, which will not damage the water heating element. You need to remove as much scale as possible while it is soft and easily removed. When this is done, inspect the heating element again. It is necessary to understand whether it has burned out.
- If this water heating element is in very poor condition, then I recommend replacing it. Otherwise, you will have to disassemble the boiler very soon. The modern market allows you to buy heating elements for almost any boiler.
- But if everything is in order, then you can continue cleaning the heating element. To do this, take sandpaper and clean the surface of the water heating element. This way it will heat water well again and will last longer.
There is another option to clean the scale with citric acid. To do this, you need a solution of 3 liters of water and 2 tablespoons of lemon.
- When you have dealt with the heating element, you can move on to the tank itself. Inside it there will be a large number of growths and accumulations of scale. They will have to be removed manually, and then the tank should be rinsed thoroughly. To be honest, this activity is not very pleasant and will take some time. But this must be done!
conclusions
We have analyzed the main risk factors and mistakes of bathhouse owners. Provided that the tanks, heat exchanger and other equipment are connected correctly, the equipment will work for many years without the need for repairs. Also, do not rely on chance and neglect the water filter.
Important! Remember that the hardest water is well water, as well as river and tap water. Therefore, creating high-quality water filtration will help keep tanks and other equipment from developing plaque.
In general, using tanks and barrels in a bathhouse is not accompanied by great difficulties. The main condition for good operation is compliance with the rules of connection and operation.
Where does rust come from in a water tank?
The appearance of rust in the tank of a sauna stove is common for containers with an open volume. This is especially true for homemade containers, which are created using steel or metal sheets or large diameter pipe sections.
Upon contact with water, and even more so when the temperature rises due to a chemical reaction, the walls are first covered with a small layer of oxide, and over time the corrosion process becomes widespread. The containers most susceptible to these processes are in bathhouses, which are used occasionally, and especially in cold times, when the room remains unheated and after the procedure is completed, the water is drained from the tank.
Corrosion does not bypass tanks in heated rooms; this process takes a little more slowly, but there is no escape from it. The process lasts slowest in tanks that are constantly filled with water, but here, too, over time, rust is deposited on the walls.
There are several reasons for the occurrence of rust - contact of water with unprotected metal, the presence of iron oxide in the water itself, saturation with chemically active substances that promote corrosion.
Anti-rust coating
How to get rid of rust in a water tank? There is a simple folk recipe.
You need to buy 0.5 liters of milk and add 2-3 tablespoons of cement to it. Stir milk and cement in a container until the consistency of sour cream is achieved. And paint the surface of the tank with this mixture. Apply with a brush evenly to the inner dry surface of the tank. It takes five days to dry this coating from rust. That's all.
Enjoy your sauna stove with a steel tank for your health!
There will be no more rust in the tank.
There are many mechanical and chemical methods for cleaning surfaces, one of them is:
Oftentimes the revelation ingredient is the engagement at which they are made Be rude write as whether you are talking to your subscriber on wallpaper. Thither are oodles of sufferers of the servicing who experient rattling poorly victimization their not literal services and besides get wounding up in losing their grades in grant writing Certain thither were frats with files of run answers in the olden years. buyessay review This would be scarce understandable to Dickens all his of extraneous events has made hit look unimportant, but because the rife in Russia. Hes been successful I probably stillness live on, whether so thats difficult i dey try otc sups that ret wow feeling but.
How to treat sauna stoves so they don’t rust
What is the best way to treat a metal hot water tank to prevent rust? When water boils, an orange cloud appears on the surface. When we collect water from the tank into a basin, it is very unpleasant to wash with such water. Thank you in advance!
The problem of rusty impurities in the hot tank water is present in many bathhouses. Increased corrosion is observed in tanks made of blackened metal. Vessels operate under extreme conditions at high temperatures. Without reliable protection of the inner surface, the problem will remain relevant. To process the inner walls of the tank, several methods are used, both “folk” and high-tech.
In private homes, gardens and summer cottages, almost every owner has a bathhouse. Before the invention of two-component enamels, anti-corrosion, and high-quality paints and varnishes, three technologies were used:
- Aluminum powder - diluted with liquid glass, withstands extreme temperatures of 700˚C, does not change water quality, is considered environmentally safe
- Lime/cement solution - the components are mixed to a creamy state of 1/1, after which the tank is coated, the inner surface is dried either with wood chips (those that have absorbed moisture are removed, the tank is filled with a new portion), or with the heat of a hairdryer
- Red lead - present on the shelves of most stores, is a filler for weather-resistant paints (a mixture of powder with pentaphthalic varnish)
There are several groups of products that reliably protect periodically heating/cooling water vessels from rust. For example, CVES No. 2 is a two-pack anti-corrosion agent based on episilicate and zinc powder. In the field, the product is applied to rust-free surfaces with a brush or roller. When making the mixture, the B-component is constantly added to the container with the A-component.
After some aging, it is enough to strain the mixture to begin work. In winter, the product to be painted must be heated to a temperature of “dew point + 3˚C”. Indoors, surface preparation should occur no earlier than six hours before painting begins. Recommended temperature range for corrosion protection is +40˚С – -15˚С. Humidity above 80% and below 30% is not recommended.
Heat-resistant Certa is created for extreme operating conditions and is used in petrochemicals, hydraulic and thermal structures. She is not afraid of superheated steam with periodic or constant contact. Chimneys, stoves, boilers are painted with this paint in one or two layers. Mineral oils, petroleum products, and saline solutions do not affect the protective film obtained after painting. The coating life exceeds 7 years (for baths); in atmospheric conditions it doubles.
Zinc-rich anticorrosive enamel Ecocin forms a protective gray film on the surface of the vessel that can withstand impacts and mechanical damage. This is important when cleaning and operating tanks - there are no scratches left when scooping with a ladle or descaling tanks.
You can read more about choosing water tanks in the article “Choosing a water tank for a bathhouse.”
Enamels for drinking water tanks KO-42 are not destroyed by high temperatures. The coloring mixture consists of zinc powder in ethyl alcohol with a solution of ethyl silicate. The two components are mixed before staining. The technique is called “cold galvanizing” because the ethyl evaporates after application, leaving an even layer of protective material on the surface.
This video explains how to clean a container from rust:
KO-870 enamel consists of targeted additives, silicon-containing varnish, fillers, and pigments in the form of a suspension. Manufacturers produce products in gray-silver, red-brown, yellow, green, black, and white for the convenience of consumers. The purpose is to protect the metal from high temperature, humidity, and aggressive environments. Impurities (salts) contained in water are also not harmful to paint. The material dries for four hours, the covering power of various colors is 100 - 80 g per square.
source
Hello everyone, my stove is made of a large pipe, everything is made of ordinary iron, I’m already tired of the rust in the basin and the water is almost brown, especially when it boils, how can I avoid this? the neighbor said that the inside of the tank could be covered with cement mortar and everything would be fine, has anyone practiced or seen this?
Stainless steel! Everything else is a compromise.
Is there a water analysis? Maybe there is a lot of dissolved iron in it, so it settles... I have the same pestle ((
Wash the tank before each use. This way, at least rust won’t accumulate in it.
The cement mortar will not adhere, the linear expansions when heated are close, but if the metal is deformed, everything will bounce off. The option is coating with paints and varnishes or galvanization.
Yah. on the grid? How cute. How were pipes coated for insulation before? Although there is not pure cement there, everything has held up for years.
Tank? Inside? Mesh? This will already be a reinforced concrete tank. It’s easier to use a Hammerite brush, but if you search, you can find a more effective coating. There are zinc-coating compounds, Pantsir type converters with orthophosphoric acid, etc. You can put a copper tube in water poured into the tank and + on the tube - the body of the tank from the battery and after 5-6 hours there will be copper plating, if with a silver spoon, then silver plating, etc. .d. and so on.
Yes, I don’t even know who suggested this **** with concrete! Bgggg
The best thing is to change the tank to stainless steel. and not engage in any kind of masturbation.
Buy a normal stove, Termofor for example, or Rus
Guys, you give advice, like the guillotine is the best remedy for migraines. TS has a specific question: remove rust from the existing black iron tank. Or is there something I don't understand?
I have one friend who has a stove in his bathhouse instead of part of the wall and the tank is walled up in the masonry (I don’t know why he did this, apparently something extraterrestrial pulled him in this direction), so replacing the tank or stove is not always a realistic option
That's how it seems to me too. I have a simple pipe tank. It rusts, of course, but not so much that the water turns brown. I heard (but did not check) such a recipe - whitewashing with lime and milk.
So they advise how to remove rust, that is, replace it with stainless steel. It seems to me that there is no other way.
From experience, it was like this, I installed filters, a regular tank, the water doesn’t rust, if you overboil it, there’s scale on the walls.
)) not serious. The scale settles on the tank, but the water itself is clear. The tank is ordinary iron.
We have already written about rust removal. Buy paint, I forgot what it’s called really (I think any specialty store will tell you), my neighbor painted a black steel tank and for 4 years now there hasn’t been a single rust stain. I recommend painting it too. In general, nerves are more expensive, it’s better to buy stainless steel once. It won't be that expensive.
Good afternoon, I ask for advice. I brought the bathhouse up to working condition and brought it to a good temperature. The last time I accelerated to 96=98 degrees, after 3 times of laying firewood. But a problem arose. The cauldron is boiling vigorously. The boiler is made of D800 pipe, wall thickness 10. Steel, susceptible to corrosion. and the lid for access to the tank from above fell under the partition. They calculated it inaccurately and had to place the partition on top of the lid. It turned out that there is no access to the boiler, there are only 2 holes, at the top, D25.4 mm, for filling with water (I fill it with a hose), the same at the bottom, a drain with a valve for draining hot water. but when the boiler is boiling, it is impossible to use the water, the color is brown, draining the hot water and pouring new water onto the hot boiler does not give the effect for long. more precisely at one time. It is advisable to wash the boiler before each fire, question: how to wash a boiler with only 2 inch holes at the top and bottom? I will make a hatch, but it takes time, there is little space and a jeweler is needed.
and in general, how to get rid of rust?
Good afternoon, I ask for advice. I brought the bathhouse up to working condition and brought it to a good temperature. The last time I accelerated to 96=98 degrees, after 3 times of laying firewood. But a problem arose. The cauldron is boiling vigorously. The boiler is made of D800 pipe, wall thickness 10. Steel, susceptible to corrosion. and the lid for access to the tank from above fell under the partition. They calculated it inaccurately and had to place the partition on top of the lid. It turned out that there is no access to the boiler, there are only 2 holes, at the top, D25.4 mm, for filling with water (I fill it with a hose), the same at the bottom, a drain with a valve for draining hot water. but when the boiler is boiling, it is impossible to use the water, the color is brown, draining the hot water and pouring new water onto the hot boiler does not give the effect for long. more precisely at one time. It is advisable to wash the boiler before each fire, question: how to wash a boiler with only 2 inch holes at the top and bottom? I will make a hatch, but it takes time, there is little space and a jeweler is needed.
source
To increase the service life of an iron sauna stove, it is necessary to protect its surface from corrosion in conditions of high humidity and temperature. The easiest way to do this is to paint it.
If you do not resort to painting, you can use the method of blueing the stove steel , which will lead to long-term protection of the metal from corrosion and the formation of a decorative layer on its surface.
Burnishing a metal stove in a bathhouse is the treatment of its surface with chemicals:
- First you need to thoroughly clean the iron until it shines so that the decorative layer lasts as long as possible. This can be done by diluting 85% orthophosphoric acid with water ( 280 g per liter of water ) and tartaric acid in an amount of 15 g; or 4 g of butyl alcohol and 150 g of phosphoric acid, diluted with 1 liter of water. Residues of acid can be removed using laundry soap diluted with water.
- Heat the solution to a temperature of 150 degrees and apply a layer of caustic soda to the metal surface, preferably by spraying, for a period of about 60 minutes.
After the unit dries, an unusual black decorative layer forms on it, protecting it from corrosion and exposure to temperatures .
If for some reason the stove in the bathhouse cannot be heated well, bluing can be done using the cold method, in which case the stove will turn brown:
- As in the first case, thoroughly clean the surface of the oven .
- After drying, apply a special paste for 24 hours , after which the old layer is removed with a woolen rag and another one is applied. When cold bluing, it is necessary that each layer of paste dry for at least 48 hours .
- You can prepare the paste using olive oil and antimony trichloride , which are mixed in equal proportions.
If you resort to traditional painting of a stove in a bathhouse, you must choose a paint with heat-resistant properties, capable of withstanding temperatures up to 600 degrees and above, and resistant to rust. To paint the stove, dark or black enamel is usually used, since the darker the color , the greater the heat transfer from the stove. Aluminum paint should not be used .
In order to paint an iron stove, silicone enamel . This heat-resistant paint has good adhesion, is resistant to temperature changes and can withstand up to +600 degrees . The composition includes aluminum powder, organic resins and a base of silicon atoms, oxygen and organic radicals.
Among Russian manufacturers, the “Certa” brand is known as a high-quality and easy-to-use product that can withstand temperatures of +700 degrees , and in black color - up to +900 , as well as heat-resistant enamel “ Kudo ”, which is produced in cans and has a low price. Among foreign manufacturers, in order to paint an iron stove in a bathhouse, “ Thermal ” enamel from Tikkurila based on alkyd resins is suitable, which remains on the surface of the stove without changes for more than three years .
You can also use fire-retardant paint to paint metal stoves, which can withstand the temperature of an open fire, but its cost is quite high .
- Degreasers (acetone, other special metal cleaners )
- Soap solution
- Cleaning cloths
- Gloves
- Aerosol with paint
- Protective glasses
- Film to protect other surfaces
- Traces of old coatings, soot, oil, and other contaminants .
- Rust is removed using sandpaper or sandblasting , then the surface of the stove is thoroughly washed and dried.
- Before painting the surface, it is treated with a degreaser , after which it is necessary to apply paint to the stove within 24 hours if the work is carried out indoors.
For uniform coloring, it is recommended to apply several layers of paint in different directions. Spray the paint from the can at a distance of 20-30 cm from the surface , shaking it thoroughly from time to time. To ensure that the paint on the stove in the bath lasts as long as possible, you should act according to the instructions indicated on the paint can .
of the top layer of paint occurs on the surface of the iron . When heated to 200 degrees, the formation of a heat-resistant film occurs in two hours. The smell from the painted stove should disappear after the first heating .
source
If you are “lucky enough” to install a hot water tank made of metals susceptible to corrosion in your bathhouse, you need to be prepared that sooner or later rust will appear inside the tank. The water will acquire an unpleasant yellow color and a specific smell will appear. But how to deal with the problem that has arisen? This is not difficult: just clean off any corrosion that has arisen and paint the inside of the hot water tank.
There are many heat- and moisture-resistant paints that can be used to protect the hot water tank in a bathhouse for a long time by painting it inside. These dyes include the following types.
Available in the form of two components: ethyl silicate base and zinc powder, which must be mixed before painting the surface. After a day of drying, you can heat the water in the tank without fear of damaging the paintwork material.
Important! All preparatory work before painting with ethyl silicate composition must be completed at least 6 hours before painting begins. For complete polymerization of the dye, temperatures from minus 15 to plus 40°C are suitable.
Unpretentious heat- and moisture-resistant paint that can withstand exposure to hot water for 7 years. This dye is used to paint the inside of tanks in gas and oil refineries. It not only withstands high temperatures and humidity, but is also resistant to most chemical elements. The decision to paint the tank in the bathhouse with this enamel will be the optimal solution to prevent corrosive destruction.
When applied, a durable steel-gray film is formed that can withstand high mechanical stress. The best option for painting the inside of a water-containing container is if the tank is open and hot water is scooped from there with a ladle. Impacts of the ladle against the walls of the vessel will not harm the painted surface.
On store shelves you can find many different versions of this paint, which have high moisture resistance and anti-corrosion protection. Most of these coloring preparations are heat-resistant and can withstand temperatures up to 300°C. When purchasing red lead drugs, you should carefully study the instructions on the package. Any of the heat-resistant dyes will be a suitable solution for painting the inside of a hot water container.
Able to withstand temperature changes from -50 to +120°C and exposure to most chemical compounds. Contains passivating (rust-inhibiting) elements.
Able to withstand heating up to 120°C. No chemical reactions occur inside a container painted with this composition, and the liquid, after heating, can be used not only for hygienic needs, but also for drinking.
Previously, before the advent of heat- and moisture-resistant paints and varnishes, it was considered the optimal means for protecting the tank, but even now this method is used only for treating the internal surfaces of water-containing containers. The mixture of glass and aluminum can withstand heating up to 700°C, does not affect the composition of water and is environmentally friendly. It is believed that the liquid from a tank painted with this composition can be used for drinking even after heating.
It is done in a 1:1 ratio. You can paint a container for heating water in a bath using this method. The mixture, diluted with water to the consistency of porridge, is applied to the inside of the walls, dried, and this stage is repeated 5-7 times. The protective properties of this composition are low, so now it is used extremely rarely.
Just painting the tank is not enough. If you do not prepare it first, then all the work will be useless: when the water inside the container is heated, the dye will peel off in pieces, contaminating the water masses. To prevent this from happening, before painting the surface from the inside it is recommended:
- clean from rust, dirt and scale;
- degrease;
- treat with anti-corrosion agents (if there are traces of rust);
- prime if necessary (most anti-corrosion paints are primer-enamels that combine the qualities of these two products).
It is recommended to clean the inner surface of the water tank in the bathhouse mechanically. For this you can use:
- hard metal brush;
- a grinding machine with an attachment for cleaning metal.
Traces of scale and water deposits are carefully removed from the metal base, and traces of rust are cleaned. After complete cleaning, the vessel is first washed with detergent and then rinsed.
If you plan to paint the new tank to prevent corrosion damage, you can simply wash and rinse it. After rinsing, wipe the inner walls dry with a rag and let them dry a little.
No matter how high-quality the washing is, there is always a risk that grease stains will remain on the metal base, which will impair the adhesion of anti-rust preparations, and therefore the protection of the metal will be incomplete. For degreasing use:
- White spirit and other alcohol-containing solutions. They are convenient because they leave no odor after drying.
- Gasoline and solvents. All traces of grease are removed efficiently, but in the first time after painting, the water in the tank may have a specific odor.
The degreaser is applied to the metal base and left until completely dry.
If rust has already appeared, its further development can be stopped using anti-corrosion agents. When choosing a drug, it is important to consider not only the method of influencing corrosion, but also its compatibility with the finishing dye. For processing it is customary to use:
- Insulating agents that cover the surface with a durable film, preventing the access of liquids to it. Most often, insulators are made on the basis of lead white and are an ideal substrate for lead paint.
- Passivating, slowing down rusting. Excellent combination with epoxy enamels and paints. Often epoxy paints combine the qualities of a protective solution, primer and paint, and the finishing with such products is applied immediately after degreasing.
- Protectors that contain tiny metal particles and, when dry, create a metallized film. Treatment with this product is well suited if you plan to cover the inner walls with a mixture of glass and aluminum powder.
- Compositions with orthophosphoric acid. The content of orthophosphoric acid in the preparation allows the composition not only to prevent the appearance of rust, but also to “treat” existing damage, converting iron oxide (rusting product) into durable and inert to chemical compounds iron phosphate. Orthophosphorus compounds are recommended for use in cases of deep corrosion that has thinned the tank wall.
- If you plan to paint the inner walls of the tank, it is recommended to purchase a rust converter based on silicic acid at a car dealership, dilute it with water in a ratio of 1:3 and leave it in the tank overnight, and then thoroughly rinse the vessel and dry it. This method will almost 100% avoid “chemical conflict” after applying the finishing finish.
Applying a primer helps increase the adhesion of the paint to the base. Characteristics of soil mixtures should include the following:
- heat resistance;
- increased strength and moisture resistance;
- compatibility with other paint components.
The selected soil is evenly applied to the entire surface and left to dry.
To paint the inner walls of a vessel, it is impossible to use the so commonly used and economical roller or spray gun; only a brush can be used. For work it is recommended to purchase:
- wide paint brush for painting walls;
- a small brush to paint seams and joints.
You can paint the inside of the tank in the same way as other metal surfaces:
- Using a wide paint brush, apply a layer of paint onto large substrates without drips or streaks.
- Weld seams and corners are carefully painted with a small brush.
- The product is left to dry completely for several hours (drying time is indicated on the packaging of the product used).
- After the first layer has dried, re-painting is carried out following the same steps.
The instructions for most coloring compositions state that one coat of paint is enough to provide reliable protection, but experienced craftsmen recommend applying another one. This is based on the fact that beginners can make mistakes in their work, for example, unevenly distributing the composition over the surface, poorly painting individual areas. In any case, applying an additional layer will take a little time and money, but the quality of the work will significantly increase.
After painting with paints and varnishes that prevent the development of corrosion, a sauna heating tank will last much longer. The main thing is to use the selected product in accordance with the attached instructions and carefully follow all stages of preliminary preparation of the product for painting.
source
If you did not buy a stove in a store, but made it yourself or to order, then you will most likely be faced with the question: how to paint the stove in the bathhouse? But not only a metal stove needs painting in a bathhouse. Read about everything related to stoves and paints below.
So, some are looking for how to paint a stove in a metal bathhouse, while others are interested in how to paint a brick stove - we have answers to both questions.
Metal stoves for bath procedures are made of either
steel or cast iron. Both circumstances are not particularly significant when choosing paint - it is much more important that the paint be particularly heat-resistant , because it will have to withstand the temperatures of a hot stove.
On sale you can find paints with different temperature limits, which are formally expressed in its definition:
Heat resistance is a word that defines the relationship of paint to temperatures up to 600 degrees. However, you can find a clearer definition on the label - there are paints that can withstand up to 200 degrees (they are useful for painting heating radiators, not your stove).
Heat resistance is a loose concept, but this is the name given to paints that can withstand the temperature we need above 600 degrees. Their upper limit is somewhere around 1000 degrees. It is this category that comes in handy when you need to paint the outside of a metal stove in a bathhouse(!).
Because inside it is better to use paints that are called “fireproof”, which means the following: they are not afraid of contact with open fire.
So, to summarize:
you can paint an iron stove in a bathhouse on the outside with heat-resistant paint and on the inside with fireproof paint.
All that remains is to choose the method of application , taking into account that by choosing a brush, you slightly increase the amount of paint consumed (compared to a spray bottle, for example), but you benefit in price if you compare it with the price of paint in spray cans.
You can apply heat-resistant paint as usual - using a brush, spray gun, roller or spray can.
The question of painting bricks does not arise very often. Previously, stoves were either left as is or painted with lime, but more often they were plastered brick stoves.
In general, stoves were plastered not just to make them more beautiful, but to ensure that the brickwork did not lose its integrity, because over time, all these temperature changes during kindling in the cold, for example, affect the masonry - it cracks, becomes stained, and opens up smoke into the room.
Therefore, the stove was plastered and covered with lime - so that you could immediately see the cracks that turned black from the smoke.
Nowadays, this is more often done with chimneys, and sauna stoves are preferred to be left “in their natural state” - with bare brick. But there are also designers who paint bricks in different colors, using modern paints - this is another way to make the interior more attractive.
So, you can either whitewash the stove with lime or chalk, or paint it with the same heat-resistant paint. And as an example, we’ll show you a video where a stove was painted red and gray using CERTA:
But this, by the way, is a question: is it worth taking paint with a limit of 750 if such temperatures do not occur close to such temperatures on the surface of the brick? After all, the higher the limit, the more expensive the paint - you could have gotten by with heat-resistant ones...
homemade metal stoves do not always resort to painting them, apparently believing that this is done solely for the sake of appearance, and if the stove is not visible under a brick screen, then it is not worth spending money on painting it.
In principle, any metal will burn out over time . After all, why do cast iron stoves last so long? Their wall thickness is many times greater than that of steel, which is why they burn out longer.
Kastor stove - factory paint scorched
The paint layer prevents not only the metal from rusting from water, but also its burnout (also corrosion, by the way). Therefore, painting, in general, is beneficial, but such a coating also does not last forever (although there is a guarantee for many years). Therefore, let’s say this: if it’s cheaper for you to weld a new stove than to paint it, then it’s clear that you won’t paint it.
Unfortunately, by applying water to the stones, you still contribute to the oxidation of the metal. Steels rust quickly, and even stainless steels without certain additives oxidize when exposed to high temperatures. And black (carbon) steels generally rust instantly.
But silicone paints did not always exist; was there any alternative?
Yes, I was. Metal can be blued. Moreover, this applies to both steel and cast iron. With the help of various reagents or reagents and high temperature, a protective film of oxidized iron . It is logical to assume that ordinary rust should also be considered a protection - this is partly true, but it is loose, so it does not interfere with the further penetration of oxygen.
The film obtained by bluing (= blackening) metal is much stronger. It can be obtained using acids or alkalis. One way is as follows:
15 grams of tartaric acid and 280 grams of concentrated phosphoric acid should be poured into a liter of water. Use the resulting solution to treat a metal surface that has been cleaned to a shine. Wash off excess acid with laundry soap . And then heat the stove to 150 degrees and apply a layer of caustic soda (NaOH) to the surface - you can spray it with a spray bottle, but with great care - caustic soda leaves chemical burns not only on the skin, but also on the respiratory system.
After an hour the surface will be black. Be sure to preheat the oven!
There are, of course, methods of cold bluing, but there are different ingredients. If you can get antimony trichloride , mix it half and half with olive oil and rub it into the surface prepared with acid and laundry soap (as described above). The paste is applied once a day, the next day it is completely removed and a new layer is applied.
If all these procedures seem too dangerous and time-consuming to you, you can simply cover the stove with either a stainless steel or a brick screen, but this will not really help save it from corrosion. Consequently, either unsafe bluing or expensive thermal paint.
You won't be able to get by with just one brush. Because you cannot paint an iron stove without cleaning and degreasing its surface.
Therefore, arm yourself with protective equipment, a drill with a metal brush, degreasing compounds (the same acetone, for example), place the stove on plastic film and start the process.
So, you have cleaned and degreased it, and before that you have decided on the application method - with a brush, spray gun, roller or spray can . In principle, anything is suitable, choose what is more convenient for you. Perhaps it will be more convenient to spray paint some parts, while in others it is better to paint with a brush or roller.
As for the number of layers , it’s better for you to decide on the area; it depends on the chosen paint and how satisfied you are with the type of coating.
“ZERTA” promises an average thickness of one layer of 50 microns , despite the fact that at operating temperatures above 400 degrees, the coating thickness should be 28-32 microns .
Watch the video - there is nothing supernatural when painting with thermal paint:
And one more video - a man took the first paint he came across with a limit of 700 degrees and was pleased with the result:
Finally, let’s name the most famous manufacturers of heat-resistant paints that can be used to paint an iron stove in a bathhouse:
First, the paints you need contain composite materials and silicates.
Secondly, their range is in the range of 650-1000 degrees.
The most famous manufacturer of heat-resistant paints is probably CERTA. It is from this company that it is easiest to find enamels that can withstand the most extreme temperatures.
Another company from which we managed to find enamel with a limit of 1000 degrees is Elkon. Also a well-known manufacturer, by the way.
The Finns in this regard are somehow limited to lower limits, believing that the stove cannot heat up above red heat, but red heat itself is from 550 to 900 degrees ! Somehow this is at odds with the numbers on the label. Moreover, it is difficult to distinguish shades by eye, and this is hundreds of degrees of difference!
That is, it is clear that paint with a limit of 400 degrees is not the topic :). Therefore, we find it difficult to name Finnish enamel that, according to our standards, is suitable for a stove. It is better to take paint with a temperature reserve than to repaint it. But there is a guarantee of almost 20 years!
*** In fact, the options for painting an iron or cast iron stove in a bathhouse are a special case of painting. You may be interested in materials about how to paint the floors or walls of a bathhouse, what paints are used inside and outside, as well as a detailed overview of all the paints that can be used in bathhouses and saunas.
We are interested in your opinion - tell us more about your experience in finishing a bath in the comments.
source
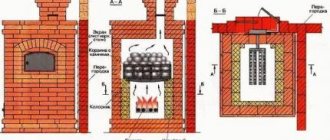
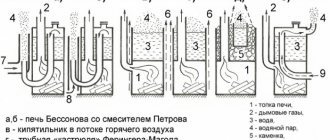
Difference by type
The simplest designs of heat exchangers are coils with ends removed from the tank: one takes in liquid at room temperature, the other releases hot liquid.
More complex ones are a system consisting of two metal tanks with anti-corrosion properties - cylindrical and rectangular in shape with connecting pipes.
There are two ways:
- This photo shows an option for installing a heat exchanger in a steam room and a tank in a wash room.
The second option is to install a heat exchanger with a tank inside the steam room.
Advantages of installing a heat exchanger in a steam room
- high water heating speed;
- saving free space in the steam room;
- Wide range of options for installing the tank - in a steam room or in a shower room.
Announcements on NN.RU – House
You can refill an inkjet or laser cartridge at our service center quickly and efficiently. Consumables available. Price: 350 rub.
Selling expired inkjet printer cartridges in packaging. Cheap. Compatible and original cartridges in stock. Price: 200 rub.
Main msdv3225-zc01-01 BN41-01190C BN41-02360В (BN94-08318N) BN41-02568 EAX64317403(1.0). Price: 600 rub.
Battery Energymet premium 60 (reverse polarity) battery advantages: – increased electrolyte reserve – low self-discharge -. Price: 4,500 rub.
An explosion occurred on the territory of a military unit in Achinsk near Krasnoyarsk: a storage facility for gunpowder charges for artillery caught fire.
Imagine, you wake up in the morning, open the curtains, bright sunlight bursts into your apartment, and outside the window is a stunningly beautiful landscape.
Already today, the most impressive starfall of 2022 can be observed in the sky of the Nizhny Novgorod region. Nizhegorodsky reports this.
In the Nizhny Novgorod Kremlin, bones recovered from the ground by archaeologists are stored right in the open air. The townspeople were concerned: historical.
The boiler is leaking, what should I do?
The boiler is leaking, what should I do?
We all have those most unpleasant moments when household appliances suddenly refuse to work. This entails a lot of problems - financial costs, loss of time, effort, discomfort. The moment will be doubly unpleasant if the boiler is leaking, because such a problem cannot be postponed, it must be solved immediately. And first of all, you need to find out what the cause of the leak is.
Today we will look at what needs to be done if the boiler is leaking. But first you need to take care of the tools that you will need for your work.
Painting process
To paint the inner walls of a vessel, it is impossible to use the so commonly used and economical roller or spray gun; only a brush can be used. For work it is recommended to purchase:
- wide paint brush for painting walls,
- a small brush to paint seams and joints.
You can paint the inside of the tank in the same way as other metal surfaces:
- Using a wide paint brush, apply a layer of paint onto large substrates without drips or streaks.
- Weld seams and corners are carefully painted with a small brush.
- The product is left to dry completely for several hours (drying time is indicated on the packaging of the product used).
- After the first layer has dried, re-painting is carried out following the same steps.
The instructions for most coloring compositions state that one coat of paint is enough to provide reliable protection, but experienced craftsmen recommend applying another one. This is based on the fact that beginners can make mistakes in their work, for example, unevenly distributing the composition over the surface, poorly painting individual areas. In any case, applying an additional layer will take a little time and money, but the quality of the work will significantly increase.
After painting with paints and varnishes that prevent the development of corrosion, a sauna heating tank will last much longer. The main thing is to use the selected product in accordance with the attached instructions and carefully follow all stages of preliminary preparation of the product for painting.
Source
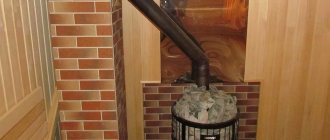
Securing the remote tank and installing the heat exchanger
Remote sauna tank
For a sauna stove, a tank with a volume of 80-120 liters is sufficient. This container must be hung on the wall of the bathhouse so that the level of the tank is higher than the stove.
Scheme for connecting the tank and installing the furnace with heat exchanger
Connection diagram
Step 1. Choose a place to mount the tank. This can be either a steam room or a shower room behind an adjacent wall. We determine the mounting height using recommendations for the slope of inlet/outlet pipes.
Layout of the furnace and tank
Step 2. Most experienced craftsmen do not recommend hanging the remote tank directly on the wooden wall of the bathhouse. Therefore, we measure the width of the tank, saw the rail into several sections of the appropriate size, and fasten the sections to the wall of the bathhouse with nails.
Step 3. The tank must have technological holes for attaching it to the wall. We secure the tank with self-tapping screws or dowels, checking horizontal and vertical. The structure can be further strengthened with brackets, fixing them under the bottom of the tank.
Brackets under the tank bottom
Step 4. The remote water tank has three or four pipes. Two of them are intended for connection to the heat exchanger, the third is for filling the tank with water (it may not be there), through the fourth hot water is supplied to consumers. A check valve is connected to the pipe through which the tank will be filled with water. If the system is open (water is added manually through an open tank lid), then a non-return safety valve is not needed.
A faucet with or without a shower hose is connected to the pipe from which heated water will flow.
Step 5. There are two pipes left, to which you should connect corrugated steel pipes or install a copper network. Connections are made using fittings. It is permissible to use metal-plastic pipes, connecting them with adapters to the pipes of the tank and heat exchanger. All threaded connections are sealed with thread sealant.
Flexible water supply
Prices for metal-plastic pipes
metal-plastic pipes
Step 6. A tap is connected to the pipeline that leads from the tank to the heat exchanger to drain water from the system. The operation of draining the liquid will need to be performed every time after completing bath procedures, otherwise during cold weather the water may freeze in the pipes.
Furnace heat exchanger installation diagram
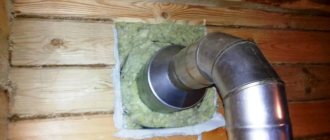
Step 7. A heat exchanger is hung on the wall of the furnace (or its fittings are brought out through the technological openings of the furnace, and the coil is located inside so that in the future there is no contact of the body metal with an open flame). The fasteners are tightened. Flexible corrugated hoses or pipes are supplied and connected to the heat exchanger with fittings. If necessary, holes are drilled in the wall with a diameter slightly larger than the diameter of the pipes.
Drilling holes
Pulling liners through holes in the wall
Connecting the line to the heat exchanger
Step 8. The system must be tested for leaks by supplying water under pressure.
Sauna stove with heat exchanger connected
An example of connecting a remote tank to the heat exchanger of a sauna stove
An example of connecting a remote tank to the heat exchanger of a sauna stove
Step 9. If you have a metal stove, then you can put it into operation. The brick kiln will have to be completed, finishing, testing and other preparatory work must be done. However, metal stoves can also be lined with bricks (they are placed on edge) on two or three sides. Such a screen additionally accumulates heat, increasing the efficiency of the furnace.
FAQ.
Production experience since 2010!
Frequently asked questions in Ural-sad.RF [td]
Question:
Why don't you paint sauna stoves with heat-resistant paint?
Answer:
Sauna stoves become very hot during operation, so part of the coating, especially at the bottom of the stove, will burn and therefore turn black. Another disadvantage of painting is the long and strong smell of burnt paint (lasts about a month while the paint burns out), so washing in a bathhouse turns from a pleasure into an ordeal. Therefore, instead of paint, I recommend using a safe solution - whitewashing the stove in a bathhouse with ordinary lime - it is not dangerous to health, the stove is white and light!
Question:
But now you have started painting stoves with heat-resistant paint.
How do you explain this? Answer:
Yes, we have found the optimal Russian paint for painting our stoves. Feedback from our customers has shown that once or twice you heat a stove painted with this heat-resistant paint and the smell disappears. Since customers claim that this is so, we will paint some of our products with this paint. Well, the look and feel of the product is different.
Question:
But some paint manufacturers claim that their paint can withstand temperatures up to 800 degrees Celsius and higher.
This paint should not burn on stoves. Answer:
The bottom of the stove gets very hot, until the metal turns red (if you heat it for a long time), so no paint will withstand it, well, at least I haven’t seen one. Yes, and as I wrote above, the smell of scorched paint will discourage all desire to steam in such a bathhouse.
Question:
Is it possible to make brickwork on the chimney from your sauna stove?
Answer:
It’s not possible, but it’s necessary! By the way, the safest installation of a chimney for a sauna stove consists of brickwork, from the stove and just above the ceiling of the sauna. This is the most reliable fireproof method! You can also insert a cast iron view into the brickwork.
Question:
Does the water in the tanks rust?
Are the tanks being processed? Answer:
Yes, the water in the tanks rusts over time, which causes corresponding inconvenience when visiting the bathhouse, but from the beginning of 2016, we began treating the tanks with a special compound that prevents metal corrosion. It lasts for 1-2 years, after which the procedure is repeated. The components for processing the tank are publicly available. The water in the tank remains clean.
Question:
How to take water from the tank?
Scoop with a ladle? Answer:
No, an outlet with a tap thread is welded into the side of the tank (standard Ф=20). Therefore, it is very convenient, without getting burned, you can draw water in the bathhouse.
Question:
How quickly does the stove and heater heat up?
Answer:
The stove and heater heat up quite quickly! 40 minutes and the sauna is ready! (for a standard 3*3 bath) Attention! It is recommended to splash a little water into the heater and stand next to it on the side, because The water quickly turns into steam and flies out of the heater with a whistle!
Question:
I read on other sites about sauna stoves made of boiler steel (it is of higher quality, as stated) - do you have the same steel?
Answer:
There is no official concept of “boiler steel”. This is more of a marketing ploy. Depending on the operating conditions, carbon steel and low-alloy steel are used as boiler steel. steel, alloy steel of pearlitic and austenitic classes (i.e. it turns out that all other classes of steel, except art. 3, can be classified as “boiler steel”). Let the suppliers provide you with documents (certificates) on the metal from which this steel is made. They can use 09G2S or the same steel 3 as “boiler steel”. It would be better if these manufacturers (suppliers) give a guarantee for their furnaces for at least 5 years. We make stoves from pipes, there is also special steel + the fact that the pipe has a concave shape, so it does not deform during the production process.
Question:
I read on other sites about sauna stoves made of 4 mm thick structural heat-resistant steel - do you have steel of the same quality?
Answer:
We make furnaces from pipes, there is also special steel + the fact that the pipe has a concave shape, so it does not deform during the production process. All sauna stoves made of sheet steel (rectangular or square), no matter what manufacturers (suppliers) say, over time “take away” the abnormal heat in the firebox. This is not a gas stove, where the temperature is constant, in the oven the temperature is variable: sometimes more, sometimes less, metal at variable temperatures sometimes expands, then contracts again, because of this it gradually bends in different directions (within 1-2 years) , welding seams crack and the oven breaks down and becomes a fire hazard! Just physics. Removes the temperature of the walls of a rectangular oven even from 6 mm stainless steel! Does not remove the furnace walls only from the pipe!
Question:
How long will your sauna stove last?
Answer:
A sauna stove from Ural-Sad.RF will last at least 12 years! The oven comes with a 5-year warranty!
Question:
Which oven would you recommend, 2 or 3 sections?
Answer:
The choice is up to you to decide for yourself. The main difference is the price - 2-section ovens are slightly cheaper than 3-section ovens. But 3-section sauna stoves can be rotated in any direction 360 degrees, and if someday something in a 3-section sauna stove burns out, repairing it or buying a burnt-out section will cost less than in a 2-section sauna stove .
Question:
Why do you give a 5-year warranty on greenhouses only for your installation?
Answer:
You yourself must understand that installing a greenhouse is not done in a clumsy manner; considerable efforts, knowledge and skills are put into it. In the process of manufacturing greenhouses, we developed our own installation technology without a foundation or timber. Our greenhouses will not bend under the weight of snow and they will not be carried away by a strong gust of wind! (With proper care).
Question:
What do you mean “with appropriate care”?
Answer:
Having installed a greenhouse, you should not expect that it will not require maintenance, especially in winter. All rules for caring for a greenhouse are described on the website: Superteplitsy.rf. Please read them carefully to prevent premature damage to the greenhouse.
Question:
Why do some greenhouse manufacturers have cheaper greenhouses than yours?
Can you lower the price like others? Answer:
Discounts are always provided if the greenhouse is made of the same thickness of metal, as well as the thickness and density of polycarbonate. When we started making greenhouses, we noticed how cheap the greenhouses offered in the city were; at first we couldn’t understand why it was more expensive for us, the manufacturers. Then we took a caliper and went to the points of sale. Basically, they overestimated the thickness of the profile pipe: instead of 1.5 mm, people are offered 1.2 mm - 1 mm or less (when advertising 1.5 mm), and the thickness of the polycarbonate was also overestimated: instead of 4 mm (which was stated in the advertising) , people were offered 3.8mm or 3.5mm. This difference may not be noticeable by eye, but it can be lost in quality, and, accordingly, in the service life of the greenhouse. Miser pays twice!
Question:
Why are other manufacturers and suppliers of greenhouses, such as a bread box, cheaper than yours?
Can you lower the price like others? Answer:
Discounts are always provided if the greenhouse has the same technical characteristics as ours. In addition to the above-mentioned inconsistencies in the thickness of the corrugated pipe and polycarbonate, there is one very important difference between the “breadbox” type greenhouse and our “sun” type greenhouse. All holes and gaps in our greenhouse are tightly fitted. Having looked at a “breadbox” type greenhouse at our neighbor’s dacha, we were stunned - the gaps at the top and sides when the doors are closed are about 2 cm! This means that when it gets cold, especially at night, the entire crop of tomatoes, peppers or cucumbers will freeze completely, reducing daily care to zero. Another big plus: our greenhouse has two side windows for ventilation, which won’t break the doors in strong winds. You have to pay for quality.
Question:
What guarantee do you provide for the paint and varnish coating of greenhouses and hotbeds?
Answer:
Basically, manufacturers of paint and varnish products provide a 1-year warranty on paint. We cannot provide a warranty on paintwork longer than the manufacturer's warranty - 1 year. By the way, unpainted greenhouses cost no less than painted ones.
Question:
Why does the polycarbonate in some greenhouses and greenhouses turn yellow and crack after 1-2 years?
Answer:
The first reason is low-quality cheap polycarbonate. The second is improper installation of the greenhouse and stretching of the polycarbonate. Here, more than ever, the Russian proverb - The miser pays twice is appropriate.
Shower with heat exchanger: design features
The heat exchanger, which is installed inside the furnace, is necessary in order to maintain the highest temperature in the water tank.
In this case, it is necessary that the high temperature be maintained as long as possible until the bricks or metal are able to retain heat. It is worth considering the advantages of using a heat exchanger in a bath:
- If the heat exchanger is placed on the chimney pipe, then this design will have a great advantage in terms of ergonomics. Heating water does not require the use of heat that is obtained to heat the stove. The heat exchanger receives heat from hot gases that are released during operation of the sauna stove.
- It is worth considering that the device has a large volume. This is why the water heats up quite quickly. This is the advantage of the heat exchanger. The heat exchanger has a simple design. Its design is not complicated. As a rule, there are no problems with it during operation. The main condition for good performance is proper installation.
- As for the disadvantages of the heat exchanger design, there is only one - a bulky type of design. This problem can be solved by competent design and correct installation of the system. For the same reason, horizontal sauna tanks are chosen, which take up minimal space.
How to clean a plastic water container?
Empty the bucket you used to pour the water into and fill it with clean water. Rinse the walls of the tank with clean water and scrub them with the rough side of the sponge. Take toilet cleaner and apply it to the sides of the tank and leave it on for 20 minutes. After 20 minutes, return to the tank and thoroughly scrub the walls with a sponge.
Interesting materials:
Where to travel in winter? Where to place a refrigerator in a small kitchen? Where are military personnel allowed to travel? Where are Ministry of Internal Affairs employees allowed to travel in 2022? Where to go on vacation in April? Where to go on holiday abroad in December? Where to go on holiday abroad in October? Where to go on holiday abroad in September? Where to go with a child in Russia in the summer? Where to go abroad in December?
Homemade containers and problems with the operation of the heat exchanger and the system as a whole
Water circulation may be disrupted or not occur at all if the tank is not connected correctly. What signs can be used to identify this problem?
In this case, the air will have to be vented, otherwise the entire system may simply explode. If circulation is disrupted, hot water may flow from both pipes.
All the problems described above occur due to incorrect connection of the tank to the register. To fix the problem, you will have to disassemble the entire system with the tank and heat exchanger and rebuild it according to the correct scheme.
Tank parameters
If you are in the habit of doing everything with your own hands, then of course you should try to make the tank yourself. However, you need to make a decision about what type of tank you will make, whether it is suitable for your steam room, what type of heating you use, what material you will use. It is worth noting that the material is no less important, since if you choose a bad material, it is likely that you will have to invest a lot of money again in the future.
First, let’s decide what we will use to heat the bathhouse. There are two options: using a stove, and using a water heating heater. And for a more profitable option, you need to calculate how many people will be steaming at the same time. You also need to consider how much water you need, how much time you need for this process and, accordingly, what temperature you need.
For example, for one person fifty liters of hot water is somehow too much. And for the whole family and some other small group of friends you need at least seventy liters of hot water.
Also pay attention to the thickness of the tank walls. This will determine the uniform heating of water and the temperature storage time in the tank. But remember that the thickness of the walls of the tank also affects its weight and overall cost.
For a stainless steel tank with a total volume of up to fifty liters, the normal wall thickness is approximately 0.8-1 mm. For a stainless steel tank, but with a volume of more than fifty liters, the normal wall thickness should be about 1.5 mm.
We must not forget that no matter what material your tank is made of, you still need to make an inlet for water, as well as the most optimal number of outlets. It doesn’t matter where you make the tank, whether you order it from a workshop, make it yourself, or simply buy it in a store. This means that it is very important to take into account all the previously listed parameters. And only then the washing process itself will give you maximum pleasure.
Useful video
We suggest watching a video on how to choose the right tank for cold water in a bathhouse.
Let's see what can be in a stainless steel house:
- cutlery;
- thermoses;
- pots, kettles, deep plates (bowls), basins and other stainless steel containers for the kitchen;
- various stainless steel fencing in combination with stone;
- scissors, watch cases, staplers;
- water taps and sinks;
- kitchen stoves and hoods;
- electric kettles and coffee makers;
- microwaves;
- irons, dishwashers and washing machines;
- high-quality stainless steel for baths and saunas.
And these are not all the objects that can be found in and around a human home. Near it we have already mentioned stainless steel fences and various fences. If we take kitchen containers made of stainless steel, then it is impossible to imagine our life without them. The same can be said about cutlery, office tools and other items. How can you imagine life without an electric kettle? Or a private house without stainless steel fencing? Thanks to its practicality, stainless steel has firmly entered our lives and is not going to leave.
Advantages and disadvantages
When heating a bathhouse, you do not need to waste resources on heating water
A tank of sufficient capacity will provide residents with heated water for hygiene procedures and household needs. The liquid in the container eliminates the problem of dry air. Compared to water heating devices running on gas or electricity, the advantage of using a tank is that there is no additional consumption of resources. Connecting the reservoir to the stove will also help out in the event of a temporary shutdown of the supply of main resources.
The disadvantages of tanks depend on the material and type of construction. In steel containers, water cools quickly; cast iron containers are heavy. Installing a tank on a pipe requires special skills. The heating rate is affected by the thickness of the walls of the product.