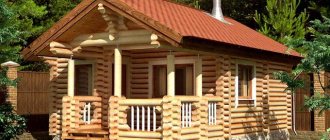
Baths and saunas are beginning to gain particular popularity. After all, they can be used not only for a pleasant pastime and relaxation, but also for medicinal purposes. As practice shows, building a bathhouse requires quite a lot of time, effort and money. In order to save money, they began to come up with new methods, as a result of which a bathhouse made of pallets began to become popular. In this case, scrap materials can be used for construction. It is important to understand that although this option is budget-friendly, it is also labor-intensive. You will have to be especially careful when choosing thermal insulation materials. But this will fully justify the efforts in the future, since a full-fledged bathhouse will be built.
No. 5. Wooden pallet bed
A bed made of pallets is a rather bold solution, at first glance, which, however, has already begun to be used in country houses, dachas and even in ordinary city apartments.
The pallets can be arranged as desired depending on the requirements for the bed. The height is adjusted by the number of pallets stacked on top of each other, the presence or absence of legs, wheels, etc. The width and length of the bed are also easy to adjust. If desired, you can make a headboard from the same pallets. If the wooden base turns out to be much larger than the mattress, it can be used as an impromptu podium or bench for the feet. The holes that are formed when installing one tier of pallets on another are used for storing bedding, books, magazines, or for organizing built-in lighting
Pallets are a durable material, so there is no need to worry about the reliability of the sleeping place - it is better to pay attention to choosing a comfortable ergonomic mattress
Garden decoration
Pallets are also suitable for creating garden paths. And here, too, you are allowed to safely experiment. The photo shows what an unusual parapet is made from boards stacked close to each other.
Beautiful wooden parapet Source yandex.net
Pallet boards can be used to cover the shoreline of artificial ponds. Wood combines beautifully with stone. Such an ensemble can decorate any landscape module and add a special mood to the overall design of the garden. Wooden paths from pallets in the country are created in different ways.
It all starts with digging a trench. A layer of top soil is removed to a depth of 15 cm. All debris (pebbles, plant roots) is removed. Geotextiles, roofing felt or any other similar material are laid at the bottom. It will help protect the wood from moisture that accumulates in the soil and prevent grass from sprouting.
The basis for the future path Source goodshomedesign.com
A layer of sand or crushed stone is placed on top of the geotextile, then it is carefully compacted. And the paving is assembled onto the finished pad. If the pallet is disassembled into boards and paths are formed by installing each individual element closely, logs are used to form paths. Ordinary boards are quite suitable for them. All parts are fastened together with self-tapping screws
To protect against moisture and mold, the wood is pre-treated with special compounds. They are applied in several layers. Each new layer is applied after the first one is completely dry.
To protect against moisture, any wood is treated with an antiseptic Source bazazakonov.ru
Separately, it is worth noting the need to process all internal elements of the pallet. Experts advise treating the part that will then be in direct contact with sand or crushed stone with protective mastic.
Path made from solid pallets Source dekormyhome.ru
You don’t have to disassemble the pallets and stack them entirely. To make such garden paths made from pallets more stable when walking, the inside of the cargo container is filled with crushed stone or sand.
To create paths, it is important to initially select whole pallets, those that have no cracks or signs of rot. To enhance the decorative properties of the material, the wood is additionally painted
Wooden paths made from pallets at the dacha are capable of connecting all household objects. They can be laid between the beds, then caring for the garden will be much easier. A large amount of dirt will not stick to your feet in wet weather. This will make harvesting easier.
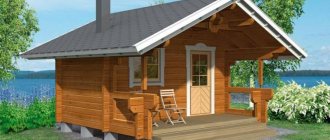
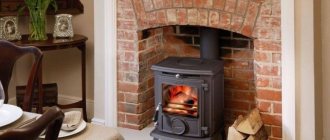
Features of a bath made of pallets
- Light weight
. Thanks to this, you can save on pouring a powerful foundation. - Good thermal insulation
. With proper insulation, such a bathhouse can maintain the temperature no worse than a log house. - Operational installation
. If you prepare materials and design in advance, construction will take only a few weeks. - Various design options
. Such a bath can be decorated in any style and sheathed with material to your liking.
- Material costs
. The building requires the installation of high-quality insulation. It also needs to be thoroughly vapor and waterproofed. The cost of these materials is quite high. Add to it the obligatory external and internal finishing, and it will not be as cheap as it seems at first glance. - Complicated installation
. If insulation work is not performed correctly, the steam room will be damp and cold. - Fragility
. Such a building is considered temporary and is designed, depending on the quality of materials, for 1-3 years. - Demanding requirements for materials
. Pallets must be of good quality and of the same type.
Overlapping frame assembly
We began sheathing transportable bathhouses with overlapping or herringbone boards (linings) in 2014.
And these were barrel baths, which we then called “Exclusive”. Despite the fact that “American” (and this is precisely the name given to this facade finishing technology) has been known since time immemorial in the States, Canada, and Scandinavia, it became widespread in our country not so long ago. The technology is simple, proven, and the result looks impressive. Suitable for exterior decoration of houses, bathhouses, and any other buildings.
Here's what it looks like live:
Article navigation
Preparing for the construction of a bathhouse from pallets
The basis of any construction is proper design. Therefore, first you need to draw up a plan for the bathhouse. Traditionally, it consists of a dressing room, steam room, washing room and rest room. At this stage, it is necessary to calculate the amount of materials required and stock up on them. The main element of construction is the pallet. These designs must be selected with special care. Old products made from rotten wood are not suitable for this type of work. Broken, insect-damaged, rotten pallets are also not suitable for construction. In addition, they should all be the same size. As for fastening elements, you will need a lot of them to give rigidity to the structure. Self-tapping screws, nails, and corners must be chosen only galvanized ones, since they are not exposed to the negative effects of moisture. The best insulation material is mineral wool (in this case you need to protect it as much as possible from moisture) or expanded polystyrene. For maximum energy savings, it is also advisable to use aluminum foil. Among waterproofing materials, give preference to rolled ones. Do not forget also about antiseptic and fire-retardant compounds, which will need to be used to treat all the wood before building a bathhouse from pallets.
Briefly about the main thing
When choosing an external finish for a bathhouse, the issue of the need for external insulation is first decided.
In most cases, it is necessary to leave an air gap between the insulation and the facade materials to ventilate it.
Most often, practical modern materials such as vinyl and metal siding and corrugated sheets are used for cladding.
Wooden panels also remain popular, but they are more expensive and require constant maintenance.
OSB and DSP boards are quite suitable as inexpensive or temporary finishing, and façade panels made of fiber cement, wood-polymer composite or slab insulation with stone finishing will give the bathhouse the most solid look.
Ratings 0
Pros and cons of homemade
Self-built pallets will cost much less than finished factory products. The main advantages of such products are:
- Formation of structures of various shapes and volumes.
- The ability to independently select the configuration of the future pallet.
- Guaranteed quality of pallet installation.
- Saving money.
- Environmentally friendly materials from which the product is made with your own hands.
- Possibility of choosing a decorative coating in accordance with the interior design of the bathroom.
The only disadvantage of a homemade pallet is the time spent on construction.
New, more economical types of materials
Wood is of course traditional and of high quality, but the budget does not always allow it to be used. In this case, technological progress offers innovative methods for constructing baths.
Formwork
The process of pouring the solution
A bathhouse made of permanent formwork consists of polystyrene foam thermoblocks one meter long and a quarter of a meter wide and concrete poured between them.
This technology provides a lot of conveniences and benefits:
- Huge budget savings.
- Increase the speed of construction work tenfold.
- Simplicity of installation work, which does not require special qualifications.
- Service life is about one century.
- Ease of carrying out repair and restoration work. The instructions allow you to replace only deformed areas.
- Possibility of erecting a building even at sub-zero temperatures.
Polystyrene foam floors
- No need for fixing solutions.
- Amazing lightness of the entire structure. This also allows you to save significantly on the foundation.
- A wide range of building products, including rounded samples.
Oriented Strand Board
Sandwich panel building
The construction of a bathhouse from OSB is possible without “wet” work with concrete, as is the case with permanent formwork. However, installation work is very easy.
And what’s remarkable is that they allow you to use a variety of insulation for a bath at your discretion:
- Styrofoam;
- mineral wool;
Roll of mineral wool
- felt;
- extruded polystyrene foam.
After erecting the bathhouse frame, you can also use different finishing materials:
plywood.
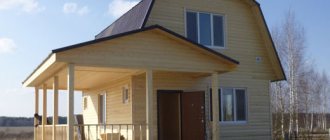
Plywood bathhouse with veranda
- sandwich panels;
- chipboard.
Such a building is distinguished by its speed of construction and high thermal insulation properties, which will allow significant savings on fuel materials in the future.
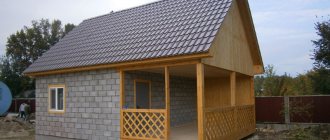
Pallets
Bathhouse made of pallets before covering with siding
This is an incredibly cheap method of implementing a sauna. But it is very labor intensive. It will be necessary to demonstrate miracles of engineering to reliably connect all building elements and give them thermal insulation properties.
If you have the necessary knowledge and skills along with free time, but no free funds, then this method is just for you.
Finishing the shower tray for the bath
We cover the shower tray in the bathhouse in the following sequence:
- We apply bitumen or rubber-bitumen mastic to the entire surface, and seal the joints of the pallet and the wall with waterproofing tape.
- Using a notched trowel, apply a special hydrophobic adhesive.
- We lay the tile and press it tightly, evenly, leaving minimal gaps between the individual elements. Tap the surface with a rubber hammer.
- To make the gaps even, we use special plastic crosses, which must be removed after installation.
- After complete installation, wait for it to dry and grout the seams using moisture-resistant grout and a rubber spatula.
- We fix special corners to the corners of the sides to avoid injuries.
- We treat all joints with the fence and walls with sealant.
- We wash the tiles, cleaning off any remaining adhesive, grout and sealing compound, and after drying, wipe the surface with a damp and then a dry cloth.
- We install the grate, cutting the sealing sleeve so that it is level with the tiles.
Leisure furniture
Garden dining furniture isn't everything. To fully enjoy a pleasant holiday among blooming greenery, you also need to buy a complete set of furniture. The sets include a sofa, two armchairs or chairs, plus a low coffee table. The most fashionable designs are those made of rattan, strewn with large pillows.
Soft accessories are mainly covered with cotton. Underneath the fluffy covering fabric is highly elastic polyurethane foam. Armchairs, sofas and chairs often have a cubic shape, making them voluminous and very comfortable.
Garden set made from pallets (pallets)
Wooden furniture made from pallets is also quite popular. This design is very easy to knock down, paint and impregnate. You can also sew pillows yourself or buy them at a garden accessories store.
The presence of a sofa, armchair or lounger made from pallets in the garden will emphasize the individuality of the landscape design of your site, create a cozy atmosphere, make it truly unusual and worthy of attention.
Construction pallets (pallets) can be used both painted and unpainted. Their design feature allows you to store something useful between the rows of boards. This space can also be occupied by drawers, providing them with a special mechanism and beautiful handles.
Preparatory work
Before starting the construction of a shower tray, regardless of the chosen shape, size and materials of construction, it is necessary to carry out preparatory work. Their volume depends on the condition of the floor and walls of the bathroom. To prepare the room for installation of the pallet you must:
- Ensure waterproofing of the room where the plumbing will be installed.
- Make sure that the shower tray can be connected to the water supply and sewage system. Pipes should be equipped with convenient holes for maximum simplicity and ease of connecting hoses.
- Close all pipe openings with special plugs.
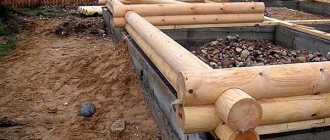
Construction of a foundation for a bathhouse from pallets
We carry out the work in this order:
- We dig four holes around the perimeter of the future steam room, 1-2 meters deep. We make intermediate recesses according to the size of the pallet so that each individual element rests on four pillars.
- We place the pipes in the holes made and check with a level the evenness of the located parts.
- We fill a bed of coarse sand, spill it with water and tamp it thoroughly.
- We prepare a concrete solution (waterproof cement M200, sand, fine crushed stone, water in a ratio of 1:4:7.5:3) and pour it to the top into each pipe in turn, burying a wire along the edges into the concrete to secure the lower trim.
Design of a change house
A barn is a stationary building that should ensure the safety of country tools, personal belongings and other similar items. Based on your own preferences and free space on the site, you should determine the desired dimensions of the building. Ideally, the length, height and width should be multiples of the pallet dimensions.
In this case, you will not have to cut the elements.
You may also be interested in construction technology.
Example: if pallets of 120x120 cm are available, then the optimal dimensions of the barn are 480 (L) x 240 (W) x 240 (W). You will need 24 pallets for the walls and 8 for the floor.
It is better to make the ceiling covering from boards. Also, boards will be needed to fasten the pallets together. And it is recommended to use timber 100x100 or 150x150 cm as the lower, upper trim and corner posts.
For construction you will also need: sheets of moisture-resistant plywood, fasteners, a screwdriver, vapor barrier film, insulation, fire-retardant impregnation, roofing material, roofing felt, bitumen mastic.
Calculation of approximate costs, prices of materials
Moisture-resistant sanded birch plywood:
- 8x1525x1525 mm – 550 rubles per sheet;
- 12x1220x2440 – 1050 rubles per sheet.
A set of doors with fittings or a gate for a barn can be purchased for 1-5 thousand rubles. Ruberoid costs about 300 rubles. per roll, bitumen mastic - from 270 rubles per container weighing 16 kg.
Materials for the roof and foundation arrangement will cost 2-5 thousand rubles. Mineral wool (8 pieces per package, 1,200×600×50 mm) costs from 65 rubles/m2 or 385 rubles/pack. Izospan (vapor protection) costs approximately 1,650 rubles/roll (70 sq.m).
American façade cladding technology
There is nothing complicated here. Whatever building you are sheathing, installation begins with the installation of guide bars. That is, we make a frame sheathing onto which we will attach the lining. It is clear that since the finishing board is attached horizontally, the guides are installed vertically. At the very bottom we nail a horizontal strip 20 mm wide - it sets the angle of inclination of the lining. Installation of boards is carried out from bottom to top.
The question is often asked, where to hammer nails when covering a facade with overlapping boards - through 2 boards, driving into the overlap? Or just the top board, driving a nail over the overlap?
Various options are acceptable. We do hidden fastening. That is, the nails are driven into the upper part of the lining in increments of 20 cm at a distance of 1-1.5 cm from the edge. That is, when the next board lies on top, the nails will not be visible.
We believe that this is the most reliable and aesthetic option.
Advantages and disadvantages of using pallets
The work is not so much difficult as it is slow. The only significant drawback of the idea is that building a bathhouse from pallets requires enormous patience and attention. The process of constructing the box of a future bathhouse from short boards is reminiscent of a children's construction set. The base of the sauna from pallets is built according to a frame scheme, so it takes three times as much time as if you install a steam room from boards or timber.
Using slats and slats from disassembled pallets provides several tangible advantages:
- Construction of a bathhouse will cost about half as much as any other option, for example, from foam blocks, lumber boards, especially timber;
- Minimal damage from a defective or incorrectly manufactured element of the foundation, wall or roof. If during the construction process a defect was discovered that was made at previous stages, it can be easily corrected by replacement;
- The frame structure of the bathhouse is easy to repair and, if necessary, add to it. The sectional assembly method makes the box plastic and flexible.
The frame of a sauna made from pallets does not move apart under the weight of snow or due to soil heaving, like frame or timber buildings, and does not become covered with cracks, like steam rooms made of foam concrete. The entire structure is assembled using wooden dowels and screws, so the building may sag slightly, but the building will remain intact in any case.
Advice! Building a bathhouse from pallets remains the best option for improving life in a dacha or suburban area. Especially if we are talking about the first construction experience.
You can often hear that building a steam room from pallets is too difficult for a novice carpenter or joiner. This is not entirely true. Large one-and-a-half-story buildings require truly professional knowledge and skills; building a 5x5 box will take more effort and time than a regular frame building. Whereas a small-sized bathhouse made from pallets with your own hands, photo, is built in less than a week.
Adjusting the height
Since the weather was hot, a light awning appeared over the construction site to protect from direct sunlight.
The man didn't want the barn to be too tall, so he shortened the top pallets by half. In his case, this was also convenient because the neighbors would not unwittingly “look” into the storage room.
At first it was planned that the floor of the barn would be level with the ground, but given that rain is rare in this area and there is no fear of flooding, the decision was made to deepen the lower part of the room. Thus, the internal space has become more voluminous.
Photos taken by the Hubble telescope: truly mesmerizing
Make eye contact: how to become interesting when meeting people in 90 seconds
A woman has been criticized online for treating her son like a “servant”
How to ensure long service life
A long service life of the shed can be achieved by treating all wooden parts with an antiseptic. The wood will not rot or deteriorate.
It is also advisable to arrange ventilation in the barn so that the air does not stagnate and conditions are not created for the growth of mold and mildew. If you plan to store vegetables in the shed, it is important to ensure that there are no rodents and insects that will damage the wall material. For convenience, floor shelving can be installed in the barn. It is convenient and functional, and it is better to refuse to use classic wall hooks and hanging shelves.. How to build a chicken coop correctly is outlined
How to properly build a chicken coop is outlined.
Construction process
The sequence of actions when building a shed from pallets is as follows:
- A shallow foundation can be made extremely simple. To do this, formwork is first installed on a pre-cleared site. The very place where the foundation will be laid is filled in turn with layers of sand and crushed stone, and concrete is poured on top.
Installing a pallet shed on a columnar foundation
The sequence of layers must be followed exactly as follows. The concrete surface may eventually become the final floor of the building. The time for complete hardening of concrete is 2-3 days with proper care; the formwork can be dismantled after about two weeks.
Make bottom trim around the perimeter of the future barn. Along the boundaries of the foundation, make an insulating layer of brick or stone to avoid contact of the base material with the ground. Place a timber of the appropriate size on top of the insulating layer. Connect the created harness to the foundation of the building. This can be done using holes and anchors drilled in the timber with a drill. All existing wooden elements must be treated with a special antiseptic.
Install corner posts that will increase the rigidity and stability of the shed structure as a whole. To fasten these beams to the bottom trim, you will need to use dowels, screws and metal corners. If you plan to make a pitched roof, then on one side the corner posts should have a different length than the beams on the opposite side. The floor joists can be connected to the bottom frame in the same way as the corner beams, that is, using self-tapping screws and metal corners. Boards are laid on top of the logs; to fasten them you will need 15–20 cm nails. This will need to be done if you do not plan to leave the original concrete floor in the barn. The construction of the barn itself can be started from any of its sides. One of the pallets must be placed on its side and then securely attached to both the bottom trim and the corner beam.
Attaching pallets to the bottom frame It is important to place the pallets in such a way that the flooring is in the interior of the building. In conclusion, I would like to conclude: a shed from pallets is quite easy to build yourself, they will save you from the need to buy expensive building materials
Knowing this little secret, you can build any outbuildings cheaply and quickly enough
Subsequent pallets will be attached in a similar way. After the first row is completed, it must be reinforced with boards or strong wire. Before proceeding with the construction of the second row of pallets, it is necessary to cut out a doorway in the structure. The first row also needs to be pre-strengthened with vertical boards. Despite the presence of corner beams, this point is still extremely important for the integrity of the room. The third row, if necessary, will be installed in the same way as the first two. Construction of the third row of pallets After all the above work is completed, you can begin installing the roof of the lean-to barn. Initially, for this purpose, the upper trim is constructed and attached, and the ceiling is made. For the ceiling, it is recommended to use a beam measuring 10 x 10 cm; it must be fastened along the perimeter of the walls of the building. The roof will require mandatory waterproofing. To do this, you need to stretch a special waterproofing film over the rafters or spread roofing felt. The final stage in roof installation is the laying of roofing material. You can use steel sheets, slate or other types of materials at your discretion.
In conclusion, I would like to conclude: it is quite easy to build a shed from pallets yourself; they will save you from the need to buy expensive building materials. Knowing this little secret, you can build any outbuildings cheaply and quickly enough.
Original creation ideas
The kitchen set consists of at least seven items:
- table for cutting meat, fish and preparing vegetables;
- stools;
- cupboard or shelves;
- sinks;
- bar counter for receiving guests;
- dining table;
- soft corner.
The easiest way to assemble a soft corner will be.
- You need to take 4 pallets and prepare them: wash, sand and prime with stain, and then varnish or paint.
- Place one on top of the other, place the third edge-on on the floor, with the main surface facing the side of the “sofa”, so that the back matches the length of the sofa.
- Fix the resulting structure with corners or self-tapping screws - you get the simplest sofa. You need to put specially made foam cushions on it on the seats and under the backrest.
Making a dining table from pallets looks a little more complicated.
- For two pallets, you need to cut off the checkers with a hacksaw at an angle of 90° to the boards near the middle row of checkers, practically divide the pallet in half so that one side has two rows of checkers, and the other has one. In one pallet the cut should be on the right side, in the other - on the left.
- A wide 14.5 cm board is placed on the resulting cut and secured with self-tapping screws.
- We install a third, completely intact pallet on the resulting cabinets; they can be secured using corners, glue and self-tapping screws.
- For convenience, wheels can be attached to the bottom board (leg). It is recommended to cover the upper surface of the table with glass or tightly fill the boards and put oilcloth on top.
To make a bar counter in a summer cottage set, you will need only two prepared pallets. You need to fold them with the bottom sides facing each other, fasten them with the corners and place them on the edge. Sew up the upper part with a wooden board to create a tabletop - to do this, you need to cut the boards of the same length and stuff them onto the crossbars, secured to the checkered pieces of the resulting cabinet. In the cabinet itself, you can cut a couple of boards, the second and third from the top, and attach a shelf of the appropriate size to the edge of the fourth board, where you can store some small things: cups, spoons, napkins.
For a sink, it will be enough to assemble the same structure as a dining table, cut a round hole for the sink and install it. If there is no sink yet, a metal basin can be inserted into the resulting hole. If there is no sewer drain, the “legs” of the cabinet are connected along the lower boards with jumpers, where a bucket is installed to drain dirty water.
The cupboard can be assembled from pallets using only the top side.
- Using a nail puller, remove the fasteners that hold the pallet checkers in place.
- Disassemble the top surface into individual boards.
- From the obtained materials, assemble a frame for the cabinet, connecting four planks alternately at an angle of 90°. Two rectangles for the frame are connected by transverse strips of equal length.
- The sides of the resulting cabinet frame are covered with boards.
The simplest shelves can be made by placing pallets one on top of the other, 3 or 4 pieces. Then cut boards between the second and third pallets (this will increase the area for storing dishes) or hang half of the pallet on the wall with the top side facing the wall, and line the bottom with a board. A small side is formed, behind which you can store cups, jars of spices and bottles of liquids.
Stools for a kitchen set for a summer house can be perfectly made from checkered pallets. You need to connect 4 checkers with transverse plank jumpers. In this case, the checker should be turned with a chamfer outward. By placing 3 such squares one on top of the other, you get 4 checkered cabinets, with a chamfer outward from the center of the stool, connected by plank jumpers. The top edge should be covered with boards and a foam cushion should be placed on top.
When all the details of the headset are ready, arrange them as you wish.
To learn how to make a kitchen out of pallets, watch the following video.
Rules for choosing pallets for construction
It is better to purchase pallets from the manufacturer
Pallets are ready-made fragments for assembling the frame of a floor, walls, ceiling and even a roof. In some cases, blocks can be obtained for free or for a symbolic amount from transport companies, where scheduled write-offs of consumable property are regularly carried out.
Not all types of such products are suitable for such construction. An important role in the selection of raw materials for the construction of a house from pallets is played by its origin, storage and operating conditions.
The following products are not suitable for building a house:
- Covered with bright, sometimes reflective paint. Such mixtures may contain toxic substances harmful to human health.
- Previously used for selling vegetables, in open areas, stored in damp and cold rooms. Such wood absorbs a lot of moisture and unpleasant odors, which can disrupt the feeling of comfort and cause allergies.
- With IPPC marking. It means treatment with chemically active substances that are incomparable to residential construction and human habitation.
- Having dark spots, inclusions of mucus and many small holes. This is evidence of damage to the material by fungus, mold and insects.
When choosing material for a pallet house, it is necessary to study the condition of the wood. It should be clean, dry, even. The overall gray tint is not a cause for alarm - this is a natural property of the raw material. Stains of dried dirt are also not a problem. It could just be splashes from a passing car.
Why did we choose the board size 145x19
We believe that this is the best option for finishing transportable baths. On large facades, a larger board - 150-200 mm - looks better, and on small facades - a smaller one.
Too often, it ripples:
And here it is just right:
When choosing a board, we are guided by personal preferences. Someone may disagree with us.
The thickness of 19 mm was also not chosen by chance. It depends on the size of the board, in our case 145 mm. The greater the height, the thicker the board is needed. If the proportions are incorrect, deformations may occur during drying and use.
Bathhouse design, highlights
Before you begin drawing up a project for the construction of a bathhouse, you should decide on its location on the site and its size. Lack of skills in developing such projects, it is better to use the services of specialists.
Basic points that should be determined before drawing up a plan:
Location of the future building on the site
Here you should take into account the location, supply and drainage of water and waste; Type of soil on the site. The type of foundation for the building depends on it; The plan must indicate the number of storeys of the bathhouse
This factor determines the load on the foundation.
The details included in the plan will make its construction easier.
Many projects provide a place for relaxation after taking bath procedures.
Standard bathhouse designs include the main premises:
- Steam room, with its main components - a stove and shelves;
- The washing room in the bathhouse should be equipped with a shower. It would be appropriate to equip this room with tubs or arrange a small pool.
The right project, which takes into account all the nuances, will allow you to build a bathhouse that will last for many years, delighting all household members and their guests.
In which lines do we use overlap assembly?
Line of bathhouses with a rounded roof “Bukhanochka”:
Modified version of “Loaf” with an entrance in the middle:
Baths with a terrace and a prominent side wall “Bourget”:
Transportable bathhouses with a roof to the ground “Rounded”:
Large stationary frame-assembled bathhouses according to the “Corner” project:
Source of the article: https://baniglushakova.ru/o-kompanii/stati/karkasnaya-sborka-vnakhlest/
Features of installing a camp bath
How to install a camp sauna: video tutorial
We won’t talk about the specifics of installing a ready-made camp bathhouse, because... all the nuances and safety rules are provided in the instructions that come with the structure. If you decide to make a camp sauna with your own hands, now we will tell you how to properly install a homemade camp sauna. There are 2 options for installing and operating a bath: traditional - “black” and cleaner - “white”. Let's consider both options.
Installing a sauna “in black”
The black sauna is a classic of the genre, because... in this case, the stove-heater is located and operates directly in the steam room. In this case, you must accept in advance that the steam room will be smoky, and you will definitely get dirty and stink of smoke. Despite this, a camp sauna “on black” will be hotter and you can steam in it longer.
Installing a black sauna consists of two main stages: heating the stones and installing the steam room.
Heating the stones
First of all, we look for suitable stones for a camp bath. You should use only round stones without chips, cracks or delaminations. It is recommended to select larger rounded stones, because... they give off heat longer (although they take longer to heat up).
Next you need to make a stove-stove. To do this, we lay the collected stones in the shape of a pyramid, and lay dry firewood on top of the stones. A more effective option is to make a metal box from twigs, place firewood at the bottom of the box, and place stones on top.
As soon as the stove-heater is made, we light a fire and wait until the stones heat up until they turn red, usually this takes from 2 to 4 hours.
Steam room installation
Installation of a steam room for a black bath
While the sauna stones are heating up, it is recommended to assemble the frame of the camp sauna. This should be done to the side so as not to damage the posts and covering material by fire. After the entire frame is completely assembled and the stones are warmed up until reddened, we proceed to installing the steam room.
First of all, we remove the remaining coals and unburnt wood from the fire so that only hot stones remain. Next, the area around the stove must be generously filled with water in order to extinguish all the small hot fragments that can burn you and expose the steam room to spontaneous combustion. After this, we place a rug or pine branches next to the fire to make the rest more comfortable and protect ourselves from illness (a warm body can easily catch a cold on cold soil).
As soon as the place is prepared, we transfer the assembled frame of the camp bath to the heated stones, covering them. That's the whole process of installing a bathhouse “in black and white”.
Installing a bathhouse “in white”
Heating the stones
Heating the stones is similar
Installing a camp sauna “in white” is no more difficult or easier than the previous method, the only difference is in the installation of the steam room and the design of the stove. First, as in the first case, we light a fire with previously prepared stones. When creating a camp sauna “in white”, the fire should have the following design: first, stones are laid out, firewood is laid on them, then the remaining stones and another layer of firewood are laid out. This design of a homemade stove will allow the stones to heat up faster, and the entire volume of the stones.
Steam room installation
Camping sauna “in white”
While the stones are heating up, we prepare the frame elements and use them to fasten them into one structure, and it is too early to cover the steam room with a vapor barrier. The assembled steam room should be located close to the fire so that you can quickly move the hot stones inside.
As for the stones, they will need to be rolled into the steam room. To do this, it is recommended to dig a shallow groove from the fire to the place where the stove is installed. Once the stones are hot, we get down to business. Using a small shovel or a thick branch, we remove all burning and burnt wood from the fire so that only stones remain. Next, we carefully roll the stones along the ditch, assembling a small stove-stove in the steam room. After all the stones have been delivered to the camp bathhouse, we pour water into the ditch to extinguish small pieces of coals and other residues from the fire. Now you can cover the bathhouse. This must be done carefully so that the covering material does not ignite from hot stones. The covering material from below must be fixed using available means (logs, stones or even sand) and that’s it, the camp sauna “on white” is ready!
Options for buildings made from pallets
As a rule, non-residential buildings are made from
Conventionally, houses made from pallets can be divided into two categories:
- Residential. This category includes country houses, outbuildings, summer kitchens designed to accommodate people, change houses. Initially, it is envisaged that the buildings will have dimensions sufficient for the free movement of people. Pallets in such cases should be considered as frame blocks with ready-made cavities for insulation and lathing for internal and external cladding.
- Non-residential. We are talking about outdoor toilets, sheds, workshops and closed gazebos. The size of such structures is limited, but even here wooden blocks can be used as a base for all surfaces. You don’t have to spend money on insulation or expensive cladding, but use available materials.
To build a house, you may need more than a dozen pallets. But as a temporary alternative to brick and timber buildings, this will be an excellent solution. There have been cases when owners of land plots built such beautiful and durable houses from pallets with their own hands that they did not want to demolish them. The buildings served for many years.
Video description
We recommend seeing how to properly sheathe frame buildings with wood:
It is important! Before installation, antiseptic compounds should be used to impregnate not only the cladding panels, but also the sheathing slats and other wooden structures hidden under the cladding.
The installation principle is that after installing the first board level, it is fixed on the groove side with nails driven at an angle or with clamps and self-tapping screws. Then the tenon of the next panel is tightly inserted into this groove and, after checking the level, secured in a similar way. This is how the cladding is installed along the entire height or length of the wall.
Internal and external corners, framing of openings are made of polished edged boards.
Upon completion of finishing, the facade is decorated with tinted impregnations, varnishes or acrylic paints for exterior use.
When choosing what you can use to cover the outside of a bathhouse inexpensively, it is worth considering options for finishing it with regular boards - edged or unedged. There are at least two ways to create attractive and practical facades from them.
- Herringbone paneling.
This method involves horizontal installation of boards with overlap. The bottom board is attached to the sheathing level, and each subsequent board is laid on it with its lower edge and fixed through with galvanized nails or self-tapping screws.
DIY furniture made from pallets in the bedroom, living room, children's room
A bed made from pallets can be perfectly decorated with an LED strip or lighting installed under the bed. Children will be especially happy with such a bed, and many adults will not refuse such an idea.
Canvas napkins or embroidered tablecloths are perfect for such tables.
Shelves and cabinets will be an excellent addition to the bed and table.
A TV stand will be a chic decoration.
Your four-legged friend will also appreciate the new bed made from construction pallets.
As you can see, there are a lot of examples of how to make furniture from pallets with your own hands. All that remains is to get the tools and get to work.
And photos of furniture made from pallets, made by yourself, will help you with this.
Care
To increase the service life of summer cottage buildings made from wooden pallets, they must be properly cared for. Renew varnish and paint in a timely manner, as well as replace damaged pallets. In fact, it is quite simple, and all actions will be carried out quite rarely.
It is recommended to update paint and varnish once a season. The old layer is removed using sandpaper. As a result, nothing should remain on the wooden surface. Afterwards a new layer of paint is applied, dries during the day, then a layer of varnish.
The surface layer of buildings made from pallets needs to be renewed annually
Replacing damaged pallets is much more difficult. Most of their designs are modular. Then getting a separate pallet is either very difficult or impossible. It will be easier to assemble a new structure or think through a disassembly system in advance.
And 9 more ideas for crafts made from pallets (pallets)
Wooden pallets have unlimited potential for creating various useful things for a country house or a city apartment. Here are some more interesting options for what can be made from wooden pallets:
- vertical landscaping of the site. The pallet can become the basis for hanging pots and containers with flowers;
- shelf for flowers and garden tools;
- interesting lamp;
- a wardrobe or chest of drawers - you just need to arrange the pallets correctly, and there are a lot of options for doing this;
- sandbox fencing;
- bedside table or TV stand;
- bicycle parking;
- a cozy place for a pet;
- Even a staircase in an apartment can be arranged if pallets are stacked sequentially on top of each other and secured well.
And the list doesn’t end there: with a little thought and imagination, you can make other stylish and convenient crafts from pallets.
Source link
How to close joints when sheathing with lapped boards
A non-trivial question: what to do with the joints? There are several ways to solve this problem. We found a picture where they are clearly presented:
We go the simplest and most aesthetic way - we make rectangular overlays, contrasting in color to the American one. It looks like this:
The least labor-intensive and technologically simple method - no errors, no jambs.