0
3758
27.01.2016
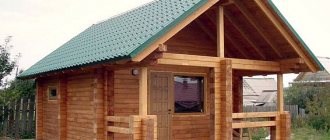
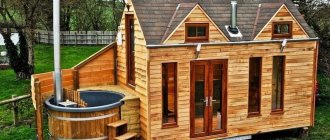
A bathhouse is an excellent addition to any country house. Building a bathhouse takes a lot of time, effort and resources. Traditionally, bathhouses are built from logs, however, the cost of this material does not please thrifty owners at all. In search of an alternative building material, some found a solution in building a bathhouse from sleepers. How can you build a durable, reliable and, most importantly, cheap bathhouse from sleepers with your own hands?
Decision-making
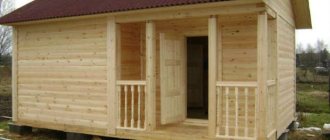
It is clear that the best option would be to build from new raw materials. A massive sleeper beam made of larch or fir is ideal, since the wood is still clean, and good quality industrial wood is used for products - larch, fir, and sometimes pine. Thanks to the pure wood, a new, self-built bathhouse made from sleepers, photo, is practically no different in appearance from a house made of timber.
But before planning how to build a bathhouse from such sleepers with your own hands, it is worth asking about their selling price; it is only slightly less than the price tag for timber and logs. But such a sleeper bathhouse is not inferior to classic timber log houses either in appearance, or in safety and comfort.
If, for certain reasons, it is necessary to build a bathhouse from treated sleepers, then you need to pay special attention to the process of choosing the material:
- For construction, solid beams are used, no older than ten years, without cracks, chips and traces of putrefactive wood;
- When tapped with a hammer, the sleeper wood should produce a sharp, almost high-pitched sound, without dull tones indicating internal defects;
- To build a bathhouse, you need to look for larch or fir; it doesn’t make sense to take pine or fir for a wooden building; such material is suitable for building a shed or fencing a site.
Birch or pine sleepers are often treated with a phenol-creosote mixture in high-pressure chambers. Impregnation penetrates very deeply into the wood. Such a sleeper will disappear from toxic compounds in twenty years, not earlier. In sleeper arrays made of larch and fir, due to the dense structure, the mixture penetrates into the thickness by a maximum of 5-7 mm, so this type of sleeper, like no other, is suitable for building a bathhouse with your own hands.
To build a bathhouse from medium-sized sleepers, you will need at least a hundred full-size sleeper beams. In total, a set of sleepers to build a bathhouse box will cost $300-350.
Video description
An example of a small chicken coop built from sleepers can be seen in the video:
How to finish
The type of finishing depends on the purpose of the building. If this is a house, barn or workshop, you need to insulate the inner surface of the sleepers as reliably as possible, having previously caulked or foamed all the cracks and joints. There are several options for such insulation:
- plaster with clay mortar;
- continuous coating with liquid glass;
- finishing with thick polyethylene film with careful gluing of the joints between the strips.
Wall insulation with foam foil film Source sense-life.com
Stage three. Walls
Stage three. Walls
So, we’ve sorted out the foundation and it’s already built, now we can move on to building the walls. But first, it is necessary to spread roofing felt on the pedestals; it will serve as waterproofing.
If the sleepers are even, then in order to save money we can place them sideways, but if the sleepers are “round” then it makes sense to lay them in the usual way. Now we need to decide which of the 2 ways we will attach them to each other.
The first method is staples. But this method is not suitable for everyone, since staples are much more difficult to find than nails.
The second method is 200 (two hundred) nails. There are no particular advantages of the first method, since the sleepers will not press against each other, and the shed may not stand for long at all.
The second method is more relevant. The nails must be driven in at an angle, thereby pressing the sleepers one against the other.
So, we have chosen the method, now we will decide how we will close the gaps between the sleepers. You can lay URSA type insulation between the sleepers, but this method has disadvantages - heat loss. But foaming the cracks with mounting foam is the most convenient way.
Laying the initial crown
- First of all, you will need to lay slats on the foundation that will prevent the sleepers from touching it. This is also necessary to provide additional ventilation.
- After this, proceed to laying the first crown, which should be positioned strictly horizontally. This can be achieved using a level.
- Connect the sleepers together, filling the space between them and the foundation with foam. The first crown does not need to be secured to the foundation, since the finished weight of the structure will provide the necessary stability.
- A layer of heat insulator (tow, jute or moss) is placed on the crown and secured with a construction stapler.
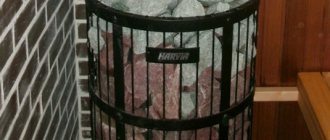
How to choose the right sleepers for a bath?
Bath sleepers
Before moving on to the technology of building a bathhouse from sleepers with your own hands, you need to pay attention to the correct choice of building materials. As you understand, most summer residents choose used sleepers that have been discontinued, although there are also new sleepers
The reason why everyone prefers used sleepers for building a bathhouse is that this option is cheaper, and the sleepers themselves almost completely erode harmful creosote over 10-12 years of service
As you understand, most summer residents choose used sleepers that have been discontinued, although there are also new sleepers. The reason why everyone prefers used sleepers for building a bathhouse is that this option is cheaper, and the sleepers themselves almost completely erode harmful creosote over 10-12 years of service.
As for the number of sleepers for building a bathhouse with your own hands, you need to purchase at least 100 pieces.
We draw your attention to the fact that very often summer residents buy a “pig in a poke”: rotten sleepers that have already rotted from the inside. If you build a bathhouse from such sleepers, after 2-3 seasons the building will completely fail and your money and efforts will simply be thrown away
In order not to be mistaken about the integrity of a used sleeper, it is necessary to knock on it with a hammer before purchasing. A dull sound will let you know that the sleeper is still intact and will serve you for at least 15-20 years.
Please note that building a bathhouse from sleepers with your own hands has many negative reviews. Despite the fact that distributors of sleepers say that sleepers no longer emit an unpleasant odor, and with high-quality insulation of the walls you will not hear discomfort, the owners of bathhouses made from sleepers claim that it is impossible to get rid of the unpleasant odor even after several seasons, and with high-quality insulation walls and ceiling
To build or not to build?
However, some of the advantages of this type of construction are closely related to negative consequences. The fact is that the resistance of sleepers to difficult environmental conditions is ensured by impregnation with specialized solutions - for example, creosol, coal oil and the most common substance, creosote. All of them contain phenol, which means they are poisonous and highly toxic. It is this property of impregnations that makes houses made from sleepers unattractive to rats and mice, as well as excellent resistance to rotting.
Impregnations for sleepers belong to the group of flammable substances, so houses made from sleepers are not the best material for building houses and especially bathhouses. A structure made from sleepers usually burns out completely in 15-20 minutes.
Another unpleasant consequence of impregnation is the specific smell that will linger in a house made of sleepers. It can be seen in the subway - it is creosote as an impregnation that creates an unpleasant and irritating air halo for the sense of smell. If you think that the unpleasant smell from new sleepers will go away during use and that used sleepers are better suited for construction, then you are mistaken. During operation, sleepers are additionally treated with chemicals in order to protect them from an aggressive environment and destruction under load, because in such sleepers you can literally find the entire periodic table, which naturally does not contribute to a healthy atmosphere in the structure that is built from this material.
And even if you manage to overcome the smell in your future home with the help of additional finishing, you will not be able to level out the harmful impregnations. This is especially true for sleepers with through impregnation (chemical treatment is carried out under pressure). When temperatures rise - in summer or in a bathhouse - the effect of substances increases further.
How to properly build a bathhouse from sleeper scraps
There are many options for constructing buildings from sleepers, and most often the raw material is laid out on a concrete strip foundation, which has a reinforced waterproofing layer of roofing material or mastic. The future process of constructing bath walls will entirely depend on the budget.
A simple version of a black bath made from untreated sleepers
Typically, sleeper production factories offer the individual ordinary developer at a moderate cost only scraps - short pieces, leftovers, with a length of 1.2 to 2 meters. The weight of one short one, together with the usual 70 kg, is only 36 kg, and this is quite convenient if you build a room with your own hands, and even more so, alone. The material must undergo factory drying and primary impregnation, through which soluble compounds are washed out of the solid wood. Such a sleeper will not shrink, and therefore the gaps for drying out are minimal. In the simplest case, you can build a sleeper bath with your own hands on a concrete strip. The steam room is very small, and therefore, in order not to bother with laying a layer of insulation on the wall surface, it is enough to sheathe the inner and outer parts of the walls using lining on the sheathing. Due to the two gaps and parameters of the walls made of sleepers, as well as partitions, an acceptable level of thermal insulation will be achieved.
Naturally, heating such a bathhouse, especially in winter, is not so easy, and therefore, in the small space of the sleeper steam room and dressing room, a pair of powerful wood stoves are used. Thermal power of 20 kW is enough to quickly and deeply warm up walls and cladding. You won’t be able to sit comfortably for several hours in such a bathhouse, but a good steam and wash after a hard day is just the thing. The advantage of this design is its reliability and simplicity. This building will not rot because there is no insulation, and therefore no places for condensation to accumulate. A concrete strip foundation must be equipped with vents. Ultimately, at the end of the bath procedures, thanks to the large amount of heat stored by the walls of the oven, the bath is evenly dried and gets rid of residual moisture.
How to build a bathhouse from black sleepers
To begin with, the material that was purchased for the construction of the bathhouse needs to be sorted and the smoothest and cleanest sleepers selected. They are suitable for laying walls on the facade. Part of the timber will be spent on cladding material - homemade tongue-and-groove boards, beams for laying walls, and those that are most saturated with phenol will be used to arrange the base and bathhouse plinth.
Foundation and walls made of sleepers for a bathhouse
The next step is laying out the binding. To construct the tie, sleepers need to be spliced into one large beam for the entire length of the bath wall. After installing and driving in the metal dowels, the strapping beam must be sealed using roofing material, and only after that the first crown must be laid. The assembly technology of bath walls made of sleepers is almost no different from laying timber, the only difference is that the crowns, after every 3-4 rows, are knocked together with steel brackets made from thick reinforcement. When laying the next crown, the surface must be laid with jute, flax, but even more often with dried moss. Bath corners are cut from two sleepers of locks “into half the tree”, and in this case the direction of cutting will change to the opposite with each further crown.
Roofing and ceiling
For a small bathhouse, the last couple of crowns must be laid at the same time as the ceiling beams. The material used is the best sleepers dissolved in two from the rest. The resulting pairs need to be spliced into a long beam, which will cover the ceiling. At the same time, the ceiling must be hammered with boards. The rafters for the roof of the bathhouse are cut out and joined on the ground, and then raised in pairs to the ceiling surface and cut into the last wall crown. You immediately need to fill the sheathing, which will be covered with roofing felt. In this state, the bathhouse should overwinter, the walls will begin to gain weight, and the process of shrinkage of the bathhouse structure will occur.
Wall decoration and boxes
When finishing work, it is necessary to pack and emboss the crowns using jute tow, cut and lay the floors inside the steam room of the dressing room and the rest room. All that remains is to cut out the door and window openings, install the frames, hang the doors and proceed directly to finishing work in the room. The ceiling covering is hemmed inside the steam room and dressing room, a waterproofing film is laid and filled with expanded clay backfill.
Subtleties of choosing and creating a foundation
To equip a full-size standard structure, it is recommended to implement a shallow shallow base. If you are planning a foundation of sleepers for a bathhouse, you need to take care of high-quality comprehensive waterproofing of the lower crowns of the walls.
In the process of creating the foundation and base of the sleeper box, the following additional measures are desirable:
- arrangement of vents - these holes provided in the concrete strip allow excess moisture to be naturally removed;
- as the first crown is formed, it is necessary to treat all mating surfaces with high-quality waterproofing mastic;
- It is recommended to lay out the next couple of rows from sleepers with an uncut protective layer.
Compared to traditional timber baths, in which the lower segment begins to deteriorate after 4-5 years of use, sleepers are more durable - the basic crowns last 15 years even in very wet soil.
Care must be taken, since the use of processed used blanks for the base and foundation can lead to unpleasant consequences. Phenol and creosote are susceptible to leaching; they are transferred by moisture into the soil, where they spread and enter the room along with evaporation. To reduce this effect, thick waterproofing and insulation are used.
Foundation for a bathhouse made of sleepers
If the soil on the site is oversaturated with water, in areas with frequent flooding by rain and melt flows, a pile foundation is used for a bathhouse. A sleeper box is clearly heavier than a panel or frame box, so 1-2 sleepers, divided in half, are used for supports. The blanks are tied together with wire, impregnated with bitumen or resin, and fixed in pits. The strapping is made from spliced sleepers and roofing felt.
We insulate the house
The ceiling is insulated with sawdust only from above.
The first thing to do is to stitch the floor beams with wide boards. Their thickness should be from 25 to 35 mm. The cheapest option is to take simple planed ones and dry them to natural moisture. But experts advise using sheet piling, this option is more expensive. The boards can be attached to the beams using nails or screws. But sawdust insulation is heavy and the boards need to be secured in a special way. Nails or screws are driven in at an angle, each time changing the angle in the opposite direction. Nails take 100 mm, screws 50 mm. The next step is to treat the beams and boards with an antiseptic. This way they will be less susceptible to rotting and fungi. A vapor barrier is spread on top. Roofing felt or PVC film is also suitable for home use. It is attached over the entire surface with an overlap of 10-15 cm. All joints are glued with bitumen or tape. In this case, the edges of the vapor barrier should extend 10-15 cm onto the walls. If there are voids on the sides, then they need to be covered with polyurethane foam. The bends must be attached to the walls using a stapler.
The sawdust is laid out in layers, constantly leveling and compacting. The height of the embankment usually reaches the upper level of the ceiling. Experts recommend scattering a thin layer of ash on top. It plays a protective role against fungi, mold and bugs. After spreading, the composition is allowed to dry for 2-3 weeks and covered with a vapor barrier on top, which prevents moisture from getting to the insulation and excess evaporation. You need to attach the vapor barrier to the floor beams using a stapler. As a result, the sawdust should be wrapped in an envelope of lower and upper layers of vapor barrier.
Then the floor beams are extended, and sheathing is made for the finishing or subfloor. Or a metal mesh is laid on top of the beams, and a cement screed is made. It all depends on the choice of material for the floor in the future.
Second way
Judging by the reviews, we can conclude that hardboard is a good way to upholster sleepers. Some craftsmen mount it on wood from the inside. However, hardboard is not effective for long. It tends to swell over time. As a result, its surface becomes wavy. As a result, cracks form on the hardboard, through which the unpleasant smell of creosote from sleepers penetrates into the room. Residents experience especially a lot of inconvenience in the summer. The owner of the house will have to tear off the hardboard covering and cover the sleepers with sheets of plasterboard. Those who upholster a house with clapboard also face a similar problem. After some time, it will also have to be dismantled and replaced with sheets. Polyurethane foam is used to seal joints. Then the plasterboard surface is carefully painted over, and wallpaper is glued on top.
Government procurement 223-FZ
In Europe, the issue of the impact of antiseptics for wood protection on the human body and the environment is dealt with much more responsibly, and there the use of SSA (analogs of ULTAN) and SSO (analogues of XM-11) has been prohibited for many years. In the USA, no other impregnation of poles and sleepers other than creosote is provided. About the depth of impregnation. For sleepers this is 2–5 mm. But such a depth of impregnation is typical for the core part of the trunk - a layer of wood that is difficult to impregnate (when cutting the trunk into a sleeper, the sapwood, an easily impregnated layer, is mostly cut off).
Fundus and blood without abnormalities; all symptoms disappeared after 2 weeks and were not observed subsequently (Arieff, Altas). Skin contact with creosote leads to the appearance of pink spots, papules, warty growths, strong pigmentation, and increased keratinization of the skin.
The articles do not say anything about the harmful factors of water-soluble antiseptics. Let's fill in the data. Water-soluble antiseptics are also harmful. But if the impregnation technology is not violated, then the harmful effects on the workers’ bodies are minimized.
They practically do not rot, are not affected by microorganisms and pathogenic microflora, insects, and rodents. The durability of the bathhouse box largely depends on how to make a bathhouse from sleepers, what kind of foundation and finishing design is planned to be used when arranging the room. The second condition is the quality of the material.
Advice! You should not completely trust reviews of bathhouses made from sleepers published by the owners of buildings. Only a few percent of respondents give an objective assessment of the emerging problems. Negatives of building a sleeper bath from ten-year-old sleepers: Possibility of poisoning by vapors of creosote, phenol.
The specific smell in subways is due precisely to the smell of creosote, which is impregnated with sleepers. Those working on the impregnation of sleepers with creosote can very quickly develop severe burns on the face (especially the cheeks and nose), forearms and neck, so that they are forced to stop work after 0.5-1 hours. Creosote is harmful to health oncology Asphalt. paraffin, petroleum derivatives, hair dyes.
Creosote is a mixture of anthracene, naphthalene, phenols and their esters. It ignites quickly and dissolves in alcohol or ether. In addition, creosote is different:
- high toxicity, which corresponds to hazard class 2;
- composition stability;
- good penetrating ability;
- low degree of volatilization;
To avoid the negative impact of creosote, sleepers and supports should not be used for the construction of low-rise houses, cottages and utility buildings.
A fairly reliable and cheap construction vapor barrier is a polyethylene film reinforced with fiberglass.
Both new and used sleepers are used for these purposes. Unfortunately, not everyone thinks about the question: is this housing construction option harmful or not, because the material is quite cheap, and the shape of the beams greatly simplifies the process of building a house.
Creosote in Civil Engineering People work in these areas around the clock. The stench, especially in the summer, is wow. By the end of the shift, my head hurts beyond belief.
Indeed, houses made of wooden sleepers are light, do not rot, are durable, protect well from low temperatures and rodent infestations, and these houses also perform well in earthquake conditions. In addition, the specific shape of the sleepers makes it easy to assemble houses of simple structures.
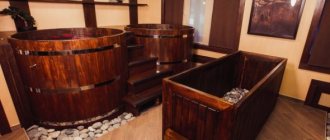
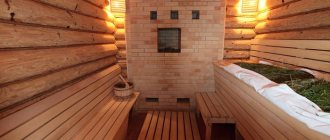
Nuances of interior decoration
Traditionally, the inside of any bathhouse is decorated with hardwood. Most often it is linden, maple or aspen. Coniferous wood is not used for these purposes, as it emits sticky resin, which is also very hot in the steam room. When finishing with ordinary boards, you need to ensure the evenness of the slats and fasteners.
We invite you to familiarize yourself with DIY bathhouse interior decoration
To avoid unnecessary problems with fastening and fitting individual components, it is best to use eurolining as a finishing material. Its slats have fastening grooves and joints, and it is attached to the frame with minimal use of metal parts. The lathing is made of wooden blocks with a pitch of 50 cm.
Thus, if you want to cheaply, quickly and independently build a bathhouse in your country house, you can use ordinary railway sleepers for the walls. Just remember that they emit an unpleasant and harmful odor to the body, which you may not like very much.
The use of additional external and internal materials helps extend the life of the structure and minimize the spread of toxic chemicals.
Interior decoration
Traditionally, the interior space is lined with deciduous wood - maple, linden, aspen, since coniferous wood releases resin when heated. If you decide to use regular boards for finishing, you need to make sure that they are even.
It is important to hide the fastening points: it is easy to get burned when touching a heated screw or nail, and metal rusts in damp conditions
Interior decoration of a bathhouse made of sleepers
Eurolining may be the optimal covering option: it does not require adjustment of components and does not create problems during fixation. The planks are equipped with fastening joints and grooves; they are installed on a frame with a small number of metal parts. For the sheathing, wooden beams are knocked together in half-meter increments. Since the finishing eats up space, it is not suitable for small baths.
You can heat the bathhouse several times before starting finishing work: the walls will warm up, and a significant part of the chemical compounds will come out of the sleepers along with the fumes.
Installation
Before discussing the construction of a domed bathhouse, I would like to introduce you to the design, whose name is “Dobrosfera”. The Dobrosfera spherical steam room is an ordinary frame bathhouse that anyone can assemble using the instructions from the manufacturer according to the construction kit principle. The object is self-supporting. Therefore, it is possible to make any layout in the steam room.
Floor joists are made using ordinary boards, which are not included in the assembly kit. The frame is made of coniferous trees - spruce, pine, etc. The raw materials undergo thermal drying, but are not treated with antiseptic compounds. The price of the set is from 32,000 rubles. Of course, this is the price of the frame only. All other materials are purchased separately. Assembling this innovative construction set will not be difficult, since the kit includes detailed instructions.
Let's get to work already. To build this bathhouse, we perform the following steps.
- We take measurements.
- Leveling the place.
- Let's make the foundation. A strip base or pile base is suitable.
- Select the type of fastening of the ribs. There are two types - connector and connectorless.
- We install communication systems.
- We assemble the frame according to the diagram.
- We carry out external cladding (most often with OSB boards).
- We install windows and doors.
- We install the roof (it is reasonable to use flexible tiles).
- We fill the frame with heat-insulating raw materials (you can actually use ecowool or mineral wool boards).
- We make the internal lining of the bathhouse and do not forget about the vapor barrier.
- We lay floors, erect partitions and shelves.
- We install the stove and install the chimney.
- We carry out interior finishing.
- We arrange interior items.
That's all. We admire the charming spherical bathhouse.
There is another option for constructing a domed steam room.
- We take measurements.
- We choose a site for the construction of a bathhouse.
- We clear the working area of debris, remove the soil cover, and fill the area with crushed stone and sand.
- We install a supporting decagon (instead of a foundation).
- We make trapezoids from boards.
- We place roofing felt and trapezoids on the sandy “foundation”.
- We connect the trapezoids with self-tapping screws.
- We make walls from bars connected with self-tapping screws.
- We make frames for windows and doors.
- We cover the walls with boards.
- We make frame ribs from bars.
- We coat the wooden elements with an antiseptic and fire retardant.
- We take a break - a day.
- We make plate connectors from metal.
- Fill the connectors with foam or resin.
- We are erecting the frame of the dome. We connect the elements with self-tapping screws.
- We line the inside of the dome with plywood.
- We insulate the walls.
- We clad the outside of the dome with OSB slabs and tiles.
- We lay the floors.
- We install communication systems.
- We install a stove-stove.
- We carry out interior finishing.
- We arrange interior items.
That's all. Enjoy the beautiful spherical steam room!
As you can see, the technology for assembling a dome bathhouse is not very simple. I would say - unusual and unusual. And if you doubt your construction abilities, seek help from specialists.
The steam room-dome is the “pearl” of a suburban area, giving heavenly pleasure!
Happy assembly, dear readers. See you again!
Wisdom Quote: What is absurd to some is proof to others (Shaftesbury Ashley Cooper).
I'll tell you everything I know
Step by step instructions
Before starting construction work, it is necessary to carefully prepare the required quantity of building material and fasteners. Necessary materials:
- For the foundation - crushed stone, sand, reinforcement, cement, waterproofing material.
- For walls, floors, ceilings - old sleepers, metal pins, tow, boards, thermal insulation and waterproofing materials, construction staples.
- Windows, doors, roofing material.
- For finishing - cement mortar, putty, paint.
Stage No. 1. Preparing the construction site and laying the foundation. For a house made of sleepers, you do not need to build high-strength foundations. It is enough to dig a trench under the strip foundation along the perimeter of the building and under the internal load-bearing walls. Fill the bottom with 10 cm layers of crushed stone and sand. Install formwork and reinforcement cage.
The height of the foundation above the ground surface should be 50 cm. Prepare a solution of crushed stone, sand and cement. Pour the foundation. When pouring the top layer, it is necessary to install mounting bolts with a diameter of 40 mm at a distance of up to a meter from each other. The foundation of the house must be left for at least two weeks.
Stage No. 2. Walling. Place a waterproofing layer and tow on the base and begin installing the first row of sleepers. Place the sleeper next to the foundation and mark where the bolt holes will be drilled. Make holes and lay sleepers on the foundation. Bolting will help make the structure of the house strong and stable.
Use metal staples to secure subsequent rows. Tying the house diagonally with a metal strip will give the structure additional rigidity.
When building a house from sleepers, you can make vertical and horizontal masonry. This approach will save time on cutting the sleepers into the required pieces. Strengthening the upper part of door and window openings is done using horizontal sleeper laying.
To secure the corners of the house, it is advisable to use the technology of constructing wooden houses. If you are not familiar with this technology, it is better to invite a specialist. Corner sleepers are additionally secured with metal squares. Tow must be placed between the sleepers. Use a mixture of straw, sawdust and clay as a compactor. Before you begin laying the last row, install the fasteners for installing the roof truss.
Stage No. 3. House roof installation. The rafter system is made in the same way as for buildings made from other building materials. Do not forget to lay a layer of insulation and waterproofing. Choose roofing material based on your capabilities. The simplest option would be to install slate sheets.
Stage No. 4. Interior wall decoration and flooring.
- The first layer is liquid glass. They cover all the walls, carefully treating the cracks. Be sure to let it dry.
- The second layer is a waterproofing film laid overlapping.
- The third layer is shingles or masonry mesh.
- The fourth layer is plaster or clay mud with straw.
Work on the floors begins after finishing work on the walls is completed. The floor and ceiling must be covered with layers of thermal insulation and waterproofing. The ceiling can be made the same as the walls or covered with plasterboard. For the floor, wooden flooring is best.
Stage No. 5. Exterior finishing. A house made of sleepers without exterior decoration does not look entirely aesthetically pleasing. Plaster is not at all suitable for exterior finishing. Plastered walls will not release the remaining creazote evaporation from the sleepers, and then the house will not be comfortable to live in. Metal or vinyl siding is used for finishing.
The construction of the sleeper house has now been completed. Even in such a house all communication systems can be installed. Bring water to the house from an Abyssinian well or well located on the site. Install the electrical network using a special aluminum corrugated pipe. You can also build a septic tank on the site yourself.
Owners of houses made from sleepers note their special thermal conductivity and excellent resistance to various natural disasters. The main thing for construction is to choose whole sleepers and perform all stages of construction with high quality.
We recommend reading:
- build a garage from a metal profile with your own hands;
- how to pour a foundation for an old house;
- DIY gate (diagram).
Waterproofing device
Foundation waterproofing device
The gap between the equipped foundation and the laid sleepers must be insulated from
moisture. This is achieved by pouring molten bitumen onto the foundation base and then laying roofing felt. Another layer is laid in a similar way after the bitumen has completely hardened.
Bathhouse construction process
Let's take a step-by-step look at the entire process of constructing a bathhouse from old sleepers on a summer cottage. The quality of the future structure depends on the choice of material.
The nuances of building a bathhouse
If you still decide to build a bathhouse from sleepers, then pay attention to the following nuances. There are two options to buy new sleepers or discarded ones
Decommissioned ones will cost much less, and if they are quite old, then you won’t even feel the smell from them. When purchasing sleepers, tap them with a hammer, the sound should be dull. This will ensure that these sleepers are of good quality and will serve you for many years to come.
Choosing suitable sleepers for a bath
Looking at a stack of sleepers, it will certainly seem to you that they are all exactly the same. A reasonable question will arise: what to choose? Meanwhile, knowledge of several nuances will allow you to choose the highest quality building material. You have two options: purchase new or decommissioned sleepers. Old products will cost an order of magnitude cheaper, and if their age exceeds 10 - 13 years, then you will hardly detect any smell, since during this time the creosol erodes.
Then you need to decide on the size of the bath. If you want to build a small bathhouse, which will only have a steam room and a sink, then about 100 sleepers will be enough for you. An exact calculation can be made based on the square footage of the premises. Before the final decision, each sleeper must be tapped with a hammer. The sound of impacts should be dull. This indicates the good quality of the material, the walls of which can last another 20 years. Otherwise, you may be given rotten sleepers that have lain for a long time on the ground under the rails.
Stack of old railway sleepers
Finally, you need to weigh all the factors again. After all, the existing smell cannot be eliminated by any, even the highest quality insulation of walls and ceilings. The main question for yourself is: do you need such sacrifices?
Final Steps
How to caulk a bathhouse from sleepers
At the final stage of construction, lay boards with a thickness of 55 cm on the beams, and then lay slate or roofing felt on the structure. Leave the bath for 6 months without touching it for the necessary shrinkage.
We suggest you familiarize yourself with How to make formwork for filling walls with your own hands? Technological process and types for erecting walls: tips for assembling the structure Photo and Video
As soon as the structure has given the necessary shrinkage, you can begin to caulk it. To do this, stock up on a hammer and caulk made of wood or metal. If you are unable to find this tool in the store, make it yourself using an electric jigsaw.
The bathhouse is caulked as follows: the insulation is twisted into a tight bundle and pushed between the sleepers of the crowns. The result should be a perfectly even and dense insulating seam. This step does not need to be carried out when initially using jute fibers as an insulating material, since this insulation itself is quite dense.
At this point, the construction of a bathhouse from sleepers is considered complete, and if you carefully study the technology, it should not present you with insurmountable difficulties in the process. The main thing is to be patient, which will pay off in the end.
Insulation of walls with sawdust
- Features of use
- Advantages and disadvantages
- Insulation technology
- Selection of materials
- Preparatory work
- Filling internal cavities
- Laying on the frame
- Thermal insulation of walls with coating
- Installation of blocks
Sawdust is wood waste particles obtained after sawing. Loose mass is considered a universal insulation material, but is most often used in one-story houses, bathhouses and houses with attics.
The most cost-effective options are to pour a thick layer of dust or a mixture based on it into the internal openings of the structure or to cover the partitions from the outside. Wall insulation with sawdust can be done at all stages of construction and operation of a building.
To insulate walls, pure material is used or mixed with other components to change its properties and improve the result. For example, to extend its service life, waste is impregnated with antiseptics, fire retardants and other agents.
Some technologies involve the construction of a frame to hold the insulating “pie,” which greatly complicates the work, but reduces the financial costs of repairs.
Dust has long been considered the best way to insulate a home. The advantages of this insulation method include:
- Absence of components harmful to humans. Natural materials such as clay, sand, lime, and lumber waste are used to prepare the solution.
- Low cost of trash. Costs will only go to the delivery of raw materials.
- Long-term operation of sawdust coating.
- There is no need to have experience working with these materials. No special equipment is required to perform the operations.
- Very low thermal conductivity of the insulating “pie”. Such properties are transferred from the tree array.
Such insulation has a number of disadvantages. The following properties are considered the most unpleasant:
- Sawdust burns well and is a material with a high fire hazard.
- They become a haven for mice and are quickly damaged by fungus and mold.
- The insulation layer shrinks; it is necessary to periodically check its condition and fill the voids.
- Trash quickly absorbs moisture. To protect the substance, a waterproofing, vapor-permeable film is required.
Securing a coating of bulk material on a vertical surface is not easy. The technology of work requires strict adherence to the order of operations, otherwise the effect of using the substance will be minimal. The quality of the components will also affect the result. Information on how to properly insulate walls with sawdust is given below.
Foundation Tools
- shovels with hand drill;
- plumb and level;
- boards for formwork;
- construction tape;
- staples;
- brick or stone;
- a mixture of gravel and sand;
- moisture-proofing material, tar can be used;
- roofing felt with cement;
- solution container;
- reinforcement and equipment for cutting it.
DIY foundation made from railway sleepers
It happens that at the very beginning of construction it turns out that traditional materials for the foundation cannot be used. What can replace them? One of such replacements is a foundation made of railway sleepers.
This type of foundation is usually chosen for light buildings, for example, for a garage, country house, greenhouses, gazebos, bathhouses and other buildings. This solution is also good because such material for the foundation can always be purchased, and even at an affordable price.
When constructing a foundation, most experts do not recommend using this railway material. The main reason is considered to be the fact that sleepers have already served for quite a long time as a railway track.
But for commercial buildings such a foundation is just perfect. There are several options.
Projects
There are quite a few design options for a sleeping bath; the choice most often depends on the budget or personal preferences. There are two types of sleeping baths: budget and full.
Budget. The sleepers are laid on the foundation, and the walls of a small area are formed. The steam room in this version is as small as possible, the second room is the dressing room. In fact, the entire bathhouse consists of these rooms, between which a stove is installed. This is a simple design, quite reliable, but heating it in winter, and even for a long time, will not be easy. But you can simply wash yourself and take a short steam in it without any problems.
Preparatory stage
In order for it to be pleasant to steam in the bathhouse during operation, it is necessary to select high-quality sleepers in advance. On the modern market there are new and used sleepers, treated with a protective compound (usually creosote) and without treatment.
Experts recommend using sleepers that have been in use for many years for the construction of bathhouses and other buildings. Firstly, the unpleasant odor has already disappeared from such material, secondly, harmful fumes will not emanate from it, thirdly, such sleepers are more resistant to the negative influence of various climatic conditions, and fourthly, this material is much cheaper than new ones sleepers
To build a small bathhouse you will need about 100 sleepers, ideally those that have lain for over 10-20 years and have lost their smell and other traces of chemical treatment. The technology of construction from sleepers is identical to the principle of constructing buildings from timber.
What should you pay attention to?
Despite the fact that with a vapor barrier, the house should become an airtight structure, unpleasant odors and harmful substances will not penetrate into it, and the wooden walls will stop “breathing.” Therefore, before removing the smell of sleepers from the house, you should worry about quality ventilation. Otherwise, the heat exchange in the room will not be fully carried out, which will lead to the accumulation of moisture. To prevent this, rooms are equipped with adjustable openings for fresh air to enter the home: microventilation devices, vents and windows. Exhaust ducts are required in bathrooms and kitchens. Additional exhaust fans will also help. This will become the basis for creating a favorable climate in the house. Of course, you should not hope that one hundred percent protection against poisons will be achieved. However, if the work is done correctly, the level of penetration of toxic substances into the living space will be minimized as much as possible.