Having your own bathhouse is the dream of many. Of course, ideally, for its construction you need to purchase special materials, for example, timber, brick, aerated concrete, etc., but not everyone can afford such purchases. If you want to make a small bathhouse and are looking for a budget option, then the best option would be a DIY bathhouse made from scrap materials.
Choosing a frame for a bath
The frame of the bathhouse consists of wooden racks 3-3.5 m long with a lower frame made of boards, an upper frame made of hewn poles and braces at the ends of the frame. Then the frame is sheathed on both sides with a hewn slab or well-hewn poles. As the sheathing is completed, its space is filled with cheap dry insulation (sawdust, peat) with the addition of lime or gypsum. In the process of backfilling the walls, the insulation should be lightly compacted layer by layer to prevent its settling and the formation of voids.
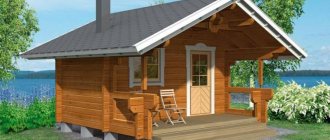
Rice. 1. Bathhouse with backfill walls: a - general view; b - plan of the bathhouse; 1 - dressing room; 2 — steam room; 3 — stove-heater; 4 — hot water tank; 5 - support under the floor joist.
Project #2 - wood concrete is used
Here's what the construction process looks like:
- Step 1. We dig a drainage hole with dimensions of 1.2 x 1.8 x 1.4 m. We fill up the OPGS with stones on both sides, make formwork, and fill it.
- Step 2. We dig a foundation 30 cm wide and up to 50 cm deep. We fill it with sand and tamp it.
- Step 3. We put up the formwork, reinforce two rods at the top and bottom. We place vertical rods every meter. We pour the foundation.
- Step 4. We lay EPS, mesh in the washing and steam room and fill the floors. In the washing room we additionally organize drainage.
- Step 5. Lay the blocks, check the evenness of the walls with a level.
- Step 6. We make the roof using 50x100 boards. The optimal distance between the rafters is 55-80 cm. Cover.
- Step 7. Cook the oven or buy a budget ready-made one. The ventilation scheme is suitable as follows: outside air goes to the gap between the stove and the brick wall, where it heats up.
- Step 8. Install the shower tank in the attic.
- Step 9. Finish the walls from the inside. If possible, use Izospan FB - a material special for baths, plus heat-resistant tape. Izolon is good for ceilings, as it can withstand temperatures up to 150°C.
This is such a budget-friendly and quite successful bathhouse.
When choosing wood concrete, pay attention: according to its density, it can be thermal insulating and structural. The first has a density of 400-500 kg/m, the second - 500-850 kg/m
This material is used for the construction of self-supporting walls and has good heat and sound insulation.
Options for installing foundation posts in the ground
First of all, the developer needs to choose the option of installing the frame posts in the ground. Depending on the nature of the soil, we offer three options for installing stands. The first option (Fig. 2) is the installation of frame racks in dense, non-heaving soil (rocky, gravelly, dense sand) with a low groundwater level, when the possibility of either settling of the racks or squeezing them out during heaving of the soil is excluded. To ensure better stability of the rack, a support cross is installed in its lower part, and when backfilling, the soil is compacted layer-by-layer with the addition of fine crushed stone or gravel. The lower part of the rack must be well coated with bitumen mastic, oil paint or, in extreme cases, burned, which will protect the racks from rotting. The frame racks are installed at a distance of 0.7-0.8 m from each other, and at the ends of the building - at a distance of 1 m.
Rice. 2. Installation of bathhouse racks in dense, non-heaving soil: 1 - support cross; 2 — frame stand; 3 - bitumen coating; 4 - bottom frame trim board; 5 - wall cladding; 6 - floor support beam; 7 - bath floor; 8 - vapor barrier; 9 - backfilling of the wall; 10 - support strip of the bottom trim board.
The second option (Fig. 3) ensures reliable installation of the bathhouse frame racks in heaving soils. The wooden stand is first tightly inserted into a piece of metal or asbestos cement pipe and buried in the ground. In this case, the buried part of the pipe should be covered with bitumen mastic outside and inside, which will ensure that the soil slides along the surface of the pipe when it swells in winter. To protect the wooden stand from rotting, bitumen coating is also used. They protect the stand in the upper part of the pipe insert and its end inside the pipe. The frame stand with a pipe insert should rest on a dense sand-crushed stone cushion, which will reduce the subsidence of the frame. The bottom board of the frame trim is installed in the racks by means of a tie-in, secured with nails and resting the board on the end of the pipe insert. The subsequent technology for constructing walls is similar to the first option.
Rice. 3. Installation of bathhouse frame racks in heaving soil: 1 - pipe insert; 2 - bitumen coating of the pipe; 3 — frame stand; 4 - bitumen lock; 5 - bottom frame trim board; 6 - braces.
The third option for fastening the racks of the bathhouse frame must be used in soils with subsiding weak-bearing layers. To attach a wooden rack, a pipe insert is also used, which is embedded in a concrete columnar foundation (Fig. 4). Then the stand is installed in a pipe with a side gap of 10-15 mm, immersing the end of the stand in the concrete mixture, and the annular gap is tightly secured with cement-sand mortar. After installing all the frame racks, the frame wall elements are installed using the methods of the first and second options.
Rice. 4. Fastening the racks of the bathhouse frame in the foundation: 1 - sand cushion; 2 - concrete; 3 — pipe insert; 4 - linoleum, glassine; 5 - cement-sand mortar; 6 - bitumen coating; 7 - wooden frame posts; 8 - wall cladding; 9 - bottom frame trim board. For all options for installing racks, the diameter of pipe inserts can be used in the range of 100-150 mm. If racks made of durable wood (oak, ash, beech) are used, then the pipe diameter can be 100-110 mm. During the installation of the frame racks, it is advisable to remove the surface layer of soil under the bathhouse building, while cutting into the racks of the lower plinth board is carried out at a level of 250-300 mm from the ground. When using pipe inserts for racks, the upper part of all pipes must be installed strictly at the same level, thus ensuring the horizontality of the lower frame trim. After installing all the racks, they are fastened together with temporary braces and sprinkled onto the laying of the lower trim boards. If you have a large number of different slabs, you can choose the bottom board with a thickness of 40-50 mm. The width of the bottom board should be determined by the diameter of the stand, which, in turn, is determined by the diameter of the pipe insert. To install the bottom trim board, cut-ins 10-15 mm deep are made in the frame posts, into which a board is inserted, secured to the support strip or to the edges of the pipe inserts using nails. The bottom board of the trim must be covered with tar, bitumen mastic, i.e. The lower part of the bathhouse frame is made of antiseptic boards.
General information
Consider the types of saunas for an apartment
Types of mini-saunas for city apartments
The sauna in apartments should not be full-size, but miniature. We briefly talk about the features of the most popular four types of mini-saunas, and the important fact is that this small sauna can even be bought ready-made.
With electric heater
The construction of a sauna in an apartment usually results in the re-equipment of the sanitary unit, since modernization of communications is important. Consequently, such an event will be accompanied by the collection of permitting documents. But installation can be greatly simplified by connecting using a flexible hose. In this case, running around to the necessary authorities can be avoided, and all responsibility in this case will fall on the manufacturer.
Phytobarrel
If you don’t have enough free space, a compact phyto-barrel is an excellent alternative to the classic options. Such a small sauna in the bathroom can be placed in any free corner. The area it occupies is approximately 1 m2. It is no more tall than a person, and the power of the heating device used in it is approximately 2 kW. The most popular models include barrels made of cedar and equipped with their own steam generator. Although such a mini-sauna is very simple and compact to operate, its installation should be entrusted to the manufacturer. The phytobarrel is easily controlled using a special remote control, and certain models have special devices that make the procedure even more enjoyable, for example, a sprayer for aromatic balm.
Portable sauna
This type of sauna is made of a frame covered with fabric. The principle of operation is similar to a phyto-barrel, and when the head is in it outside the heat zone, such a device is inexpensive, has a low weight and is compact. The main advantage of a portable sauna is that it is easy to use, and the only thing required for operation is an outlet.
Infrared sauna
From experience, we can say that this type of sauna is the optimal solution for indoor use, and it, like an important steam room, can remove toxins and excess fluid from the body, and can also activate the functioning of human organs.
Finnish type sauna
If there is enough space in the apartment, you can completely think about arranging a Finnish sauna. Even in 1 session it can accommodate a couple of people, and the steam in it is dry, it heats up to +100 degrees. This point is the main difference from the saunas listed above.
Turkish steam room
Selecting a location - pantry, bathroom or balcony
A sauna in an apartment with your own hands must be designed correctly, and the first thing to start with is selecting a location and developing a project. The following options can be considered for its placement:
- Combination of a corridor and a sanitary unit that leads to the kitchen. You can even add a bathroom here.
- Balcony or pantry in the case where the sauna will have infrared heating. By the way, a sauna on the balcony is beautiful because it will not reduce the living space of the apartment.
Naturally, the size of the sauna will depend on the number of people
When making the appropriate calculations, it is important to allocate at least 2 square meters of space for each person. The ceiling height in the room should be 2 meters or more
If you decide not to buy a ready-made miniature sauna, but to equip it yourself, then you can leave the one you have. An excellent option would be tiles, and the room for the sauna should be at least 1.8 * 2 meters. This makes it easy to place a bench, and such a sauna will become a practical and also convenient solution for an apartment.
Upper framing device
After installing the lower frame, they begin laying the upper frame frame. It is made of hewn poles with a diameter of 100-120 mm, which are connected to the posts by cutting, followed by fastening with nails (Fig. 5).
Rice. 5. Top trim device
At the ends of the building frame, as well as where the pitch between the posts is 1 m, it is necessary to install braces that provide rigidity and stability. Sheathing the bathhouse frame can be done depending on the availability of cheap materials at hand: slabs, substandard boards, poles (Fig. 6).
Rice. 6. Sheathing the walls with poles: 1 - frame stand; 2 - bottom trim board; 3 - support beam; 4 - floor board; 5 - vapor barrier; 6 — sheathing poles; 7 - backfilling of the wall; 8 — support bar.
The walls are covered in horizontal rows, starting from the bottom of the frame. The first outer row of sheathing must be thoroughly coated with bitumen mastic over the primer. On the first internal cladding board, the bitumen coating should be applied only on the side adjacent to the backfill. To protect against rotting, it is necessary to cover the floor support beam with drying oil and oil paint, and also coat the lower surface of the floor boards with drying oil, which will ensure reliable protection of the wood from mold and rot. After 2-3 rows of internal and external cladding are secured to the frame posts with nails, it is necessary to lay a layer of roofing felt, roofing felt or glassine into the inner cavity of the wall, which provides waterproofing for the backfill and also acts as a vapor barrier. Then the internal cavity of the wall is filled with insulation (sawdust, peat) with the addition of lime. The walls are backfilled with dry material with light layer-by-layer compaction. Where the windows are located, it is necessary to install additional trim boards between the posts on which the window frame will rest. To secure the doors, vertical posts are installed between the lower and upper frames. Where the partitions are located, it is necessary to provide for the installation of frame racks in order to be able to construct the partition using bottom trim boards.
Useful tips
It is better to place even the lightest bathhouse on a platform made of concrete or wood.
When building a bathhouse, it is worth considering the advice of experienced builders.
- A log house or log house is a fire hazard. It is necessary to observe all fire safety measures: install a shield with tools nearby, install an RCD, and keep a fire extinguisher.
- You can install a bathhouse using improvised materials anywhere. However, it is better to place it on the south side and not be shaded by trees.
- A mini-version of one steam room is placed next to the summer shower or a canopy is installed, where a barrel and a ladle are left for dousing.
- It is better to place even the simplest structure not on the ground, but on a platform covered with a layer of crushed stone and sand.
To insulate baths, it is recommended to choose mineral wool rather than more water-resistant polystyrene foam or polyurethane foam. This is explained by the fact that mineral wool has high vapor permeability.
Construction of a bathhouse ceiling from scrap materials
After erecting the walls and partitions of the bathhouse, you can begin installing the ceiling, which is done in relation to the frame structure of the bathhouse. To do this, well-matched slabs, boards or straight hewn poles are placed on the top frame frame. Then this roll-up is covered from below with a vapor barrier material (glassine, foil) and sheathed with thin boards (10-15 mm). The roofing is also covered with a layer of glassine or roofing material; boards are fixed around the perimeter of the ceiling, forming a box 150 mm high. The ceiling box is covered with a layer of insulation (sawdust, peat, expanded clay), which is covered on top with roofing felt or roofing felt and the roof sheathing is arranged. Corrugated asbestos cement sheets, secured with roofing nails, are laid on the sheathing, also covered with a layer of roofing felt. The roof of a frame bathhouse with backfill walls is usually made of a pitched roof, which greatly simplifies and reduces the cost of construction (Fig. 7).
Rice. 7. Construction of the ceiling and roof of a frame bath: 1 - frame racks; 2 - false ceiling; 3 - glassine; 4 - ceiling roll; 5 — upper trim of racks; 6 - insulation; 7 - roofing felt, roofing felt; 8 - sheathing; 9 - asbestos-cement roofing sheet. The construction of the bathhouse floor begins with the installation of a support beam. It is secured with nails at the level of the bottom trim board around the perimeter of the frame (Fig. 2; 6). To provide additional fastening of the floor boards, it is necessary to install a joist resting on a separate support and frame posts. Subsequently, all work on the construction of the floor, heater, shelf, water drainage and drainage pit is carried out according to the rules set out for a wooden bathhouse. The proposed version of a frame bath using cheap scrap materials can be built by any craftsman, even those who do not have much experience in construction work. The construction of a frame bath can be completed in the shortest possible time (1.5-2 months), and the use of cheap materials will provide significant savings on the family budget.
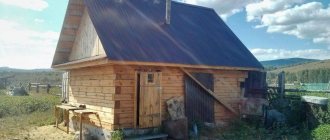
Features and advantages of small bath buildings
For a summer house you can build a small wooden bathhouse
The most popular material for building a bathhouse is wood, which is highly flammable. This imposes a number of fire safety restrictions: the need for treatment with fire retardant compounds, strict adherence to fire safety standards when installing the stove and chimney. When building any bathhouse, even when using non-combustible material, it is necessary to maintain the regulated distance to neighboring objects located on the site.
Construction of a steam room is a fairly simple and quick procedure. In most cases, small baths for a summer residence do not require a solid foundation and the purchase of a large volume of raw materials. In addition, in the process you can use up timber and other available materials left over from the construction of other structures.
The raw materials used should not have rotten areas, wormholes, cracks or other signs of destruction.
Other advantages include:
- no need to spend money on a massive foundation;
- speed of construction;
- small area occupied by the object, which is especially advantageous if the site is small;
- the ability to fit the building into different types of landscapes due to its compactness.
Read on to find out more!
How to combine a bathroom in an apartment
Bath: the main element
Wooden floor in the bathhouse
Do-it-yourself bathhouse roof, calculation and installation of eaves
Do-it-yourself sauna sewer
Do-it-yourself plank and concrete floors in a bathhouse
- 2.6
Rating: 2.6 out of 5 Votes: 189
- 8
Reply
6 years ago
Svetlana
6 years ago
Quote
The steam room that is described in the video can be taken with you on a hike without any problems, it seems to me that it won’t take up much space. I will definitely save the information to try to make it at home. I don't think I'll spend much. No honestly, that's a good idea. Thanks for the interesting information.
Andrey
6 years ago
Quote
A common misconception is that a bathhouse, even in a country house, must be built from 150 mm timber. To keep it hot. My dacha is used in the spring and autumn. Therefore, I built a bathhouse from 50x100mm boards. The steam room is lined with foil from the inside and clapboard made of aspen on top of the foil. The fever easily lasts for a couple of hours. But what a saving in material.
Dmitriy
6 years ago
Quote
Building a bathhouse at home is no problem at all, if only there was a desire and need for this very steam room! A friend of mine fenced off part of the garage and made a steam room right in it, laid out the walls from cinder blocks, put moisture-resistant sealant on top and covered everything with wood! The main thing is to choose a good boiler, which is the source of the hot steam room.
anastasia
6 years ago
Quote
A bathhouse is the most necessary thing in any home. We bought a house, but unfortunately there was no bath there. But there is an opportunity to make a bathhouse just for us. Your method is cool and practical. We will immediately begin building the bathhouse.
Alla Knyazeva
6 years ago
Quote
Interesting method. My father started building a bathhouse a year ago, and then gave up - prices for building materials began to rise. And here is a truly alternative option. I’ll show my father, we’ll resurrect our bathhouse)
Alla
6 years ago
Quote
The instructions in the article are simple and clear, but the materials in question are not entirely accessible, at least for me, but the video really allows you to have a bathhouse always close to you
Angelina
6 years ago
Quote
A bathhouse is a necessary thing these days! If you don’t have a house yet, this is not a problem - you can always spend the night in the dressing room. But if you have a house and nowhere to wash yourself, this is already serious. The construction option described is really very profitable! You can also make a shaped panel from plywood for the ceiling: beautiful and inexpensive!
Preparing the area
An important point in construction is the selection and preparation of a place for a bathhouse. The building is located in accordance with the rules of law and ease of use. The following recommendations will help you determine the best site:
- The bathhouse is not placed near bodies of water to avoid flooding.
- Current building codes and regulations clearly define at what distance from the fence a bathhouse can be built. It is allowed to erect a building at a distance of more than 1 meter from the fence. The distance between fire hazardous objects is 10-15 m. Water intake points are located at a maximum distance of 20 m.
- The best place is the backyard of the house, in privacy.
- During construction, a drainage system is provided in advance - into a septic tank or central sewer system.
Advice! To avoid possible disputes, it is recommended to immediately agree with your neighbors on the location of the bathhouse.
Where to begin?
When planning to independently build a bathhouse on a summer cottage, you first need to deal with a number of issues.
You need to start preparing by choosing a project. Then, in the absence of sufficient experience in the field of construction, it is useful to familiarize yourself with the theoretical part of the construction work on the construction of a bathhouse.
Consider the placement of the building and the supply of communications to it, purchase all the materials necessary for the work. After this, you can begin the interior arrangement and decoration of the room.
The last stage will be the purchase or independent production of furniture for the bathhouse.
How to make a temporary bathhouse on site or in nature with your own hands
What could be better and more useful than a bathhouse on site, in nature or on a hike. You've probably had similar thoughts more than once, but you didn't dare to do it, because... We thought it would be difficult to do this ourselves. In fact, it is not as difficult as it seems.
Raw material!
First of all, before building a bathhouse, you need to purchase polyethylene measuring 3 × 5 m. You should also cut fabric panels measuring 1.5 × 3 m and acquire a rope in advance to connect the parts of the body. The rest you can find where you decide to locate.
Let's start by finding a suitable flat place - preferably near a pond, so that you can immediately plunge into the water. The area for the bathhouse should be approximately 2 × 2 meters. If you are somewhere in the forest, in nature, then for your own comfort, it is advisable to clear the chosen place of branches and thickets.
Examples of solutions
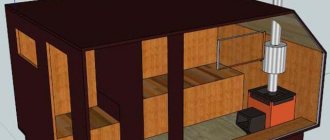
The smallest bathhouse for 1 - 2 people
The most compact bathhouse for a summer residence, designed for one person, has dimensions of 2.5 by 1.2 m. The dimensions of the dressing room in such a building will be 1x1.2 m, and the steam room - 1.2x1, 5 m. It is assumed that the visitor will wash directly in the steam room (or, in warm weather, outside). In the dressing room you can change clothes and relax between visits. A building with a similar division of functional areas, designed to serve two people, will have the shape of a square with a side of 2.5 m. At the same time, the dimensions of the dressing room will be 1x2.5 m, and the paired room - 2.5x2.5 m. Choosing or creating with your own hands stove for such a bath, you need to take into account the limited space.
The layout of a room with dimensions of 3x3 m can be done in different ways. If you want the steam room to accommodate 3 people, it can be made with dimensions of 1.5x3 m. The remaining space can be divided in half between a dressing room and a small shower, or you can neglect the latter and adapt the room for visitors to rest between visits. A similar layout is suitable for a building with dimensions of 3x4 m. In this case, with a steam room size of 4x2 m, it can accommodate 4 people. A bathhouse measuring 4x4 m or more allows you to organize all the main zones: a steam room, a separate shower room and a room that combines the functions of a dressing room and a relaxation room. If the building dimensions are sufficient, the last two zones can be made separate.
How to choose a site for construction
The construction of a bathhouse usually begins with choosing the most suitable location and drawing up a construction plan
When preparing calculations, it is important to comply with the rules and regulations that govern the conditions for locating a steam room in the residential sector. The specific structure must be located at a distance of no closer than 1 meter to the boundary of the neighboring plot
If there are wooden buildings in the neighbors' yard, there should be more than 15 meters from them to the bathhouse.
A separate bathhouse or one built as an extension to a house can only be built taking into account the rules and regulations regarding natural, plant, and protected areas. The permissible distance to a reservoir is 5 meters, an artificial well with drinking water is 12 meters, tall trees are 4 meters, and a forest area is 15 meters.
In the house
You should plan the construction of a steam room in your home at the building design stage. The bathhouse will require special waterproofing, finishing, and processing of materials. More often they make mini-rooms, but they are spacious enough for a comfortable stay. The advantages of planning a residential building with a bathhouse include the following factors:
- Saving space in the garden area;
- Possibility of free movement between rooms, without the need to go outside;
- Simplified firebox. All necessary materials are located in the living area;
- Close location to the bathroom.
The disadvantages of organizing a bathhouse right in the house include a high fire hazard. Even high-quality and systematic treatment of a room with fire retardants does not provide 100% protection against fire and smoke. Additional vapor barrier will also be required. Due to high humidity, complex ventilation will have to be done. Good air exchange can be ensured by installing expensive internal equipment.
Extension to the house
It is possible to attach a bathhouse to a residential building only if the house is made of brick or foam blocks. In other cases, being too close may be unsafe. You can use a ready-made terrace or fill a separate area with the foundation for a sauna. Before laying the floor covering, it is necessary to consider good protection from moisture and a high-quality sewer drain.
You can make a bathhouse extension 2 years after the shrinkage of the main residential building. It is easy to bring communications into the room and make it heated. Disadvantages include a high risk of fire due to open flame. The danger increases if the frame part of the dacha extension is made of budget timber or poorly processed wood materials. Dirt and debris from the firebox easily enter the house, and high humidity destroys the wall covering, leading to inevitable frequent repairs.
Freestanding
The best option for building a bathhouse on the site. The easiest way to make it is from a log house. You will need a lightweight foundation, timber for making a roof truss, and basic material for the walls. Construction will take a minimum of time. You can safely implement your favorite design and furnace equipment with any characteristics.
The disadvantages include the use of an impressive area for construction and a large amount of building materials and improvised means. Due to the distance from a residential building, heating costs will increase, and attempts to save money will lead to a deterioration in technical parameters.
Steam room dimensions
According to fire safety requirements, it is prohibited to place steam room shelves near the stove.
When choosing the size of the steam room, you need to start from the number of people visiting it at the same time.
The most convenient option is a steam room for two. It is recommended to make ceilings no lower than 2 meters. The most optimal height is 2.3 m.
Keep in mind that the temperature decreases significantly as you move away from the stove.
You should not make the steam room too large or too small.