Repairing concrete floors with your own hands is by no means a simple “greasing” with cement mortar. Such a “blame” will not stop the destruction of concrete, will not level the floor and will not block the access of vapors through it.
The thing is that concrete, even if it has gained structural strength, lives its complex physical and chemical life for decades: it changes its structure, gains strength, and then weakens a little until it stabilizes. Fresh concrete has a number of indicators, including shrinkage rate and coefficient of thermal expansion, that differ significantly from cured concrete. For the repair of an old floor to be successful, you need to somehow coordinate the properties of the old and new concrete. One of the optimal methods for minor DIY repairs is to impart thixotropic and rheological properties to fresh cement mortar.
Options for dust removal of concrete floors
The formation of fine and medium-fine dust is a problem that sooner or later appears on all concrete floors (if concrete acts as a finishing coating). At the same time, an untreated concrete floor (without topping or impregnation) begins to generate dust almost immediately, regardless of the grade of concrete (however, the lower the grade, the more dust).
Impregnation for concrete
Various impregnations for concrete floors are designed to solve the problem; there are many of them on the market. Compositions can be classified according to the type of action:
- Sealing impregnations. Operating principle – the composition is applied in the form of a varnish to the surface, absorbed to a small depth (up to 1 mm). After application, the composition is clearly visible on the surface of the slab, so its abrasion can be controlled (for re-processing).
- Impregnations acting at the molecular level. The composition is applied to the surface, absorbed and changes the molecular structure of concrete (strengthens). The impregnation is not visible on the surface, does not wear off like a layer of varnish or paint, and lasts longer.
There are also more expensive solutions - applying a thin-layer self-leveling coating (in other words, polymer paint), or installing a self-leveling floor.
Procedure for repair work
Repairing damage found in structures that have been in use for a long time is carried out according to the following scheme:
- determine the width, depth and nature of the gap, select the appropriate composition for repairing and protecting concrete;
- open the gap, remove crumbled parts of the material, dust, and, if necessary, clean the reinforcement from corrosion;
- the cavity is cleaned with an aqueous solution and a brush (sponge, syringe), followed by removal of excess moisture;
- “expand” small cracks until they can be filled, prepare large ones for strengthening. To do this, grooves are made for laying reinforcing wire (diameter of at least 4 mm) across the gap;
- the reinforcement protruding after cleaning the cavity is treated with a special compound to prevent further corrosion;
- coating the surface to be repaired with a primer to improve the adhesion of the repair mixture to the existing composition;
- direct sealing. For extensive and deep damage, it is performed in several stages. If gradual restoration is not possible, standard measures are used to prevent premature drying of the repair composition. How to protect concrete outdoors from destruction to create the required curing conditions is decided depending on the scope of work and weather conditions.
Additionally, you can use a protective coating for concrete to prevent its further destruction and the formation of new damage. As a main function, such coatings provide waterproofing.
There are different types of coatings.
Rubber coating for concrete is one of the most difficult in terms of preparing the solution and using special equipment and equipment for application, but it has excellent performance characteristics and a high degree of waterproofing. Restoration work with rubber coating is especially appropriate for structures that are constantly exposed to atmospheric and ground moisture, including foundations.
Climatic and chemical exposure
A separate group consists of defects that arise as a result of a reaction to any chemical substance or climatic influence.
This may include:
- the appearance of light spots and stains, so-called efflorescence, on the surface of the concrete floor. The reason for the formation of salt deposits is a violation of the humidity regime or the ingress of calcium chlorides and alkalis into the composition of the concrete solution. It is for this reason that experts recommend using imported water to prepare the concrete mixture in areas with highly carbonate soils;
- destruction of the concrete floor surface under the influence of low temperatures. When water gets into the pores of the top layer of concrete, it freezes and increases in volume by 10-15%. Therefore, the microscopic pores gradually expand. The more often the freezing/thawing process occurs, the more intensively the concrete deteriorates. To combat this phenomenon, special anti-frost impregnations or compositions are used that reduce the porosity of the material;
- Corrosion of reinforcement also belongs to this group of damages. Metal mortgages become covered with rust where they are exposed. This leads to a decrease in the strength of the reinforcement and the entire concrete structure. To prevent this process, the reinforcement must be treated with an anti-corrosion compound.
All the defects described above can manifest themselves in a variety of forms. The first signs of many of them may look quite harmless, but if they are detected, appropriate measures should be taken. Otherwise, the situation may worsen dramatically over time.
Classification of concrete damage
As a result of various internal and external influences (see Table 1), concrete can crack. This applies to large and small objects stressed by external loads or under tension from their own weight. To understand why concrete cracks after pouring, you first need to know the classification of cracks.
Spalling and cracks in concrete vary:
- by nature – through and superficial (deep and shallow). To determine the depth, various types of probes and ultrasonic devices are used;
- in width – microscopic (hair-like), medium (over 1 mm), wide, massive (more than 10 mm). To determine the width of cracks, measuring instruments of varying accuracy and nature are used;
- by exposure of reinforcing elements - promoting corrosion (up to the reinforcement, with its complete or partial exposure) and passing between the reinforcement elements (along the edges, in the spaces);
- by time of formation - primary (during the process of hydration, shrinkage of the concrete mixture) and secondary (during the operation of the structure);
- by location - at the corners and edges of a concrete object, over the entire surface, throughout the entire volume, local (for example, in the area of applied stress or periodic mechanical influences);
- according to the degree of impact on the structure - reducing strength (5...50%), destroying (reduction in strength over 50%).
Important: if the expected concreting and operating conditions are violated, the occurrence of cracks is inevitable, therefore a margin of 10...30% is included in the design conditions.
Causes of cracks and other defects in concrete floors
There have always been problems with concrete. It is believed that the main reason for the appearance of cracks after concreting the floor has always been residual stresses in the structure of the material:
- As a concrete floor sets, the surface loses water unevenly and hardens faster than deeper layers. The inner layers of concrete put pressure on the surface, causing it to peel and crack;
- It is quite difficult to ensure uniform distribution of cement grain, sand and water in the solution, even with the most thorough mixing. Therefore, the surface of a concrete floor is always covered with an invisible network of microcracks and chips;
- Water flowing into seams and joints with subsequent ice formation. In cold weather, due to the ice crust, the concrete slab can even rise above the cushion.
Laying a floor or platform with a concrete screed is considered one of the simplest technological operations. Simply mix the ingredients and pour the mixture onto the floor. But it is almost never possible to do this in one batch; you have to pour the concrete floor in several approaches.
The appearance of cracks on the concrete floor means there are problems with the foundation or building frame
Hence the problems, for the imperfection of the technology you have to pay later by repairing the concrete base of the floor.
Advice! There are two ways to avoid the problem. Firstly, you must fill the floor in one step, for example, from an automixer. Secondly, use tampers and vibrators, which perfectly squeeze air out of the concrete mass, and this is another factor contributing to the occurrence of cracks. Thirdly, additives and plasticizers must be added to the concrete mass.
Local concrete spalling indicates a violation of mixing technology
Experienced motorists can confirm the fact that a concrete floor poured in a garage in one step on a sand base requires virtually no repairs for 20-40 years of service. The exception is when the owners do not insulate the gates and do not make a drain to drain rainwater at the entrance. Then the repair of the concrete floor at the entrance to the room is almost guaranteed.
Mixer and rule
All repair compounds for concrete must be mixed: ready-made with water; homemade - with PVA suspension. It is impossible to knead manually: the finished solution must be as “dry” as possible, i.e. water or suspension is added in a minimal amount. A very viscous mixture will have to be “pounded” for too long to achieve the desired homogeneity, and irreversible changes will begin in it, deteriorating the quality of work.
To mix small volumes of repair building compounds, I use an electric drill or hammer drill at low speeds with a special attachment - a mixer. The principle of its operation is no different from a cocktail mixer.
In tool stores you can find a wide selection of different mixers, sometimes in completely bizarre configurations. But a mixer, in no way inferior to them, is made from an even rod 8-10 mm in diameter and half a meter long, the end of which is bent into a ring or simply folded in half.
The kneading lasts 3-5 minutes. When kneading in a bucket, move the tool in a circular motion; in the trough - transverse zigzag. You should have a bucket of water at hand - after kneading, the mixer should be rinsed immediately by immersing it in water and turning it up to high speed. When mixing with a hammer drill, you should never turn on the impact mechanism: the entire room and you will immediately find yourself covered in a thin layer of concrete.
In addition to a mixer, to repair a concrete floor you will need a rule - a wide, one meter, spatula. A plaster float will not work: it will not smooth out the concrete properly, and will wear off on it itself. The rule, on the contrary, is to purchase a factory one, and you should not skimp on it, especially since it is inexpensive. Concrete is a good abrasive, and if the middle of the rule turns out to be “eaten away,” then the floor will turn out humpbacked.
Floor condition assessment and initial preparation
The restoration of structures inside and outside the premises precedes the preparatory stage. The site must be fenced, lighting, delivery and preparation of materials and equipment must be organized.
Floor repairs will only be successful if a thorough inspection of the surface is carried out. During this stage, the type and volume of defects, the causes of their occurrence, and what must be eliminated are determined.
The initial assessment of the structure is carried out using visual inspection, for which the following categories are provided:
- good condition of the concrete floor;
- efficient;
- limited capacity;
- emergency (inoperable) condition.
To assess the danger of detected defects, the following categories are used:
- A – defects, damage to critical structures. This poses a danger, even to the point of their destruction. Such floors are taken out of service for repairs, restoration, and strengthening;
- B – defects do not pose a risk of destruction, but over the course of operation they can provoke damage to other components and elements; when they develop, they pass into the first category;
- B – these are local defects and damage. Even when developed, they cannot affect the damage and load-bearing capacity of the main structures.
In order to optimally select the work technology and repair material, a detailed examination of the technical condition of the concrete floor should be carried out. To do this, you should read the technical documentation, inspect the object and conduct instrumental surveys.
As a result, the physical and mechanical characteristics of concrete are assessed (tensile/compressive strength, retention of passivation properties in relation to reinforcement, condition of reinforcement, chloride content). Determine the condition of the artificial stone (moisture content, density, water resistance, etc.). The inspection should be carried out at a positive temperature, from +5 to +10 degrees.
Concrete floors are characterized by several types of damage:
- chips in areas where structures meet;
- reinforcement reaching the surface;
- reinforcement mesh corrosion;
- temperature-shrinkage cracks;
- abrasion and other mechanical damage.
Violation of waterproofing, general structural integrity, and sealing of seams also require repair measures
As a result, several groups of damage can be identified:
- three degrees of reinforcement corrosion (uneven, local, continuous);
- five degrees of concrete damage. The first is characterized by surface contamination (fats, oils, algae, mosses), shrinkage cavities, cracks, but at the same time the surface retains high strength. For the second - a crumbling, dilapidated surface with peeling. There are small chips, shrinkage cracks, and some efflorescence. Strength is reduced by 10-15% of the original. With the third, inactive cracks up to 0.2 mm appear, rust, chips, continuous efflorescence appear, strength is lost by 20%. In the fourth case, inactive and active cracks larger than 0.2 mm appear, there is exposed reinforcement, chips, and severe efflorescence. The fifth degree of destruction is characterized by loose concrete, exposed reinforcement with loosely fixed, exposed filler, deep chips, and internal voids. In some places the material completely loses its strength.
What to do? Damage belonging to the first group does not require immediate action. They can be eliminated during preventative maintenance. If the defects belong to the second group, repairs will provide additional durability of the structure. This must apply to the materials used - they must also be durable. Cracks located in the area where the reinforcement is located must be urgently repaired.
In case of more serious defects, they begin to restore the structure according to a specific feature. The technologies and materials used must ensure the durability and strength of the structure. In some cases, individual projects are developed to repair concrete floors.
If the damage is accompanied by the simultaneous action of the aquatic environment, it is recommended to additionally use penetrating materials as a protective composition when carrying out repair work.
If the surface operates in conditions of variable temperatures, in aggressive conditions, protection of the reinforcement is mandatory, the structure of the artificial stone is compacted, and chemical resistance is increased.
Cracks opened by more than 0.5 mm, voids, are filled by injection. This will increase the load-bearing capacity and restore the solidity of the floor. Repairs are carried out after the development of cracks has ended and the cause of their formation has been determined.
Protection and prevention during concreting, means and methods
To prevent concrete from cracking, the hardening mixture must be protected from external influences until it is completely cured and reaches brand strength. For this, experts recommend:
- make plastic shrinkage of the mixture minimal;
- ensure the absence of impacts that reduce the strength and durability of the composition.
At the same time, according to regulatory documents, acceptable dates for starting work on concrete objects are those at which 100% brand strength is achieved, and removal of the formwork is expected after reaching 70% readiness of the composition.
- careful selection of the percentage composition of the mixture, taking into account operating conditions;
- vibration compaction, including repeated compaction if necessary. Preference should be given to the machine version, since manual does not provide the necessary guarantee of the absence of cavities and the correct distribution of volume throughout the formwork space.
To avoid the problem of “concrete cracking as it dries,” it is also important to take care of the mixture during the curing process.
- Protection of concrete outdoors from excessive dryness and wind, daily and long-term temperature changes. To do this, depending on the air temperature, measures such as covering with film, moistening the concrete and formwork, maintaining a thin layer of water on top of the poured mixture, and thermal insulation of the mass are used.
- Protection of concrete from destruction (mechanical and chemical damage) until it reaches its design strength. For this purpose, the formwork can be covered on top with shields over film or thermal insulation.
Polymer coatings for concrete during the curing process (film) are laid, whenever possible, as a single piece or with pieces overlapping at least 30 cm and the seams are taped.
Shrinkage cracks in concrete mortar
What you need to know about concrete? This is a multicomponent solution in which chemical reactions occur. The main chemical reaction of concrete mortar is hydration between the cement stone and water, as a result of which the plastic mixture turns into durable stone. These processes are characterized by internal stress of the structure.
The first shrinkage cracks may appear on the concrete surface in the first 6-8 hours after pouring, as it contracts, releasing moisture. Cracks may also appear during the further period of strength gain. What can affect the appearance of cracks:
- Incorrect proportions of concrete mortar components:
- excess water;
- excess cement;
- absence of plasticizers and others.
- Incorrect initial care of the setting mixture. Moisture should not leave the solution too quickly:
- if 10% of the moisture evaporates in a short period of time, then 18% of the strength of concrete is lost;
- if 20% moisture, then 30% strength;
- if 30% moisture, then 50% strength.
Therefore, the solution is protected from drafts and direct sunlight. To do this, the surface is moistened and tightly covered with film. In general, small shrinkage cracks (hairline cracks) are normal for concrete, but their width should be no more than 0.1 mm.
Measures to save the concrete surface from cracking
The best method of dealing with damage in concrete is to prevent it from occurring.
Therefore, it is worth taking care of the quality of the concrete structure in advance:
As you can see, there is nothing impossible or inaccessible to repair a concrete surface with your own hands. Of course, it’s better to avoid such troubles, and then you won’t have to rack your brains over how to repair a crack in concrete.
In any case, high-quality artificial stone is not only durable, but also susceptible to repair work, which will extend its service life for many years. The main thing is to do everything correctly and carefully.
Source
How to repair cracks?
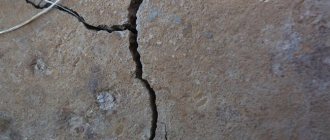
The types of deformation described above lead to the screed starting to crack. This is bad because over time, even the smallest recesses expand, and because of them, major repairs of the floor will have to be done. Cracks are one of the most severe types of destruction, requiring emergency removal, so they must be eliminated in a timely manner. Cracks can be small or deep.
Small-diameter cracks are considered to be damage up to 2 mm wide.
You can repair the screed yourself as follows:
Use a grinder to widen and deepen the crack
Particular attention should be paid to the fact that after expansion, the edges of the crack should not crumble, but should be absolutely solid. If you can’t use a grinder, you need to stock up on a hammer and chisel. After expansion, the cracks need to be cleaned
Only a construction vacuum cleaner is used for this purpose. The cleaned areas are coated with epoxy primer. This must be done several times until the mixture is completely absorbed into the concrete. After the primer has completely dried, the damaged areas are filled with a mixture of Rizopox 3500 and quartz sand. The mixture should fill the crack just above the surface level. After the mixture has hardened, the repaired areas are sanded and cleaned.
Repairing minor damage takes little time and allows you to do without special tools.
If large cracks have formed in the screed - more than 2 mm in width - the repair process will proceed according to the following scheme:
- As in the first case, the cracks must be cut to their full depth.
- After expanding the crack across it, it is necessary to make several grooves.
- Small repair seams (1.5 cm long) are made along the grooves at intervals of 2 cm.
- The prepared recesses should be cleaned using a construction vacuum cleaner, treated with a primer and left to dry.
- After the primer has dried, the repair joints will need to be filled with pieces of reinforcement, metal staples or wire.
- Next, the cavities are filled with liquid mortar made from a mixture of sand and cement. The surface is leveled with a lath and sanded after drying.
Reinforcing the screed helps protect it from stress and extends its service life. There is also a little trick that will help you find out whether the cracks are expanding over time or not. To do this, you need to glue a paper strip to the edges; if it breaks after a while, then the forecasts are disappointing. If the piece of paper remains the same as it was, then everything is in order. But this method requires a lot of time.
Selecting a mixture for repairing a concrete surface
Before you start repairing the floor in an apartment with your own hands, you need to prepare a mixture for restoring concrete surfaces and structures. They are presented in large quantities in construction stores. In order to choose the right brand of mixture, you need to determine the degree of damage to the concrete surface:
The purpose of the repair mixture must be indicated on the packaging. Such manufacturers of mixtures for restoring concrete surfaces as Emaco, Birss, Ceresit, and Bars deserve attention.
You can use universal repair mixtures, such as Ivsil Render.
Since the price of special thixotropic compositions containing reinforcing microfibers and polymers is quite high, for a small amount of work the mixture can be prepared independently. To do this, take 1 part PVA glue and mix it with 4 parts water. Using this solution, using a construction mixer or a special attachment on a drill, mix the sand-cement mixture in a ratio of 1:3.
Repair compounds for concrete
In order for the restoration of artificial stone to be successful, before choosing a repair composition, a thorough inspection of the destroyed structure is carried out and an analysis is performed. The mixture is selected taking into account the following factors:
- the degree of loading of the structure, its load-bearing capacity;
- depth of damage;
- operating conditions of concrete (humid environment, temperature conditions, degree of exposure to aggressive environments);
- accessibility to the damaged area;
- expected scope of work.
If you are repairing the concrete surface in a visible area, it is important to take into account aesthetic requirements
Major Damage Repair
The large damaged area is filled with new concrete mortar. First, the surface of the structure is cleaned of loose pieces and dust. A clean, solid base of good quality concrete should remain.
Filling is carried out with a cement composition with complex additives that improve its performance characteristics. Good results are achieved by fast-hardening polymer mortar or fiber-reinforced concrete.
For concrete repair with cement mortar to be successful, it is important to create conditions for its reliable adhesion to the base being restored. Two methods are usually practiced:
- Continuous filling of the entire area of the structure is carried out with a solution more than 100 mm thick. If partial restoration is carried out, the concreting site is deepened.
- Better adhesion between old and new layers occurs when a steel reinforced mesh is attached with dowels to the base being restored.
Before pouring the solution, the surface of the structure being repaired is treated with epoxy, acrylic or other adhesive compounds that provide better adhesion.
Dry mixtures for concrete repair
All dry mixes for concrete repair contain cement, which ensures optimal compatibility with the concrete structure being restored. There are many compounds from different companies on the construction market.
Apply the repair composition in a layer 5-50 mm thick on horizontal and vertical substrates. To restore the ceiling, it is optimal to maintain a mixture thickness of 30 mm. Better adhesion is ensured by pre-treatment of concrete with a primer or primer.
concrete repair mixture OSNOVIT
According to the type of application, dry mixtures are divided into the following types:
- for work at temperatures above +5°C;
- at negative temperatures;
- for waterproofing and providing protective properties;
- for repairs that do not change the geometry and load-bearing capacity of the concrete structure.
The scope of application of dry mixtures is wherever quick repairs are required to eliminate defects.
Pros:
- good adhesion to the old base;
- high mechanical strength of the frozen composition;
- due to additives, the mixture does not shrink;
- possibility of eliminating defects up to 100 mm deep.
The disadvantage is the high cost and short shelf life.
Thixotropic mixtures
In essence, these are analogues of conventional dry mixtures, but with improved characteristics. Popular manufacturers are: MAPEI, BASF, Sika. The thixotropic composition for concrete repair is based on cement, sand, and complex additives. Mixtures with polymer fiber are considered the most effective.
Sika concrete repair mixture
The optimal layer thickness is from 10 to 30 mm. The mixture is used when repairing monolithic and prefabricated concrete structures, for sealing seams, and restoring protective layers.
Pros:
- resistance to mechanical loads and abrasion;
- good adhesion to the base;
- resistance of the frozen composition to moisture and low temperatures.
The downside is the high cost and inability to use at sub-zero temperatures.
Epoxy and polymer compounds
The main purpose of the compositions is the repair of self-leveling floors, injection work, and the organization of protection of a concrete structure from the effects of destructive factors. Popular, "Technoplast", "KrasKO".
polymer composition for concrete repair Elakor
Sometimes the composition is applied to improve the adhesion of the base to the new repair layer. Polyurethane mixtures eliminate leaks and prevent the influx of water.
Pros:
- resistance to mechanical and chemical stress;
- good wear resistance;
- high adhesion to the base;
- good waterproofing properties.
The disadvantage is the short viability period.
Technologies for eliminating major damage
There are several technologies that can help repair major damage in concrete structures.
Injection
This technology is used to restore the integrity of structural elements in basements, tunnels, foundations, especially block-type ones. Its essence is that the gap is filled with repair mortar under strong pressure. For this purpose, special equipment is used - injection pumps (manual models are produced for everyday use), packers - tubes. With their help, the filler is introduced into the hole.
For such repairs, one of three compositions is used:
- Polyurethane or epoxy resins . These products are effective in sealing small cracks and form a seamless structure with the thickness of the concrete. One of their advantages is fast setting. Resins have waterproofing properties and help eliminate leaks. Epoxy compounds are used when the structure is constantly in contact with chemically active media.
- Polycement mixtures (microcements) . These preparations are made on the basis of finely ground Portland cement. Auxiliary components include sodium carbonate filler, lime and other additives. Microcements are indispensable for major damage in a concrete structure.
- Waterproofing solutions . Polyurethane mixtures are suitable for restoring constantly wet areas, especially in sewer and water supply systems. Acrylic gels, when reacting with water, increase in size several times. They not only cover the cracks, but also dry the concrete a little.
Self-expanding cords
The use of bentonite cords is another way to repair cracks caused by shrinkage and deformation of concrete structures.
Bentonite cord.
The rope is made from sodium bentonite and rubber. This material is often used for waterproofing joints. Under the influence of water, it increases 16 times, and tightly closes even the smallest cracks.
Cords are produced in various widths with a length of up to 40 m. The cross-sectional shapes are square, rectangular, or round.
You need to choose the right harness parameters. The quality of the repair will depend on this.
The advantages of the material include:
- environmental friendliness;
- low cost compared to other repair compounds;
- ease of installation;
- resistance to dynamic loads;
- chemical passivity;
- resistance to low temperatures;
- long service life.
Installation features
Prepare cracks for repair as described above. Check that the cord is completely dry. It is placed in the middle of the hole or closer to the side that gets wet more.
The cord is attached to dowel-nails and self-tapping screws. The distance between the fasteners should be about 45–50 cm. If this method of fixation is not possible, use a polymer adhesive solution (recommended at low temperatures), sealant, or rubber mastic.
The cord pieces are overlapped (4–5 cm), for which they are preheated.
Connecting ends is also practiced. To do this, the ends of both cords are cut so that the contact area is as large as possible and secured with polymer-based glue. The edges are trimmed and joined to the transverse previously installed elements, forming a closed system.
The empty space is filled with sealant, preferably polyurethane based. Then the surface to be repaired is leveled, and excess mixture is removed.
Expert opinion
Levin Dmitry Konstantinovich
This technology is convenient because work can be carried out even in the cold.
Shotcrete
This method is used for foundations, underground parts of buildings, facades. Shotcrete involves filling the damage with a jet of sand-cement mixture supplied under high pressure. Repairs are carried out using dry and wet technology.
Scheme for sealing cracks in concrete using shotcrete.
For this method, shotgun installations have been developed that supply the solution at a speed of 80 m/s under a pressure of 50–350 kPa. Upon contact with the surface, the solution compacts and covers all cracks.
Dry method
The shotgun installation uses two sleeves. One by one, a dry mixture based on Portland cement, modifying additives, and fine aggregates is supplied. In other words, water. The components are combined in a nozzle, and the finished solution is supplied to the surface to be repaired. The dry method is convenient because it does not require pre-mixing the solution.
Wet method
In this case, the ready-made mixture enters the installation. Despite the fact that kneading takes a lot of time and effort, this method has its advantages. The advantages are reduced dust formation and minimal loss of composition due to reduced rebound of the working solution from the surface.
For each method, their own models of torquet equipment are produced. In addition, the dry method requires certain professional skills. Even a beginner can do wet torquetting.
The technology is used not only for concrete structures. It is effective in restoring brick and stone masonry.
Have you ever had to seal cracks in concrete?
It happened, it didn't happen
Video description
How to strengthen concrete that is peeling off from the base is described in the video:
Having found out why the floor screed cracked and what to do, you can begin repairs.
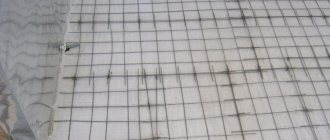
- First, by tapping, areas of delamination and voids are identified and marked with chalk.
- In the marked places, holes are drilled in the screed at a distance of 15-20 cm from each other.
- After cleaning and priming, an epoxy mixture is poured into the holes.
- It also seals cracks.
- After the mixture hardens, the holes are filled with liquid cement mortar.
When drilling repair holes, there is a high risk of damaging the cable Source sense-life.com
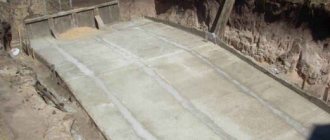
Major floor repairs
Applying a thin repair layer to a concrete surface
This type of repair involves a complete replacement of the top layer of the screed. It takes place in several stages:
- After complete dismantling of the old screed, a viscous cement-sand mixture is prepared in a ratio of 1:3 and laid on the floor according to pre-set markers.
- The laid portion of the solution is leveled using the rule. The next portion can be laid after the previous one has been completely leveled.
- When the concrete composition has hardened, the markers can be removed and the holes can be filled with mortar.
How to repair a delaminating foundation
Peeling of the screed from the rough concrete base is a fairly common defect. This creates voids between the screed and the base. The latter circumstance, in turn, reduces the strength of the screed. You can identify peeling areas by tapping the floor with a metal rod or hammer. A dull sound will indicate the location of the void. Repairs also require “tearing” of the edge of the card, the place where the screed is lifted, and cracks. If the area of delamination is insignificant, it is enough to cut it out and fill the hole with a repair compound. However, practice shows that there are usually several zones of detachment.
If the base peels, you need to use a repair compound
, it is better to use the injection method for repair
- First, as we have already written, you can determine the contours of the damaged area by tapping;
- In the defective area, we drill a hole with a radius of five millimeters to a centimeter, in increments of two and a half centimeters.
- We pump an epoxy-based compound into the hole using a syringe. The viscosity of the composition must be reduced. This operation is best carried out in several stages so that the solution is absorbed into the base and completely fills it;
- You need to stop pouring the solution into the cavity only when the level of the repair composition stops decreasing there.
- Injection stops when the level of repair compound in the drilled holes stops decreasing.
Next we apply the repair coating. However, you need to wait a day for the mixture to harden in the holes. PolaRemont.ru recommends that you completely dismantle the worn screed and fill in a new one if the level of damage exceeds thirty percent.
Repairing cracks in concrete using self-expanding cords
This method is suitable for repairing defects that occur on the surface of swimming pool bowls, for restoring external walls and monolithic foundations. Stages of repair work:
- Cutting a crack, removing weak elements and dust.
- Measuring the width and depth of the crack.
- Selecting a suitable self-expanding cord or tape.
- Laying the cord or tape into the prepared cavity.
- Fill the remaining space with polyurethane sealant using a mounting gun.
What are the consequences of not taking action after identifying floor defects?
It is worth soundly assessing the risks of possible consequences and the costs that the company operating the floors in need of repair will incur.
- Increasing logistics terms. Transport moving through warehouses is forced to reduce speed.
- Industrial accidents. Ruts, holes, potholes and broken seams can cause product and warehouse items to fall and become damaged.
- Destruction of technology. The wheels of equipment that moves on a destroyed concrete base are subject to increased wear.
Slow sales of products, defective goods and broken equipment lead to loss of company funds. There is not always extra finance for additional production and replacement of equipment. Timely elimination of floor defects will be a much more prudent and rational decision.
If the defect is small, destruction does not occur very actively. However, as soon as it grows to a certain size, comparable, for example, to the size of a vehicle wheel, problems begin to grow exponentially. It is better not to let the situation get worse. Once a defect is discovered and its possible consequences are known, repairs should be carried out.
Which sealant to choose for exterior and interior use
The choice of concrete sealant depends on the following factors:
- Location of damage;
- External or internal method of application;
- At what temperature is the sealant used;
- Will the surface be painted after treatment?
After the buyer has chosen a sealant for joints in concrete, there are important points to remember:
- Volume. The consumption is determined in advance, otherwise the excess will be a waste of money.
- Best before date. There is no benefit from expired sealant; it does not perform its functions.
- The packaging must not have cracks or other damage. If air gets inside, the composition will dry out.
Note! Each concrete joint sealant is designed for a specific location and will only be effective if the instructions are followed.
Sealants are divided into types according to the place and purpose of use. These factors determine its properties and consistency.
- High temperature (heat resistant) sealant for cracks in concrete. Auto mechanics use it. Often used for stoves and fireplaces. Suitable for indoor use, so the room must be thoroughly ventilated. The damage is repaired with a construction gun.
- Water resistant. Suitable for sanitary ware (baths, sinks, showers). Suitable for both indoor and outdoor use.
- Sanitary. Repairing of chips is carried out indoors. Resistant to steam once completely dry.
- Universal. It is used both inside buildings and outdoors. It is used to repair damage to metal, wood, glass and plastic. Withstands both low and high temperatures.
- Outer. Good for sealing cracks in ceramics, concrete and metal. Insensitive to direct sunlight.
- Liquid. Fills cavities in heating systems. Self-sealing. Eliminates leaks in the system.
How to repair potholes in a screed
Potholes can occur for two reasons:
- In places of voids in case of violation of work technology;
- Mechanical loads on the old screed are high.
It is possible to delay the moment of dismantling, “extending life” only by promptly carrying out repairs.
It works better using the following technology:
- Make a neat cut along the rectangular perimeter of the pothole. Its depth should be similar to the thickness of the screed.
- The damaged material is removed with a chisel. Use a hammer drill if the amount of work is large.
- Clean out the cavity that was created after removing part of the screed. Remove all debris and dust. A vacuum cleaner will help you.
- We prime the prepared surface. Be especially careful when choosing a primer.
- We fill the pothole with repair compound. Use a spatula. Among the brands producing the composition, it is better to focus on brands such as “KEMA” or “IVSIL RENDER”. Level the surface of the created patch with a lath. Please note that if the depth of the hole is more than five centimeters, then it is better to pour the repair composition in several approaches.
- When the composition has hardened, remove any irregularities with a sander.
Causes of screed defects
Damage to a concrete floor screed does not occur on its own. For this, there must be reasons contributing to the appearance of one or another type of defect:
- Defect - Cracks and gouges in the screed. Reasons - There are no shrinkage joints in the floor. The filling was carried out with a solution of the wrong consistency. Weak reinforcement of the base during construction.
- Defect - Small holes all over the surface. Reasons: When pouring, air bubbles remained in the solution. The screed was poured without priming the surface.
- Defect - Peeling of the screed. Reasons: Pouring was done on a poorly cleaned surface. Incorrect preparation of the base before screeding.
- Defect - Heavy dust on the screed. Reasons: Intensive use of coating. The screed was made with low-quality concrete.
What loads destroy concrete?
To better understand the nature of destruction caused by operational loads, we will highlight their main types:
- static. Industrial equipment and loaded racks in warehouses constantly put pressure on the operating floor. As a result of static loads, cracks appear on it;
- dynamic. The movement of pedestrians and vehicles, shock loads lead to the formation of chips and cracks;
- abrasive. Friction provokes destruction of the floor surface;
- vibration. As a rule, vibration loads come from turning and metalworking equipment, which also threatens the development of cracks;
- chemical. The use of caustic cleaning agents and shock cleaning methods, exposure to aggressive liquids on the base leads to structural damage and gradual destruction of the surface layer.
We eliminate a hole in the floor: on a concrete screed, on a wooden screed, between boards
We will send the material by email
A hole in the floor can appear for various reasons, ranging from old age to irresponsible attitude towards the coating. The method of sealing the defect is selected depending on the nature and type of damage, as well as the material from which the finishing floor covering is made.