Experts have been noting for many years that concrete floors have gained the love of consumers and are widely used. This position of concrete floors is due to their operational properties and excellent characteristics. Thus, they are distinguished not only by a high degree of strength, but also by a low dust separation rate, resistance to chemical influences and deformation. In addition, the cost of concrete floors is low, which is also their undoubted advantage. Despite the many advantages, sooner or later repair of concrete floors is inevitable.
It is obvious that no matter how durable the floor is, it is constantly exposed to a variety of influences: mechanical or chemical. This leads to the appearance of defects of varying complexity on the surface of the coating. However, modern technologies and materials make it possible to successfully repair most damage and restore the original aesthetic appearance of concrete floors.
Obviously, timely and high-quality repairs of a concrete floor will increase its service life and eliminate unwanted financial and time costs for laying a new floor.
Restoring a concrete floor: repairing cracks
Before starting restoration work, it is necessary to conduct a thorough diagnosis of the damage and determine the causes of its occurrence as accurately as possible. This will allow you to choose the right technology for eliminating defects.
Causes of floor defects
Today, all the causes of various defects in concrete floors can be combined into several groups.
Destructive action of soil
Experts include heaving of the soil in winter in poorly heated rooms as the main problems; poor compaction of bulk soil; shrinkage of the structure that occurred over time; erosion by groundwater and many other problems.
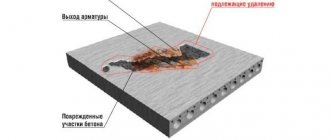
In such situations, the exposed concrete coating may look quite attractive and comply with the existing operating conditions, but if internal defects are detected, a major reconstruction is necessary.
Various internal factors
These usually include the formation of cracks as a result of shrinkage or insufficient care of the floor surface in the first hours after installation; peeling of a layer of concrete from the surface. If such situations arise, the surface of the concrete floor is subject to restoration work only after carrying out the complex repairs necessary in a particular case.
The influence of external negativity
An external factor that influences the condition of a concrete floor and leads to its destruction can be considered dusting of concrete as a result of natural wear and tear of the coating surface; potholes and chips from impact on the floor with heavy objects; chemical corrosion.
If the damage is local in nature and does not affect the entire surface of the floor, then measures are taken to eliminate existing defects and strengthen the floor with special compounds.
Otherwise, when damage is widespread, eliminating defects will not be enough. Experts recommend removing the old concrete coating and installing a new floor.
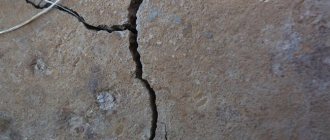
Today, all concrete floor defects are usually divided into several groups depending on their complexity. The most common problem with such a floor is considered to be the appearance of cracks.
Repairing cracks in concrete floors
Undoubtedly, cracks on the surface of a concrete floor can be different, both small and larger and deeper. Repairing deep cracks is more complex and requires more time and money.
Repair of small cracks
Such repair of cracks in a concrete floor does not take much time, does not require the use of massive and complex equipment, and, accordingly, takes less time.
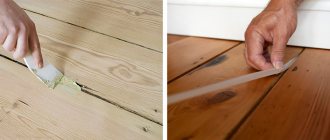
So, eliminating a crack must begin with a thorough inspection. It will help identify the presence of chips near it, which, if ignored, can lead to negative consequences, in particular, to the appearance of holes in the floor surface.
To prevent this situation from occurring, you need to use a chisel and run it along the crack, tapping the tool with a hammer. This measure will help detect hidden chips that can later be eliminated.
Using the same chisel, the crack in the surface of the concrete floor is shaped into a regular cone. Then dust and all debris are removed from it, and the crack itself is watered.
Expanding the crack with a chisel will help identify and eliminate any weak areas before repair.
This was the preparatory stage for repairing a crack in a concrete floor. After its completion, you should prepare a cement mixture to which PVA glue is added. The result should be a fairly liquid composition, which is poured into the crack.
When pouring the mixture, remember that it shrinks. That is why you should pour the solution slightly above floor level. Excess is removed using a spatula or a regular wooden slats.
After the cement mortar has dried, the floor surface is treated with a grinding machine, or, if it is not available, with an abrasive wheel. To eliminate concrete dust, the floor surface is locally flooded with water.
Repair of deep cracks
If quite deep and large cracks are found in the concrete floor, then it will no longer be possible to get by with improvised means.
So, to start work, you need to use a circular saw to make special cuts along the existing cracks. They are necessary in order to completely eliminate part of the concrete floor that has undergone deformation.
It is worth paying attention to the fact that when working with a circular saw, a diamond blade is used.
Using a chisel and hammer, remove all concrete from the cut. The resulting “flap” is cleaned of dust, that is, filled with water. In addition, this will improve the adhesion of the mortar and concrete.
As in the case of small cracks, pre-prepared cement mortar is poured into the crack slightly above floor level. After this, the floor surface must be grouted using a grinding machine.
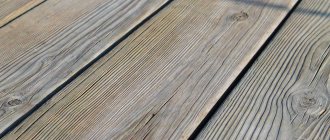
Filling a treated crack with a repair compound
After removing excess mortar, you can enjoy the look of a smooth concrete floor.
How to repair shrinkage cracks
When shrinkage cracks occur, a special machine is used to “expand” them to a depth of up to 5 mm. Then the concrete dust is removed, the crack is primed and filled with a repair compound.
The repair composition used must not shrink!
After the repair work has been carried out and the composition poured into the crack has completely hardened, the floor surface is sanded.
To prevent the occurrence of shrinkage cracks, experts recommend the use of special mineral-polymer complexes, which are added to the concrete composition at the stage of mixing it. These compounds compact the structure of concrete and compensate for its shrinkage.
If the concrete is cracked
When cracks of any nature appear on the concrete mass, it is necessary to monitor the process and, if possible, stop it. At the stage of curing the mixture, this can be timely moistening or protection from the wind. Termination of the process will significantly reduce the problems of repairing cracks in concrete and will preserve the functionality of the structure.
If cracks are detected in a structure that has been in operation for a long time, you should:
- conduct an inspection of all parts of the building (structure) to determine the distribution of cracks. This will allow you to determine the cause of cracking;
- identify the nature of the detected damage (superficial or through, extensive or microscopic, with or without exposed reinforcement);
- determine the opening width of cracks in concrete and their geometry (the degree of narrowing as they go deeper into the mass, tortuosity, etc.).
It is necessary to decide on a repair composition for sealing cracks in concrete after determining the nature and extent of damage, and also depending on the time of occurrence of damage.
The cracks appeared before hardening - it is necessary to arrange additional vibration compaction, two or more times, until the cavities are eliminated. If cracking begins during the hardening process, cement or concrete mixture is rubbed (poured) into the formed cavities and the surface is rubbed down. After 5...6 hours after the mixture has hardened, the cracks that have appeared are cleaned, dust is removed and the mixture is grouted (filled) until the surface is completely leveled.
Most often, cracking occurs after several months or years of use. In this case, depending on the nature and extent of the damage, a mixture for concrete repair is selected:
- by injection. With this option, a relatively liquid “cement paste” is fed through a polymer pipe directly into the crack under pressure. The plasticity of the composition and the pressure make it possible to repair deep and tortuous cracks in the material;
- grouting/filling method. Depending on the location of the surface (vertical, horizontal, inclined), a more or less thick mixture is selected and the method of compacting it in the cavity;
- shotcrete. In this case, a complete repair of concrete is carried out - eliminating damage, strengthening the surface, removing the surface layer that has lost the necessary strength.
The composition of the mixture for repair work includes cement, fractionated sand, water and polymer or organic additives to increase the plasticity of the mixture. Typically, PVA glue is used as a plasticizing additive.
Ready-made mixtures for concrete repair are conventionally divided into:
- areas of application - restoration of road and floor coverings, stressed structures, structures with exposed reinforcement that requires protection;
- complexity of the composition - one-, two- or multi-component;
- conditions of use - at low temperatures, quick-hardening, castable (for horizontal damage) and thixotropic (for vertical surfaces).
Important: the permissible thickness of bulk mixtures is up to 100 mm, quick-hardening mixtures are up to 40 mm. Concrete protection must be provided during the curing process, just as during the concreting process.
Only a master can finally decide how to repair cracks in concrete after inspecting the object and observing (analyzing observations) the damage.
Other types of concrete floor defects
Today, in addition to traditional cracks, there are quite a large number of other concrete floor defects that must be eliminated. Their complexity determines the need to use certain equipment and technologies for restoring concrete floors.
Local detachments on the front surface
If local delaminations from the underlying base occur on the surface of the concrete floor, you can use special compounds.
As a rule, these solutions are based on epoxy resins, characterized by a low degree of viscosity, and are introduced under the facial covering by injection.
In case of large-scale delamination, strengthening the concrete floor by injection is no longer possible; it is necessary to remove the destroyed top layer and pour a new screed
Quite often, potholes appear on the surface of a concrete floor. Most often, their appearance is associated with heavy objects falling onto the floor.
Potholes on the surface of a concrete floor are filled with cement
Existing potholes must be thoroughly cleaned of debris, dust and oils, if any. Then priming is carried out, improving the adhesion of concrete and repair composition. As a rule, prepared potholes are filled with a cement composition with the addition of strengthening substances.
It is recommended to pay special attention to the conditions in which the repair composition must harden. Thus, areas of the concrete floor that have undergone repairs must be kept under film in conditions of high humidity. In addition, for 8-10 days the floor surface should be protected from any loads.
Elimination of horizontal irregularities
Horizontal unevenness is the result of poor-quality casting of the concrete floor and violation of appropriate technologies. To eliminate these irregularities, a special machine is used, with which the base of the concrete floor is milled to a depth of 1 cm.
After this, the surface is sanded until the unevenness is completely eliminated. Then it is necessary to remove the concrete dust and saturate the floor with polyurethane primer. An epoxy analogue can serve as an alternative.
The prepared area is filled with a repair compound, and after it hardens, the surface is sanded again.
Loosening the top layer of concrete
Wear on a concrete floor can lead to loosening of its surface. If damage of this nature does not exceed a depth of 3 mm, then in such an area it is enough to remove the top layer of concrete by grinding. This is carried out until a durable surface is obtained, which is thoroughly cleaned of dust.
If the top layer of the concrete floor is slightly damaged, it is simply polished
Then the concrete is treated with special strengthening and dust-removing compounds that have a chemical effect. An alternative can be polymer or polymer-cement compositions.
Thus, by analyzing a number of reasons that lead to the appearance of certain defects on the surface of a concrete floor, the types of these defects and elimination technologies, we can conclude that the process of restoring a concrete floor is quite labor-intensive and responsible.
How to grind a concrete floor - video
To carry out high-quality repairs of concrete floors, you must ensure in advance that you have all the necessary tools and equipment. Directly when carrying out restoration work, all available nuances should be taken into account and technology should be followed. Otherwise, the result will be short-lived.
The popularity of concrete floors is explained by numerous advantages, such as resistance to external influences, low cost, and durability. But, despite such remarkable characteristics, the concrete surface from time to time needs restoration and improvement, which allows you to increase the service life and quality several times. Thus, repairing concrete floors is not such a rare procedure that helps restore the floor to its original appearance.
Defects do not arise just like that; the appearance of any of them is preceded by a number of violations committed both in the process of arranging the floor and in the process of its use. The most common problems: 1. Chips and cracks in the concrete floor.
Reasons for appearance:
- violation of the ratio of cement and water during pouring;
- insufficient reinforcement;
- absence of temperature-shrinkable seams or untimely cutting of them;
- movements at the base.
2. Delamination of the floor. Reasons for appearance:
- incorrect preparation of the concrete floor base;
- the presence of pollutants on the surface of the base.
3. Elevation changes. Reasons for appearance:
- filling the floor “by eye” or poor-quality alignment of the guides;
- failure to grout.
4. Dusty surface.
Reasons for appearance:
- increased exploitation;
- pouring low-grade concrete (M250 and below).
5. Peeling of the finishing coating. Reasons for appearance:
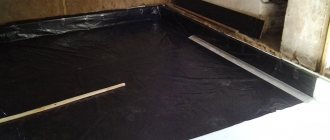
- lack of base waterproofing, liquid penetration;
- installation of the floor on a base with a humidity of more than 4%;
- low grade strength of the base;
- underlying polluting factors.
6. Small through holes, craters.
Reasons for appearance:
- poor processing with a needle roller;
- arrangement of the floor without soil or insufficient amount of it to hermetically seal the pores of the base.
These are the main problems that significantly complicate the use of a concrete floor and create preconditions for carrying out repair work.
Concrete floor repair
The progress of work directly depends on the characteristics of the problem that has arisen. Methods for eliminating the defect and materials necessary to implement the plan are selected individually. Slightly different from .
Elimination of irregularities
Irregularities that arise during operation are removed using a grinding machine. The surface of the concrete floor is milled to a depth of at least 10 mm and then sanded until the unevenness is completely eliminated. The treated area is dedusted using an industrial pump. Next, impregnation is carried out to strengthen the concrete floor. An epoxy or polyurethane primer diluted with solvent R-646 or solvent (1:10) is used as impregnation. The area treated with a grinder is leveled with a rule or a lath, and after polymerization, final grinding is carried out.
Repair of recesses
Potholes are a fairly common phenomenon that occurs due to a violation of the technology for arranging concrete floors and requires immediate elimination.
- cut off the damaged area on four sides using a diamond disc (to a depth of about 20 mm);
- Use a puncher to remove the damaged coating;
- the open cavity must be removed from dust, which is done using a sandblaster or industrial vacuum cleaner;
- the surface of the recess is treated with a primer for mineral mixtures;
- the cavity is filled with a special repair compound (IVSIL RENDER, Consolit-Bars or similar);
- the mixture is leveled with a lath or rule;
- After the composition has gained the necessary strength, sanding is carried out flush with the floor.
It is important! If the pothole depth is more than 50 mm, then the repair mixture is applied in several layers.
This kind of patching can be done not only in the presence of potholes, but also in places of increased technological load, which will reduce the risk of damage to the existing coating by half.
The advantage of this method is the implementation of restoration measures while maintaining the possibility of using the premises, which is sometimes very important.
The purpose of the repair work is to:
- preventing concrete from staining around the edge of the resulting crack;
- avoiding further lengthening and widening of the gap;
- preventing liquids from entering through the crack;
- when planning to lay flooring on a concrete floor, for example, laminate, avoid the occurrence of holes in it.
To seal cracks, polymer-modified concrete mortar (cement + latex), PVA-based mixtures, epoxy and polyurethane compounds are used.
Restoration of small cracks (up to 2 mm)
1. The surface is cleaned, the crack is expanded to a depth of 10 mm.
2. Using an industrial vacuum cleaner, the resulting seam is removed from dust. 3. The resulting cavity is filled with epoxy or polyurethane primer, diluted in a ratio of 1:10 with solvent R-646. 4. The seam is filled with a repair mortar based on epoxy resin or polyurethane (the filler is sifted quartz sand). If necessary, another layer is laid.
5. After the construction mixture has hardened, the surface is sanded.
Restoration of deep cracks
The technology for repairing large cracks is somewhat different. 1. The crack is cut to a depth of 50 mm using a grinder. Two channels are cut along it on both sides, through which the damaged part of the concrete is removed. 2. The resulting area is deepened and dust-free. The cut site is primed with an epoxy or polyurethane composition based on solvent or solvent R-646. 3. The crack is filled with the mixture; if necessary, the primer is applied a second time.
4. The surface is sanded to the floor level.
Metal staples are often used to enhance the result. Work progress:
- the crack increases to 20 mm;
- a transverse slot with a depth of 20 and a width of 150 mm is made perpendicular to the recess lines;
- the base of the slot is blown with a vacuum cleaner and primed;
- then a little repair mixture is applied and metal brackets are laid;
- The crack is sealed with a repair compound and sanded.
It is important! The use of metal brackets allows additional reinforcement of the concrete floor.
Correction of expansion joints
Expansion joints will also require proper attention over time. If the edges are destroyed and the integrity of the seams is damaged, the following must be done: 1. Expand the damaged seam, trim off the uneven edges. Remove remaining concrete, dust, debris, and loosely attached fragments from the resulting recess. 2. Prime the inner surface with epoxy primer. 3. Seal the seam with a repair mixture based on cement and polymers. 4. Mark the seams with markers - steel rods installed along the entire seam. It is also necessary to install markers at the joints of the seams. 5. After the joint compound has set with the floor surface. 6. Remove the markers and cut a new expansion joint along their seams. We vacuum it and fill it with Viloterm Cord. 7. Perform final sealing using silicone sealant.
Dust removal of the floor
Sooner or later, concrete begins to gather dust, which is unacceptable, because... Increased dust formation is harmful to human health. Wet cleaning alone is not enough; more radical measures should be taken to eliminate the problem.
Dust removal involves applying certain coatings to the surface of the concrete floor. For floors that experience light loads, thin-layer coatings (up to 150 microns) are used. For example, Ashford-formula, Elakor-PU, Neomer-LP, which are applied to a pre-cleaned and vacuum-cleaned floor.
However, floors that are subjected to increased loads most often begin to gather dust. It is impossible to remove dust from such a floor using a thin-layer coating. In this case, it is advisable to apply a polymer protective solution with a thickness of 250 microns: Retroplate, Elakor-ED primer, Elast-PU.
The technology in both the first and second options will be the same:
Leveling a concrete floor
Changes in height are also a fairly common problem. There are several ways to fix it. The simplest is to use a self-leveling mixture. To work, you will need tools: a bucket, a brush, a roller with a long handle, a trowel, a trowel, sometimes a watering can and a hammer. Materials: self-leveling mixture, soda ash.
It is important! Self-leveling mixture is a simple and easy way to level the floor, which can be used even by those who have picked up a trowel for the first time.
1. The surface of the concrete floor is thoroughly cleaned of dust and washed with soda solution several times. 2. Self-leveling mixture is prepared in accordance with the instructions. Due to the fact that the solution sets very quickly, it is recommended to prepare small portions, especially if you are doing leveling for the first time. The resulting mixture must be mixed with a trowel. 3. Before application, the floor is moistened. This will help set quickly and prevent shrinkage cracks. 4. The mixture is poured onto the floor, using a trowel we distribute it over the surface. If the solution has already hardened, but the desired effect cannot be achieved, you can moisten the surface with water from a watering can and touch up areas that you don’t really like.
How to repair holes in the floor depending on the material of the damage
Let's look at several possible options regarding the question of how to fill holes in a concrete floor.
Repairing Potholes in Concrete Floors
It was described above that potholes in the concrete of a house, apartment or other premises often appear when laying communications (in particular pipelines for sewer systems and water supply systems). Elimination actions are carried out according to the instructions:
If the pothole is large enough, you will have to use rubble or broken bricks to fill it securely. The hole is filled with waste materials, carefully planned inside, and then filled with a cement-sand mixture. Ripping out the surface is carried out in the same way as described above.
Sealing through holes
How to seal a hole in the floor if it is through, you can find out in this section. Through holes in a concrete screed resulting from laying sewer or water risers are more difficult to seal. Here you will need not only a monolithic fill, but also reinforcement. The whole process consists of the following steps:
It is desirable that less repair work and operation of the pipelines take place during drying, since there is a risk of the solution shrinking and creating a gap between the pipe and the cement plug.
On a note! It is advisable to isolate steel pipelines from the cement-sand mixture, since direct contact promotes corrosion and, as a consequence, destruction of the pipeline.
Repairing a hole in a monolithic slab
It happens that cracks appear in monolithic slabs. They can be sealed using quick cement mortar, which sets within a couple of hours and remains strong for a long time. You can purchase such a product at a hardware store.
Before application, the edges must be cleaned, and then PVA adhesive is applied to them (it is advisable to choose a white liquid). After this, the holes are filled with prepared cement mortar. The mixture is leveled with a spatula, and the excess is removed while the composition is wet.
Repairing holes in rotten boards
You can repair a hole in the floor if the board is rotten by partially replacing the boards. To do this, you will have to purchase material of the appropriate type and size. It is advisable to replace rotten boards if two conditions are met: the number of damaged boards is small and they are not tongue-and-groove.
In a similar situation, it is best to simply disassemble the entire floor and sort the boards, in which you need to select good and bad material. If most of it is in poor condition at the time of the inspection, then it is rational to carry out not a partial, but a complete replacement of the flooring.
On a note! It is possible to remove gaps using plywood or OSB overlays if you plan to cover the surface with laminate in the future. Just be sure to first remove debris from debris that could negatively affect the plane of the surface.
Cleaning cracks between wooden floorboards
This problem can be solved using several methods. Everyone will be able to accomplish them. They can be considered in detail below.
Application of wedges
They must be made from naturally dried slats:
All that remains is to try to hide the defect. To do this, you will need paint, but in this case you will have to renew the entire coating so that there are no visual differences in the shades of the floor.
Using tow, cord or rope
It is noted that this method has been repeatedly tested by time and is more than reliable. How it is done:
If everything is done correctly, then the coating will last for a long time.
Sealing holes with sawdust and glue
For this method, you should choose fine sawdust. You can make them yourself, but if you don’t have anything else, then it’s advisable to buy the composition at a hardware store. Next, all actions are performed step by step:
All that remains is to wait for the surface to dry completely. This will take 2-3 days, after which the surface is carefully sanded. You must wait for the glue to dry, otherwise stains and traces of the mixture may remain on the clean surface.
Filling cracks with foam
You can repair cracks in the floor using construction foam. What should be done:
It should be recalled that polyurethane foam is a rather caustic material, but only during direct installation. From the moment it dries, it becomes safe and does not emit a toxic odor.
Repair using acrylic sealant
Narrow and wide cracks in the floor can be easily sealed using specialized construction sealant. It is sold in syringes, with the help of which it is easy to penetrate into the cracks between the boards, as well as at the ends near the walls.
Fill holes with care, as too much compound may not spread properly into the cracks. The product should be squeezed out little by little. But do not forget that the sealant will not be ideal in all cases, since it is characterized by characteristic shrinkage and is also not resistant to temperature changes. Accordingly, it is suitable for use in exclusively heated rooms.
Thanks to the claimed elastic material, it is possible to correct the problem of a “playing” floor, or walking boards with holes between them. Before using the product, be sure to make sure that the surface is grease-free and dry. Otherwise, soon the material will begin to move away from the seat.
On a note! Sealants that are used to seal cracks in the floor are quite viscous and smooth, so they are not susceptible to paint. They will be visually visible during finishing. To get rid of this defect you will have to decorate the floor.
Paints for repairing concrete floors
The modern building materials market offers a huge variety of paints for repairing concrete floors, which differ in their scope of application and properties. For example, there are paints for leveling, removing dust, and protecting the floor. When using such materials, carefully read the instructions, many of them require compliance with a certain temperature regime, the exposure time, the ratio of components when diluting, etc. may also differ.
Using the above-described concrete floor repair technologies, you can not only increase the performance characteristics, but also significantly improve them. Correctly and timely restoration work will extend the service life of the concrete coating, which means it will save a considerable part of your money.
When replacing flooring, apartment owners often have to deal with the need to repair a concrete floor, which can be either a concrete floor or the interfloor floor slab itself. Despite the fact that concrete is a durable and reliable material, under the influence of various factors, potholes and cracks can appear on it. To prevent further destruction, timely measures are necessary, because the service life of the finished floor depends on the condition of the concrete base. Let's find out how to repair a concrete floor using special mixtures for repairing concrete floors.
Repair of large potholes on the screed.
The technology is approximately the same, only in addition, to fill potholes, quartz sand is mixed with epoxy resin.
Other (down-to-earth) options are also possible:
- Creating a contact layer on a pothole.
- Laying a thick mortar from a ready-made high-quality mixture with additives.
Causes of defects in concrete
Defects on a concrete floor can form for various reasons, which are primarily associated with violations in the process of its arrangement.
Cracks often appear due to the absence, untimely cutting or incorrect calculation of the thickness of joints in concrete floors, designed to prevent stress on the concrete during thermal expansion and shrinkage. A correctly made temperature-shrinkable seam will avoid many problems.
Other reasons for the appearance of cracks include:
- a large amount of water in the solution when pouring a concrete screed or a lack of it;
- poor quality reinforcement;
- lack of waterproofing of the base.
Defects can occur even with quality work done. Any coating is subject to natural wear and tear and is negatively affected by excess moisture. Potholes are caused by physical forces. The influence of external factors on the concrete floor cannot be ruled out. The weak point is the junction of the wall and the floor; cracks often appear there.
It is necessary to determine the type of damage. This will allow you to draw up a work plan and select the right material. The following types are often encountered:
- small depressions, potholes;
- cracks of various sizes;
- the finest cracks and chips.
Repairs should not be delayed for a long time. The size of the defects may gradually increase, the concrete will begin to crumble and come off in pieces, which will complicate the repair of problem areas.
Thixotropy and rheology
Before considering floor screed repair methods, it is worth learning some important concepts. One of them is thixotropy - the ability of a medium to be easily influenced, to reduce viscosity under constant influence. A striking example of a thixotropic substance is ordinary construction bitumen: if you press on it, a hollow appears on the material.
We also need to mention rheology here - this is superfluidity. A phenomenon that not only physicists encounter, but all people in everyday life. As an example, we can take sunflower oil, which is not nearly as fluid as liquid helium, for example, but still gives an idea of this property.
Under construction conditions, thixotropy and rheology are quite strongly related. It is important to know about these concepts when repairing concrete screeds. Thanks to rheology, during the repair process the solution fills all the smallest irregularities, and thixotropy makes it possible for the old and new concrete mass to interact for maximum strength of the coating.
On the modern building materials market you can find many thixotropic-rheological mixtures intended for repairing defects in concrete floors. They are produced on the basis of polyurethane and epoxy resin, but for repairing a concrete floor in a house/apartment (where stable conditions are provided and there are no significant loads), you can make an inexpensive thixotropic composition with your own hands.
Selecting a mixture for repairing a concrete surface
Before you start repairing the floor in an apartment with your own hands, you need to prepare a mixture for restoring concrete surfaces and structures. They are presented in large quantities in construction stores. In order to choose the right brand of mixture, you need to determine the degree of damage to the concrete surface:
- First degree - there are cavities and shrinkage cracks.
- Second degree – surface peeling, small chips.
- Third degree - cracks within 2 mm with a depth of no more than 40 mm.
- Fourth degree – cracks more than 2 mm, depth up to 10 cm.
- Fifth degree - large potholes and cracks, depth more than 20 cm.
The purpose of the repair mixture must be indicated on the packaging. Such manufacturers of mixtures for restoring concrete surfaces as Emaco, Birss, Ceresit, and Bars deserve attention.
You can use universal repair mixtures, such as Ivsil Render.
Since the price of special thixotropic compositions containing reinforcing microfibers and polymers is quite high, for a small amount of work the mixture can be prepared independently. To do this, take 1 part PVA glue and mix it with 4 parts water. Using this solution, using a construction mixer or a special attachment on a drill, mix the sand-cement mixture in a ratio of 1:3.
Stages of repair work when sealing cracks using the trowel/fill method
If defects are found, you should:
- Inspect the entire building structure to identify problems.
- Determine the nature of the defects (surface, through, microscopic, massive), the width of the opening, the degree of exposure of the reinforcing elements.
- Select the repair composition in accordance with the survey data.
- Open up a crack in concrete by removing loose particles with a brush and vacuum cleaner before repairing the defect.
- to clean it from corrosion products with a metal brush and treat it with an anti-corrosion compound.
- Open small cracks to a state in which they can be filled with a repair compound. Large cracks in concrete with an opening width of more than 4 mm - prepare for strengthening. To do this, grooves are made across the gap in the concrete element for laying reinforcing wire in them.
- Treat the surface to be repaired with a primer , which increases the adhesion of the repair composition to the base.
- Seal the cracks . Most often, cement-sand mixtures with factory-prepared expanding cement are used for this purpose. When deciding how to fill a crack in concrete - in the screed and seams between floor slabs - you can choose a mixture consisting of liquid glass (20% of the total mass), cement (20%), sand (60%).
Preparatory work
After choosing the material for repairing concrete floors, you should begin the repair. First comes the preparatory stage:
- All foreign objects are removed from the room.
- Existing debris, concrete chips and dust are swept away. Potholes and cracks are thoroughly cleaned with a vacuum cleaner.
- Any dirt, rust, mold or old soil is removed with a stiff metal brush.
- To remove grease stains, you need to use a special solution.
- The concrete floor is swept with a wet broom, then it needs to be dried.
- If the reinforcement is visible, it should be cleaned with sandpaper and primed with a compound with anti-corrosion properties.
It is better to tap areas of the concrete surface that have lost strength with a hammer and clear them. The rule also applies to the edges of problem areas.
Preparing the premises
Before repairing a concrete screed, it is necessary to properly prepare the room and the coating itself. First, all furniture, interior items, equipment, etc. are removed from the room, leaving it completely empty. If there is a floor covering on the screed, it must be removed.
Next, remove debris and dust, paying special attention to all damaged areas, where the largest volume of pieces of concrete, peeling elements, etc. most often accumulates. Layers of old primer, various coatings and paints, and chipped concrete parts are removed with a wire brush.
After everything is thoroughly cleaned, notches are made in the repaired area to increase adhesion between the old and new concrete. Dust and chips that appear during the process are carefully swept away with a broom. It is better to use a construction vacuum cleaner if you have one. Next, the surface is carefully treated with a primer or degreasing impregnation.
Filling potholes in a concrete floor
Repairing concrete floors begins with widening and deepening the pothole around the perimeter. It is better to use a grinder with a diamond blade for this.
- The cut is made 1 cm deeper than the defect. The pothole widens to the sides by 2–3 cm. If necessary, these figures are increased.
- Using a hammer drill or a hammer with a chisel, a recess is made at the site of the pothole; a rectangular depression should be obtained. If a hammer drill is used, it is better for strangers to move away.
- The recess is thoroughly cleaned with a vacuum cleaner and primed.
- You can fill the pothole after the soil has dried. The mixture is carefully leveled and pierced several times to remove air. You can use a metal pin or trowel. Level the surface using the rule.
The depth of the pothole matters. If it is more than 5–6 cm, then the composition is poured in several layers. The maximum layer thickness is 2 cm.
- After hardening, they proceed to grinding. A building level will help you achieve a level concrete base.
It is recommended to carry out work wearing a respirator, safety glasses and gloves. Windows must be open during renovation. The floor can be coated with concrete paint, which will provide additional protection. It is selected specifically for residential premises. A floor repaired in this way will last a long time.