Concrete coatings are used in a variety of areas: when installing floors, concreting surfaces in both industrial and residential buildings, constructing highways and much more. However, concrete has a low tensile strength, so during the hardening process the mixture contracts slightly and shrinkage of the structures occurs. Because of this, minor and more serious defects appear on the surface. In this case, sealing of cracks in concrete is required, which is performed using different technologies depending on the type of damage and the cause of its occurrence.
Types of cracks in concrete
Some novice or unscrupulous builders prefer to simply cover up a hole or any other defect with putty or mortar. However, before you repair a hole or crack in a concrete wall or other foundations, it is worth understanding what exactly caused such troubles to occur.
There are several types of defects:
- Superficial. Such cracks often appear after pouring the foundation during the drying of the sand-cement mortar, if the mixture was prepared without observing the required proportions of the components, low-quality components were used, or there was not enough water in the mixture.
- Shrinkage cracks (also called hairline cracks). Defects of this type are considered the most dangerous, since they cause not only deformation of the fundamental foundation, but also the entire building as a whole. This leads to a decrease in strength. Defects of this type appear when there is an uneven load on the foundation and when the cement composition is incorrectly selected.
- Temperature-shrinkable. Cracks of this type appear during the hardening process of the concrete base due to the exothermic reaction occurring between cement and water. Very often, when constructing walls and ceilings, novice builders do not take into account the freedom of deformation, as a result of which temperature stress occurs in the concrete mass and defects appear on the surface.
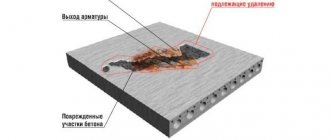
- Cracks and holes appearing due to poor quality reinforcement. If the frame for strengthening the structure is too weak, it will bend under loads, which will also lead to the formation of defects. In addition, the reinforcing rods may begin to oxidize. Due to corrosion, the material increases in size, tearing the concrete mass from the inside.
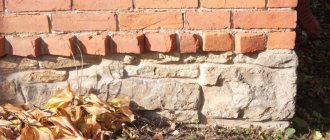
Concrete surfaces located outdoors are also susceptible to cracking. The external environment contains chemically active substances that create favorable conditions for the appearance of defects.
In addition, sharp temperature changes, which can occur both on the surface and in the thickness of the concrete, have a destructive effect. In this case, not only cold air, but also ultraviolet radiation has a detrimental effect.
It is also worth paying attention to the width of the cracks, since in some cases such defects are not critical.
What to do if the plaster in your apartment is cracked
Defects on plaster often appear. To prevent the wall from collapsing, defects must be removed in a timely manner. Why is this happening? Having examined all kinds of ruptures, the palm among the defects is occupied by small cracks. This happens for several reasons:
- If the greasy solution is poorly mixed or when it dries quickly on the wall. It is not allowed to apply a thick layer of plaster in one go. What is the best way to cover it? Finishing putty, water-based paint, gypsum plaster or fiberglass will help “cure” small cracks. But when large cracks appear, you need to open it up, remove all dust, moisten it well with water and fill it with solution.
- If large cracks appear at the joints, it is better to use reinforced mesh, which is glued to the flaw and plastered.
Acceptable crack sizes
In the construction industry there is such a definition as the permissible crack opening width, which is determined according to DBN V.2.6-98:2009 based on operating conditions:
- The crack size should not exceed 0.5 mm if the concrete surface is not exposed to weather conditions. That is, it is not affected by moisture, low temperatures and ultraviolet radiation.
- The permissible crack opening width cannot be more than 0.4 mm, provided that the structure is exposed to weather influences.
- The width of the crack should not exceed 0.3 mm if the concrete base is located in an aggressive environment.
- It is not recommended to allow the formation of gaps larger than 0.2 mm when we are talking about reinforced structures that are characterized by reduced resistance to corrosion.
Horizontal cracks with a small opening, which often appear in reinforced concrete columns, are also considered harmless.
However, it is important to take into account that there are certain operating conditions under which cracking is not allowed at all:
- if we are talking about reinforced concrete structures that constantly interact with liquids and gases (that is, they must be impenetrable and airtight);
- when using structures that are subject to more stringent requirements for their durability.
Having determined the type of defect and the need to correct it, it is much easier to choose than to repair holes in a wall or any other concrete surface.
Cement mortars
These compounds are very popular due to their low cost and ability to repair minor shrinkage cracks in concrete.
Repairing a crack
Before you begin sealing, you need to check the crack itself for chips around it. If there are any, then in the near future they may turn into holes, so it is imperative to remove all peeling pieces of concrete. After this you need:
- Perform jointing. To do this, using a chisel and a hammer, you need to walk along the entire length of the crack so that its depth is at least 5 mm. If necessary, you can use a spatula to create a depression.
- Remove dust using a vacuum cleaner and rinse the resulting depression with water.
- Remove excess water and cover the crack with cement mortar (3 parts sand to 1 part cement with the addition of PVA). In this case, you need to ensure that the composition covers the entire space of the recess.
- Moisten the poured cement with water.
Filling the hole
If a hole has formed in the concrete surface in which the reinforcement is visible, the defect can be repaired as follows:
- Clean the hole in the concrete and treat its surface with an anti-corrosion compound.
- Place pieces of steel wire about 4 mm in diameter into the recess.
- After this, the recess is covered with a primer, applying it evenly over the entire surface. In this case, the thickness of the mixture layer should be about 3 mm.
- Without waiting for the mixture to dry, fill the hole with a cement compound for sealing cracks in concrete and make sure that it fills the entire hole. If the hole is too deep, then cement is poured in several stages. In this case, each subsequent layer must be moistened with water from a spray bottle.
- Level the surface with a lath (metal or wood), moving the tool from right to left.
- After the mixture has hardened, excess cement composition must be removed with a spatula and the surface must be plastered. If the crack was too deep, then leveling is done using a grinding machine.
Healthy! The cement composition must be poured with a reserve so that it is slightly higher than the floor surface. The mixture will shrink as it hardens.
After 24 hours, the concrete floor can be painted or any finishing material can be laid on it.
However, it is worth considering that such sealing of cracks in concrete will not provide a sealing effect and is not suitable for surfaces that have increased waterproofing requirements. In addition, the cement composition can be considered as a temporary solution to problems. Sooner or later the defects will appear again. If you want to “overhaul” the holes and avoid their occurrence in the future, then in this case you can repair the defects using resins, specialized repair compounds based on them, or sealant.
How to repair holes in a brick or concrete wall
The extent of repair work to the surface of a brick or concrete wall will depend on the extent of the damage. If these are holes left when old nails, screws or dowels were removed, then it is enough to cover them with putty or a special repair mixture.
Let's take a step-by-step look at how this can be done:
- To do this, take a long nail or screwdriver and widen the hole. This must be done so that the putty penetrates as deeply as possible inside.
- Then use a dry brush or vacuum cleaner to remove any accumulated dust and crumbs.
- Now moisten the resulting hole with water. For this purpose, you can again use a brush or a spray bottle, or a piece of foam rubber. This should be done so that moisture from the repair mixture or putty does not quickly absorb into the wall.
- After a few minutes, putty the damaged area, carefully rubbing the mixture into the hole.
- Once completely dry, sand the surface with fine-grained sandpaper.
- Now the area can be painted over or wallpapered.
If the hole in the wall is large and deep enough, for example, it was left after replacing pipes or dismantling an electrical outlet, then putty alone will not be enough. You will need either cement, gypsum, or a ready-made concrete repair mixture, which can be purchased at a hardware store.
What to do in this case:
- Before you fix a hole in the wall, prepare the hole by clearing away any debris and moistening it with water.
- Then fill the void with pieces of stone or brick mixed with cement mortar. This will save putty and strengthen the area being restored. Cement mortar for this purpose is prepared from one part cement and three parts sand. In such a case, you can also use building gypsum or concrete repair mixture.
- When this cement (or plaster) “patch” has dried, putty it, carefully filling and leveling the remaining voids and cracks that have formed.
- The area treated in this way should dry well. This will take at least 12 hours.
- When everything is fairly dry, smooth the surface with fine-grit sandpaper. To prevent this place from showing off as an ugly bump, it should be leveled with the rest of the wall surface.
- The wall is leveled, and now it can be painted or wallpapered.
If, during the shrinkage of the building in the room, the interpanel seams have come apart or a deep crack has formed, then there is no need to rack your brains about how to repair such a hole in the wall. In this case, use polyurethane foam, which is sold in aerosol cans at any hardware store. It perfectly fills voids, easily penetrating even hard-to-reach places. In this article you can learn how to repair cracks of varying complexity.
Polyurethane foam adheres perfectly to various surfaces and quickly hardens in air. So you are guaranteed a good result in the process of eliminating deep cracks and holes.
- Before you start work, prepare the place - clean it of dirt, dust and other debris. Wet the wall surface.
- Before applying the foam, you need to shake the can well so that its contents turn into a homogeneous mass. This will take you at least a minute.
- During operation, hold the container upside down, since the gas contained in it, which displaces the polyurethane foam, is lighter than it.
- Vertical cracks should be filled from bottom to top.
- If the hole is too deep, apply the contents of the can in layers, applying a new layer after the previous one has dried.
- After filling the hole, do not touch the damp polyurethane foam with your hands, this can change the structure of the material and slow down the process of its hardening. Wait until it dries.
- Remove excess dried foam with a knife and putty the surface.
- When the putty is dry, smooth the area with fine-grit sandpaper.
Now you can see for yourself that it is simple and easy to repair any hole in a concrete or brick surface, no matter what size, without outside help.
The main thing is to correctly assess the scale of the repair work and carry it out in accordance with the rules for using the material that you will use when restoring your wall.
Long-term repair of defects
When deciding how to repair cracks in concrete for a long time, you should pay attention to this method of treating defects. Resin and sealing mixtures based on it are suitable for restoring screeds, blind areas and various concreted areas or horizontal surfaces.
Repairing cracks in concrete using such compounds has a number of advantages. First of all, this is the low cost of the mixtures, as well as their quick drying. On the other hand, the resin allows you to securely fix the seams and keep them from subsequent enlargement.
So, to eliminate defects you will need to prepare:
- angle grinder and diamond-coated discs;
- vacuum cleaner;
- spatulas and a trough for diluting the composition;
- primer composition for concrete;
- Epoxy (base A and hardener B);
- Fine-grained sifted sand.
Before you repair a crack, you need to clean it of dust and dirt. After this, we carry out the sealing in the following sequence:
- We repair the crack. In this case, the width of the resulting recess must be at least 5 mm.
- Using a grinding machine, we cut transverse seams in the concrete in increments of 400 mm (the length of the grooves is about 100-150 mm).
- We remove the loose layer of concrete and remove dust from the surface using a vacuum cleaner.
- We treat the surface of the defect with a primer, and fix the transverse grooves using repair brackets.
- We prepare a solution from resin (base), hardener and sand according to the instructions on the packaging with the composition.
- We fill the defect with the resulting mixture and quickly level the surface, since the setting time of the resin is only 10 minutes.
After this, it is recommended to fill the surface with sand, which will need to be removed with a vacuum cleaner before plastering the base or covering it with finishing material.
The best epoxy compounds
If we talk about the best materials for repairing cracks in concrete walls and other surfaces, the most effective today are considered to be:
- Domestic epoxy resin ED-16 and ED-20 costs about 2,000 per 3 kg. The hardener will have to be purchased separately (costs about 300-500 rubles).
- Epoxy 520 resin from the Czech manufacturer Spolchemie costs 3,500 rubles per 5 kg.
- German composition UZIN KR 416, which will cost 2,700 rubles per 0.75 kg.
Also very popular are compositions from the Italian manufacturer Sika.
However, it is worth considering that this method of correcting defects is not suitable for treating holes that form in concrete foundations under strong pressure from water. In this case, it is worth using a sealant.
Use of sealants and self-expanding tapes
It’s worth saying right away that this method of sealing defects is very expensive, so it is most often used when repairing concrete bowls of country pools. However, despite its high cost, the use of sealant and self-expanding cords has its own advantages:
- the ability to process any type of defect;
- complete tightness;
- the ability to carry out installation work in cold weather conditions.
To work, in addition to the standard set of tools, you will need:
- mounting gun;
- self-expanding tape or cord;
- chisel and brushes;
- sealant for concrete.
However, before covering up the flaw, you need to measure the dimensions of the cracks and purchase the right type of sealant and tapes depending on this. For example, if the hole depth is 60 mm, then an 18 x 23 mm cord will do.
The next step is necessary:
- Expand the cracks and remove dust.
- Install the cord into the recess.
- Fill the remaining space with sealant.
- Smooth out the protruding compound using a spatula.
After completing the work, you won’t have to guess how to putty the surface or caulk it. It is enough just to apply the composition and smooth it out.
If we talk about the best compositions of this type, the most popular are:
- Domestic ELASTOSIL PU 20 costs 280 rubles per 600 ml.
- The composition is from the French manufacturer Rubberflex, which today sells for 300 rubles per 310 ml.
- PLOW tape made in Russia costs about 260 rubles per linear meter.
Cost of sealing leaks
| Name of works | Unit | Price in rubles |
| Waterproofing of cold joints: - Work on installing grooves - cleaning the grooves - layer-by-layer compaction with a non-shrinking composition | m.pog | 600 |
| Waterproofing of interblock seams: - Work on installing grooves - cleaning the grooves - layer-by-layer compaction with a non-shrinking composition | m.pog | 400 |
| Waterproofing of expansion joints: - Work on installing a groove - cleaning the groove - sealing an elastic profile - sealing a non-shrinking composition - a set of injection works | m.pog | 4900 |
| Injection waterproofing of seams / shut-off waterproofing - Work on the installation of fines - cleaning of the fines - layer-by-layer compaction of a non-shrinking composition - Work on the installation of boreholes and installation of packers - a set of injection works - dismantling of packers and sealing of injection holes | m.pog | 1200 |
| Injection waterproofing into the concrete body - marking, work on drilling holes and installation of packers - a set of injection works - dismantling packers and sealing injection holes | m2 | 1900 |
| Injection waterproofing into the body of a brick - marking, work on drilling holes and installation of packers - a set of injection works - dismantling packers and sealing injection holes | m2 | 1900 |
| Cement-mineral waterproofing | m2 | 600 |
| Penetrating waterproofing | m2 | 600 |
| Waterproofing of communication entry points: - Work on installing a groove - cleaning the groove - layer-by-layer compaction with a non-shrink composition - Work on constructing boreholes and installing packers - a set of injection works - dismantling packers and sealing injection holes | PC | 6900 |
Waterproofing cost calculator for self-calculation
Click to open the calculator and calculate the cost of work
Calculation of the cost of injection and suture waterproofing
Injection
Also, when deciding how to seal holes in a concrete wall in the most effective way, especially if not only a crack has appeared, but also water is flowing through it, you should pay attention to this method.
Injection technology involves introducing a special composition (polyurethane or epoxy resin, microcement or waterproofing mixture) into the thickness of concrete using special injection pumps that create strong pressure.
To perform such restoration of defects it is necessary:
- Make holes in a staggered pattern on both sides of the gap.
- Install packers in them (special tubes through which the solution is supplied, reminiscent of a dowel) at an angle.
- Pour in the solution.
- Pull out the tubes and cover the surface with the building compound.
So, we looked at how to fix a hole in a concrete wall yourself, but what if we are talking about aerated concrete?
Conclusion
A properly manufactured or selected repair mixture will help to completely restore even a heavily damaged area of a concrete monolith. It is important that if used correctly, its surface will become even more durable and resistant to aggressive influences.
You can make a mixture for high-quality concrete repair yourself, but experts advise using ready-made compounds. All their components are precisely dosed, they are more durable and convenient to use. In case of complex damage or repair of vertical structures, ceilings, additional reinforcement from metal or polymer fibers will make the top layer of concrete extremely durable.
Features of sealing cracks in aerated concrete
Cracks form in aerated concrete as often as in conventional cement-sand monoliths. To seal them, work is performed in the following sequence:
- A layer of destroyed building material is removed from a wall or any other aerated concrete surface and cleaned of dust and dirt.
- The gap is primed. To do this, it is recommended to use a 50% aqueous dispersion of PVA and water (1:3 ratio).
- Cracks are sealed depending on their size. If the damage is single and its width does not exceed 0.4 mm, then the gap is widened to 10 mm and any building compound is poured into it (you can use cement or special adhesive for aerated concrete). If the width of the defect is up to 10 mm, then it is better to use a porous adhesive composition for sealing and widen the gap to 20 mm. If a defect up to 20 mm wide appears, it is recommended to use an adhesive or cement composition, after adding coarse crushed stone from aerated concrete.
After completing the work, it is necessary to cover the treated surface with a sheet of plywood (secure with self-tapping screws) for 3-5 hours.
Self-production
A durable and strong composition for repairing damaged concrete in private construction can be made independently. To do this you will need one part cement, three parts purified fine sand. Instead of pure water, an aqueous solution of PVA or Bustilat glue is used in the proportion: one part glue, three parts water.
To prepare the repair mortar, cement and sand are thoroughly mixed, and a mixture of glue and water is added until the mortar becomes plastic. It is brought to homogeneity with a construction mixer. Prepare this repair mixture for concrete immediately before starting work so that it does not set prematurely. It is suitable for repairing and updating floor screeds; a more plastic and thick composition is used for repairing vertical concrete surfaces.