Building a bathhouse with your own hands is always cheaper than ordering work from specialists. After building their home, almost every owner thinks about a bathhouse. It’s cheaper to build a bathhouse with your own hands, so you don’t have to pay for the work. And a bathhouse assembled with your own hands will be of high quality, since it was built for yourself. But before installation, everyone wonders how much it costs to build a bathhouse with your own hands? It is difficult to answer this question, since a number of factors, construction features and materials must be taken into account. We will tell our readers how much it will cost to build a bathhouse yourself and how to perform the calculations.
Preparation for construction
Before building a small bathhouse, it is necessary to carry out preparatory work.
Choosing a location
Any structure, regardless of area and purpose, should begin to be planned, following certain norms and rules. The location for the bathhouse must be selected taking into account a number of requirements.
The building must not:
- Being too close to a residential building.
- Harm the communication system.
- Pressure the area closest to it.
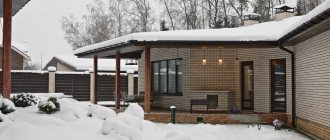
It is recommended not to build a bathhouse next to a window so that it does not block the view. Not because of regulations, but because of aesthetic feelings.
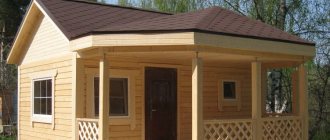
The bathhouse must be correctly placed on the site Source mebel-go.ru
It is necessary to take into account the distance to other structures in order to avoid problems with government employees and neighbors. SNiP rules regulate at what distance a bathhouse must be built from other structures. According to the rules established by the state, from the bathhouse to other structures and buildings there must be:
- 3 meters – to a residential building;
- 4 meters to medium trees, and 5 meters to large ones;
- 1 meter to other bushes;
- 4 meters from buildings where animals are kept.
Selecting wall material
Yes, a bathhouse can be built from any materials. But it is advisable not to use the same brick, polystyrene concrete and foam block. They get too hot and then take a long time to cool down. Such structures create high humidity, and when ventilated, the room dries very quickly.
Bricks and blocks can be used if desired, but they must have a multi-layer cladding for such variable thermal conditions.
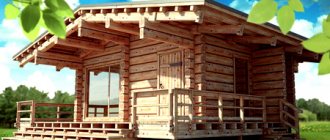
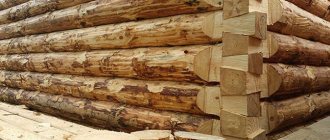
Timber is the best material for a bath Source deltodom.ru
The best option is timber. It does not require any cladding. In addition, it is wood that produces useful and healthy steam when warmed up.
Finishing
In the question of how much it costs to build a good bathhouse, its interior decoration plays an important role. It is this that directly affects ease of use and aesthetic pleasure.
A standard Russian bathhouse has several main rooms: a steam room, a shower room and a vestibule. If desired, some equip a bathroom, a rest room and various utility rooms. The decoration of each room may have its own characteristics.
But the most optimal option for interior decoration of a bathhouse is considered to be lining made of hardwood. This material is available to everyone, it can last for many years. If you need a higher quality coating, you can use porcelain stoneware or ceramic tiles.
Drawing up project documentation
Creating a bathhouse project consists of:
- Outlining a sketch and drawing.
- Drawing up a work schedule.
- Calculation of estimates.
Using the drawing you can:
- make the correct orientation to the cardinal points;
- plan doors and windows;
- carry out the wiring correctly.
It is recommended to build the bathhouse not as an extension, but as a separate building from the others.
Drawing of a bathhouse made of timber Source bepeza.ru
When drawing up a project, it is necessary to take into account the climatic conditions and location of the facility:
- It is advisable to install windows from the west and south.
- Place the doors on the side of the house.
- If possible, it is better to build a bathhouse on some hill. Thanks to this, storm water will bypass it.
See also: Catalog of companies that specialize in the construction of bathhouses from timber.
Obtaining permission from administrative authorities
If you build a bathhouse without approving it in the relevant structures, it can be demolished due to any complaints from neighbors.
Calculation of the cost of a bath Source et.aviarydecor.com
Therefore, it is necessary that the project be approved. To do this it must include:
- Floor plan, even if the bathhouse consists of one floor. The plan must include detailed drawings, sections and explications.
- Approximate estimate for materials.
- Type of foundation with drawings.
- Written consent of all closest neighbors for the construction of a bathhouse.
Obtaining permission is a mandatory procedure.
Examples of price tags for the assembly of a log house
A general description can only give a general idea. To make it more specific, you need to give at least a couple of examples of real prices. To assemble a simple oak frame of 10 square meters in Moscow and the Moscow region for a steam room with the necessary processing and insulation will cost no less than 40,000 rubles . And this is just to assemble a bare log house. There is a separate price for the foundation, as well as for connecting electricity and water supply.
In the regions, the situation is almost the same - in Samara and the Samara region, assembling a similar structure will cost about 30,000 rubles . The prices indicated are the lowest possible, despite the fact that the customer will do most of the work himself - purchase materials, bring everything, pour the foundation, and the craftsmen will only assemble the building, process it, insulate it and supply everything that is needed for the steam room. All prices are taken from the official Internet resources of companies involved in construction, finishing of premises and summer cottages.
Bathhouse layout
In order for the project to be complete and allow you to obtain permission from the administrative authorities the first time, you must have a good knowledge of the structure of the bathhouse. This will help you create the correct drawings.
The baths consist of 4 parts:
- Waiting room.
- Shower room.
- Steam room.
- Tambour.
Typical layout of a bathhouse with a vestibule Source mir-ban.ru
Tambour
After entering, a person finds himself in a vestibule. The vestibule is at the same time a hallway and protects the dressing room from cold air. It is sometimes used as a locker room. The size is chosen by the future owner.
Waiting room
Behind the vestibule is a dressing room. This is the room where people relax. Because of this, it should be made comfortable, convenient, and most importantly, spacious. This room is also used as a cooling area, so a window is necessary.
Relaxation room in a bathhouse made of timber Source hr.aviarydecor.com
The minimum recommended area is 6 m2. For additional convenience, it is advisable to install a table, a TV and a bench for relaxing.
Important! Many make the floor slippery. This is a grave mistake. After leaving the steam room, your feet may be wet, which will directly lead to injury.
Shower room
Next comes the shower room. In addition to washing equipment, if desired, you can install a toilet. If you have enough space, it would be an excellent solution to place a swimming pool. 3 meters under it will be enough.
Shower in a bathhouse made of timber Source rusles-perm.ru
Steam room
At the very end of the bathhouse there is a steam room. The main thing to consider is that the doors should not open onto the vestibule! This error will constantly reduce the temperature in the steam room, which will reduce its effectiveness.
Steam room in a bathhouse made of timber Source hometi.ru
Thermal insulation work
For thermal insulation, foil film is used.
When arranging a room, the correct order of laying layers of heat and vapor barrier is important. This will protect the walls and floor from the accumulation of condensation, which contributes to the destruction of wood.
A layer of vapor barrier is installed on the rough flooring, and mineral wool is placed in the empty spaces. Waterproofing strips are laid overlapping on top (they can be connected with a stapler) and finishing boards are nailed.
On the ceiling, mineral wool insulation is covered with foil film. You can arrange a decorative coating on top of the finishing boards.
The walls are covered with wooden panels and foil film is attached to them. Beams with a square cross-section (side 5 cm) are nailed on top, forming a cellular structure. Mineral wool is placed in the gaps. Another foil layer is mounted on top and a lath is filled, to which the finishing coating is attached.
Stages of bathhouse construction
Below is a step-by-step answer to the question of how to build a bathhouse from timber.
Foundation
The construction of a timber bathhouse begins with the construction of a foundation. The strength of the structure will depend on the quality and reliability of the foundation. Therefore, it is necessary to treat this stage with full responsibility.
Nuances:
- In addition to the material, when choosing the type of foundation, you should take into account the type of soil and the topography of the earth.
- Considering that structures made from timber are not heavy, in order to equip the foundation with even terrain, a strip foundation would be an excellent choice.
- If the difference in relief is more than one meter, it is better to choose bored piles.
If it is decided that a bathhouse made of timber with a strip foundation will be built on specific land, it is necessary to begin work as follows. The first step is to transfer the finished plan to the area. A theodolite will help with this. In the absence of this construction device, it is proposed to use pegs and cords. Using them, you can also draw straight lines.
As soon as the markings are ready, construction of the foundation begins. The first step is to dig trenches. Their depth is determined by the type of soil and the depth of freezing in a given area. If the soil is heaving, the trench should be 17-20 cm greater than the maximum freezing depth. Depending on the climate zone, the latter indicator may vary.
Foundation for a bathhouse made of timber Source sl.aviarydecor.com
A layer of sand is poured into the finished trenches, the minimum thickness of which is 13-15 cm. Next, wooden formwork should be installed. In addition to the wooden shield, any sheet materials are used for this:
- slates;
- boards;
- plywood, etc.
Then a layer of waterproofing for the foundation should be laid. To give rigidity to the structure, the foundation can be reinforced using a frame of 14 mm rods, which are connected with wires. After this, a concrete mixture is prepared to fill the trench. After 4 days, the formwork is removed.
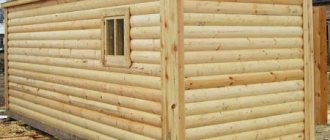
Selection and purchase of timber
Further steps directly depend on the raw materials from which you need to build a bathhouse from timber. You only need to prepare in advance the high-quality wood necessary for erecting walls in the bathhouse.
Timber is one of the most popular and best building materials for baths:
- It gives minimal shrinkage.
- Does not require adjustment.
- Mounted on a small foundation.
But at the same time, its quality directly depends on the selected raw materials. Therefore, at the stage of purchasing material you need to be extremely careful.
It is necessary to choose the right timber for a bath Source el.decorexpro.com
When the site is located in a temperate climate zone, it is not recommended to use logs whose thickness is less than 20 cm. Otherwise, the walls will be too small and thin. Consequently, heat will be retained inside very poorly.
Small logs are often used in an attempt to save money, but this is a fatal mistake. This will only increase costs, since everything will need to be covered with thermal insulation materials.
Important! You need to find and buy a good timber. You should not waste money on material with defects. If cracks, axial deformations or lesions are present, discard and look elsewhere.
When purchasing, you should pay attention to the thickness of the trunks. If possible, it is better to buy those logs whose thickness difference between the ends does not exceed 3 cm. Timber is cut along the length of the bathhouse. In most cases, the dimensions of bath complexes are 6x6 or 6x3.
Laying rows
Next you need to move on to the installation work of assembling the log house. The log house includes several crowns:
- The first row is called the lining crown. It is advisable to use the thickest logs for it and place them on the foundation base. Before this, it is necessary to lay waterproofing. After this, the lower trim is assembled. Logs are made on it in order to assemble the floor in the future.
- Then comes the horseshoe crown. A window row is laid on it, and then a row above the window. How many rows there will be is calculated during the creation of the plan. The height of the building depends on this factor.
- At the last stage, when all the crowns have already been installed, the log house is left for some time. It must sag and take its final form. The best time for this procedure is up to 700 days.
The most important stage in the construction of a bathhouse is the laying of the mortgage crown:
- 20x20 bars are great for the first row.
- Mandatory - all beams should be cut so that their length is the same.
Important! Even slight precision cannot be tolerated. In most cases, “in the paw” is chosen as the type of connection.
When laying a bathhouse on pads, and not on a foundation, it is advisable to build a temporary roof over the building.
Laying rows of timber baths Source izhevsk.ru
It takes a lot of effort to get the rows perfectly positioned and laying out as evenly as possible. After finishing the first row, the remaining space between the base and the materials is filled with foam. There is no need to fix the first screw - the overall stability is guaranteed by the weight of the structure.
As soon as the process of assembling the log house is completed, window and door frames are installed.
Installation process: additional factors
It is imperative to lay waterproofing between the base and the first row of timber. The surface is covered with bitumen, then a layer of roofing material is applied. As soon as the first layer cools, apply the second and roofing material.
Mortgage rows should always be treated with antiseptics:
- Particular attention should be paid to the surface adjacent to the base.
- Machine oil is excellent as an impregnation.
Most professionals use this oil because it is inexpensive and is sold almost everywhere.
The timber needs to be specially processed Source dom-expert.by
Next, the rail is processed. The maximum thickness is 1.5 cm. You should buy enough slats to completely cover the foundation. First they are laid on the base. This is done for:
- Lack of contact with the foundation.
- Ventilation improvements.
- Protecting trees from mold and mildew.
All of the above will increase the shelf life of the tree.
Roofing, screeding and finishing - the final stage
We continue to build a bathhouse from timber and reach the final stage. After completing the main work (construction of walls and foundations, etc.) it is necessary:
- Lay the floor.
- Do some finishing on the inside.
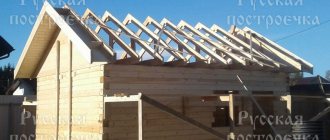
- Decorate the roof.
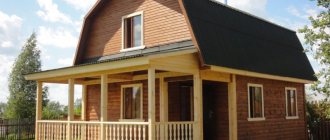
The roof is very easy to do. You should choose between single-slope and gable. Their main difference is the slope. A gable roof is made from 2 planes that together form a ridge. A single-pitch roof is one piece of canvas. It is chosen for garages, sheds and other non-residential buildings.
Gable roof of a bathhouse made of timber Source it.aviarydecor.com
It is with the installation of logs that flooring begins. Boards are laid on the joists. It is advisable to make them from pine or larch. You definitely need a floorboard!
Further work directly depends on what kind of floor is being built. Bathrooms have non-leaking or leaking floors. When choosing the second option, the boards are simply placed as close to each other as possible, increasing the angle slightly. The water flows at an angle into a gutter or siphon.
Further finishing is entirely a matter of the owner’s taste. Timber is an interesting and design-friendly material that does not require much effort in design after construction. Leaving it in its original form will create the atmosphere of a classic Russian bathhouse.
Accessories
The bathhouse must have many accessories and additional parts, so when calculating the cost of construction, you need to take into account the internal components.
One of the main elements of each bath is a stove or heater, which produces steam. This design must meet high fire safety requirements, so its choice must be approached responsibly. Nowadays, metal stoves are becoming increasingly popular because they do not require the construction of a foundation.
The modern market offers a lot of additional accessories for heaters:
- the chimney is the most important component of a sauna stove, since without it combustion products will not escape;
- a firewood rack is, as a rule, a metal device that is necessary for storing logs;
- protective screen - a device with the help of which the air near the heating device is activated, thanks to which the bathhouse heats up faster;
- stove stones differ in heat capacity, resistance to temperature changes and strength characteristics.
The equipment for other rooms in the bathhouse is also required: steam room and shower. For the latter, a certain set of accessories will be required, thanks to which a person will be able to take water procedures. It includes: a tank with hot water, a basin for rinsing, a wooden font.
As for the steam room, it requires components that can withstand high temperatures without emitting harmful substances. So, the accessories should be as follows: oak brooms, a steamer, a wooden ladle and headrests, ventilation grilles, bath caps.
Required Tools
Few tools were required to build a log bathhouse:
- chain saw (it would take a very long time to cut with a hacksaw);
- drill with a wood drill with a diameter of 12 mm;
- hammer;
- axe;
- hand plane (the volumes are small, and carrying a wire behind an electric plane would be inconvenient);
- slick;
- stapler and staples for it 12 mm high;
- roulette;
- marking pencil.
Since the weather was not always conducive to the successful progress of the work, we also had to stock up on covering material so that the fresh impregnation would not be washed off from the wood.