Every person who loves bath procedures dreams of having a room at home in which they can steam to their heart's content. First, you need to order a design for a bathhouse with a utility block, and only then do the actual construction.
It is worth noting that bathhouses, which are built from timber and at the same time have a utility block, are more popular. This is understandable, because any person strives to ensure that any room in which he spends a lot of time is both cozy and multifunctional. It also needs to be said that a bathhouse with a utility unit under one roof is very popular among owners of small plots or, for example, dachas, especially since projects for such buildings are very easy to order.
If we talk about the advantages of the above structures, then the most important thing is high functionality.
After all, such a design does not take up much space and at the same time combines the functions of a bathhouse, pantry, kitchen and room with any other purpose. By the way, as for the cost of such structures, it will also save money for bathhouse owners. After all, it is much cheaper to build one room than to erect several separate buildings. The main thing, of course, is to think through this process to the smallest detail. So as not to miss any important details. And then the resulting result will delight not only the owner of the premises, but also all his guests.
Project of a one-story bathhouse made of expanded clay
The first thing you should not forget about is that expanded clay concrete blocks are not frost-resistant (up to 50 freeze-thaw cycles), they have a high level of hygroscopicity, which means that the structure requires increased protection from moisture and proper insulation.
The most inexpensive and fastest way to build a bathhouse is to choose expanded clay concrete blocks as the main material. Such a building will cost several times less than its brick or wooden counterpart. On average, including all transportation costs, materials for constructing the foundation, walls, roofing and interior decoration, the cost of a one-story small bathhouse (6x5 m) with a terrace of 5 m2 will cost 230-280 thousand rubles.
Projects of bathhouses made of expanded clay concrete blocks in the photo below:
- without a terrace with the simplest and most ergonomic layout 4x3, with a total area of 12 m2;
Masonry in such buildings can be done either in half a stone or in a whole stone. The second is preferable - less costs will be spent on insulation. A cement-sand mixture or assembly adhesive is used. Most experts still recommend giving preference to glue. As a thermal insulator - polystyrene foam, mineral wool with foiled polyethylene foam on the inside.
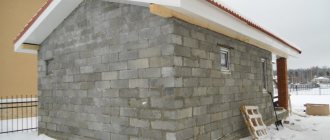
As you can see in the photo below, external cladding is also needed, because the expanded clay structure itself does not look very beautiful. In addition, the walls need heat and waterproofing. Exterior finishing is carried out by plastering, brick, facing with facade putty or siding.
The advantages of such a bathhouse are that you can build it yourself; lightweight blocks do not require the involvement of an entire construction crew and special equipment.
Useful video
A set of photographs in a video demonstrating the stages of implementation of a specific project combining a bathhouse and a barbecue area:
And this video shows another completed project - a bathhouse with a barn . The sound, unfortunately, disappears at times, but you can get an idea of the appearance and internal structure of such a combination:
Well, as you can see, any options have a right to exist, if you don’t forget about fire safety and rationally use the available space.
Source
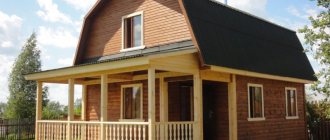
Project of a two-story bathhouse made of expanded clay concrete blocks
The construction scheme for a two-story bathhouse made of expanded clay is a little more complicated.
Although you can get by with a simpler option.
Since expanded clay concrete is a lightweight material, the number of storeys in the bathhouse will not bear a large load on the foundation, and even for a two-story structure, a shallow strip base is suitable (the work will take up to 3 weeks). Insulation of the walls of the first floor requires special care; it can be done according to the same scheme as for aerated block structures.
Before you start planning a two-story bathhouse, you need to think about what elements it will include:
- place for a swimming pool;
- the presence or absence of a bathroom on the second floor;
- carport or garage;
- open or closed barbecue terrace;
- attic;
- billiard room;
- a recreation area with a bar, a small cafeteria or a full-fledged dining room;
- the number and location of windows, doorways, as well as the stove.
A bathhouse made of expanded clay concrete is a truly profitable building in all respects, which is easy to build with your own hands in the shortest possible time and at the same time saves money.
Conclusion
The presence of a utility block in the bathhouse adds many useful features, which include preparing food and receiving guests, which allows you to transfer some of the functions of a residential building there.
It should be taken into account that the economic block also requires additional measures for arrangement: independent water supply, sewerage, fire safety, and so on.
A huge range of projects for such buildings will help you choose the best option for your site.
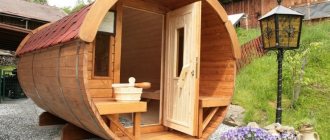
Ready-made sauna with utility block
The video in this article will provide you with additional information on this material.
Features of a bath made of expanded clay concrete
Low cost, zero shrinkage and high strength of the material are “compensated” by the costs of high-quality heat, hydro and sound insulating coatings, without which the bathhouse will begin to collapse quite quickly and staying in it will become uncomfortable.
It is almost impossible to build very complex and multi-story structures from expanded clay concrete - the limit is two floors and rectilinear room shapes.
Each layer of the box must be leveled with cement mortar and roofing material applied.
It is better to make the roof gable with roofing felt, tiles or corrugated sheets as roofing material.
On the floor made of expanded clay concrete, it is necessary to make a concrete flooring, on which tiles, tiles or wooden planks will already be laid.
For internal cladding, it is best to choose lining made from alder, larch, cedar or ash. These are the most durable rocks that can protect the walls from the aggressive microclimate in the steam room and wash room. You can also use bamboo - it is not afraid of moisture and looks very impressive.
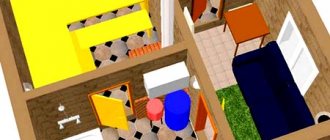
Bathhouse layout
How a bathhouse made of expanded clay concrete will look externally and internally depends entirely on the type of cladding chosen. In any case, the material for the box will be sewn into insulating layers, so everything here is at the discretion of the owners, their preferences and budget.
You can build a simple and neat bathhouse, as in the photo below.
Minimum costs, sparingly used space, the premises are limited to a steam room, a washing room and a small relaxation room.
But with sufficient funds, the project can include a terrace, second floor, or attic.
Organize an indoor pool and any other extensions (garage, summer kitchen, utility rooms).
Make the cladding so attractive that only the owners and contractors will know what material was used for the box.
Given the small size of the building site and the need to save money, you can build an interesting European version that will surprise you with its compactness and originality. The building occupies only 10 or 12 m2.
What are they building for?
After purchasing a plot of land and at the initial stages of its improvement, the owners need somewhere to store construction and finishing materials, all kinds of tools, hide from the rain themselves, and even live. To do this, they build a small building from the simplest materials, but this, of course, depends on the time of year during which construction is taking place. During construction work, this is necessary to ensure that all the required tools are always at hand.
In the future, this or a new structure can serve as a good shed, where various kinds of gardening equipment are usually stored. The room is also suitable for organizing a woodshed, toilet or shower.
Bathhouse and utility block under one expanded clay block roof
So, what kind of foundation should be made when building a bathhouse with your own hands from expanded clay concrete blocks?
Do you know that there is a high probability of land subsidence or that groundwater is shallow - choose bored piles with a grillage. This option is suitable for any unstable, movable soil: poured concrete ensures an equal load on the piles.
There are no problems with subsidence, the soil is homogeneous - place expanded clay blocks on a strip foundation. The bathhouse is a light-weight building, so for it a shallow foundation at a level above freezing of the soil would be a suitable choice. And this will not require large financial expenses from you.
Use reinforced concrete FBS blocks for buildings on rocky soils, in climates with permanently low temperatures. Such a foundation requires resorting to special equipment, which affects the owner’s wallet, but it can be built quickly.
Often in private construction it is recommended to pour a slab foundation. It is chosen by those who are planning a basement floor in their house, or are building a multi-storey building that requires a reliable foundation. The monolithic slab will withstand ground movements on wet sandy soil, and will fill well on problem-free soil. However, slab foundations are more expensive than others.
An important issue during construction is the installation of waterproofing. This is especially important if the soil under the bathhouse is poorly permeable loam or if groundwater lies too close to the surface.
Waterproofing can be vertical or horizontal. The first type - horizontal - is cheaper. Giving preference to it, you can lay rolled roofing felt (preferably in more than one layer) or membranes on top of the foundation and soak them with mastic. Vertical waterproofing is installed on the entire foundation from the very foundation to the first reinforced belt. In this case, it is more economical to secure it to the level of reach of precipitation in order to eliminate the influence of rain or snow on the foundation. Materials for vertical waterproofing are selected both roll (technoelast, roofing felt) and coating (bitumen mastic).
The insulation of a bathhouse made of expanded clay concrete blocks from the inside may differ from the insulation from the outside. Baths are insulated with natural or synthetic materials. You can use mineral wool outside - laid even in one layer on the mortar joints between expanded clay blocks, it guarantees heat retention in all rooms. Attach it to brackets that will hold the exterior trim. Extruded polystyrene foam retains heat very well and is not of interest to rodents. This is a modern insulation material that firmly holds the attention of builders.
In the rest room the wall pie should be as follows:
- exterior decoration,
- insulation on the outside,
- expanded clay concrete blocks,
- sheathing,
- internal lining.
For insulation inside a bathhouse, many developers prefer expanded clay, mineral wool and glass wool. Mineral wool/glass wool does not represent huge financial costs for thermal insulation of walls and ceilings; thanks to its slab or roll form, it is very easy to install and is made from natural raw materials.
Expanded clay is an excellent way to insulate floors. It is durable, cheap and made from environmentally friendly natural raw materials. This is the best choice for reducing heat loss from the bathhouse floor - due to its flowability, it occupies any unevenness.
How to arrange a steam room? Along with insulation, during the construction of a bathhouse, work is carried out on waterproofing and vapor barrier.
Choose mineral wool or glass wool as insulation, insulate the walls and ceiling with a hydro-windproof vapor-permeable membrane Izospan AM, or polyethylene - it has been the people's choice for many decades, construction cardboard or foil. Membrane vapor barrier is expensive, but durable and easy to install. Foil or reflective vapor barrier quickly heats the room and is insensitive to condensation and high steam room temperatures. Polyethylene film is inexpensive and protects the insulation layer, but over time it deteriorates from hot steam. Kraft paper with a metallized heat-insulating layer is very popular among steam lovers for its low cost and quality.
For waterproofing, the best choice is the use of coating materials. These are heat-resistant compositions made of liquid polymers with low toxicity.
In a steam room, the wall design should be as follows:
- exterior decoration,
- ventilation gap,
- insulation on the outside,
- expanded clay concrete blocks,
- wooden sheathing, into the cells of which insulation boards are inserted,
- vapor barrier in the form of a membrane with a foil coating based on kraft paper,
- counter-lattice to provide a ventilation gap,
- internal lining.
We recommend doing thermal insulation of the steam room both from the inside and outside: you will save your nerves and time for good heating of the room for washing, and the walls themselves will not absorb drops of condensation.
A sauna stove is a significant stage. Whether you lower 300 thousand rubles down the chimney or not depends on the right choice and correct removal of the chimney. You can buy a ready-made metal stove, or build a brick stove yourself. Both options are widely known and effective. Is there a difference?
A metal stove does not require additional time for painstaking masonry; it heats up instantly and cools down in the same way, gradually filling the entire bathhouse with heat. A stove made of ceramic bricks, on the contrary, warms up slowly, but also takes a long time to cool down. The modern installation of a stove in a steam room with a firebox helps the owner keep the steam room clean and not pollute it with soot. Place coal or firewood for storage in the rest room.
Let's start the conversation with ventilation. Since moisture will often condense on the walls in the bathhouse, it is necessary to install a ventilation gap. The ventilated gap is part of the intra-wall system and is left before the installation of exterior finishing begins. The influx of fresh air contributes to the rapid drying of walls and floors and the good health of people.
Ventilation in the bathhouse can be either artificial or natural. Artificial ventilation is created in a room using air ducts and fans that move air masses within a room or from room to room. This air flow is easy to control - the owner decides how much and where.
Natural ventilation is air masses that are directed not by a person, but by the difference in pressure and temperature between the street and the room with heated air. When using the sauna, warm air rises, so it is necessary to equip the bathhouse rooms with two air intakes: for the entry and exit of the air flow.
In addition to ventilation, any sauna requires water, sewerage and electricity. Water can be supplied from a centralized network, from a well on the site or from a nearby well. Gas boilers are used to heat it. We recommend not limiting the sewerage system to drainage, but setting up an autonomous system, separate from the cottage. Electricity can be created by running a generator or connecting to a centralized power grid.
All communications of the bathhouse should be discussed during the discussion of the project and the experience of technical specialists should be referred to.
Jumpers and ceilings are responsible for the load-bearing function. Pre-fabricated reinforced concrete lintels are often installed over standard window and door openings. But they can be done immediately on the site, cut out of a concrete block, cast from concrete, assembled from brick or metal corners.
As a floor for a small bathhouse, the right solution would be to purchase timber, since there is no point in weighing down this structure with reinforced concrete slabs.
A pitched roof also has a similar characteristic, but the usable area for use in this case will be several times smaller. As a rule, it is chosen for a bathhouse or garage attached to other structures, and the slope is not made high. The flat version is less versatile - such a roof is more typical for buildings in climates with little rainfall. It must be well reinforced to withstand heavy snow in winter.
Let's look at how to arrange a rafter system for a gable roof with insulation. This is the best way to make your sauna suitable for use in any season. You can begin installing the roof frame immediately after erecting the expanded clay block walls. Waterproofing and mauerlat (wooden boards or a whole beam) are placed on the wall. The rafter system rests on it.
The rafter system consists of many trusses - isosceles triangles - installed at the same distance from each other. Wooden trusses for baths should be impregnated with special chemical compounds that protect the wood from rot. In length, they should hang over the walls by approximately 30 to 40 cm, forming a cornice overhang. It is convenient to fix the rafters to the mauerlat and the upper ridge of the roof with metal screws.
Examples for inspiration
Each owner, when arranging his country plot, tries to make it more individual. However, sometimes you have to face situations where there is no inspiration or ideas to work with. In this case, simple examples of completed work help.
With parking
There are not always enough materials to build a full-fledged garage combined with a bathhouse. Sometimes such a building is deterred by the high cost of wood or blocks, in other cases there is not enough money to isolate one room from another and ensure safety. In any case, you have to sacrifice a full-fledged garage. However, this does not mean that the car will have to be parked directly in the open air, because you can always arrange a parking lot next to the bathhouse.
This example is a classic wooden bathhouse with a sloping roof, which is additionally supported by columns. This is beneficial because the car is protected from sunlight, rain and snow. The main room is occupied by a bathhouse, which has enough space for a shower and a full-fledged steam room with a good stove.
For two cars and a sauna
If you are not short on funds, you can build a beautiful sauna with a terrace and a garage for two cars next to your house. The presence of two gates will keep the room warm, and it will be very convenient to enter. On the other side is the entrance to the bathhouse. This is not just a steam room, but also a place for complete relaxation. After a good evening in the steam room, you can calmly sit in the company of friends on the terrace, because there is definitely enough space for everyone.
Two-story building
This option is suitable for those who do not save money, but are trying to place everything they need in a small area. The first floor of such a building is allocated for a garage. A wide lift-up door will provide comfort when going outside.
On the second floor you can place a bathhouse: even in such a small area there is enough space for a steam room and a stove. A table or sun loungers can be placed on the balcony. A building of this type looks good even without additional decor, but if there is an opportunity to decorate the finished building, it is worth taking advantage of it. Massive stucco molding, beautiful forged elements and wide columns will make even an outbuilding truly luxurious.
Making a creative idea a reality is not at all difficult - especially if you take into account all the recommendations of experts and various nuances. The main thing is creativity and perseverance.
You can learn how to make a sauna stove with your own hands from the video below.
Complete set of bathhouse with utility unit
The price (turnkey) includes workFoundation:Shallow strip foundation 25x30x20cm (WxDxH.W)Walls:The walls are made of decorative expanded clay concrete block 400x190x190 mm (wall thickness 190 mm) The walls are insulated in a steam basalt slab 50 mm thick plus, vapor barrier and foil. The walls in the dressing rooms and washing room are not insulated. The walls inside the bathhouse are sheathed with clapboard (over lathing). In the steamy linden. The dressing room is made of pine. The ceiling height is 230 cm (finish 218 cm). The ceiling is rough lining on foil. The ceiling is insulated with expanded clay. The partitions are made of planed timber 10x50x100 mm plus a basalt slab, plus lining. Steam room and sink:Shelves in the steam room: two-tier, aspen.Floor boards:Floor joists made of timber 150*100 mm. Subfloor made of unedged boards. Skull block 50*50 mm. The floor is not insulated. Edged planed boards in the washing compartment (with artificial slots for drainage).Single pitch roof:Rafters (board of natural moisture) 100*40 mm. through the meter. Lining - spruce, pine 13-18 mm. Roofing - ondulin (color of your choice) or corrugated sheet. The sheathing is not solid, made of unedged boards. In increments of 30-40 cm. Window:Wooden window 400x400 mm. 1 piece, and plastic 1000x600 mm (1 piece). Doors:Iron (China) 2 pcs. Paneled – 1 piece, bathhouse – 1 piece (1800x1700 mm.) Washing room:A shower tray is installed. A cesspool of 60x60x60 cm is dug out and a drain pipe is connected to the sink. The cesspool is equipped with a wooden lid.Electrical installation:Installation of wiring, sockets, switches, lamps.Furnace installation:Not included. Additional charge. If you want to install your own stove, we will install it on site for an additional fee. payment.* Find out from the manager the price (turnkey) for the construction of a bathhouse with a utility block.
What can be ordered additionally when building a bathhouse from expanded clay concrete block?
- Blind area 300 rub/m.p.
- Brick lining of a bathhouse 550 RUR/m2
- Furnace lining with brick – 550 RUR/m2
- Wall partition from blocks 300 rub/m2
- Installation of a sandwich pipe through the roof - 4,000 rubles.
- Floorboard 36 mm – 250 rub/m2.
- Coating lag – 70 rub/m2.
- Making a concrete pad for a stove – 500 rub/m2
- Floor tiles 500 rub/m2.
- Warm floors: water - 400 rub/m2 (without connection)
- Warm floors: electric - 400 rub/m2 (without connection)
- Iron door (China) - 7000 rub.
- Roofing: metal tiles -250 rub/m2.
- Gutters 300 rub/m.p.
- Drain pit with concrete rings (1 meter deep, d-1 meter) - RUB 6,000.
How does the order happen?
You choose a project on our website. Call by phone. We are discussing all the details of the upcoming construction of a bathhouse made of blocks. On the appointed day, a team of builders and a truck with material will be at your place. Signing the contract at your site. Payment at your site in three equal installments. Construction of the foundation 1/3. Construction of roof walls 1/3. Finishing and delivery of the object, payment 1/3. WARRANTY for all materials and work - 2 years.
** Depending on the wishes of the Customer, it is possible to make changes to the dimensions, heights, materials and configuration of the bathhouse project.
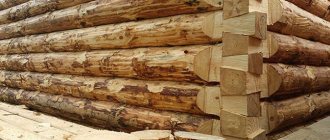
The bath wall can be made to choose from:
— edged timber 150×150** — rounding O 200mm** — chopped log 220-240mm* — planed profiled timber 90x140 mm. — expanded clay concrete blocks 200x200x400 mm. — aerated concrete blocks 200x250x600 mm.
** When building a bathhouse with a utility block under one roof, expanded clay concrete blocks are used.
The declared cost of a bathhouse is not a public offer and assumes the approximate cost of building a bathhouse in Tolyatti or Samara to assess the volume of your investment. The final cost is determined after receiving the adapted bathhouse design and visiting the land plot.
DIY expanded clay concrete shed
Expanded clay concrete is a building material that contains sand, cement and expanded clay. The use of expanded clay concrete blocks will provide construction with an environmentally friendly material that does not require significant costs. It is used for the construction of partitions, load-bearing walls and for mounting openings in monolithic housing construction. Expanded clay concrete blocks are excellent for subsequent finishing work and have thermal insulation and frost-resistant properties. The ease of installation of the expanded clay concrete block allows you to erect buildings and structures with your own hands. For example, you can build a shed yourself without much effort.
General recommendations
You can make an expanded clay concrete block with your own hands; for this you will need sand, cement and expanded clay. With the help of vibrating pressing and steaming machines, finished products are made suitable for various house constructions. The use of expanded clay blocks for the construction of agricultural buildings, ancillary structures, namely a barn, is relevant.
Due to the foamed and fired clay in the composition of expanded clay, the lightness and strength of blocks made from this solution is ensured. Expanded clay concrete has thermal insulation properties and is recommended for the construction of buildings in areas with hot and cold climates.
When building sheds from this material, it is worth remembering its high porosity; for this, the walls are covered with a waterproofing layer. Due to the lightness and large size of expanded clay blocks, installing walls in a barn will not take much time and effort.
It is recommended to build walls in 2 blocks, and install partitions in one.
Preparation of tools and materials
When working with expanded clay concrete blocks, you will need the following tools:
- roulette;
- mixer;
- building level;
- jointing;
- Master OK;
- rubber hammer;
- square;
- reinforcing mesh;
- grinding apparatus;
- electric saw;
- bucket;
- container for making a working mixture;
- cement;
- sand;
- expanded clay;
- water;
- roofing felt for waterproofing.
Return to contents
Construction technology
A barn made of expanded clay concrete elements begins with marking the area and digging a trench to a depth of 50 cm. Next, they begin to pour the foundation. To provide the barn with a warm floor, in addition to pouring concrete, thermal insulation materials are laid. The concrete solution is left to harden and gain maximum strength characteristics. After which they begin to lay expanded clay concrete elements.
To preserve heat in the room, experienced builders recommend laying more than one block. The solution is prepared at the rate of three parts sand and one part cement. The barn construction technology includes installing ventilation for fresh and natural air exchange.
To build a shed with your own hands, you need to have certain knowledge and skills. It will take about a week to build a custom shed. At the end of construction, windows, doors, and flooring are installed. Check air circulation.
Determining the location and marking
The construction of outbuildings begins with determining the optimal location. For convenience, sheds are located near the house or behind it, but in such a place that they are not conspicuous. After choosing the territory, they begin to mark it, installing pegs throughout the entire area of the site. Next, remove a layer of soil 0.3 m deep, in which the roots of the plants are located.
Foundation
Before proceeding with the installation of the foundation, the purpose of the shed is determined. To store small items, a columnar foundation is erected; a strip foundation is used in the case of future storage of large equipment in the barn. With a columnar foundation, aerated concrete columns are made along the entire perimeter of the site. To do this, holes are dug, and their middle is filled with sand and compacted. To install a strip foundation, a ditch is dug and the bottom is covered with sand. The strip type foundation requires the installation of formwork and reinforcement structure. The ditch is filled with concrete and left to dry for a week.
Walls and roof
Laying the first row of walls starts from the corner. The second row is carried out in the middle of the block of the previous one in relation to the bottom row. The third row is laid like the first. Before starting to build a wall, it is important to take care of future openings for windows and doors. The openings are connected with an adhesive mixture or concrete mortar. You should ensure that the installation is even, using a building level.
Roofs for utility buildings are suitable for ordinary pitched roofs. A base of beams one to one and a half centimeters thick is prepared for the roofs. The bars are mounted alternately with the crossbars. When installing the beams for the base, maintain a distance between them that corresponds to one meter. The roofs of the barns are covered with slate, following the technological process, namely:
- sheets are laid from below;
- place slate sheets overlapping each other;
- Self-tapping screws or nails are used as fasteners.
Return to contents
Finishing
Like all buildings and structures, the barn needs finishing. However, there are no difficulties in this case. It is important to install doors, windows and choose flooring material. The walls of the barn are plastered, which increases the service life of the building. To build a floor, you will need to fill it with sand, lay wooden blocks and cover it with the selected material. To install doors, first mount the door frame, fasten the doors and attach the lock of the required reliability.
The plastered outer side of the building is painted or covered with tiles or decorative stone. It is also possible to use plastic panels on a wooden frame. Interior decoration consists of several options. This could include wall cladding with USB boards and painting.
Construction
The process is shown in this video:
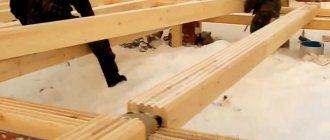
Foundation arrangement
First, you need to make markings according to the project. If wood is chosen as the wall material, a columnar foundation will be sufficient.
To do this, holes 1 meter deep are drilled across the area of the site using a hand-held gas drill, into which ready-made concrete blocks or asbestos-cement pipes are mounted and then filled with concrete. At this stage, the main condition is to maintain a single level above the ground surface - about half a meter.
Walling
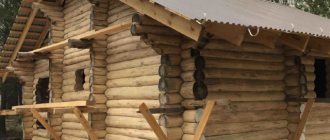
If you purchased a sauna with a utility block made of wooden beams, it is enough, following the instructions, to assemble the already fitted bars in the correct order.
In the case of erecting a frame-panel building, first a frame is built from timber, which is subsequently sheathed on the outside and inside with OSB slabs with thermal insulation placed between them - foam plastic or mineral wool.
Roof
First, a frame is made from a wooden beam, onto which the roofing material is attached - ondulin, metal tiles or any chosen analogue.
When installing a roofing covering, it is necessary to provide high-quality waterproofing that prevents the penetration of atmospheric moisture into the room and a vapor barrier that prevents the wooden roof structures from becoming damp from the inside.
You will find all the information about wooden cabins for your dacha here.
It is also necessary at this stage to lay a chimney pipe from the heater stove. It is better to organize a chimney on the basis of a stainless pipe, since classic asbestos-cement pipes today do not meet fire safety and sanitary standards. When overheated, they can easily collapse and during operation they release many harmful carcinogenic substances.
If the attic room is planned to be used, for example, as a guest room, then the roof must be additionally insulated from the inside and decorated with decorative finishing.
Interior decoration
It consists of arranging the floor base and ceiling. First, a supporting frame is made from untreated timber, on which a tongue-and-groove floor board with a thickness of three to four centimeters is laid.
The ceiling is made either on the basis of wooden boards or sheathed with OSV panels.
Find out how to properly build a chicken coop here.
Steam room
Aspen is traditionally considered the best material for interior decoration of a steam room. The walls and ceiling of the room are sheathed with treated aspen boards, and two to three rows of shelves are made from it. The door to the steam room should also be wooden or made of translucent heat-resistant glass.
It is better to use a ready-made metal stove, since independently installing a heater in a bathhouse/sauna requires specific skills and certain experience.
Project of a two-story bathhouse made of expanded clay concrete blocks
The construction scheme for a two-story bathhouse made of expanded clay is a little more complicated.
Although you can get by with a simpler option.
Since expanded clay concrete is a lightweight material, the number of storeys in the bathhouse will not bear a large load on the foundation, and even for a two-story structure, a shallow strip base is suitable (the work will take up to 3 weeks). Insulation of the walls of the first floor requires special care; it can be done according to the same scheme as for aerated block structures.
Before you start planning a two-story bathhouse, you need to think about what elements it will include:
- place for a swimming pool;
- the presence or absence of a bathroom on the second floor;
- carport or garage;
- open or closed barbecue terrace;
- attic;
- billiard room;
- a recreation area with a bar, a small cafeteria or a full-fledged dining room;
- the number and location of windows, doorways, as well as the stove.
A bathhouse made of expanded clay concrete is a truly profitable building in all respects, which is easy to build with your own hands in the shortest possible time and at the same time saves money.
Final stage
When the main construction work has been completed, and a new resident has settled on your site in the form of a utility block with a firewood shed, you should move on to its internal arrangement. First of all, this is a supply of communications, because now you definitely cannot do without electricity and water. Installation of various devices, pipes and taps in the shower, sockets, lamps is carried out.
If the cabin is made of wood, then the procedure for applying paint and antiseptic is mandatory. And if we are talking about a garage or woodshed, do not forget about the mandatory presence of ventilation.
The utility block is considered a truly necessary structure on any site. At the beginning of construction, it serves as an excellent “shelter”, and upon completion it serves as a storage room for garden tools, a firewood shed, a toilet, and anything else the owners of the site may want.
Next you will find an overview of the finished project of a utility block with a woodshed.
Features of a bath made of expanded clay concrete
Low cost, zero shrinkage and high strength of the material are “compensated” by the costs of high-quality heat, hydro and sound insulating coatings, without which the bathhouse will begin to collapse quite quickly and staying in it will become uncomfortable.
It is almost impossible to build very complex and multi-story structures from expanded clay concrete - the limit is two floors and rectilinear room shapes.
Each layer of the box must be leveled with cement mortar and roofing material applied.
It is better to make the roof gable with roofing felt, tiles or corrugated sheets as roofing material.
On the floor made of expanded clay concrete, it is necessary to make a concrete flooring, on which tiles, tiles or wooden planks will already be laid.
For internal cladding, it is best to choose lining made from alder, larch, cedar or ash. These are the most durable rocks that can protect the walls from the aggressive microclimate in the steam room and wash room. You can also use bamboo - it is not afraid of moisture and looks very impressive.