When building a house, each owner tries to insulate the base of the building, which is its foot part, as best as possible. After all, it is this part of the foundation that comes into contact with both the soil and the floors, which contributes to the appearance of dampness in the room and a decrease in temperature. To protect the foundation and preserve heat in the house, extruded polystyrene foam is often used. Due to its performance characteristics, this material is best suited for insulating the base.
How to quickly and cost-effectively finish a basement and façade insulated with XPS boards?
The plinths and facades of country houses are often insulated with slabs of extruded polystyrene foam (XPS).
In this case, the finishing is usually mounted on glue or lathing. Is there a faster, easier, more efficient design option? Plastering external walls or installing wooden and metal sheathing under a ventilated façade is quite labor-intensive. In the first case, a plaster-adhesive solution is applied to the surface of the slabs and a reinforcing mesh is embedded in it. The dried layer is covered with a layer of soil and then with decorative plaster.
The ventilated facade system involves fastening to the wall of the house, but at some distance from it, with a frame or brackets. Facade panels, siding, block house, etc. are fixed on them. The space under the cladding is filled with insulating material, leaving a ventilation gap (20–50 mm) between it and the cladding.
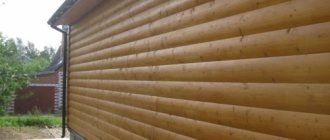
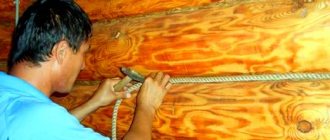
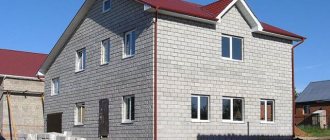
The advantages of HAUBERK facade tiles from TECHNONICOL Corporation are that their installation does not require either cement mortars or an additional frame. The material is fixed directly onto the thermal insulation layer of extruded polystyrene foam boards and secured with plastic screws
Lightweight, strong, durable
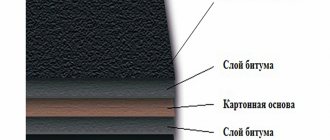
Surely many will note the similarity of HAUBERK facade tiles with bitumen shingles. The tiles are thin (3 mm) sheets with figured cutouts along one edge. Element size 250×1000 mm. It is based on durable, non-rotting fiberglass impregnated with improved bitumen. The bottom is covered with quartz sand and the top with colored granules of natural basalt. It is this “stone” layer that reliably resists mechanical damage and accidental fires, and is also responsible for color constancy.
Facade material “works” in a wide temperature range: from −60 to +110˚С. The walls of the house lined with it are airtight and resistant to mechanical stress. The basement of the building is located in a more extreme zone. In summer, it gets wet from slanting rains and drops of water bouncing off the blind area. In winter it is covered with a layer of snow. Nevertheless, the guarantee for HAUBERK facade tiles from TECHNONICOL Corporation is 10 years for residential basements and 20 years for non-residential basements, which, you see, is quite a lot.
The weight of 1 m² of HAUBERK facade tiles is small - about 12.8 kg. Therefore, rigid slabs of extruded polystyrene foam reliably hold it, but only with proper installation. However, the process is simple and can be done by any master.
“Installation of HAUBERK façade tiles with plastic screws has a number of features. Firstly, the distance from the edge of the cap to the cutout of the tile should be 1 cm. The first row of tiles is mounted so that their petals overlap the adhesive strips and fasteners on the starting (bottom) strip. Each tile is fixed with 5 screws. If the screw hits the XPS board mounting dowel, it will be moved to the side. Subsequent rows are positioned with a shift relative to the bottom row by half a petal. As a result, it turns out that each tile is securely fastened with 10 screws, since one screw fixes 2 rows of facade tiles.”
Beauty and flexibility
Note that flexible HAUBERK tiles equally easily cover ordinary facades and houses of non-standard shapes, including those with bay windows and terraces, arches and rounded elements. At the same time, the amount of waste is minimal - up to 5%.
Particular expressiveness of the cladding will come from the shape of the tiles and the harmonious shades of the basalt granules of the top layer. For example, the laconic form of cutting tiles from the “Stone” is reminiscent of classic stonework. And their colors reproduce the natural palette of minerals: from deep gray slate to light beige travertine and gray-brown quartzite.
The prototype of the tiles from the “Brick” is classic masonry with a graphic pattern and recognizable shades. Smooth lines, right angles, clear proportions are associated with the reliability of brick buildings. A wide selection of colors from dark brown to terracotta and light sand will help make the decoration of a country house unique.
Source
Choosing insulation for the base
The choice of materials for thermal insulation of the base is not as large as for the walls. Due to its proximity to the ground, its operating conditions are more extreme than those of walls.
When calculating wind loads, it is taken into account that they are significantly lower near the ground. This means that the conditions for weathering excess moisture from materials are worse. Source docplayer.ru
There is almost always a higher level of intrinsic moisture content of the materials. Rain and melting snow have an impact. There is also a capillary rise of water through micropores in concrete, brick or in the plaster finishing layer - it is not in vain that the basement is horizontally waterproofed before building walls. And the conditions for weathering excess moisture near the base are worse than near the walls - the wind speed and pressure are lower near the ground. Therefore, the use of mineral wool for insulating the base is eliminated using both the “wet facade” technology and the ventilated facade technology.
Insulation for the foundation plinth is selected from three types of foam :
- expanded polystyrene;
- extruded polystyrene foam (EPS);
- sprayed polyurethane foam (PPU).
Note! Usually, “in everyday life,” foam plastic means expanded polystyrene, but this is a whole class of cellular plastics made of different polymers and varying degrees of rigidity.
In practice, extruded polystyrene foam is most often chosen. Conventional expanded polystyrene and hardened polyurethane foam have lower resistance to mechanical loads, a higher coefficient of water absorption and higher thermal conductivity.
Thermal conductivity and operational humidity of EPS are better than those of conventional foam. Source severnaya-palmira.ru
See also: Catalog of companies that specialize in foundation repair and home insulation.
Insulating the foundation of a house from the outside with polystyrene foam
The high cost of energy resources forces all home owners to take measures to reduce heat losses. Insulating the foundation from the outside with polystyrene foam is one way to reduce heat loss and reduce the cost of maintaining a house. In addition, these measures increase the service life of the foundation and improve the overall performance of the building.
Is it necessary to insulate the foundation of a house?
Expanded polystyrene serves as an additional layer of waterproofing, which is very important for waterlogged soil types. The material compensates for swelling of the earth during freezing - the load on the foundation is significantly reduced. This is especially important for shallow strip foundations that do not have a sufficient safety margin.
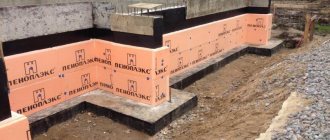
Insulation of a shallow strip foundation
The technology for laying expanded polystyrene slabs has several options; you need to choose a specific one taking into account the characteristics of structural architectural elements, the climatic zone of residence and the physical characteristics of the soil. We will try to consider all insulation options and give practical advice to reduce the labor intensity and cost of work while ensuring high quality and reliability.
Are there differences for different types of bases?
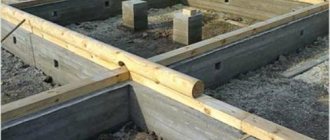
When installing a slab version of the USHP type construction, thermal insulation is laid under the foundation in 2-3 layers of 100 mm each (you can learn about the construction technology of installing a slab foundation with your own hands here). The formwork is also assembled from extruded PPS slabs. USHP is suitable for houses made of timber, aerated concrete and frame structures.
Why is it better to choose polystyrene foam?
Existing construction technologies today enable developers to use several types of insulation: liquid (foam), polystyrene foam, loose expanded clay or slag, expanded polystyrene. Why do we recommend polystyrene foam?
- Low thermal conductivity coefficient with relatively high physical strength. Production technology involves the use of special innovative additives to improve the performance characteristics of the material.
- Versatility of use. Expanded polystyrene can be used to insulate not only foundations (outside or inside), but also walls, ceilings, floors, etc. This greatly simplifies the building construction process and minimizes unproductive losses for insulation of the entire building. You can purchase the same type of insulation for all structures, including ceilings, walls and floors, and then use it based on the needs for each element of the building.
- Manufacturability. Expanded polystyrene is easy to cut and process; there is no need to purchase special tools and equipment for work. The slabs can be fixed with dowels and large caps or glued. The shelf life under proper conditions is practically unlimited. If for some reason the insulation of the foundation is postponed to a later date, the quality of the material will not deteriorate.
- Low price and long service life. In terms of the totality of these characteristics, polystyrene foam has no equal among all insulation materials.
Work order
With the proper approach, insulating the base is not as difficult as it might seem at first glance. As soon as the surface is thoroughly cleaned of contaminants, you can begin priming. It is recommended to select a deep penetration primer that will provide the required surface characteristics.
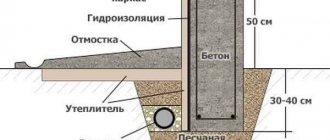
Scheme of proper insulation of the base.
By the way, the insulation of the base with foam plastic is carried out in the same sequence, so you can take this article as a basis when using this heat insulator.
- Upon completion of all preparatory work, you can begin installing the insulation. Regardless of what you choose: foam plastic, polystyrene or expanded polystyrene, it is best to start insulating the base from the corner. This approach will allow you to make high-quality markings, as well as cut the thermal insulation material in advance.
- Using a notched trowel, thoroughly coat the entire surface with glue, then apply polystyrene foam or polystyrene foam to the wall, hold for a while until the adhesive sets, and release.
- All joints that are formed when working with expanded polystyrene or penoplex must be carefully glued, for which traditional mounting tape is used. Once you have glued several sheets, you need to secure them with plastic dowels. Polystyrene, in principle, is easy to process, so making several holes can be done without difficulty. Using dowels, we carefully and securely fix the polystyrene. Thanks to this, it will not fall off or sag throughout its entire service life.
- As soon as the process of gluing and fastening the heat insulator to the surface of the base is completed, it is necessary to attach the slope corner to the same glue. Then the reinforced mesh is installed using cement mortar. It is best to cut the mesh to the size of the insulation material. Next, we wait until the solution dries, after which we begin finishing work.
The adhesion of the thermal insulation material will be of the highest quality if all stages of work are carried out at a positive temperature. When frost occurs, cracks will not appear in this case. In principle, any insulation of a room must, as already mentioned, be carried out in summer or autumn, when there is no precipitation or sudden temperature changes.
Where to start with insulation
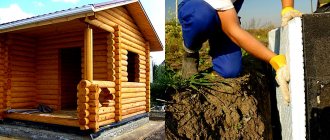
It is advisable to insulate the foundation during construction; such work is best done immediately after removing the formwork. The process is greatly simplified, safety is increased, and the amount of excavation work is minimized. In addition, the risks of reducing the load-bearing characteristics of foundations are eliminated.
The photo shows the process of dismantling the foundation, after which it is advisable to carry out insulation
If insulation is done in a residential building, then the list of works increases, their complexity and cost increase. Before starting insulation, you should analyze the condition of the building and take into account plans for the use of basements.
- Proximity of groundwater . If the house is located on a waterlogged area, then before starting work on insulating the foundation, you need to do reclamation. We'll tell you how to do this a little below.
- Purpose of basements . If they are planned to be used only for storing food products or small household equipment, then insulation is done according to one algorithm. Completely different work needs to be done for foundations, the basements of which will be used for recreation rooms, gyms, etc.
Depending on these parameters, not only the depth of insulation is selected, but also the characteristics and technology of laying the insulating layer.
After the preparatory issues have been resolved, you need to calculate the nomenclature and quantity of building materials. At the time of purchase, the quantity increases by approximately 10% to cover various waste and errors.
Calculation of the quantity of materials
Price issue
See also
: Layout of a rectangular house: how to choose the best option
In order for thermal insulation to last a long time and also reliably, you need to competently approach the issue of insulation.
For many, it is important to know how much the work will cost. Let's talk a little about the prices for foundation insulation with penoplex. Or more precisely, how much the material will cost. If you do the work yourself, then there won’t be that many additional costs.
The price of penoplex depends largely on the thickness. Current prices are approximately as follows:
- thickness 2 cm costs 60-70 rubles per 1 sheet;
- 3-4 cm will cost 100-150 rubles per sheet;
- with a thickness of 5-6 cm the price will be 170-200 rubles;
- if you take 10 cm thick, you will have to pay 300-350 rubles for one sheet.
At higher densities the price will increase by about 10%.
Now you need to calculate how many sheets will be needed for your construction and insulation. And then estimate the total costs. It all depends on the size of your house, as well as the design of the foundation.
Preparation for insulation of foundations located on waterlogged soils
Builders use polystyrene foam boards to relieve the thrust loads of the soil during its freezing/unfreezing. But after this, the polystyrene foam receives significant damage, which reduces its heat-shielding properties. In our case, it is necessary to take special measures to ensure that the slabs fulfill their main task - to serve as reliable and effective insulation. This can be achieved by removing excess moisture; the lower the relative humidity of the earth, the lower the coefficient of its expansion during freezing. Accordingly, the less compression force on the plates.
The task of the preparatory work is to drain groundwater. How to do it?
Foundation drainage diagram
Foundation drainage device
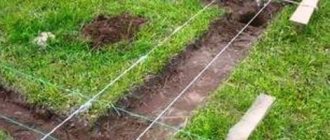
Step 1 . Dig a trench around the perimeter of the house to the depth of the foundation. Width ranges from 40–50 centimeters.
Important. Never undermine the ground under the foundation strip, dig very carefully. If the ground is numb and has insufficient load-bearing properties, then let the depth of the trench be 5–10 cm less than the depth of the foundation.
Ditch for drainage system
One more tip. Are there concerns about the strength of the foundation? Do the work in stages, each wall separately. You can dig a second trench only after the previous one has been filled. This complicates the whole process, but it is not worth risking the stability of the building. The use of earth-moving equipment is not recommended. It may be more difficult and difficult to do by hand, but the risk of damage to the house’s structures is completely eliminated. It’s hard to dig on your own - invite neighbors or friends to help. If this is not possible, use the services of construction crews. Just don’t forget to control the quality of their work; there are often outright hacks. Especially in such low-skilled jobs.
Step 2. Consider a method for draining groundwater. They can be taken directly outside the site or into special containers. It all depends on the terrain and the depth of the drainage pipes. Please keep in mind that the angle of inclination of the drainage system should be within 2–3 mm per linear meter. Immediately dig a trench to lay the pipe that drains water away from the house. If possible, do drainage throughout the entire area, and not just near the house. It's expensive, but it greatly improves the comfort of living in a country house.
Compacting gravel at the bottom of a ditch
Step 3. Lay drainage pipes around the perimeter of the foundation, making sure that they have the required slope in all places. Drainage pipes have holes for receiving water, do not allow them to become clogged. Cover the pipes with geotextiles and pour sand 20–25 cm thick on top. Then the water is drained using ordinary plastic ones.
Laying pipes and connecting drainage wells
Pipes are covered with rubble
Step 4. Compact the sand well and fill the remaining space with soil. Remove large stones, they can damage the pipes.
Wrapping the ends of the geotextile and backfilling the soil
Practical advice. In order to further reduce the lateral soil pressure on polystyrene foam, it is recommended to make a sand layer up to 30 cm thick between the material and the ground. If the house is located on a hill and there is no groundwater problem, then insulation is done faster and easier.
Prices for impact-ramming machine models
The final stage of insulation of the basement part of the foundation
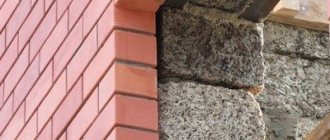
There is one important point here. The walls of the house should always be slightly wider than the basement. Otherwise, water will flow from them into the cracks, which will cause not only excessive moisture in the structure, but also a breakdown in strength.
If a mistake was made during the design or construction of the house and the base part of the foundation is wider than the wall, then additional measures will have to be taken to drain rainwater. The easiest way is to use metal canopies around the entire perimeter of the base.
Protection of the base from precipitation
Flashings for the foundation plinth
If the excess thickness is insignificant, then it is eliminated after insulation of the facade walls. And in the vast majority of cases they will have to be insulated; these are today’s state requirements for the thermal protection of buildings. And not only public, but also private houses. Building a residential building without a project is prohibited by regulations, and no one will sign the project if the latest building codes and regulations are not followed.
As for the use of dowels to fix the insulation on the base part, there are two opinions among professionals.
Dowels for thermal insulation
First, if you wish, you can drill holes and use special dowels with large heads. The practical effect in terms of the strength of the insulation will be insignificant, but it will take a lot of time and labor. We don't even take into account the cost of materials.
Second. Carefully fix all slabs protruding above the ground. If in the lower part air pockets are allowed between the slabs and foundations, then on the base part the fit should only be continuous. Is the concrete surface on the plinth too uneven? You will have to carefully scrape off all the protrusions or pre-plaster them.
Prices for popular types of plaster
What is foamed polyurethane foam, how is it used to insulate the foundation
Do-it-yourself insulation of the foundation of an already built house has recently become popular with the help of foamed polyurethane foam, which is characterized by excellent consumer qualities. The only disadvantage is the need to use a special installation during application, in which the polyol and isocyanate are mixed under pressure, after which the synthesis of the polymer begins. During the reaction, carbon dioxide is formed, which creates bubbles that are separate from each other. Spraying is carried out in a thin layer on a previously cleaned and prepared base.
Before insulating the foundation, it is recommended to familiarize yourself with the positive and negative qualities of the material:
Foamed polyurethane foam is used for insulation of already constructed buildings
- Excellent thermal insulation properties, which are improved due to the presence of carbon dioxide bubbles, because the thermal conductivity coefficient of polyurethane foam is slightly lower than that of air.
- Resistant to mold and fungal growth.
- Continuity of the applied layer without gaps, joints, cracks or seams.
- Light weight, which allows the solution to be used on houses with any type of foundation. At the same time, high strength, rigidity and elasticity.
- Easy repair. If a certain area is damaged, it can be easily cleaned and filled with a new portion of polymer.
- Quick application. Spray insulation takes no longer than one day to complete.
In addition to the need to use special means for application, the disadvantages include the high cost of the material and the inability to carry out the work independently.