Review author: Terrari School of Design
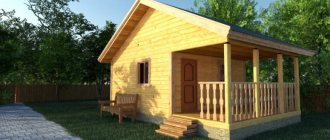
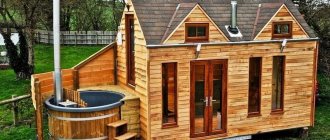
How nice it is to spend your free time at the dacha with your family. Messing around in the garden, cooking, watching the kids play with the dog or cat. And at the end of the day, after pleasant and useful work, go to the bathhouse and just relax.
After all, if you don’t have this magical remedy on your site, then you need to build it as quickly as possible. Having looked through specialized magazines, you can find a variety of colorful photos of a bathhouse in a country house that will not leave anyone indifferent, and certainly one of them will definitely appeal to you. All that remains is to make up your mind and start construction, fulfilling a number of conditions.
Selecting a location
Typically, summer cottages are quite small in size. There are some tips about the location where the building will be located:
- Elevation. This will make it much easier to drain excess water.
- Near any body of water.
- It is convenient when the entrance to the bathhouse is visible from the window of the house itself.
But it is also important to remember fire safety and think through everything, taking into account existing measures. For example, there should be no less than eight meters between the mini sauna and the house.
If this norm is violated, the situation can lead to conflict with neighbors, even leading to court proceedings.
Layout of flower beds and flower beds
Flower beds and flower beds will bring visual pleasure while staying in a suburban area. Having studied the possible design options for color compositions, it will be easier to choose an interesting option for the landscape design of your own site with a bathhouse. The materials used in the arrangement and the location of the flower beds can transform the most inconspicuous area into a fragrant Eden. The following types of flower beds are popular:
- The border will decorate any path. In the design it is important to use low flowers up to 45 cm; the width of the plantings can reach a meter.
- The mixborder is incredibly attractive. Different in shape and types of flowers used, they delight the eyes of others throughout the warm period.
Attention! The effect of continuous flowering can be achieved with the correct configuration of the mixborder. Here it is important to select a set of annual and perennial plantings with additional planting of lush greenery, which will gradually replace each other. - Simple stones enclosing a flowerbed or casually placed on it are another trend in the design of a site. The rules for arranging a rock garden and a rock garden are different, but they are united by their priority use in the design of coniferous plants.
- Experienced flower growers can transform the design of a site with an arabesque - a flower bed that imitates the outlines of an animal.
The use of available materials when decorating flower beds on a site is one of the most popular landscape design techniques. Bicycle, barrel, tires, cart - it is not possible to list all the options. The imagination of the site owner can exceed all expectations.
A compact area is not a limitation for planting flower beds. In this case, the design moves from the horizontal to the vertical plane. Various hanging pots and boxes, multi-tiered flower beds and wall panels - there are many ways to beautifully decorate a space without taking up free space.
Materials
Various types of modern baths can be built using a variety of materials. There are several types of buildings:
- Frame. Usually they choose it because of its low price and good quality. And thanks to the lightness of the material, you won’t need a lot of money for the foundation.
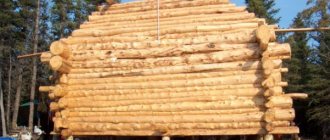
- Wooden. This design will be somewhat more expensive than the previous one, but will be stronger and of better quality. In addition, you won’t have to insulate it.
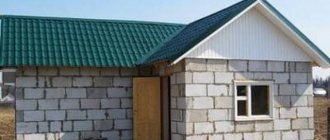
- Brick or stone. Such a bathhouse is built quite rarely, since such a structure requires a stronger foundation, and the walls are frozen, and it takes a long time to warm them up. But there is an exception - gas and foam blocks. The walls are warm and do not require a strong foundation. The only downside is poor moisture tolerance.
- Arbolite. A very good material that makes the bathhouse warm, durable and does not require much expense.
Advantages and disadvantages
Barrel-shaped baths have a number of advantages. Among them:
- small dimensions, the bathhouse fits even in the smallest gardening area between the garden bed and the greenhouse;
- mobility, the design can be transported in the back of any truck, and the Mini version can be transported in the trailer of a passenger car;
- installed on any flat area with organized drainage without a permanent foundation;
- speed of construction, assembly takes a day or two;
- the absence of corners ensures quick heating up to 80°C (up to an hour) and long-term heat retention;
- sufficient comfort, despite the small dimensions, rounded walls serve as natural backrests;
- original and aesthetic appearance;
- easy care, no corners makes cleaning easier;
- cost-effectiveness during construction and during operation.
Among the advantages of a barrel sauna are the speed of construction and easy maintenance
The disadvantages include:
- problems with additional thermal insulation;
- tightness in small models;
- the impossibility of impregnating the sheathing boards with potent agents that prevent rotting and fungal attack;
- the difficulty of replacing sheathing boards that have become unusable, especially on the floor.
The advantages of the design significantly outweigh its disadvantages when an inexpensive, compact, prefabricated and mobile bathhouse is required.
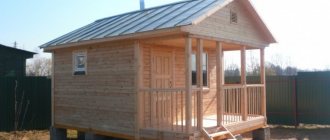
Frame bath
For such a structure, it is important to take reliable resources. The beams of the frame bath must first be dried and leveled if necessary. A lattice frame is produced for the walls. To make it you need:
- The bars differ in their cross-section and are suitable in size.
- Insulation with excellent thermal insulation qualities. It will be used when filling the structure.
- Something to sheath the structure on both sides. Typically, OSB, edged boards, siding or lining are used for this.
Design Features
The main feature of a barrel sauna is its barrel-shaped or cylindrical shape. Two round end panels with a diameter of 2.5-3 meters are sheathed with boards, forming a cylindrical body. The boards are tied together with bandage tape. Minimal contact with the ground provides good thermal insulation. Inside the barrel, a floor is laid, benches, a sauna stove, and, if necessary, partitions are installed.
The light summer cottage option is limited to this; 1-2 people can steam in a 2-meter barrel with minimal amenities. More advanced structures up to 12 meters long are connected to electricity, water supply and drainage, have a steam room, soap bar, shower, forced ventilation and a relaxation area. They can accommodate up to 5-6 people.
The doors in the partitions are made of wood; in expensive models, they are made of tinted or frosted glass. Sometimes, instead of a small window in the end panel, it is made entirely or completely from tempered glass or double glazing.
Barrel baths also include miniature single-seat baths made from a half-barrel standing vertically. Ofuro, or Japanese heated bath, is gaining popularity outside of its native country.
Brick, stone or block bathhouse
The walls can be made of ceramic or silicate bricks, rubble, limestone, shell rock, foam blocks, cinder blocks, and gas blocks.
Arbolite bathhouse
This material is durable and lightweight, often found in the construction of prefabricated baths. Arbolite blocks, in fact, can be easily made with your own hands.
For this you will need ordinary sawdust, but if they are not available and cannot be purchased, then ready-made blocks are sold quite inexpensively.
Erecting walls made of wood concrete does not take much time, which is also a definite plus.
Classification of baths by microclimate
By and large, all baths can be divided into three main groups:
- Steam with minimal heating - characterized by soft heating up to +45-50⁰С and high humidity, which reaches 100%. In such a microclimate, the body does not experience overload; detoxification and cleansing occurs not due to high temperatures, but due to absolute humidity.
- Steam with medium heating - temperature within +50-60⁰С, with air humidity of 60-65%. At average temperatures and high humidity, a thin film of water from condensed steam forms on the skin, due to which the body warms up faster and deeper.
- Dry air - at temperatures of 100⁰С and above, humidity is minimal and is no more than 20%. High temperatures are necessary for deep heating, since dry air conducts heat worse than humid air. But many people tolerate elevated temperatures more easily than high humidity with average heating.
It is convenient that today there is no need to choose only one of the modes, since modern furnace equipment is universal and, if desired, you can get both hard dry burning and soft wet steam in the same bath.
Construction stages
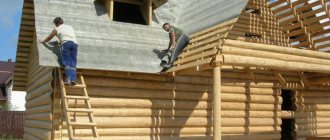
Many people wonder how they can build a bathhouse themselves. It is best not to build it alone, so it would be nice to call one of your relatives for help.
Otherwise, the process will drag on for a long time, and besides, there are jobs that cannot be done alone.
Tips and tricks for building wooden pergolas
If you are planning to make a wooden pergola, listen to the following recommendations:
- Place several through arches in one line with gaps above the garden path. Once they are entwined with grapes, your tunnel will become green.
- If the site is small, corner buildings are appropriate. They are built according to the same scheme as rectangular structures. But in this case, 3 supports are taken. The roof shape is triangular.
- The pergola initially should not be massive and very high. After some time, it will be entwined with plants, which will visually make it larger.
- Until the structure is overgrown with plants, shade it with textiles. Use hanging flower pots as decoration.
- In order for the extension to look beautiful in the garden area, it must be compatible in size with other decorative elements.
Now you know everything about what function pergolas perform and how you can make them yourself. We wish you success!
Source of the article: https://zen.yandex.ru/media/gryadki/delaem-pergoly-i-arki-iz-dereva-dlia-dachi-svoimi-rukami—poshagovaia-instrukciia-i-foto-5f0a9b613321d05e223b4d1b
Marking
After choosing a place to place the building, you need to mark the territory. To do this, you need to transfer the size of the building to the terrain.
Pegs that are driven into the future corners of the bathhouse will help with this. It is important to ensure that the angles are exactly right. Further actions depend on the foundation:
- Slab. Expensive, chosen only when absolutely necessary. They are marked either exactly in size, or a little wider so that the foundation extends beyond the building;
- Tape. The most used, relatively cheap, high quality. The marking is carried out so that the concrete tape runs along the perimeter and under the partitions;
- Columnar. Also popular, most often refers to buildings made of wood. They are marked based on the size of the bathhouse and the number of supports made;
- Screw. Some people think that this method is a recent development, but it is not. It has been serving in various buildings for many years and performs well. Its advantages are the ease and speed of installation, as well as the unnecessary need for earthworks. And such a foundation is not afraid of uneven terrain. The marking is carried out precisely, based on the number of piles.
Interior of a bathhouse with a swimming pool
When decorating a room with a swimming pool, it is important to choose moisture-resistant finishes, furniture, decor and install a floor with an anti-slip coating.
The choice of style depends on the preferences of the owners and the harmonious combination of materials. Do not overload the room with decor. The room should have enough space to move around freely.
Popular interior design styles:
- Russian;
- country;
- Mediterranean;
- Oriental.
Pool decoration often includes tiles and mosaics in the following colors:
- blue, light blue, azure;
- beige, brown;
- White gray;
- light green.
People try not to use flashy bright shades of red and purple, since they are visually irritating to a person. To create a relaxing atmosphere, it is better to choose calm pastel colors.
The photo shows an example of decorating a room with a corner pool in a modern style. The ceiling is finished with composite panels with spotlights, so that the lighting is distributed evenly. The floor is ceramic tiles. The doors from the steam room to the pool are glass. On the walls there are panels with a repeating pattern of a sunset on the sea.
Finishing the pool and the area around it with small mosaics remains always relevant.
Here is a half-timbered room with protruding massive beams on the ceiling and panoramic glazing.
The classic clapboard finish will fit into any style. Here the owners decided to add some textiles in the form of white curtains.
The photo above is an example of a small sauna with a square pool. The bathroom is small. The shower room is located in the same room, just separated by a curtain. The steam room is hidden behind a glass door. There was also room for a table with chairs.
This is a combination of different styles. The walls are brick. The ceiling is lined with clapboard. Many windows make the room bright. The pool is oval in shape, finished with porcelain stoneware.
Such a small tank will fit compactly even in a small Russian bathhouse. Large windows offer a beautiful view of the winter forest. The lower part of the walls is lined with stone, the top with decorative plaster.
Fill
A shallow strip foundation is suitable when the soil is dry, there is no moisture, there is little frost in winter, and the construction is not heavy.
To do it, you need:
- Conduct internal markings.
- It’s good to think in advance where the stove is located so that you can immediately lay the foundation for it too.
- To simplify the work, you can place wooden structures resembling benches in the corners. They are needed to attach the measuring cord.
- Get rid of the fertile layer of soil and make a trench. The clay obtained from it can be used as bedding later. The depth of the trench should reach a durable layer of clay. Most often, 50-60 centimeters are required.
- Level the bottom and cover the trench with a layer of sand, and then wet it with water and compact it. The thickness should be more than 15 centimeters.
- Fill in a new layer of crushed stone and compact it.
- Make formwork and cover it with polyethylene from the inside.
- Build a structure made of metal or plastic and lower it into the trench. To raise it above the topping, you can put granite pieces underneath.
- Fill the foundation with concrete and level the resulting area. The formwork can only be removed after at least a week.
Concrete becomes very strong after about a month, so it must be handled carefully at first. It’s better to wait a month before moving on to building a bathhouse.
How to make a sauna with a swimming pool
The process is complex. Masters do not advise beginners to take it on without the necessary knowledge. Below we will look at the nuances of constructing a pool under different conditions.
During the construction phase of the main building
The construction of a stationary pool is done simultaneously with laying the foundation and building the bathhouse itself. The location of the bowl, size and shape are thought out at the design stage of the entire building.
The difficulty that will have to be faced is the arrangement of a separate sewerage system. A regular drain hole will not be enough. And for this you will have to request permission from the relevant services.
Another point that is decided before starting work is the shape and design of the descent ladder in the pool. It can be made monolithic from degrees, or you can buy a ready-made metal one and secure it later. The last option is simpler and cheaper.
When all the nuances are provided for, permits are obtained, you can begin building the pool. The step-by-step process looks like this:
- The construction site is being marked.
- A pit is being dug. Digging by hand with a shovel is difficult - it will take a lot of time and effort. And for this you will have to hire people. It’s easier to order special equipment.
- When the required depth is reached, the bottom is compacted. A gravel-sand cushion is poured on top of the ground. The optimal thickness is 15 cm. It is compacted and moistened with water.
- Roofing felt is laid along the bottom and walls of the pit. The pieces are overlapped by 15–20 cm. The joints and seams are covered with hot bitumen or other sealant.
- Formwork is assembled from boards to fill the walls of the pool. Enough for the inside. The walls of the pit will serve as the outer walls. Nails and screws are suitable for connecting boards.
- A solution is being prepared for pouring the first layer onto the bottom. Recommended brand of cement is M-400. 1 part cement is combined with 5 parts crushed stone and 3 parts sand. Water should be no more than half of the total volume. The thickness of the mortar layer is up to 15 cm.
- After the first layer hardens, a reinforcing mesh is formed. To do this, steel rods with a diameter of 1 cm are tied together with wire or plastic clamps. The recommended cell size is 15*15 cm. Lay the mesh 5 cm above the layer of hardened concrete.
- A second layer of concrete is poured onto the bottom up to 15 cm thick.
- The walls are being reinforced.
- Filling the walls with mortar. Perform one at a time to ensure uniform hardening. To clearly calculate the volume, you need to multiply the length, thickness, and height of the walls of the bowl.
- Once the concrete layers have completely hardened, it is necessary to waterproof the floor. Thick geotextiles and polyethylene film are suitable. An alternative is plastering the walls with moisture-resistant compounds.
Silicone-based plaster mixtures are best suited for finishing swimming pools.
Optionally, tiles or mosaic pieces are laid on top of the plaster.
In a completed building
For small one-story bathhouses, a portable pool is an excellent solution. It can be installed during the operation of the building.
Sold in the form of a finished bowl made of impact-resistant plastic in oval, square, round and other shapes. All necessary equipment is included in the kit. The tank is completely sealed. Installation can be done by specialists in a day.
The water in the pool is heated to the required temperature by a special heating element.
On the street
It is important for an outdoor pool to have good waterproofing, since the structure will be constantly exposed to the external environment and precipitation.
Otherwise, the procedure is similar to the installation of a stationary pool during the construction of a bathhouse, as described above.
Briefly the sequence of work is as follows:
- Marking is being done. A pit is being dug. The depth of the pit is made 15 cm greater than the depth of the tank.
- Gravel is poured onto the bottom, compacted, and moistened with water.
- The first layer of solution is poured up to 15 cm.
- A reinforcement mesh is formed. A second layer of concrete up to 15 cm thick is poured on top.
- The formwork for the tank walls is assembled.
- Concrete is poured at a time for the walls of the bowl. If possible, a vibrating hammer is used to remove any remaining air from the solution. An alternative is to pierce the thickness in several places with a steel rod.
- Next, you need to give the concrete time to stand and dry completely so that it gains maximum strength.
- Waterproofing is being installed. The cheapest way is to line the bottom and walls of the bowl with thick plastic film.
A reliable, but expensive method of waterproofing for outdoor pools is the use of Osmoseal. This is an excellent sealant for exterior use. Apply in two layers.
To finish the bowl, glass mosaic, porcelain, and ceramic tiles are used.
Walls
When building a brick, stone or block bathhouse, masonry always starts from the corners. A solution of cement and sand is created and blocks are laid on it.
You should also use stretched string to lay the material evenly.
Having made lintels on top of the doors and windows, you need to make formwork at the top and build an armored belt. It is needed to secure the bolts on which the Mauerlat board will be attached. When the mixture is completely dry, you can begin to make the roof.
Other pergola options
An arched pergola is a classic option. The assembly of the structure is carried out according to the same scheme as the rectangular one. The roof shape should be rounded:
- For an arch you need a semi-arch base. The material for the template will be fiberboard. For the semi-arch, take a planed board (thickness - at least 50 mm).
- Use a dowel to fasten the parts together.
- You can strengthen the structure using wood glue. While it dries, secure the parts with clamps.
- Once everything is dry, remove any remaining glue and sand.
- As soon as the side battens are ready, you can begin installing the arches.
Advice
. The fan configuration is an addition to the veranda or terrace. A canopy of this type is only suitable for large areas.
A derivative of a curved roof is an openwork pergola. Free from heavy elements. Thin supports will replace 4-5 volumetric supports. The number of the latter will have to be increased. An openwork extension is a structure that is devoid of a roof. It can be vines of climbing plants that wrap around the slatted sheathing. The canopy will not provide shelter from the rain, but this design fits harmoniously into the garden.
Frame installation
The frame is made of wood, insulated and sheathed with various types of finishes. To carry out a vapor barrier, take a film specially created for this purpose.
This will prevent moisture from accumulating inside. As insulation, you can use mineral wool or fiberglass. They seal perfectly and do not spoil natural air exchange.
The walls should be insulated and sheathed after the work on the roof is completed. This way the materials will not suffer from possible getting wet.
Example of design with photo
To clearly understand how best to place a bathhouse on a site, you can give a visual example.
This diagram shows that the bathhouse is located next to the garage, and the entrance to it is through the garage. On a square plot, all requirements for the distance between residential buildings are perfectly met. All outbuildings are located away from the sauna.
Floors
A frame bathhouse requires only insulation of the floor and covering it with boards, but other buildings, on the contrary, require more difficult work:
- Installation of logs;
- Tricks of the subfloor;
- Securing the vapor barrier;
- Laying insulation;
- Performing waterproofing;
- Laying floor boards.
Buildings built with a columnar or pile foundation can only afford an insulated wooden floor.
Ceiling
Aspen, alder and linden will serve wonderfully as ceiling materials. They are not particularly thermally conductive, which means they will not heat up from the warmth of the dressing room or rest room.
It is recommended to sheath it with wooden clapboard, which can easily withstand elevated temperatures. You cannot take pine or spruce, as they release resin when heated.
In addition, fiberboard and chipboard sheets are also dangerous to use as ceilings - they can emit fumes that are dangerous to humans.
Fire safety requirements
Steam room is a room that involves the operation of heating systems. That is why, when building a bathhouse, you should study fire regulations to avoid fire. The main material used is wood. It is known to be flammable. Therefore, each structural element must be treated with a fire retardant. The use of resinous rocks is unacceptable. When heated, this natural material releases resin. And it can cause a burn.
Other requirements:
- Insulation of pipes and ceilings with non-combustible materials.
- Covering the walls and floors located next to the stove with heat-resistant screens.
- The heating device is raised above floor level.
- Placing a 65x75 cm metal plate in front of the firebox.
- Availability of ventilation. May be natural or forced.
- The wiring is mounted in closed boxes.
- Grounding of each electrical appliance.
- Self-extinguishing wire insulation.
- The stove requires a chimney connected to a pipe. Smoke must not be allowed to escape through ventilation.
Compliance with fire safety standards during the construction of a bathhouse is a guarantee of the safety of vacationers and their property. Therefore, the choice of materials and the construction process are approached responsibly in order to prevent the building from catching fire.
Roof
The first step is to install hydro and thermal insulation. Basically, the roof greatly depends on the area in which the bathhouse is built. So, for example, if the wind in these places is strong, then the slope must be small, and vice versa.
After installing the roof, you need to finish it, and then think about ventilation.
Ventilation
Many people think that it is completely unnecessary, but this is not so. Without ventilation, hot air is trapped at the top, and on the contrary, it is cold at the bottom.
It is better to place the first vent hole lower, next to the boiler, and the second one near the ceiling, on the other side. The bathhouse should be ventilated every couple of hours. This will make it possible to keep warm.
Types and sizes
In such a bathhouse you can equip the following types of health procedures:
- Traditional Russian steam room with washing area. The steam room is filled with wet steam at temperatures up to 85°C. It gives special pleasure to whip yourself or a friend with a birch or oak broom. After the steam room, be sure to splash yourself with a bucket of cold water in the washing area. Such a bathhouse consumes a lot of water; you should consider a way to drain it into the drainage.
- Finnish sauna. Dry and very hot steam is used here - up to 120°C. It is necessary to consider a ventilation and thermal insulation system in order to quickly warm the room to the required high temperature. If space allows, then install a font for dipping. Otherwise, they will equip a dousing font - a bucket of water suspended from the ceiling.
- Ofuro. Single heated mini-sauna from Japan. The half-barrel is placed vertically, a seat and a water heating system are installed in it. Ofuro is often placed outdoors, in which case the barrel is closed on top with a lid with a cutout for the head.
Japanese bath Ofuro
The size of the structure determines its capacity and the ability to accommodate additional amenities and premises. The steam room itself occupies 2 m, and this is the length of the minimum module.
- Mini - from 2 to 2.5 m, 2 (lying on shelves) to 4 (sitting) people of average build fit into the steam room. Such a bathhouse weighs up to half a ton.
- Standard - up to 3.5 meters long. In addition to the steam room, there is a modest dressing room that helps place clothes and keep warm. This design weighs about a ton.
- Maxi-up to 6 meters long, has a full soap compartment and a dressing room of increased length, which can be used as a resting place.
- Two six-meter modules are mega-joined, with a vestibule between them. On one side there is a bathhouse with a steam room, washing and shower rooms, on the other there is a relaxation room
Despite the large size of individual models, they do not require powerful foundations and can be installed on lightweight support structures the size of railway sleepers.
Insulation and vapor barrier
A frame bathhouse is not insulated - when constructing the frame, thermal insulation is immediately installed in it. A wooden structure needs a sheathing where the necessary material will be laid. But other types require more complex work.
You will need mineral wool, the thickness depending on the climate conditions and the type of bath. As a rule, the layer thickness is about fifty millimeters. The insulation itself can be either mats or rolls.
Vapor barrier is very different from waterproofing. The first one will do its job perfectly, even if it’s cheap, while the second one will only ruin everything.
Therefore, you need to be careful not to confuse them and not buy a fake.
Preparing to assemble a wooden pergola with your own hands
Wooden trellises are an ideal support for climbing plants. The main advantage of the material is its environmental friendliness. As for metal, it is reliable and durable. Keep in mind that such elements can heat up under the influence of the sun, and this will cause the death of the shoots.
For the canopy, prepare:
- cement composition;
- timber of two types: 50x40 mm and 60x40 mm;
- long screws;
- self-tapping screws with washer;
- varnish;
- profile 60x50 mm made of galvanized sheet;
- polycarbonate (thickness 10 mm);
- fastening elements for polycarbonate: end profile and thermal washers.
Finishing
The simplest and most convenient materials for finishing a finished bathhouse at the dacha will be lining or something similar. And if we talk about finishing the exterior, then absolutely anything that is suitable for cladding a house will be suitable.
But if the bathhouse is built from rounded logs, then it already looks attractive and there is no need to sheath it.
Documents that regulate construction
For gardening non-profit partnerships (SNT), the standards for the construction of a bathhouse on a summer cottage are regulated by SP 53.13330.2011 and SNiP 30-02-97 (updated by additions from 2022).
Issues related to the registration of structures are addressed in the following codes:
- Tax;
- Civil;
- Housing
Issues of real estate registration (in some cases, baths fall under this category) are regulated by Federal Law No. 340.
Furniture
You can do all the arrangement yourself, or purchase it in stores before studying a huge number of photos of the bathhouse inside and decide what you like.
There are no restrictions in the choice of material, but there is no need to use chipboard - such furniture will soon become unusable because it cannot withstand strong humidity.
Here are the main points, after which you will get a pretty good bathhouse, where you can invite not only relatives, but also friends to take a steam bath. After all, colorful photos of a bathhouse in a country house will not leave anyone indifferent.
Construction, sanitary and fire safety standards
The construction of a bathhouse must comply not only with urban planning standards, but also meet the sanitary, construction and fire safety requirements established by SNiP 30-02-97.
General rules for building a bathhouse:
- the distance from the bathhouse to the boundaries of neighboring plots must be at least 3 m;
- from a separate building to a residential building - at least 5 m;
- to avoid water contamination, the distance from the bathhouse to the nearest open reservoir or well with drinking water should be more than 20 m;
- construction works better on higher ground, so the risk of flooding can be significantly reduced;
- when constructing a log house, all wooden elements must be impregnated with a special compound (anti-peren) to prevent fire in the event of cracks or damage to the chimney;
- doors in the bathhouse must be installed so that they open outward;
- if it is planned to organize a drainage system, then the permissible distance of the sewage system to the border of the neighboring plot must be at least 1.5 m;
- when constructing a bathhouse with electricity in it, wire insulation and grounding are mandatory;
- For cladding the ceiling and walls inside the building, only fireproof materials must be used;
- all heat-generating elements of the stove must be located at least 12 cm above the floor level;
- to install the chimney, it is necessary to use non-flammable, heat-resistant materials;
- the presence of a fire extinguisher and ventilation holes in the bathhouse is a prerequisite;
- A protective sheet of metal measuring 65x75 cm must be placed in front of the combustion chamber.
A bathhouse is a complex construction project with an increased fire hazard, which is subject to strict sanitary, hygienic and fire safety requirements. To avoid possible problems when approving a building, it is recommended to prepare a working draft of the planned building in advance.
Thus, if violations of legal rules are discovered (for example, the distance established by SNiP standards is not maintained), it is easier to correct them at the design stage, rather than demolishing an already completed structure.