Despite the fact that we ourselves do not consider iron stoves a good option for creating the conditions of a real “Russian-style bathhouse,” nevertheless, this is the type of stove that most owners of personal country baths can afford. And not all owners are fans of traditional conditions, so they are quite happy with everything that is in the gap between a real Russian and a real Finnish bathhouse. Based on this, we decided to look at what suitable stoves are on the market today and, together with you, create an adequate rating that will help other readers decide on the choice of a stove for a Russian bath in the sense in which it is understood by the majority (about those for a sauna , see here).
Types of stoves
Do-it-yourself sauna heater stove can be made in 2 types:
Read also: How to go towards your goal correctly
- made of brick;
- metal.
Actually, such a stove is called a heater not because it is made of stone, but solely because of the method of pumping steam. The oven heats the stones and by pouring water over the hot stones, the temperature rises. Naturally, both brick and metal stoves have their pros and cons.
Brick oven
Scheme of a stove with a firebox in the dressing room.
How to choose?
To know how to choose a stove for a sauna with a separate steam room and sink, you should use the following tips:
- The fryer must have high thermal power, sufficient to heat the steam room and water in the washing room, as well as provide steam. For each room, this indicator is individual and depends on the size of the heated area and the material from which the bathhouse is made.
- A properly selected design is compact in size, easy to use and eliminates the possibility of fire.
- The stove must be equipped with a high-quality steam generator and heat accumulator. This is necessary in order to easily set the desired mode that determines the type of bath: from real Russian to dry Finnish.
- It is necessary that the roaster be equipped with tools to adjust the convection.
- There should be no significant areas on the furnace structure whose temperature may exceed 150 degrees.
- If you are offered a brick or metal Dutch oven, opt for the latter option. Metal stoves are capable of heating a steam room with high speed and efficiency, take up less space, do not require a foundation, and are easy to use and maintain.
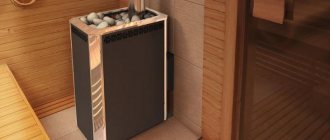
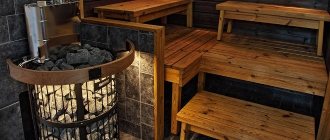
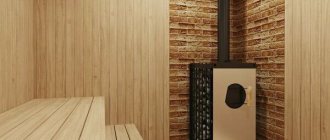
This is what a sauna stove with a separate sink and steam room looks like:
Laying a rubble concrete foundation
A heater stove for a bathhouse with your own hands can be built on a different type of foundation, which is created as follows:
- They dig a pit taking into account the amount of soil freezing. It needs to be made wider relative to the perimeter and depth by 10-15 centimeters. A rubble concrete foundation is laid provided that the walls of the pit do not crumble and groundwater does not seep through.
- Crushed stone 15 centimeters high is poured onto the bottom and compacted, making a horizontal platform.
- Next, they build a formwork that looks like a box without a bottom. The inside is covered with a waterproofing layer of roofing felt or hot bitumen is used, after which it is immersed in a pit.
- A layer of stones with a diameter of no more than 15 centimeters is placed at the bottom, and crushed stone is poured into the spaces between them.
- A solution of Portland cement and sand (in a ratio of 1:3) is poured on top, reminiscent of thick sour cream in composition.
Further actions depend on the selected option:
- The first row of stones is filled with solution and left for 24 hours. Do the same with the second layer of stones and wait a day. Continue in the same way until the desired level is reached.
- If the volume of the base is small, the filling is done at one time.
The level of the rubble concrete foundation is made 6-7 centimeters below the finished floor. The surface of the screed is checked with a level and covered with film. After about one week they begin laying.
Combined bathhouse
The main attractive force of a one-room space for spa treatments is the ability to place everything you need in an area of no more than 10-15 m2. The advantages of this arrangement:
- the room warms up quickly;
- fuel is saved;
- everything is nearby;
- construction is much cheaper and happens faster.
This bathhouse is convenient:
- for most older people;
- for a lonely person;
- for a family of up to 4 people.
In winter, such a room is instantly ventilated. Some, in order to save steam for others, wash in a trough on the floor, where the air is cooler. In summer you don’t have to use the steam room.
The negative nuances of the combined option for a large number of people, in addition to cramped conditions, are manifested in increased humidity in the steam room, which makes breathing difficult and reduces the effect of temperature on the skin. For many people, the smell of soap on the shelf spoils their pleasure. If there is an organizer with a steady hand in the team, he can convince everyone to first take turns steaming and then wash together.
The negative consequence of a combined steam room and washing room is a quickly deteriorating wooden floor. Anyone who builds thoughtfully lays the boards in such a way that they are easier to replace. If you decide to lay a tiled floor, you need to put rubber mats on it for safety.
Features of operation
After erecting a stove with a heater for an open or closed bath, it is necessary to dry it. Operating rules:
- It is forbidden to heat the stove with wood for seven days after laying.
- You can heat the stove only after a week. To quickly dry the masonry, it is recommended to perform 3-4 heatings every day for the next 7 days.
- Massive logs should not be used for the first fires. It is important to choose fuel that will burn quickly enough - wood chips, birch bark, straw, small dry branches.
Before starting the first kindling, it is necessary to check the draft. To do this, you need to bring a lit match or lighter to the blower. If the flame reaches towards the hole, there is a draft, you can start a fire.
You also need to pay attention to the stones used. It is better to use basalt, granite, andesite.
Requirements for stone backfill:
- stones should not emit harmful substances when heated;
- cobblestones must maintain their integrity under constant temperature changes;
- The stones must heat up quickly and transfer heat effectively.
The suitable size of stones is at least 10 cm in diameter.
No matter how correctly the stones for filling the heater are selected, with active use, after about a year they will begin to crack. Every 10–12 months you need to go through the entire backfill, throw out small fragments and replace damaged cobblestones with new ones.
The heater can be “built on top” of many standard brick and metal stoves. When assembling it yourself, it is important to make the structure such that it can accommodate the required amount of stone backfill, withstand its weight and exposure to high temperatures.
Foundation for a brick stove-heater
If you want the stove you made to last for many years, you should take care of making a reliable foundation for it. In this case, be sure to take into account the following nuances:
- The foundation of the bathhouse and heater must be different, especially if the total mass of the stove exceeds 700 kg. There must be a distance of at least 500 mm between them.
- The foundation for the heater must have a depth below the soil freezing level of an average of 700 mm. In different regions of Russia, the level of soil freezing is different.
- The size of the foundation should be half a brick larger than the stove itself on each side.
So, let's look at the step-by-step process of making a foundation for a stove:
- To begin, dig a pit with a depth below the soil freezing level, on average 700 mm. The size of the pit around the perimeter should be 100–150 mm wider. This will allow you to easily install the formwork, and fill the resulting gap with sand or gravel.
- At the bottom of the pit we make a sand cushion. At the exit it should have a thickness of 150 mm. After pouring a layer of sand, water it with water to compact it. As water is absorbed, the sand will settle, so you will need to add it to the desired thickness.
- When the water is completely absorbed, a layer of stones or broken bricks is poured on top of the sand. It needs to be compacted. The resulting gaps between the stones should be filled with sand and watered. It is very important that the sand fills the space between the battle and the stones as densely as possible. The thickness of this layer, in our example, will be 250 mm.
- If the sand has stopped settling, then the next layer of crushed stone can be backfilled. It also needs to be compacted well.
- Now you need to make formwork from boards 40 mm thick. The internal size of the formwork must correspond to the size of the foundation. The top of the formwork must be leveled. It should be securely fixed in the pit and a reinforcement cage should be placed inside it. There should be 50 mm between the formwork walls and the frame.
- At the next stage, perform concreting. In this case, it is necessary to tamp with a piece of steel reinforcement or a wooden beam. The upper level of liquid concrete must be brought to the edges of the formwork. The surface of the screed should be smooth. As a result, the formwork should be on the same level as the subfloor of the bathhouse. The poured concrete must be left for several days to set.
- When the concrete has acquired sufficient strength, the formwork must be removed. The surface of the concrete is covered with two layers of molten tar. After this, fill the space between the walls of the soil and the concrete with sand or gravel. After this, cover the concreted area with plastic film and wait 7 days. Then you can start laying bricks.
Rubble concrete foundation
There is also another option for making a foundation for a heater. The sequence of its manufacture is as follows:
- A pit is also dug to indicate the level of soil freezing. Its size should be wider around the perimeter and 100–150 mm deep.
- If groundwater does not seep into the pit and the walls do not crumble, then you can begin to lay a rubble concrete foundation.
- Fill the bottom with a thickness of 150 mm with crushed stone. It should be compacted well. In this case, the platform must be horizontal.
- After this, formwork is done. It looks like a box without a bottom. Its size must correspond to the foundation design plan.
- The inner walls of the formwork are covered with hot bitumen or roofing felt for waterproofing.
- Next, immerse the formwork into the pit.
- Place the first layer of large stones up to 15 cm in diameter at the bottom.
- The resulting voids between the stones must be filled with crushed stone.
- A layer of cement-sand mortar is poured on top. The consistency of the solution should resemble thick sour cream. It is prepared as follows: Portland cement M400 or 500, one part and 3 parts sand. Water is added until the consistency of the solution resembles thick sour cream.
Foundation for a stove with waterproofing completed
After these steps, you can follow one of the following paths:
- Spray the first row of stone with the solution. Leave it for a day. Then pour the second row of stone also at intervals of a day. And so on until you reach the desired level.
- If the volume of the foundation is small, then concrete can be poured in one go.
The foundation level should not reach the level of the finishing floor by 60–70 mm. Be sure to check the top layer of the screed for level. After this, the surface is smoothed and covered with plastic film. In a week, the foundation will be ready for masonry construction.
The drying speed of concrete will depend on weather conditions. Therefore, in some cases you will have to wait more than one week.
Foundation slab on piles
Foundation screed
Let's consider another option for making a foundation for a stove-heater. A reinforced concrete slab with a thickness of 150 mm is laid at its base. Its lower layer must be reinforced. The larger the area of the installed slab, the more reliable the entire structure will be. But what if the predominant soil is moist clayey and loamy? Such a slab will not be able to balance the force of frost heaving when the soil freezes. Among other things, even in sandy and dry soils, seasonal movement of the foundation can be observed. To get out of this situation and increase the stability of the foundation, several piles are laid under the slab, on which the slab will later rest.
You can make such piles as follows:
- Using a garden drill Ø20 cm, drill a cylindrical hole 1000 mm deep.
- The bottom of the pit is covered with a layer of crushed stone 150 mm thick and compacted.
- After this, take the roofing material and roll it into a tube that will serve as formwork in the pit. This tube is immersed in the hole.
- Next, pour concrete into the hole to the level of the slab installation.
- After an average of 10 days, it will be possible to install a reinforced concrete slab on the piles.
The foundation must be waterproofed along the top edge. This will prevent groundwater moisture from penetrating the brick structure of the furnace. For this purpose, lay 2 overlapping layers of roofing material on the installed slab, which is coated with hot bitumen. In this case, the roofing material should extend beyond the foundation by 50 mm. The second layer of roofing material is laid perpendicular to the first.
Necessary tool
To lay a stove, you will need the following set of tools:
- small trowel;
- hammer-pick;
- square 60×40 cm;
- plumb line;
- steel level 60–90 cm;
- grinder with cutting disc for stone;
- protective glasses.
Pros and cons of brick sauna stoves
In favor of a brick oven, it is worth highlighting the following:
- Environmentally friendly raw materials, which is safe for health.
- Long service life. It can last up to 100 years or more.
- Wear resistance and strength of the material.
- The ability to retain and release heat for a long time. The water in the tank, heated in the evening, will be warm until the morning.
- The steam produced is of good quality.
- Combustion products do not pass through the inner heater.
- The stove is capable of heating large rooms.
- Brick is a fireproof material.
Among the disadvantages, users note that:
- It will not be possible to build a structure quickly and without experience. Here you need to correctly draw up a drawing, carry out calculations, and understand the principles of brickwork.
- The oven is heavy. Therefore, a reliable foundation must be poured under it.
- The design takes a long time to heat up compared to its metal counterpart.
- Prolonged heating entails increased consumption of wood fuel.
- High cost of work (if ordered from a stove maker). Large amounts of money spent on purchasing materials.
Despite so many shortcomings, the advantages of the design are much more significant, which is why the demand for the construction of a brick oven with a water tank is only growing.
Bathhouse with steam room and sink in one room: advantages and disadvantages
A bathhouse with a combined sink and steam room is not so common at the moment. This option is chosen mainly if the area of the site does not allow for two separate rooms.
Another advantage is that a bathhouse, where the steam room and washing room are combined, is much more pleasant to visit in winter: it heats up quickly and is quickly ventilated. In summer, on the contrary, it is quite difficult to cool the washing room.
A bathhouse with a combined sink and steam room has significant disadvantages. The first of them is due to the fact that with such a design it is much more difficult to maintain the necessary conditions in the steam room. In particular, if someone washes in the washing room, the humidity level in the room will increase, and the steam room will be less comfortable. And the smell of soap or shower gel also interferes with creating the desired atmosphere.
Any bathhouse should be equipped with a sink and a steam room. To effectively use space, many owners install a special stove. It divides the bathhouse into two rooms.
Ways to increase furnace efficiency
Increased equipment efficiency, economical fuel consumption is possible with complete combustion.
When the firewood is on top of the grates, the primary air passes from below through the grate from the ash pit. This air promotes the oxidation of fuel, releasing water vapor and carbon dioxide. As soon as the temperature of the wood increases, flammable gases begin to be released. They burn out in the space directly above the fuel and come into contact with coke elements, forming carbon monoxide.
To increase the efficiency of the stove, it is necessary to ensure the combustion of combustible gases in the firebox. To do this, secondary (additional) air is passed through the holes in the firebox door.
If this is not done, there will be underburning of the wood and increased deposition of soot on top of the stones. The consequence is that heat transfer decreases and the risk of fire increases due to the large amount of soot in the pipes.
At the beginning and at the end of the firebox, excess air enters the firebox. The intensity of wood burning decreases. Heat leaves through the chimney along with flue gases. To reduce heat loss, it is better to close the dampers on the chimney.
Other ways to increase efficiency include:
- Increase in the volume of stones.
- Increasing the heated surface area.
- Reducing the thickness of the walls of the structure (material – metal).
It is necessary to take into account the direct relationship between the size of the firebox and fuel consumption. The larger the volume of the firebox, the greater the fuel consumption. At the same time, the heat transfer of the furnace also increases.
Bathhouse with steam room and sink in one room: advantages and disadvantages
A bathhouse with a combined sink and steam room is not so common at the moment. This option is chosen mainly if the area of the site does not allow for two separate rooms.
Another advantage is that a bathhouse, where the steam room and washing room are combined, is much more pleasant to visit in winter: it heats up quickly and is quickly ventilated. In summer, on the contrary, it is quite difficult to cool the washing room.
A bathhouse with a combined sink and steam room has significant disadvantages. The first of them is due to the fact that with such a design it is much more difficult to maintain the necessary conditions in the steam room. In particular, if someone washes in the washing room, the humidity level in the room will increase, and the steam room will be less comfortable. And the smell of soap or shower gel also interferes with creating the desired atmosphere.
Any bathhouse should be equipped with a sink and a steam room. To effectively use space, many owners install a special stove. It divides the bathhouse into two rooms.
Bricks and their masonry
Bricks for the stove should be chosen of high quality and well fired, with perfect edges and without visible defects. To make a sauna heater with your own hands, it is better to take refractory ceramic bricks of the same size.
For the fuel zone, it is better to take fireclay bricks in yellow or other light shades, which can withstand high temperature loads. But it is not suitable for masonry itself, since fireclay cools quickly.
To lay fireclay bricks, you need to use a solution based on fireclay fireproof white clay or purchase a special composition for this purpose.
But it will not fit the entire stove, because the masonry may collapse over time. See also: how to prepare mortar for laying bricks.
For external masonry, a composition based on clay and quartz sand is suitable. The composition should first be sifted through a mesh to prevent large particles from getting into the solution. It is best to take clay from a quarry with a depth of 2 m or deeper. Then it is soaked in water and ground through a sieve twice: first through large and then through small cells.
To understand how to make a heater in a sauna stove with your own hands and how to lay the bricks, you need to decide what type of heater will be - open or closed. The first option is simpler.
If we are talking about a small heater, then it will be enough to heat a steam room with a tank. The tank itself must be located separately, while the water is heated in it through an open siphon. A pipe placed above the fire is welded into the tank. When the water in it boils, it rises into the tank, and cold water comes in instead. When constructing a closed stove, the place for stones must be laid out from fireclay bricks. The process of its construction is very complex and requires certain skills.
When laying, you need to pay attention to the seams: they must be airtight so that carbon monoxide does not get inside. The mortar must be stretched across the entire width of the brick, the thickness of the seam should be small (for ordinary ones - up to 5 mm, for heat-resistant ones - up to 3 mm) . To achieve this, it is recommended to consider the following:
- before work, you can make two metal guides with the required diameter;
- Before laying the brick, guides are placed on both sides of the previous layer; after pressing it against the bricks, a closed seam is formed, after which they are removed;
- they should be placed so that they are at the edges of the brick, and the mortar from the next one will fill the empty space that they formed.
Each subsequent row of bricks must be laid only when the previous one is completely laid out. It is recommended to first adjust the bricks in rows to size , and only then lay them on the mortar. Be sure to check the corners with a square. It is strictly forbidden to place ordinary bricks in the same row with heat-resistant ones, since when heated they have different expansion, which can lead to the formation of seam cracks and gas leakage in the future.
When the masonry is completed, it must be dried for 10 days. Drafts are not allowed. Only after this time can you heat the stove for the first time.
How to choose?
To know how to choose a stove for a sauna with a separate steam room and sink, you should use the following tips:
- The fryer must have high thermal power, sufficient to heat the steam room and water in the washing room, as well as provide steam. For each room, this indicator is individual and depends on the size of the heated area and the material from which the bathhouse is made.
- A properly selected design is compact in size, easy to use and eliminates the possibility of fire.
- The stove must be equipped with a high-quality steam generator and heat accumulator. This is necessary in order to easily set the desired mode that determines the type of bath: from real Russian to dry Finnish.
- It is necessary that the roaster be equipped with tools to adjust the convection.
- There should be no significant areas on the furnace structure whose temperature may exceed 150 degrees.
- If you are offered a brick or metal Dutch oven, opt for the latter option. Metal stoves are capable of heating a steam room with high speed and efficiency, take up less space, do not require a foundation, and are easy to use and maintain.
This is what a sauna stove with a separate sink and steam room looks like:
Water container
Before making a stove with your own hands, we advise you to decide on the size of the container for heating water. To do this, you should have an approximate idea of how many residents will live at home and whether you plan to invite guests to the bathhouse. The calculation is based on 8-10 liters of hot water per person.
Water heating container
It is better to use an open water container. Evaporation during operation will be small, but you will receive a number of advantages:
- Free access when filling Water heating tank
- Possibility of servicing the interior.
- When the oven operates, scale will form on the walls of the container. Open access will allow you to freely clean and dry the inner surface.
- In winter, this will completely remove remaining water, protecting it from freezing. Water heating container
A boiler of the appropriate size, sold in specialized stores, is perfect for the container. If desired, the container can be welded individually.
Water heating container
Our advice: when making the bottom, use thickened steel.
Separate bath
If the area is more than 15 m2 and you want to do everything according to the rules, then the individual rooms will turn out to be quite bearable. Tested by many people. Modern shower cabins fit in the required quantities into a small washing area. A washing room, arranged in the old fashioned way, will perform the same functions.
High humidity cannot be avoided in the washing room. The surfaces of walls, ceilings, floors are covered with tiles, porcelain stoneware and similar materials. If the bathhouse is a log house, then it is built from pine or larch. These rocks are resistant to rotting and deformation, which confirms their use in shipbuilding.
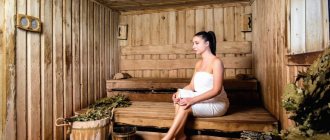
The main element of the steam room is a stove, preferably a heater. The shelves are equipped in several levels to suit all tastes. The temperature under the ceiling is higher. The shelves should be facing towards the oven. A container of cold water is needed to add steam by splashing on the stove, or to pour over for invigoration. Birch, oak, and cedar brooms will be needed for massage and ambience.
Everyone will make a decision in accordance with their material capabilities and desires. It should be noted that the humidity of the sauna is ≈20%, and the humidity of the washing room is 70%. Therefore, you will not be able to enjoy dry steam in a combined version. Washing at a temperature above 60°C is not comfortable: you will immediately sweat again. In summer it is debilitating. But still, each option has its own advantages.
I like1I don't like