Wooden floors: pros and cons
If you look from the point of view of ease of installation, then a wooden floor will be a priority. The problem is that after 8-10 years some elements will need to be changed. However, this will not be difficult to do. Both deciduous and coniferous species are used as building materials for bathhouse floors. The main thing is that they are resistant to temperature changes and moisture.
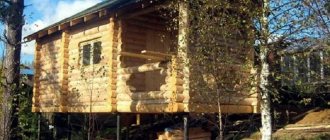
PHOTO: bany73.ru Wooden floors in a bathhouse are much nicer than dead stone
The most suitable boards for these purposes are made of oak, larch, beech, and birch. But pine or aspen boards should not be used here.
Spilled wood flooring and its features
A poured floor is a budget option that does not require much time for installation. It is a regular wooden lattice. Its elements are mounted at a short distance from one another, which ensures unhindered flow of water into the ground.
PHOTO: izhevsk.ru Spilled larch flooring - it’s easy to make, and this wood will last a long time
This type of floor does not provide for the arrangement of sewage drainage, as well as insulation. For this reason, a bathhouse with similar floors can be considered a country option, which will be used only in the warm season. In winter, such a bathhouse will be uncomfortable, and heating it in the cold is not so easy.
The peculiarity of the poured floor is that the boards are not fixed to the logs. They can be removed from the base at any time for drying or repair. Installation of such flooring is extremely simple.
PHOTO: avatars.mds.yandex.net The flood floor is installed according to the same principle - individual panels can be pulled out and dried
Leak-proof (classic) floors: installation nuances
Such a floor is much more difficult to install, but its arrangement makes it possible to insulate it. This means that you can use a bathhouse with a classic wooden floor at any time of the year and at any temperature. This floor is assembled on logs that are recessed into the ground or mounted into the base. The coating itself is made with a slight slope towards the drainage hole - the ladder.
PHOTO: avatars.mds.yandex.net Non-spillable classic floor - boards fit tightly to one another
First, a subfloor is laid on the joists, after which a tongue-and-groove board is used for the finishing surface. It must not have defects or be deformed. The subfloor is insulated with moisture-resistant materials.
PHOTO: banyabest.ruSchematic representation of a non-spillable floor layer by layer
Recommendations for choosing the direction of fastening the lining
The finishing panels can be fastened vertically or horizontally
The finishing panels can be fastened vertically or horizontally. You can find basic information about each method in the following table. The data obtained will help you make the right choice.
Table. Options for fixing the lining
Finishing direction Illustration Basic information Vertical
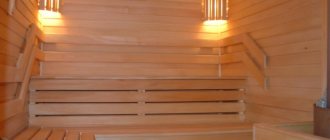
Vertical fastening of the lining
Vertical fastening of panels has a big drawback - the boards heat up unevenly along their length, which negatively affects their service life. Vertical cladding is optimally suited for steam rooms operated primarily in conditions of high temperature and low air humidity, i.e. in sauna mode. To ensure more efficient air circulation in the space between the insulation and the lining, several holes are usually drilled in the sheathing. Horizontal
Horizontal
In the case of a horizontal arrangement, temperature deformations of the lining material will be much less noticeable. Horizontally oriented finishing allows you to visually expand a small steam room. When the panels are fastened horizontally behind them, more efficient air circulation will be ensured - in this situation, the sheathing will be attached to a vertically oriented frame, as a result of which the gap will also be vertical. In addition, with this orientation of the frame it will be much more difficult for rodents to get into the space behind the skin. Horizontal lining is attached much faster and easier than vertical
Important! If you decide to orient the trim panels horizontally, make sure that the groove “looks” down.
Thus, the optimal direction of the casing elements is determined by the operating features of the steam room. If this is a real Russian bathhouse with splashes and steam, it is better to mount the boards horizontally. In saunas, the option of vertical orientation of the cladding elements demonstrates itself well.
Preparation
I read a bunch of sites on how to dry wood at home, since no one uses fresh saw cuts - they crack badly and can become moldy. To be honest, there is very little information on the Internet on this matter, it is poorly verified, scarce and contradictory. Basically, all the advice boils down to the fact that this should be done in production conditions. In the end, I chose and decided to try the two most realistic methods for me: boil the saw cuts in oil or in a very concentrated salt solution. I outlined a general procedure: file, dry, process, sand. So, vacation came, we went to the village, and I began to act.
Article on the topic: What types of Russian baths are there?
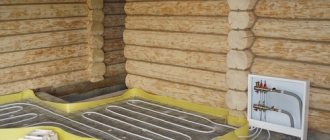
Waterproofing sand cushion
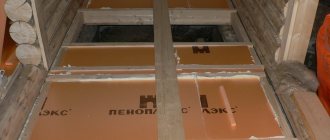
After the sand has settled, you need to spread a plastic film over its surface with an overlap of at least 30 cm at the joints of the strips. This is enough to prevent the groundwater from rising higher. We overlap the film onto the walls by at least 10 cm on each and fasten its edges to a wooden beam using a construction stapler so that they do not fall down. Then we lay PVC film on top of the polyethylene film to waterproof the pools.
On top of the PVC film, for swimming pools, we lay guide bars for the base of the floor (joists). We fill the space between them with sand (if it is a steam room) and polystyrene foam if it is a rest room or washing room. We lay a vapor barrier membrane on top of the bars and fasten it to the staples with a construction stapler. Then we place construction plywood on top of it with a thickness of at least 16 mm.
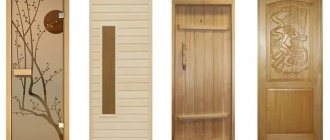
Wall decoration
Finishing a steam room with your own hands requires certain knowledge and skills, so it makes sense to hire a professional craftsman. In any case, you should have an idea of the key points of construction and finishing work. For interior decoration, only certain materials should be used, which will be discussed further.
Experts advise finishing with paired linings from deciduous trees, since they do not emit resin.
I want to see everything!
I want to see everything!
Linden
Not only flowers and linden honey have healing properties, but also linden wood: when exposed to high temperatures, linden boards spread a pleasant aroma and release essential oils into the air, which are endowed with bactericidal and anti-inflammatory properties. High air humidity in baths contributes to the long-term preservation of the beneficial properties of wood.
Do-it-yourself barrel sauna: construction nuances
The essential oils released into the air are hypoallergenic, which makes linden a very valuable material. During the process of construction and operation, other useful properties of linden are revealed: this wood is easy to sand, has a low density and is practically waterproof.
Aspen
Clean, hygienic, moisture-resistant, having a pleasant light shade, not subject to deformation, aspen is perfect for finishing a bathhouse. Aspen does not rot in an environment with high humidity: when saturated with water vapor, it is able to quickly restore its original dryness. Aspen does not emit resins, has a pleasant, discreet odor and has the ability to clean the bathhouse from “old” steam.
Alder
The moisture-resistant properties of alder have been noticed and used for a long time: this type of wood was used in shipbuilding, bridge construction (making piles), construction, including in the decoration of baths and saunas. The light coffee shade of wood, diluted with marble veins, will make the bathhouse stylish and exclusive.
Abashi
Abashi wood (originally from Africa) is a more expensive and exclusive material for finishing a steam room in a bathhouse. This finish is reliable and durable, despite exposure to high temperatures and humidity. Abashi wood shades range from cream to light yellow, they are pleasing to the eye and look interesting and stylish in the interior. Abashi wood is not subject to deformation, rotting, has low density and high strength, and due to its low thermal conductivity, it does not burn the body, even when very hot.
Canadian cedar
Coniferous trees can also be used in finishing a steam room (usually those varieties that emit the least amount of resin are chosen). In the decoration of elite saunas, expensive and solid Canadian cedar, which has antiseptic properties, is used.
Its dense wood with an original texture and complex coffee shades, when heated, spreads a subtle balsamic aroma that soothes, relaxes, relieves stress and fatigue, and fills the body with strength. Canadian cedar wood is moisture-resistant and heat-resistant.
Sauna from a sea container
A unique and stylish design solution can be a combination of several tree species in the decoration of your steam room or sauna: for example, dark alder harmoniously combines with light abasha, linden or aspen wood. Experiment and enjoy the result!
Wooden floors leaking
General scheme for creating a floor in a bathhouse
The simplest floors. The design of leaking floors does not provide insulation, so they are used either in the south or in the warm season, in the country. There is no water drainage system as such in the design of such a floor. Waste water is most often drained directly onto the ground. But, if the soil is clayey, then you will have to install a water drainage system. To do this, we make a reservoir, as described in the section describing the construction of concrete floors. There is no need to bring the pipe into the bathhouse. The design of the floors does not require a special drain hole.
If we lay the logs on the ground, then perform the following steps:
- we treat the logs with an antiseptic;
- level the site;
- add gravel;
- we compact the site. On clay soils, it is imperative to slope towards the reservoir;
- install support posts for the logs;
Supports for logs
Installation on the ground on posts
- we lay the logs. Step – 50 cm;
Joists on supports
- lay the floor. Leave a gap between the boards, floor and wall. The gap is up to 3 mm. Water will flow through these gaps. We do not attach boards to the joists. Leaking floors are removed from the joists and taken out to dry after using the bath. The cushion under the joists and the joists themselves must be laid so that the lower edge of the floor is higher than the upper edge of the foundation (basement).
The service life of such floors is short. They will last no more than five years.
Video - Laying posts for logs
There is another option for installing leaky floors:
- After preparing the site, beams are installed along the perimeter of the foundation. They are made from timber treated with an antiseptic. Its size can be 100 x 100, 100 x 150, 150 x 150 mm;
- logs are attached to these beams;
- The floor covering is laid on the joists.
Attaching joists to foundation supports
Floors can be made from both softwood and hardwood. Larch is considered the best wood for making floors. But, unfortunately, in our time it is very, very difficult to find larch. Therefore, pine is used when constructing floors. Linden is the most commonly used hardwood tree. Oak should not be used. It becomes slippery when wet.
Laying boards for leaking floors
The boards used for flooring are edged and planed. Its thickness must be at least 30 mm. The most common board for flooring is a 50 mm thick board.
Advantages of ceramic tiles in a bath
The special qualities of this material speak in favor of choosing ceramic tiles for flooring in a bathhouse:
- Environmentally friendly - the tiles are made on the basis of natural clay and mineral fillers.
- High moisture resistance.
- Hygiene and easy care.
- Resistant to very high temperatures, steam and condensation.
- Resistant to chemicals and detergents.
- Biological passivity – fungus and mold do not form on the surface of the cladding.
- Wide selection of shades, textures, imitations of other finishing materials.
- The material can be used in a “warm floor” system.
- The material allows you to perform the necessary slope to organize water flow.
- Organic combination with natural wood.
Tiles matched to the color of natural wood are almost invisible and do not disturb the atmosphere of the traditional bathhouse interior
Installation work
When wondering how to upholster a bathhouse with clapboard with your own hands, you should start by selecting the required tool.
Minimum Required
For this you will need:
- A cutting tool such as an electric saw or jigsaw;
- Mounting fasteners, including a stapler and staples for it;
- Screwdriver or screwdriver;
- An electric drill or hammer drill, if the walls are made of solid building material;
- Measuring ruler or tape measure;
- Plumb, rectangle and level;
- Hardware with which to secure the lining in the bathhouse, for example, screws or ordinary nails.
Installation of electrical equipment
Upholstery of a bathhouse with clapboard should begin only after installation of electrical wiring and equipment. Having professional knowledge and skills, this will be very easy to do; otherwise, it is advisable to contact a specialist, since unskilled work can lead to disastrous consequences.
Electrical devices in the bathhouse must be installed in accordance with fire safety regulations
Insulation finishing
Insulation is a necessary stage in the construction of a bathhouse, since it is associated with the quality of work and saving energy resources. Before deciding how to install the lining in the bathhouse, you should purchase thermal insulation materials.
In the simplest version, it can be aluminum foil mounted using brackets. Next, the insulation itself is laid in the gaps between the wooden battens of the sheathing. Upholstery of the bathhouse with clapboard begins only after installing the vapor barrier.
In the photo - vapor barrier using foil
Some hobbyists prefer to lay down the insulation first, then cover it with aluminum foil, and finish with the sheathing. One of such solutions can be seen in the photo below.
Performing lathing
When wondering how to decorate the inside of a bathhouse with clapboard, it is worth considering the need to install sheathing. Most often it is made using wooden beams. In a certain sequence, the planks are attached to the wall, for which dowels or screws are used.
Installation with nails
The installation process will not be complete without drilling. If the walls have a wooden base, then, as the instructions say, the sheathing can be installed using nails. In both the first and second cases, it is extremely necessary to treat the wood with an antiseptic composition.
Installation of lining
Let's find out how to properly upholster a bathhouse with clapboard. Let's just say one thing: this approach adds excessive beauty, simplicity and benefits.
Dressing room lining
The following minimum rules should be followed:
- Trimming of the lining is carried out only after an accurate measurement of the ceiling height. The panels are fixed along the area of the lock and from the side of the heating element or corner;
- Installation of the lining is done sequentially along the entire perimeter of the internal space of the bathhouse. The last fragment of the panel is trimmed;
- Slopes are made in the same way as with a metal analogue.
Remember that wood is very sensitive to changes in temperature conditions, so before use it is better to let it sit in the room where installation work will be carried out. One day is enough for the lining to acquire the required humidity and temperature. If lining made of cedar or other exotic trees is used in the finishing, the acclimatization time will be different.
When installing the lining, as well as when carrying out paint and varnish work, you should be guided by fire safety rules in order to prevent accidental fire of the structure.
Final work
After fixing the lining, in order to increase its durability, practicality and reliability, antiseptic treatment and impregnation should be performed. Some experts insist on additional coating with special-purpose paints.
Here is one example of how this can happen in practice.
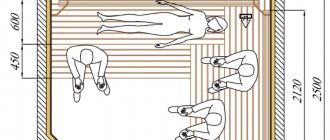
What is the design of the floor to ensure water drainage?
When a person washes, large volumes of soapy and dirty water pour down. This means that so that it does not stagnate in the room and an unpleasant odor does not appear, it is necessary to ensure its rapid outflow into the waste pit.
It is for this characteristic, which ensures high-quality drainage, that the floor design is:
- Leaking - releases water through cracks located directly in the floor surface. In this case, the floorings should be taken outside and ventilated - this way they will be less susceptible to rotting and fungus. In the meantime, while the wooden gratings are drying in the fresh air, you can treat the underground area.
- Leak-proof. Here the floorboards are laid tightly next to each other and with a sufficient slope towards the drain hole. Water passes through it and then goes to the sewer.
Mistake #2
Do not leave a gap between the lining and the insulation. Someone is fastening the lining tightly. And it leaves no ventilation gap.
As a result, the lining does not dry out and picks up more and more moisture. With expansion, the consequences of such irresponsibility are visible.
Even if there is no gap, the lining begins to rot on the back side, rot, and mold may appear. But you won’t even know about it right away. Over time, an unpleasant odor will appear and you will find the source by disassembling the lining.
Source of the article: https://dom-srub-banya.ru/chem-krepit-plintus-v-bane/
Materials
There are only so many building materials you can use in a steam room. And since we are talking about finishing, there are even fewer of them. (For those who would like to learn more about insulating a bathhouse, we recommend this article.) These are wood, stone and tile. Plastic, glass and metal are not used in the steam room, or are used little (glass is a window and, possibly, a door, for example).
Tree
linden shelves, Extra grade
It can be called the main material, because it is suitable for finishing floors, walls, and ceilings, and can also serve as a material for doors, door frames, and window frames.
Wood varies by wood species and lumber types.
The types of wood recommended for finishing a steam room with your own hands are deciduous species, for example, linden, aspen, alder, ash, oak. The latter is not afraid of water just like larch, but (like larch) oak cannot be called cheap.
Linden is perfect for a bathhouse - its thermal conductivity is low, and its volume changes little from water, which makes it especially suitable for making doors, but it also has unpleasant properties. The wood is soft, not very dense, so it is easily damaged by fungi and bacteria, not to mention insects and rodents.
The linden tree must be protected - use coatings that are acceptable for a steam room so that the walls, say, made of linden lining, will last longer.
ADVICE! However, it is better not to use linden for flooring; it is too soft a tree for such purposes.
Aspen is also an excellent option for a steam room - an inexpensive tree whose density is closest to the overly praised abash. Aspen has approximately the same characteristics as linden; it is also prone to rotting and needs protection.
In the photo: lining, this type of lumber is most often used for finishing the inside of steam rooms and bathhouses.
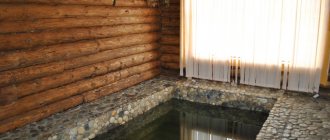
Stone
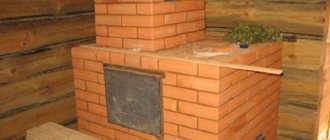
Stone in the steam room is found not only in heaters or in the lining of stoves, but also on the walls.
The corner in which the stove is located needs to be made fireproof, so why not decorate it with natural stone tiles or pebbles and cobblestones beautifully laid in mortar? True, it is better to cut the pebbles on a stone-cutting machine, and then put them in the solution with the flat side facing the wall. This way you can make a whole panel of stone.
We do not recommend making a “corner” from a stone exactly the same color as the stove surround (if there is one) - this will purely visually unite the stove and the corner; it is better to play on contrast or a play of color and texture.
The main difference between laying stone tiles in a steam room is that here, in addition to moisture, it will also be subject to strong heating, and when the bath is lit, it will also be subject to rapid temperature changes.
Ceramic tiles
In the previous chapter, we did not talk about the fact that natural stone can be used as a floor covering, because the material is quite expensive. But ceramic tiles are quite suitable for finishing the stove “corner” and for the floor.
IMPORTANT! However, glazed ceramic tiles in a steam room should not be used either near the stove or on the floor - for various reasons. The basis of the glaze is glass, and here it is not heat-resistant, so it will deteriorate from the heat of the stove
And you shouldn’t use it on the floor because of the smoothness of the glass glaze - you can easily slip.
The best option for a steam room would still be Metlakh tiles, which can easily withstand high temperatures and have a surface rough enough to be installed in bathrooms for a long time. In addition, nowadays the color range of these tiles has expanded significantly, and can be matched to the overall design. Not to mention the variety of patterned options.
ADVICE! If you are not sure about tiles, use traditional ladders - wooden gratings for your feet.
In general, we will try to persuade you a little about choosing such a covering in the steam room. The main argument is that wooden floors will fail faster than tiles, unless, of course, they are made of larch. Ceramics do not need to be treated with any compounds, it is fireproof, does not rot, does not darken, and it is easier to clean such a floor.
How to attach skirting boards
Probably each of us had to buy skirting boards. Modern skirting boards are beautiful and come in a variety of colors. It is these products that give the room a complete look. In this article you will learn how to cut a baseboard and install it yourself. In general, attaching a plinth is quite a difficult job, which requires knowledge of some of the subtleties and nuances of the procedure. Of course, you can entrust the process to professionals. However, if you put in a little effort, you will succeed.
Table of contents:
What types of skirting boards are there?
Installing skirting boards is the final stage of finishing the room. The aesthetic functions of the skirting board cannot be overestimated, because it levels the bottom lines of the wallpaper, and also makes a beautiful transition between the walls and the floor covering. Before installing the baseboard, you need to select it. Construction stores offer their customers a huge selection of skirting boards made from wood and plastic. But in any case, such products have one purpose - hiding and decorating the corners between the walls and the floor.
The difference between plastic and wooden skirting boards, first of all, lies in appearance. If your floor is covered with parquet, then, naturally, you should not try to imitate wood from plastic; you should immediately buy a wooden baseboard. If the walls are not particularly smooth, you should install plastic skirting boards, which can hide such imperfections due to their ability to bend. In addition, the plastic plinth includes a box through which you can pass a telephone cable.
Before installing the plinth, you need to choose a method for attaching it to the wall and learn how to cut the corners of the plinth. You can use liquid nails as a simple option, but in this case the walls should be as smooth as possible, otherwise such nails will be of no use. The most common solution is the hidden fastening of the skirting boards, since the next time the skirting board is repaired, it can be very easily removed and installed back.
Making a wood floor
There are two types of wood floors: leaking and non-leaking.
The name “leaking floors” speaks for itself - water simply escapes through the cracks into the underground space. Such floors have a number of advantages:
- they are cheaper than non-leaking ones,
- You can use unedged and ungrooved boards;
- the boards are not nailed down, but simply laid on the joists, which allows, if necessary, to dry them outside and clean under the floor;
- installing a leaking floor is the least labor-intensive and even a not very experienced craftsman can install it.
However, it should be taken into account that such floors are cold, which means they will be more appropriate for southern regions.
In non-leakage floors, the boards are fitted tightly to each other, and the water flows into a specially made hole and is then collected in a catch basin or discharged through a pipe outside the bathhouse. Such floors are warm, since a subfloor is made under them and a layer of insulation is provided. The main disadvantage of installing this type of floor is considered to be labor intensive compared to leaking flooring.
Mistake #1
After delivery of the paneling to the installation site, immediately begin work.
There is no need to do this. Unpack the lining and stack the entire volume. For a minimum of 14 days.
Layers in the stack must be made through even and equal-sized bars. After 1 meter. 1 row of lining, then a block. There is no need to stack two or three pieces on top of each other.
Why is it important? And I put emphasis on this? Because the manufacturer, as a rule, may not dry the wood completely. This happens 99% of 100%. Alterations will become more expensive or labor-intensive for you.
The room should be warm and ventilated. For example, under a canopy or terrace. An enclosed space will also work. Important: sunlight should not hit the material. The wood will begin to darken. Will affect the labor intensity of grinding.