Features of creating a shower in a bathhouse with your own hands
When arranging a shower for a bath, first find out its purpose and location. Why do you need a shower for a bath? To simply wash yourself or to combine business with pleasure in the form of contrasting douches after the steam room? It is important to decide on the type. A summer shower at the dacha or in a private house will come in handy in the heat. Heating occurs from the sun's rays. The winter one has a heating tank and is located in the bathhouse building.
The choice of location depends on the design of the shower and the characteristics of the bath. For example, a concrete floor will allow you to install both a shower corner and a cabin. The proximity of water intake points will reduce construction costs.
Then you should deal with a number of questions:
- Cold water supply.
- Drainage.
- Equipment, consumables.
- Ventilation and electrical.
- Heating water.
- Washing room design.
Let us dwell in detail on the most important aspects of building a shower.
Cabin installation
Then we build the cabin. Four vertical pipes or other supports are installed. They are tied with a profile pipe or other elements. This is how the frame for the booth is made. The pipes are secured with transverse jumpers. Then the country shower is sheathed with polycarbonate, steel sheets, siding or clapboard.
The roof is made in the form of a water tank. Many ideas for creating showers involve open-type designs. A roof made of natural materials or polycarbonate looks great.
The door can be assembled from boards. There is a simple structure of the walls. Plastic pipes or wooden supports are installed along the contour. A special film is stretched over them or PVC panels are mounted.
We build a reliable frame from the following materials:
- Metal frame showers are made of steel pipes, which are reinforced with cement and piping. All pipes are mounted in special recesses and treated with cement mortar;
- a wooden shower consists of a frame as a support for a container of water. The walls of the cabin are made of slate, boards or metal profiles. At the same time, the collapsible type of construction is distinguished by fastening large-section glasses in the corners of the frame into which the side elements are inserted.
To heat the water faster, the outside of the tank is painted black. A special greenhouse above the container will allow you to store hot water for a long time. A plastic water container weighs less than a steel one. Models with a built-in pipe are offered in stores.
Water supply and sanitation
The bathhouse does not need to be connected to external utility networks. But the installed shower stall must be fully functional. For this purpose, an outlet and an inlet are provided. There are several ways to install a drain.
Organizing a drainage pit or septic tank is a common option. Expanded clay, broken brick or crushed stone are used as a filter. The disadvantage is the rapid clogging of cleaning materials. The well is also used as a method of drainage. It is better to build it at the initial stage of construction, so that the pit is located at the lowest point of the site.
Before digging, it is important to study the soil layer. In the presence of nearby groundwater, this method of drainage is not suitable. If the soil is loose, additional strengthening of the walls will be required. To do this, they are filled with concrete, lined with bricks, or factory-made reinforced concrete rings are purchased. Optimal trench dimensions: 3 meters deep and 1 meter wide. The distance to the foundation of the bathhouse is 2-5 meters. The washing room in the bathhouse with a shower and the drainage pit are connected by pipes at an angle of 20 degrees. This slope is sufficient for water to flow by gravity. At the end, the finished trench is concreted. The shower stall in the washing room is equipped with a drain. It protects against unpleasant odors and prevents waste from entering the pipeline.
Accommodation options
It is recommended to place the shower next to the steam room.
The most common option is to place the washing room next to the steam room. At the same time, you should not install a shower in a walk-through room. If the building is used all year round, it is advisable to provide the washing area with heating. It can be either autonomous or implemented during the combustion process of the furnace. For the first case, an electric heater is best suited. It is easy to use and has a low price.
It happens that the sink is also placed in another room, for example, combined with a rest room where visitors stay between visits. In this case, you can mount a shower stall in the corner or isolate the washing space with a sliding curtain.
Materials for shower equipment
When creating a shower in a bathhouse with your own hands, you should take a responsible approach to the choice of materials and equipment.
When installing pipes, preference is given to durable and lightweight polypropylene. Withstands temperatures up to +80 degrees. A polyethylene pipeline has the same advantages, but can heat up to +60 degrees. As the indicators increase, it is necessary to install reliable drainage systems. The metal is durable, but heavy and susceptible to corrosion.
A bathhouse with a shower is equipped with a set consisting of a flexible hose, a watering can with a holder and a mixer. When installing a water supply, a special tool for measuring and cutting is used, as well as a welding machine or soldering iron. The shopping list includes finishing materials, shut-off valves: taps, valves, gate valves and fittings for pipes.
Conclusion
A shower room is an optional, but pleasant addition to the bathhouse.
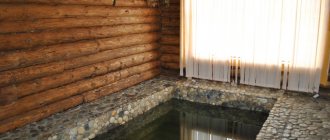
It gives you the opportunity to splash around in the water after a steam room if there is not enough space to install a pool. The arrangement of the room should be approached as carefully as the bathhouse as a whole. The video in this article will go into more detail about this topic.
Source
Ventilation and electrical systems
Ventilation in the bathhouse protects wood and the human body from damage by harmful bacteria and mold. Ventilation is divided into three types: natural, forced and combined. In the first option, the bathhouse with shower is ventilated by air entering through the window. In the second, a fan is used, and in the third, a supply and exhaust system and street air are used. In a well-built room, the supply and exhaust openings are located so that the air is distributed over a larger space when moving. When choosing a ventilation installation method, the material of the walls and the location of the building play a role. In a wooden bathhouse, the ventilation process involves windows, doors, vents in the foundation and holes in the ceiling or walls. To prevent drafts and steam from escaping, the walls are insulated by creating additional holes with valves for air removal and entry. For inflow they are made at the bottom, for outflow - at the top of the opposite wall. The minimum height is 80 cm from the floor level.
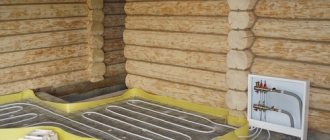
Heating of the washing compartment of the bathhouse
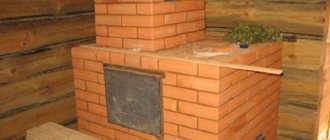
- Heating of the washing room can be carried out together with heating of the steam room compartment. The heat source is a stove-stove. It should be installed in the wall between the steam room and the washing compartment. It is worth noting that this type of heating does not guarantee uniform heating. In addition, after completing bath procedures in winter, it is necessary to drain water from all containers and sources.
- A more practical way to heat a bathhouse and washing room is electric. To heat the washing room, it is enough to install 2-3 radiators in the room, depending on the heated area. True, the cost of such heating is not low, and in the event of a power outage we end up with a “frozen” bathhouse and damaged equipment.
- It makes sense to connect a gas main and install a separate gas boiler in the bathhouse if the building is large - about 150–200 m2. Otherwise, you can install several gas convectors in the sauna premises. One device is enough for a washing room. Convectors operate on bottled or main gas.
- If the bathhouse is located close to the house, then it can be heated via a heating main from the common house system. In this case, ordinary radiators are installed in the bathhouse premises. For a medium-sized washing room, as a rule, one radiator is sufficient.
Hot water for shower: heating methods
The simplest and most inexpensive option for heating water is the sun, when it is easier to do without running water. Building a warm shower is easy. It is enough to hang the tub in the morning under the scorching rays. But this is only suitable for hot summer weather. In order not to depend on solar energy and to enjoy a comfortable shower at any time, you need to choose other methods.
Warming up without power supply: oven and gas
Fans of old bathhouse traditions will appreciate stove heating. It involves the use of a remote or built-in tank heated by wood. From the container, water flows into the shower in the sauna or bathhouse.
The presence of gas on the site allows the use of a gas heater in the form of a column. Provides fast heating. Before use, it is necessary to check the premises for compliance with the rules for the operation of gas appliances.
Electric water heating
Showering in a bathhouse with water heated using electricity is done using heaters. They are divided into flow and storage.
The first type is a small device installed next to the mixer. The absence of a storage tank does not interfere with the rapid heating of cold water passing through the heating elements. The disadvantage is high energy costs. It is also worth considering the risk of fire due to poor wiring in the bathhouse building.
Which pump to use
When deciding how to make a shower in a bathhouse, you cannot miss a very important point: for normal operation of the water heater, you will need a water supply under appropriate pressure. For this reason, equipping a bathhouse with a shower involves installing a pump. Depending on the source of water, the following can be used:
- a deep pump, with which water is supplied from a well;
- a submersible pump designed to extract water from shallow wells or reservoirs;
- surface, which serves to raise water from a depth not exceeding 7 m; such a unit can be used to increase pressure in pipes connected to a centralized water supply.
Selection of finishing materials for the shower
A washroom with a shower in a bathhouse in a country house or in a private house is provided at the design stage. This will avoid many problems, for example, with the drainage system. Finishing material is selected based on taste preferences. A shower in a wooden bath involves treating the walls with an antiseptic and priming with a waterproof compound. The cladding is made with natural and plastic lining. Plastic is less attractive, but is moisture and steam resistant. It is most often used for covering surfaces when installing a shower stall or a metal tray. Artificial stone and tiles are also found.
A shower room made of logs or timber is covered with waterproof plasterboard. The resulting smooth surface is covered with tiles or small mosaics. Natural materials give the room a rich look, but are the most expensive in price.
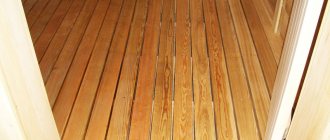
Concrete floors are better than wood floors. It does not rot, is durable and allows the use of any floor coverings, for example, porcelain stoneware. If the shower in the steam room has a wooden base, it should be protected from water. It is worth pouring a reinforced concrete screed on top. Tiling is the most convenient and advantageous option. You can take relaxing treatments right on the floor.
Bath showers are popular. With their help you can improve your health and have a good time. Contrasting douches strengthen, invigorate and relax. To get maximum pleasure, do not build a shower for a bath without water supply, ventilation and other engineering systems. They will protect your building and site from the negative effects of a humid environment, and create comfortable conditions for washing and strengthening the body.
Preparing the base
When constructing a lightweight frame structure, it is not at all necessary to lay a foundation, but when building a stationary summer shower, this stage of work cannot be skipped. To carry out the work you will need:
- Roulette and level;
- Pegs and cord;
- Bayonet shovel;
- Garden drill;
- Pieces of roofing felt;
- Metal grid;
- Crushed stone and sand;
- Cement mortar.
Preparing the foundation for a summer shower
The dimensions of the foundation depend on the building materials from which the building will be built. To build a shower from cinder block or brick for a slab foundation, you will need to dig a pit about 15 cm deep. The work is carried out in several stages. Having decided on the location of the summer shower, prepare the site:
- Using a tape measure, pegs and string, mark out the area of the required size.
- In the designated area, a layer of turf 15 cm deep is removed.
- Level the base of the pit.
- The bottom of the pit is lined with a “cushion” of sand and filled with mortar, creating a flat surface.
Tip: If you plan to use a wooden or metal frame as the shower floor, before pouring the base you need to prepare a place for the racks by installing sticks of the required diameter vertically wrapped with roofing felt.
How to arrange a frame
Although the load from the water tank and the sheathing material is small, the frame must be strong and stable. Stands that are too flimsy can bend and fold at the most inopportune moment.
Metal
To make a metal frame for a tank with a volume of 200-250 mm, profile pipes with a cross-section of at least 20x40 mm or a corner with a shelf with a width of 45 mm are suitable. Round pipes with a diameter of 40 mm or more can be used, but connecting them is more difficult. If there are several tanks, even more powerful racks are needed.
The frame is assembled from racks, strapping and jumpers. Welding or bolts are used for connection. Weld seams are processed with a grinding machine. The finished frame is coated with waterproof paint.
Wood
The shower frame is made from softwood lumber. They are inexpensive, and due to their resin content, they are more resistant to moisture than deciduous ones.
The cross-section of the bottom trim is 100x100 or 150x100 mm, the racks are 100x100 mm. The workpieces are connected using metal corners, bolts and a tongue-and-groove lock.
First, the lower frame beam is installed on the foundation, then the racks and the top frame are attached. For stability, the structure is reinforced with jumpers and jibs. The wood is first impregnated with an antiseptic.
Device order
The exhaust duct is located in the corner of the steam room opposite from the stove
Hole preparation
Supply and exhaust ventilation in the steam room begins with creating holes for the ventilation duct. The procedure for creating them is similar for both “inflow” and “outflow”, only the location of the holes changes. The size of the hole for the ventilation duct should be 2-3 mm larger than the size of the pipe being installed. Once the markings are made (taking into account the gap), you can begin the process of creating the hole. A hammer drill with an appropriate attachment is best suited for this. The tool must be held horizontally, but the minimum downward slope must be observed. This will allow you to gradually expand the hole without putting much strain on the nozzle and the hammer itself.
Pipe installation
The ventilation pipe is placed in the hole made and then equipped with a fan, for which it is also necessary to provide an electrical supply. The most rational option is to purchase a ventilation pipe with a fan already built into it. All that remains is to install the pipe and blow it with foam, which will fix the structure and prevent its destruction.
Final stage
It is necessary to bring the system into proper shape. To do this, we remove the dried polyurethane foam and, using the self-tapping screws that come with the fan, install the ventilation grilles. When creating ventilation in a steam room, the main thing to remember is that the reliability and efficiency of such a system depends on the quality of the materials used. It is better to install a system from expensive structural elements than to periodically redo the ventilation due to wear and tear of parts or materials.
List of sources
- www.stroy-dom.net
- banya-expert.com
- ventkam.ru
- banyaspec.com
- poparimsya.online
- bannyi-den.ru
- 9ban.ru
- strmnt.com
- santehnicheskij-mir.ru
- SdelatBanyu.ru
- kaksdelatbanyu.ru
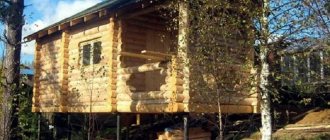
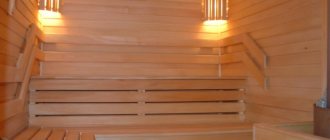
Sauna at the dacha
A standard sauna for a summer cottage must meet the basic condition: maximum enclosure with complete tightness of the structure. Such a building must be equipped with basic communications: ventilation system, electrical wiring and water supply.
Linear proportions are selected in such a way that at least 3 cubic meters of space are allocated for each visitor. Only if these proportions are observed, you can get a sauna that will look aesthetically pleasing in the photo and during visual inspection, and will also be comfortable to use.
If the property does not have a building of suitable size, then you can think about such a phenomenon as a sauna in a country house, but again it is worth taking into account various risks. The article itself is devoted to the stage-by-stage construction of a sauna on a summer cottage.