Arrangement of the territory in the garden requires effort in organizing a fireplace for cooking.
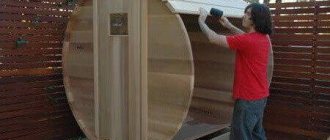
Laying stoves is a complex operation that requires a lot of experience and a sufficient amount of knowledge. We invite you to learn about the basics of laying stoves in order to have an idea of how it is done. The simplest is considered to be the laying of brick stoves. In fact, laying brick stoves requires a lot of special knowledge on the construction of fireboxes and vaults, chimney systems and other technological elements. This page describes how to lay simple stoves in a garden plot. A similar principle can be used to create heating and sauna stoves. Look at the photo of the furnace masonry, which illustrates the basics of all operations and the materials used. The video of furnace laying offers more clarity, where the work of a real professional and his advice are presented.
Detailed description of brick kiln laying technology (with video)
The description of the laying of stoves should begin with the fact that the walls and corners of the stove should be positioned strictly vertically. In order for the stove to be level, it is recommended to lay it out in formwork, which should be plumb and level at the construction site.
The step-by-step laying of the furnace begins with the need to mark the contours of the future structure on the foundation with chalk, taking into account the thickness of the seam. Masonry should be carried out with ligation of vertical seams on half of the brick, under jointing. First, all the bricks of the row must be dry fitted, then removed and placed on the mortar.
Brick laying should be done quickly. Otherwise, it will be impossible to lay the thickened mortar and level it in a thin layer, so all halves, quarters and three-quarters of bricks must be prepared in advance.
If you apply the mortar to the entire row of masonry at once, it will quickly thicken, and the joint will be uneven in thickness, so it is recommended to apply the mortar in an even layer separately to each brick. The detailed masonry of the furnace is discussed in detail in this material.
To quickly and evenly apply the mortar, it is necessary to place a small amount of it on the corner of the brick and spread it along the edge with an inclination towards the edge. Then you should unfold the brick, apply the solution to its second half, forming a tubercle in the center.
The thickness of the seams of stove masonry made of ordinary red brick should be no more than 5 mm, and of refractory and refractory bricks - 3 mm. The thinner the seams, the better the quality of the stove.
The technology of laying stoves requires that when constructing pipes, the thickness of the seams should be no more than 10 mm. The seams should be completely filled with mortar, and the internal and external surfaces should be cleaned of excess by hand or with a trowel.
Master's advice. For better retention of the plaster on the surface of the stove, it is recommended to leave the seams unfilled to a depth of 5-10 mm. If the stove is not planned to be plastered, then the seams should be filled completely.
If the brick does not fit properly onto the mortar, it should not be corrected by tapping. It must be removed, the surface must be cleaned of the solution, moistened and installation repeated.
Each row of masonry must be made with 1/2 brick joints. In rows where three-quarter bricks are used, it is allowed to bandage 1/4 bricks.
The furnace must be laid taking into account the need for horizontal rows and verticality of outer surfaces and corners. To comply with this rule, each row of masonry should be checked with a building level for horizontality, and with a plumb line for vertical walls and corners.
For convenience, it is recommended to stretch a cord between the formwork posts, which you can use to guide you when laying. Each row must be checked against the order drawings.
All internal surfaces of furnaces must be smooth, without protrusions and depressions that impede the movement of gases and impair the operation of the furnace. Turns and corners in the channels should be rounded, and the narrowing or widening of parts should be done gradually, therefore, after 5-6 rows of masonry, the internal surfaces of the firebox must be wiped with a wet rag, smoothing and rubbing the seams to remove excess mortar. If this is not done, the solution may crumble during heating.
When facing with refractory bricks, the thickness of the seams should be no more than 3 mm. This brick should not be tied with red brick. Due to their different thermal expansion, the masonry may collapse.
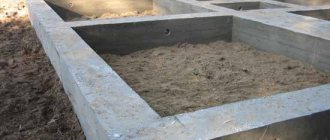
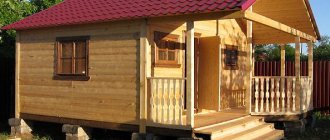
An outdoor stove should be easy to install and easy to use. It should be built on a separate, reliable foundation, not connected to the foundation of a house or other nearby building. It is prohibited to tie up the masonry of fireplaces with adjacent structures (walls, fences).
It is imperative to bandage the vertical seams of the masonry, and also ensure that the thickness of the seams is no more than 5 mm. In some cases, coincidence of vertical seams is allowed, but not more than two rows of masonry.
It is forbidden to place bricks with the chipped or hewn side inside the firebox or ducts, as in this case they will collapse from exposure to high temperature. A detailed illustration of the laying of a brick oven in the video will allow you to familiarize yourself with this process:
On a note! It is prohibited to coat the internal surfaces of stoves with mortar or plaster, as these layers quickly fall off and clog the channels.
One should also remember about the different thermal expansion of materials when attaching metal parts to the furnace. For example, metal supports must be guided away from the furnace using wire strands. More space is required for longitudinal thermal expansion, for example when installing grates.
Rules for installing a brick chimney
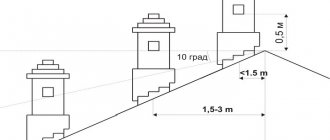
1. The chimney should not be low. Ideally, the height of the brick chimney should be higher than the ridge of the roof or at the same level with it.
2. It is imperative to provide an inspection hatch (soot duster) at the bottom of the brick chimney in order to occasionally inspect the brick chimney and clean it of accumulated soot and dirt.
3. You must install the cap on the chimney yourself to prevent dirt and water from entering the chimney.
As can be seen from the above, installing a brick chimney with your own hands is not so difficult. Below you can safely share your tips and comments about the laying of brick chimneys, the basics and technology of this work.
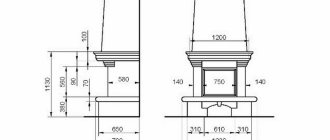
Rules for laying the furnace vaults of an outdoor stove
When laying furnace vaults, it is necessary to block the combustion openings, fireboxes, and chambers using simple and complex shaped lintels. The ceiling in a wall is called an arch or arched lintel, and the ceiling between the walls is called a vault.
To cover large spans, an arched ceiling is used.
Vaults can be steep, flat or gentle. The semicircular arch is equal to half a circle. A gentle vault is less steep. The three-center arch is even flatter; thanks to its design, heating occurs evenly over the entire surface. This is important when baking pies. The number of bricks in the arch and rows in the vault should be odd. The middle odd brick is called a castle brick. The bricks on which the lintel or arch rests are called heels. To give them the desired shape, such bricks have to be trimmed. The space covered by any jumper is called a span. The lifting height of a vault or arch is the lifting boom.
The construction of any lintel must begin with the laying of bricks on which it will rest. They should be hewn out according to a template. Since the height of the arch or vault can be different, the angle of the heel changes. You cannot use one heel shape for all arches and vaults.
The laying of the furnace firebox begins with the preparation of circles and foot templates; for this, on a sheet of paper, cardboard or plywood, it is necessary to draw a vault of the desired shape so that an odd number of rows of masonry can fit in it.
You can easily and quickly build a vault on two boards. An axis should be drawn in the middle of the narrow board so that it intersects the wide board. At a distance of 3-5 cm from the bottom edge of the wide board, you need to draw a straight line A-B, marking the width of the firebox on it. The axis should run in the middle of the firebox, between points B and D. On the axis from line A-B, the height of the arch lifting boom should be measured upward. The resulting point can be designated by the letter D. After this, you need to select the center O in such a way that the circle passing from it, forming the arch, runs through points B, D and the upper point of the arch lifting arrow.
The rules for laying a furnace recommend using formwork for the arch, which is laid on prepared circles.
After installing and securing the formwork, a nail should be driven into the central point O, from which the circle was drawn, and strong twine should be attached to it, which is necessary for checking the rows of the vault and marking the bricks to be laid. The brick for laying the vaults must be hewn, giving it a wedge-shaped shape.
In this case, the seams have the same thickness. When using regular brick, the seams will be thinner at the bottom and thicker at the top. They must be completely filled with solution.
The heels should be trimmed and laid very carefully, since filling large voids with mortar and crushed stone can lead to settlement of the vault or arch and their destruction.
The laying of the vault should begin from the edges, from both heels at the same time, moving towards the middle of the vault or towards the castle. The bricks need to be fitted tightly, so that they almost touch each other on the side of the firebox.
The seams between them must be directed to one point or to the center from which the curve of the arch or vault is described.
The last thing to be inserted into the row of masonry of a vault or arch is a castle brick, greased on both sides with clay mortar. It is advisable to strike only with a log or a mallet, since an ordinary hammer can split the brick.
Master's advice. During work, the accuracy of the formwork installation must be constantly checked and adjusted by driving wedges between it and the furnace walls. The finished vault should be left in the formwork for several days, after which it can be disassembled, gradually removing the wedges. The circles are taken out last.
Preparation of the solution
Before starting construction work, it is necessary to prepare a sufficient amount of masonry mortar. For sauna stoves it is made on the basis of clay and sand. Clay should not be used from the surface layers of the soil. The extracted material must be crushed and soaked in water to the consistency of sour cream. The sand must be sifted on a mesh with a cell of 5 by 5 mm.
The recipe for preparing the solution is quite simple. Sand is added to liquid clay at a ratio of one to two and water is gradually poured in. The resulting mixture should flow smoothly from the trowel. It should be remembered that the solution should be prepared for one day of work. Because unused mass tends to dry out quickly.
Laying and lining of the firebox and furnace wells
The laying and lining of the furnace should be carried out only according to accurate, pre-made calculations. Fireboxes up to 42 cm wide should be covered with a simplified triangular vault, placing the brick flat, followed by continuation of the masonry walls, which will firmly press the heels to the underlying rows of masonry. If such a vault is erected without continuing the masonry, this may cause the heels to shift due to the thrust of the vault, and then lead to its collapse.
To avoid this, the heels laid under the arch for laying the firebox must be tightened using pieces of square, rectangular, corner or T-steel connected with a wire harness. A wire bundle consists of several wires twisted together using a nail.
The harness should be located inside the masonry, in the seam. If the harness is open, it will quickly burn out. Instead of wire, you can use strip steel, firmly fixing it to the bars. In some designs, the ends of the bars may extend outward. In this case, they should be tied together with strands or round steel rods with threads and nuts at the ends, for which holes should be drilled in the ends of the bars.
Fireboxes with spans up to 38 cm can be covered by releasing bricks from the side walls of the masonry. To firmly fix the overhanging supporting bricks, the side walls of the masonry must be located at least four rows of masonry above the row to be overlapped. The more rows are laid out, the better the laying of the furnace fireboxes, this way you can avoid the ceiling tipping over inside the furnace.
In the process of laying furnace wells, it is recommended to block the combustion openings with various jumpers. It is forbidden to rest bricks on the door frame. If the width of the combustion hole is less than 250 mm, it is blocked into a lock by cutting off the brick. If the opening width is more than a brick, it is necessary to make a brick lintel.
An even simpler version of the stove
If the previous option seemed complicated to someone (although it is not), we can offer an extremely simplified heating design. You can lay out this oven with your own hands in literally an hour, even if your hands are far from being called golden.
Figure 4. The simplest version of a brick oven
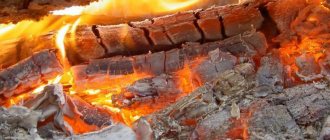
The operating principle of the structure is simple. Solid fuel burns below, and settles here under the influence of its own mass. Temperature changes create a draft that carries hot air currents upward. In this case, the firewood burns almost without a residue - the smoke is minimal.
For masonry you will need only two dozen whole bricks and two halves. The stove consists of five rows. The design is so simple that there is no point in describing the order. The procedure is clearly shown in the illustration.
Figure 5. Order of the simplest brick structure
* If you lay the bricks correctly (and it is very difficult to do otherwise), the result will be similar to that shown in the photo. It is recommended to bind the bricks with clay mortar. But in field conditions, you can do without binding material - just put the components on top of each other according to the order. In this case, the stove is built in five minutes.
Figure 6. Masonry process
Figure 7. Finished mobile brick oven
For those who want an intermediate option, we can recommend a slightly more complicated option.
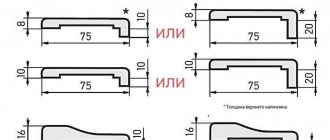
Figure 8. Diagram of a simple stove
* According to this diagram, the output is an L-shaped three-section stove. The first compartment is designed for loading firewood. The second is a chamber in which the logs are burned. The third compartment is the chimney duct.
Figure 9. L-shaped stove
To create this structure you will also need 20-30 bricks. This option can be completed by yourself in a couple of hours, if the skills of a mason are completely absent. A specialist will complete the construction in a matter of minutes.
Proper completion of the laying of a wood-burning stove for a summer residence
At this point, the laying of the outdoor stove is almost complete, but there are a few technological aspects remaining. Grate bars and grates should be located 7-14 mm below the combustion opening. A gap of at least 5-10 mm should be left between the grate and the masonry of wood-burning stoves along the entire perimeter, filling it with ash or sand so that the expanding metal does not damage the masonry when heated. When laying the grates, it is recommended to tilt them towards the door by 2-3 cm, which will ensure that unburned fuel rolls off the back wall onto the grate. The grate slots must be placed along the firebox (from the door to the rear wall).
Cast iron stoves used in kitchen fireplaces are best laid level on a thin layer of clay mortar.
Proper laying of the furnace implies that the structure must be dried naturally, or, in extreme cases, artificially. During the drying process, all valves must be open around the clock. The pipe can only be closed during a thunderstorm. This drying process takes approximately 10-12 days.
Artificial drying is faster. To do this, it is necessary to heat the stove with a gradual increase in the amount of dry fuel: shavings, straw, wood chips, finely chopped firewood. It is forbidden to dry the stove by burning a large amount of wood at once, since the water in the brick, turning into steam, can destroy the masonry.
The first addition of fuel should not exceed 20-25% of the amount required for normal combustion. For the second furnace, the volume of fuel can be increased to 30-40%, for the third - to 60-70%, etc. up to the full norm. After each firebox, all stove devices must be open, and the temperature of its outer surface should not exceed 50-60 °C.
Laying a stove for a summer residence and drying is considered complete when damp spots no longer form on the surface of the stove and there are no traces of condensation on the valve.
How to install stove appliances?
For stoves, only cast iron appliances are required. Firstly, their coefficient of thermal expansion is not very different from that of bricks. And, secondly, cast iron products do not bend or warp under the influence of high temperatures, which cannot be said about steel products. Oven appliances are installed with a gap of 5 mm between them and the brick.
Furnace, blower and cleanout doors are secured using steel plates (clamps) 2mm thick and nichrome wire up to 2mm in diameter. The gap between the brick and the door is sealed with an asbestos cord or a cord made of kaolin wool and fiberglass. The rest of the furnace appliances are also sealed - grates, valves, hearth stoves and cast iron ovens.
It is recommended to install ovens only from cast iron - cast iron. Their installation is the same as for all stove appliances.
Incorrect operation
Fires often occur even with an ideal stove design. This is due to errors during combustion.
In extreme cold, people sometimes heat their stoves for too long. As a result, individual parts of the equipment become very hot. If they come into contact with wooden objects, there is a serious risk of fire.
Therefore, the stove should be heated several times a day for 1 - 1.5 hours. When you go to bed, the kindling must be stopped. Heating furnace equipment must not be left unattended.
Do not place wooden furniture, drying laundry or flammable objects near the stove firebox. Unextinguished coals and ash are prohibited from being thrown near buildings. During kindling, the door must be closed and the entire firewood must be placed in the stove.
It is important to remember that each type of stove is designed for a specific type of combustible material. Experimenting with other types of fuel is dangerous. This can lead to cracks and burning coals falling out.
To avoid fire, furnace equipment must be carefully prepared for winter. This process will be different for different types of ovens.
Cleaning the chimney
Before winter it is necessary to clean the chimney. Subsequently, this procedure must be repeated every 2 to 3 months. If you neglect to clean the pipe, the soot may catch fire.
Now in China you can stay in a hotel with polar bears
The Russian Union of Travel Industry named the share of those planning domestic tourism
“There will be more Russian programs”: expert on pre-installation of software on Apple gadgets
You can clean the chimney mechanically or chemically, and also use folk remedies for this purpose.
Cleaning
The chimneys of steel stoves are cleaned not with a metal, but with a plastic brush. You can also use chemical cleaning methods or folk remedies. If you use chemicals, make sure they do not damage the metal.
Remove soot, carbon deposits and ash from the fuel chamber. Pay attention to the condition of the non-combustible cladding. If it is deformed, replace it.
Dry cleaning
Using this method will allow you to clean the chimney by hand less often. Chemicals prevent soot accumulation. This cleaning method does not take much effort and time, but you will have to spend money on special chemicals.
You can find a variety of chimney cleaning products on sale. They are produced in the form of tablets, briquettes, powders and liquids. Such chemicals are simply placed in the firebox along with the firewood. When burned, they release gases that destroy soot.
The first space hurricane: plasma rained down electrons
Altruism has been found to keep people healthier than exercise.
Home is better: Russian artists whose careers did not work out abroad
Before purchasing such drugs, carefully read the instructions for them. Make sure this product is suitable for your oven type.
If you are using chemicals for the first time, check the chimney. It should not be clogged with debris and foreign objects. If the pipe is heavily clogged with soot and there is no draft in it, then you will first have to clean it with a brush.
Types of tile layouts may vary
- Vertical seams match. This layout is for tiles of the same size. If rectangular tiles are installed, then the layout can be both vertical and horizontal, while you can lay out colored contrasting zones and insert panels - it looks linear and neat
- Bandaging, or displacement along vertical seams. Used in geometrically complex areas so that trimmed fragments are not noticeable
- Diagonally. Artistic and complex layout, allowing for rare designs. Very original, but you will need about 10-15% more tiles, a lot of trimming and waste
- Tiles of different sizes are laid out in checkers, carpets, highlighting fragments and contrasting zones, panels and decorative elements are possible