Since the bathhouse has high humidity and temperature, special requirements are imposed on the arrangement of the floor covering. Failure to comply with them will lead to the fact that it will be inconvenient to move around the room, and in the absence of proper outflow of water, stagnation will form.
Not every material can be used as a floor covering. If ceramic tiles and wood are ideal, then linoleum, laminate and parquet are never used for known reasons.
Let's figure out which material is best suited for flooring in a bathhouse and what features of flooring exist.
Which type of flooring is better?
Before constructing a floor in a bathhouse, the owner must decide on the requirements that he places on it. Usually the choice has to be made between a concrete structure and wooden boards:
- A concrete foundation takes a long time and is expensive to lay. It is guaranteed to last more than 50 years, and with proper updating and proper operation there is no need to replace it;
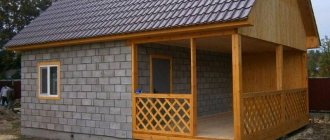
The process of pouring a concrete base for a bathhouse
- A wooden floor is easy and cheap to construct. It looks great, but needs to be replaced regularly, about every 5-10 years.
Arranging a wooden floor in a steam room
If wood is chosen as the material for the floor, you should decide on the type of construction. There is leaking and non-leaking. The first one is easier to arrange and looks more interesting. The boards laid in the bathhouse do not need to be nailed to the joists. They are installed at a distance of at least 3 mm from each other. When you need them to dry quickly, you can simply collect them and take them outside to dry. It is not necessary to construct boards with a gap in the dressing room. In other rooms, a gap of about 2 mm is left from the perimeter walls, creating a conventional frame around the floor, indicated by a small indentation.
Layout of a leaky type floor
How to make: instructions
These instructions depend on what type of foundation you have. If you are making a poured floor, it will be attached to the foundation.
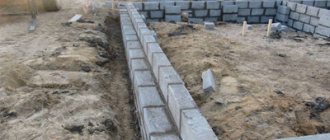
Let's assume that you have a strip foundation. Then there are two options: either lay the logs directly on the tape, or first place the strapping beam on the tape, and the logs are attached to it. But to lay the strapping beam, you must first provide for the installation of anchors directly into the concrete of the strip that has not yet hardened. The timber is placed on anchors and tightened with bolts.
If the foundation is piled or columnar, then it is connected by a grillage, which can be wooden or metal. In both cases, the logs will be attached to the grillage in approximately the same way (taking into account the grillage material) in the previous option.
ADVICE! It is clear that boards are placed on the joists with a gap of, say, 1 cm. But do not forget that you need to leave a gap between the boards and the wall, and its value is 1-1.5 cm.
How to make a concrete screed and drain. You will have to start by creating a drainage system or digging a trench through which water will be discharged either into a septic tank or into a drainage field.
The drainage system under the floor is a sand bed, on top of which gravel is poured. However, on clay soils this will not help much.
If the water is to be drained, then you first need to completely remove the soil layer from the ground, pour 10 cm of sand, then gravel.
Under the future drain you need to make a pit - a concrete tank into which used water will flow and leave through the pipe.
The simplest drainage scheme with a pouring floor
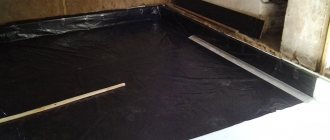
The sand and gravel cushion is covered with a layer of waterproofing (roofing felt, for example). Then there is a layer of insulation (often polystyrene foam), on which a reinforcing mesh is laid. Everything is filled with concrete.
A slope is made on top of the rough screed, which converges towards the pit.
This option is suitable for owners of bathhouses with a strip or columnar foundation.
The technology does not change if you decide to make a waterproofed (dry) floor covered with ceramic tiles.
Advantages and disadvantages of leaking floors
Pros.
- The structure is built very quickly.
- Non-leakage flooring is the leader among other types in terms of cheapness.
- A drainage hole is made in the underground for sewerage. There is no need to install any other systems.
- Waterproofing and thermal insulation are not laid.
Minuses.
- Intended for temporary use; you cannot take a steam bath in winter (in cold climates).
- To be able to use a bathhouse with a leaking floor constantly, it is necessary to build it in a warm climate.
- If you choose poorly hewn boards or place them unevenly, the floor will not be reliable.
- Fragility.
Concrete floor in the bathhouse
Choosing material
The most important point in the construction of the floor is to ensure the unhindered flow of water from the bathhouse.
Tree
Let's start the conversation about installation with how to properly make a floor in a bathhouse using wood. The most important thing here is to choose the most suitable type of building material. Experts recommend coniferous wood, as they are not susceptible to the harmful effects of moisture.
The rules for laying the floor are as follows:
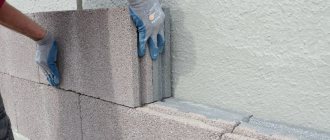
- Brick columns are installed on the ground, the height of which should be no less than thirty centimeters. The sides of the rectangular section of these elements should be equal to a quarter of a meter.
- Wooden logs are mounted on top of the mentioned posts, serving as support for the flooring.
- Edged boards are laid on the crossbars, the thickness of which can vary from two and a half to three and a half centimeters. The design is shown in detail in the photo:
Plank floor.
The steam room can be equipped with a leaking or non-leaking floor. The first ensures the outflow of water directly through the existing cracks. The second is equipped with special channels that direct the liquid into the sewer.
A leaky floor is quite convenient because the floorboards are laid on top of the joists without being secured. This makes it easy to remove them when they need drying or when you need to clean the subfloor.
As for the non-leaking floor, the boards are firmly fixed, which means they can be dismantled only if their service life has expired.
When installing such a floor, a prerequisite is careful treatment of all components with special means. In addition, the floor of the bathhouse must be insulated.
The boards fit together quite tightly. Along with this, a certain tilt is made to direct the water towards the drain of the bath. At the end of the drain, a reservoir is installed to receive liquid.
The photo shows both versions of the wooden bath floor. The photo of a non-leaking floor clearly shows the drain hole - an essential element of such a design.
Leaky floor installation.
Non-leaking floor.
Clay and concrete
The advantage of a clay floor is its simplicity. However, when exposed to water, clay turns into mud.
Next we will talk about how to properly make a floor in a bathhouse so that it does not spoil the appearance of the room and the mood of the owners:
- It is necessary to make a recess at a distance of half a meter from the foundation. The height of its walls should be five tens of centimeters.
- The bottom of this depression is covered with a bedding consisting of crushed stone or sand.
- A concrete screed is made on the constructed bedding.
Pouring concrete screed onto reinforcement.
In this case, you can use tiles as a covering (photo). Or you can leave bare concrete.
Tiled floor in the bathhouse.
Construction of a standard bath floor
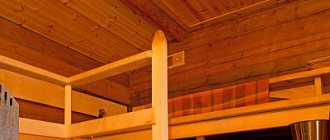
In the steam room, the floor should rise slightly compared to the zero level. You can make it higher by only 8-10 cm, and the desired effect will already be achieved - maintaining a high temperature in the room is ensured. In the washing department the floor is made below the finishing level. This improvement will help prevent excess water from entering the remaining compartments of the bath.
Installation of plank floors
The most common floor design in a bathhouse (layers from top to bottom).
- Finish coating.
- Wood or concrete (final row).
- Small air space.
- Lining (small layer).
- Insulating layers (hydro- and thermal insulation is required, sometimes noise insulation is added separately if there are industries, clubs, or other establishments that are a source of noise near the bathhouse).
- Lathing.
- Insulating layers (in cold winters to protect the floor structure from cold or moisture).
- Rough floor.
- Wooden beams for sheathing.
- Waterproofing (laid on the ground).
Construction of a concrete base
Anyone who prefers a concrete floor needs to do the following:
- Thoroughly compact the soil base.
- Pour and compact a layer of expanded clay 150 mm thick on top.
- Pour the concrete preparation 50 mm thick, after laying a mesh of thin reinforcement on the expanded clay.
- Treat the corners between the walls and the floor with waterproofing mastic or lay a strip of roofing material in this place, so that 500 mm of its width is on the wall, and 200 mm on the floor. It is recommended to apply such protection after each layer - it will prevent moisture from penetrating into the underlying layers, which could cause the development of mold and mildew in them.
- Reinstall and connect the lower part of the drain drain to the sewer.
The drain consists of two parts, each of which has a flange. The part with the upper flange needs to be temporarily disconnected, and the lower one, which we will now install, must be covered with tape or plastic film so that the solution does not get into it.
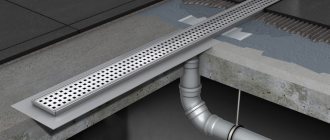
Further actions depend on the location of the ladder installation. The line drain (looks like a long tray) just needs to be installed against the wall and connected to the sewer, having well lubricated the connection with sealant.
There is no point in saving sealant: the pipe joint, being filled with screed, will be completely inaccessible, so the likelihood of leakage must be minimized. Moreover, the rubber o-ring will dry out over time (natural aging of rubber) and will not be able to provide a tight seal. We remind you that the drain must be equipped with a dry valve, and not a conventional water seal.
The same should be done with a point drain if it is installed in a corner.
If you want to install a point drain in the middle of the room, you need to calculate its location and installation height.
Location
This point is relevant if the concrete floor is to be covered with ceramic tiles. From an aesthetic point of view, it is important that the ladder is harmoniously combined with such a covering. To do this, you need to calculate its location so that it:
- for small tile sizes: installed instead of one of the tiles;
- for large tiles: installed at the junction of two or four tiles symmetrically with respect to them.
Installation height
Having determined the location, the ladder must be raised to such a height that the pipe connecting it to the sewer has the correct slope. Its value depends on the diameter of this pipe:
- with a diameter of 30 mm: the slope is 1:20 (5 cm per 1 m);
- at 50 mm: 0.02–0.03 (2–3 cm per 1 m).
To set the pipe and drain to the desired height, you need to place wooden pads or insulation under them.
Good to know: drains with adjustable height are available.
Further actions
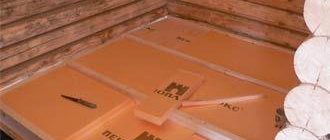
The next stage is laying the heat insulator. In this case, a material that can withstand loads should be used as insulation. It is cheapest to use expanded clay, but you need to take into account that its thermal conductivity is not the lowest. A more effective option is extruded polystyrene foam, which is slightly more expensive.
Granulated polystyrene foam, which we commonly call polystyrene foam, cannot be used, as it will collapse under load. Extruded one can withstand loads of up to 50 t/sq.m. m. You can recognize it by its structure: it is homogeneous, while granulated polystyrene foam consists of many glued granules of different sizes.
The thickness of the insulation should be such that there is a distance of approximately 35–40 mm from its top to the bottom of the drain flange. If polystyrene foam is used, then grooves need to be cut in its sheets for the drain and sewer pipe.
Then:
- We install a damper tape around the perimeter of the room immediately above the insulation. This will allow the screed to expand freely when heated. Such a tape should be installed both in the steam room and in the washing compartment, where the floor will be heated by hot water pouring onto it.
- We lay a cement-sand screed on top of the heat insulator. It fits under the very flange of the ladder, that is, its thickness is the same 35–40 mm. For reliability, this layer can be reinforced with wire. The solution is smoothed out using the following rules and then left to mature.
- We lay waterproofing: a reliable waterproofing material, for example, roofing felt or Isoplast membrane, is laid over the entire screed with an outlet on the walls, and a hole is cut in it at the place where the drain is installed, corresponding to the internal diameter of the drainage device. Thus, the flange of the drain is covered with waterproofing.
- For greater reliability, you can lay one or two more fragments of waterproofing material measuring approximately 1x1 m on top of the ladder, cutting holes in them in the same way. It is also necessary to make small holes in the waterproofing above the mounting holes of the flange.
- We screw the upper part of the drain into place: first, the sealing ring supplied with the drain is placed on the flange, then the upper part is installed and screwed tightly. The next step will be to pour the screed again, so the drain must again be covered with film from the solution.
- We pour another layer of screed, forming a slope towards the ladder.
The required slope for the floor is 1 cm per 1 m of length, that is, 1:100. The shape of the surface will depend on the type and location of the drain:
- If it is a long tray and installed along the wall, the floor is given the appearance of a single inclined plane.
- If the ladder is a point and stands in a corner, the floor is divided diagonally into two parts and each of them is given the desired slope.
- When installing a point drain in the center of the room, the floor is divided diagonally into 4 isosceles triangles, sloping towards the drain.
The slope of the screed is formed using plastic beacons - long slats, one of the edges of which is located at the desired angle. Often such beacons are even included in the gangway kit.
The thickness of the screed is selected so that near the ladder it is lower than its grate by the thickness of the finishing coating.
Finally, we apply the topcoat. The concrete floor is quite cold to the touch, so wooden grates are usually laid out on it in the bathhouse. But even in this case, it is worth not limiting yourself to treating the screed with a deep-penetration waterproofing impregnation, but laying a waterproof coating on it, smooth but not slippery. Thanks to it, the floor will be much easier to keep clean.
Liquid glass or liquid rubber can be used as a finishing material, but most often the floor is covered with waterproof ceramic tiles with an anti-slip effect. The grout should also be waterproof, and it is highly advisable to add an antifungal additive to both it and the tile adhesive.
Work on laying tiles should begin from the ladder and if its location was calculated correctly, the tiles near the walls either do not have to be cut at all, or they will be cut equally at each wall.
The seams are made no more than 3 mm wide; grouting should be done one day after laying the tiles.
Useful tips for creating a floor
- The bars are preferably laid so that liquid can easily flow along the joint line.
- To prevent the space under the floor from filling with moisture, a gap of about 15 cm is created from the internal backfill to the wooden base thanks to large beams.
- To make movement on the floor inaudible, you need to put fiberglass pads under it. They are located on the waterproofing layer. Sold in rolls, produced in the form of a thick tape.
- Wooden materials are treated with an antiseptic. It is advisable to use a chemical composition that can help get rid of all microorganisms and prevent damage to the wood.
- All boards are pre-dried or purchased already dried from a trusted company.
- When installing ventilation, it is necessary to organize its proper drainage. From the underground it is led out along the wall into the attic; a separate pipe is constructed for this purpose. If the foundation is monolithic, then you can make holes connecting the ventilation gaps with the air outside.
Recommendations for constructing a floor in a bathhouse should be applied to your own structure, sometimes adjusting the instructions. It is advisable to leave the basic standards according to which the floor should be constructed unchanged, since they are determined by the natural properties of the materials and the specific state of the air in the bathhouse.
Solving ventilation issues
The simplest option for organizing ventilation of the space between the “subfloor” and the finished flooring was mentioned earlier - holes are prepared in the floor and pipes leading out of the room are fixed in them. A diagram of such a system is shown in the following image.
The simplest option for organizing ventilation of the space between the subfloor and the finishing flooring
Another option for ensuring ventilation is the arrangement of multi-level floors. In this case, the height of the floors in different rooms will differ. So, in the wash room the floor is made on average 3 cm lower than in the dressing room.
Another option for providing ventilation
The first option has gained the most popularity among developers. The procedure is extremely simple: during the process of arranging the floor in the corners of the washing room, special holes are left in the base for further installation of ventilation pipes. Pipes with a diameter of 5-10 cm are mainly used. The material used may vary.
Ventilation pipes
The ventilation pipes are installed directly after finishing the walls of the room. Ventilation pipes with a diameter of 5 cm or less can be disguised under the casing if desired. More impressive pipes are usually mounted in corners and attached to the surface of the walls with special clamps. It is advisable to install pipes with a diameter of more than 5 cm in baths that are visited more than twice a week.
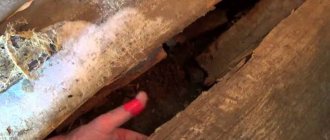
Effective protection of joists and floor coverings from rotting
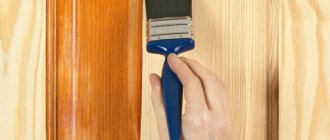
To prevent the bathhouse floor from rotting, experts recommend treating it with heat-resistant water-based varnish. Such a coating can withstand heating temperatures of over 100 degrees, providing the surface with reliable protection from high humidity, hot steam and dirt.
The protective varnish is applied to the wooden base with a brush in several layers. Work is carried out in a well-ventilated room at an air temperature of 4 to 28 degrees.
If a wooden floor is installed in a leaking bathhouse, then a protective composition is applied to the finishing coating and to the supporting joists.
Laying floors in a bathhouse is a complex procedure that depends on the design features of the building, its size and type of foundation. But, despite the technical difficulties, any owner of a private bathhouse can master the technology of laying floors with his own hands.