Traditionally, we are used to pools being installed in Finnish saunas. There you can quickly and safely refresh your body, warmed up after a hot steam room.
And the Russian bathhouse never had a pool inside, so people ran out into the cold in winter and rolled in the snow or jumped into an ice hole.
For greater comfort and a pleasant stay, many people want to have a swimming pool in a private bathhouse. The opportunity to plunge into a plunge pool with pleasantly cooling water will not leave anyone indifferent.
If you correctly understand the sequence of construction work, you can make such a structure with your own hands.
Swimming pool in a bathhouse or sauna - convenience and feasibility of construction
Traditionally, we are used to swimming pools being installed in a Finnish sauna, as this is assumed by the project. The Russian bathhouse never had an indoor pool, so after the steam room people ran out into the cold in winter and rolled in the snow or jumped into an ice hole.
But since time does not stand still and everything in the world is improving, our bathhouse now has a swimming pool, which is installed indoors. It is not only convenient, but also practical. If you live in a country or private house where there is no river nearby, then naturally, after the steam room there will be nowhere to run to rinse off. And if you decide to take a steam bath in the spring or summer, when it’s hot outside and there’s no snow, then you’ll have nowhere to fall. In general, a swimming pool in a steam room is a must.
Swimming pool in a bathhouse, lined with stone
Even if you live near a river, you cannot be sure that there will be clean water there and that after such a swim you will not have to take a bath or shower again. In your own pool, the water will always be clean, cool and treated with special antiseptics, that is, chlorinated. Therefore, you can happily take a steam bath and swim in the pool even with small children, without fear of germs and bacteria that are found in rivers and other bodies of water.
Some people install a pool near the bathhouse, but then they will have to constantly clean it and change the water, since an outdoor pond requires more attention and effort to maintain.
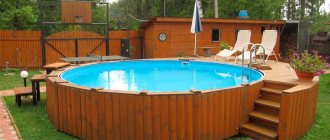
Stationary pool near a wooden bathhouse
The water in an indoor pool does not need to be constantly changed and cleaned, and it will only need to be chlorinated as needed. Thus, we can say that when planning the construction of a bathhouse on your site, do not forget to allocate space in the drawing for a small pool.
Positioning relative to the floor surface
By and large, the entire variety of pools can be divided into two main types: in-ground and non-in-ground. Recessed structures require the installation of a “bed” - a recess relative to the floor level into which the pool bowl is installed. Non-buried pools are installed with their soles directly on the floor surface.
Here, it is necessary to note the following pattern. The greater the volume of water held in the pool bowl, the deeper it should be positioned relative to the surface level. What is good about the recessed design:
- Theoretically, the volume of water held in the bowl is limited by its strength, to a much lesser extent, since it is additionally supported by the mass surrounding it.
- These structures are easy to use, even for people with limited mobility, since the water's edge is below floor level.
- Such systems can be very well equipped, due to the fact that the equipment can also be placed in hidden cavities, channels and other communication systems. Without bringing them out.
- Finishing requires a significantly smaller area, since the outer part of the bowl is hidden to varying degrees under the surface.
Non-recessed structures are much easier to install, since they do not require a “bed”. This is especially convenient when the idea that it is worth organizing a pool with your own hands in a bathhouse came after the bathhouse was built and began to function. This quality negates dismantling work in the plane of the floor and excavation work below it.
A word from Experienced! It’s unlikely that you’ll be able to build a deep enough swimming pool in a sauna with your own hands. For example, if the height of the ceilings of the washing room does not exceed 2200 mm, then with a pool depth of even 1500 mm, the free space above the water level in practice will not exceed 500 mm. And this is negligible. These designs are good for outdoor use, especially in conditions of varying terrain. Then, to ensure a convenient approach to the water's edge, it is enough to organize a small podium, and in conditions of a steep fall you can do without it altogether. Obviously, a non-buried pool has a limitation on capacity, since it is determined by the load-bearing capacity and strength of the walls.
Construction of a home pool: types of structures and their arrangement
Swimming pools in the bathhouse can be of various types, types and designs. Today, there are three types of such structures that are usually installed in a bathhouse. Pools can be large or small, deep or shallow, as well as round, square, rectangular, oval or have an unusual geometric shape. It all depends on the design of the bathhouse, as well as the space that will be allocated for the pool.
If the bathhouse is small, then we recommend making the pool a small corner one so that you can simply rinse off after the steam room. And if the project involves a huge bathhouse with a large area, then you can install a large pond where you can swim freely.
Small plunge pool for a small bathhouse
Stationary pools are the most durable, comfortable and durable. They are a deep concrete bowl that can be of any shape. Such a structure can be recessed into the ground or located on the surface. A concrete pool will require more time to build and more money to purchase materials, but it has a long service life and will therefore serve you for many years. The inside is usually tiled.
Stationary pool in the bathhouse
PVC pools can also be installed indoors, sunk into the ground when building a bathhouse, or left on the surface. But such reservoirs do not have a long service life, have certain conditions for their operation and are quite expensive. If a crack appears in such a pool, it will need to be replaced, which costs a lot of time and money. Therefore, if you choose this type of structure for a bathhouse, it is best to make it mobile so that, if necessary, it can be removed from the room.
Plastic pool in a polyvinyl chloride bath
Spa pools with hydromassage, made of special durable material, are not intended for swimming, but only for relaxing water treatments. Since such designs are sold ready-made, it is not always possible to choose the required size or shape specifically for your bathhouse project. I would also like to say that a hydromassage pool would not be entirely appropriate in a bathhouse, so it is best to abandon such an idea unless, of course, it is part of your plans.
SPA pool with hydromassage in a wooden bathhouse
Project gallery
Bathhouse project with a swimming pool
Bathhouse project with a large round pool
project of a two-story bathhouse with a swimming pool
Drawing of a bathhouse with a square pool
Bathhouse with a large rectangular pool
Large sauna complex with swimming pool
Project of a large wooden bathhouse with a swimming pool
Waterproofing
In many ways, the choice of waterproofing type depends on the individual idea of the pool. If tiles are used as a finishing material, then it is advisable to provide liquid waterproofing of the bottom and walls. Only after this can you begin laying tiles on a hydrophobic composition.
It should be remembered that ceramic tiles cannot be used for such a tank, since they have a porous structure: they not only absorb water well, but are also an excellent environment for the formation of fungi and mold. You need to purchase porcelain tiles, which, of course, are more expensive, but more reliable. As an alternative, you can consider glass mosaic tiles.
If PVC film is used for finishing, additional waterproofing is not needed. If desired, you can treat once with a penetrating liquid composition. When choosing such a finishing material, preference should be given to more durable types - at least 3 millimeters thick.
To prevent slipping in the pool, you need to choose a rough film rather than a smooth one. You can choose any colors: plain, with a pattern, the effect of stone chips or mosaics and others.
Preparation for construction: drawings, determination of dimensions depending on the area of the room
Since we will be building a pool inside a bathhouse, the drawing must be drawn up in accordance with this decision. If the bathhouse is large enough, then a separate room can be allocated for the pool, which can be equipped at your discretion.
- If there is not enough space, then it can be installed in the washing room in the form of a small font. In any case, all calculations are carried out at the stage of marking the territory and installing the foundation of the bathhouse, since a stationary pool requires, first of all, proper excavation work.
- Also, when choosing a place to build a swimming pool, it is necessary to take into account that all water supply systems and sewerage systems must be calculated taking into account the fact that this reservoir will require constant water purification and its proper circulation. In addition, the proximity of groundwater should be taken into account, since the structure should be no closer than one meter to it. Otherwise, groundwater will simply wash away the foundation and destroy it.
- The walls of the pool should not come into contact with the walls of the bathhouse, as the water will put a lot of pressure on them and cause cracks to form. Therefore, it is necessary to fill the distance between the reservoir and the walls with sand or lay it with polystyrene foam.
The size of the pool matters, since only by building a square or rectangular structure can you save room space and reduce material consumption.
We will build a pool measuring 2.2x2.2 meters and 1.5 meters deep. This will be a small pond for a bathhouse, in which both adults and children can swim.
Project of a bathhouse with a stationary pool in a separate room
Above ground hot tub with plastic bowl
For such a bowl you don’t even need to rebuild the rim
The easiest way to make a pool is to purchase a plastic bowl and place it at floor level. Then only the supply and discharge pipes will be under the floor, and all other appliances can be placed in the basement. Minimum excavation work, no risk to the foundation, no costs for waterproofing and no complex calculations. From the purchases: the bowl itself, facing panels (you can use the remains of the lining), water pipes made of cross-linked polyethylene or polypropylene, connectors for them, as well as additional devices: pump, filtration system, water heater, skimmer and pressure gauge. You can monitor the quality of water yourself, without automation.
Complex tools are also not needed. A standard gardener's kit will be enough: a jigsaw for trimming the front panels, a mallet for fitting them, the simplest soldering iron for assembling pipes, a sensor, a utility knife and a screwdriver for installing the electrical part of the system.
Those who want to have a built-in automated pool will have to look into excavation robots.
If you are planning to equip your first pool, you will not be able to provide for all the nuances. Therefore, it is best to use ready-made projects, which indicate all the necessary pipes, leads and components. Examples of projects are attached to the article. You can change the parameters of the bowl as you wish. But in no case should you reduce the power of filters or pumps without a reason, otherwise the system will not be able to cope with the load.
Selecting a material: tips for craftsmen
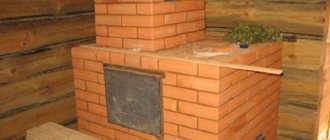
Choosing material for a stationary pool is quite simple, since here we will mainly need only high-quality concrete mortar mixed with cement, sand, crushed stone and water.
For the first pouring of the base (bottom) of the pool, you can take the M100 grade of cement and this will be enough. It is recommended to construct the walls and bottom of the reservoir only from M400 cement, since its composition contains the substances necessary for such a structure (mastics, waterproofing agents, etc.). Final work is also carried out using cement of this brand, which has a high degree of waterproofing.
Cement grade 400 for concrete mortar
The composition of the concrete mixture must be correctly adjusted, since the quality of the construction of the pool bowl depends on this.
- Sand should have fractions of no more than 1.5–2 mm. Free from clay and other foreign matter. Also, silted sand should not be used.
- Crushed stone and gravel must be taken from durable rocks without foreign impurities. The fraction is about 1–2 mm.
- Cement grade 400 must be fresh (shelf life from the date of manufacture is no more than 3 months).
- Only clean and soft water is used (you cannot take it from a river or pond).
The concrete solution is prepared in exact proportions: 1 part cement, 3 parts sand and 5 parts crushed stone. The portion of water is determined by its ratio to the entire mass of the dry mixture. For greater stability of concrete, before using it, it is necessary to use hydraulic additives (4 kg of additive per 1 cubic meter of concrete solution).
Special hydraulic additives for concrete mortar, intended for the construction of swimming pools
Step-by-step instructions for DIY construction
The production of an artificial reservoir in a bathhouse is carried out sequentially:
- A hole is dug in the ground, which is 50 cm wider and 40 cm deeper than the planned pool bowl;
- The bottom of the pit is formed at a slope; a drain pipe is placed at the deepest point, connecting it through a pipe to a sewer or pit filled with stones. The recess with drainage, as well as communications for removing waste water, should be located at a distance of 5 meters from the created reservoir;
- Approximately 7 cm of the hole is filled with sand, the “cushion” made is pressed and covered with a layer of gravel;
- Along the walls of the pit, pins about 1.5 cm thick are driven in every 30 cm;
- They create a horizontal strapping, that is, they form a kind of grid with cells of 25–30 cm². The parts of the finished lattice are welded or tied to each other with steel wire;
- 12 cm of the bottom of the pit is filled with concrete, on top of which a metal mesh is placed to reinforce the structure;
- The mesh at the bottom of the pit is connected to the reinforcement elements along the walls, after which they again begin to fill the pit with concrete (again 12 cm);
- Work is interrupted for at least 12 hours to give the concrete base time to harden;
- Sheets of roofing material and boards are placed in a concreted pit, which will protect the surface of the hardened cement from destruction due to the constant walking of builders;
- At a distance of 20 cm from the walls, boards are driven in, thereby creating formwork;
- 20 cm of the bottom of the formwork is poured with concrete. The created layer is compacted, and another layer of cement and sand mortar is poured on top of it. This action is repeated until the concrete is level with the ground surface;
- After two or three days, the formwork is removed, after which the concrete structure is given time to completely harden. During one and a half weeks of concrete hardening, it is recommended to moisten its surface 2-3 times a day;
- Waterproofing is laid in a concrete bowl using polyvinyl chloride film;
- When the concrete structure has completely hardened, it is plastered. To do this, use a solution of sand and cement with the addition of ceresite emulsion;
- Finishing work is carried out in a concrete bowl, that is, tiles or other material are glued to the walls and floor;
- The pool is equipped for operation, which implies the organization of a filtration system. To do this, a skimmer is attached to the side of the pool and adjusted to the water level. This device collects and holds large debris on the mesh. A skimmer is the only possible option, because creating an overflow system in a bathhouse is too difficult. A ladder is installed on the drain hole in the artificial reservoir, which is used to remove water from the bath.
Calculation of the amount of material and necessary tools
To build stationary concrete, we will need a large number of materials and various tools.
- Cement grades 100 and 400;
- Fine sand 1.5–2 mm;
- Crushed stone;
- Fittings (long rods with a diameter of 1.2–1.4 mm);
- Reinforcing mesh;
- Wooden boards for formwork;
- Pumps for filling the pool with water;
- Plastic pipes of different diameters;
- Waterproofing film;
- Ruberoid;
- Adhesive solution with latex;
- Pool frame;
- Geotextiles;
- Metal sheets;
- Mosaic or porcelain tiles.
Tools
- Shovels;
- Concrete mixer;
- Trowels;
- Containers for solution;
- Level;
- Plumb;
- Bulgarian;
- Hammer;
- Sander;
- Tampers.
To mix 1 cubic meter of concrete or 2400 kg you need:
- 325 kg - cement;
- 170 l. - water;
- 625 kg - sand;
- 1250 kg - crushed stone.
Water disinfection
It's no secret that utility prices are constantly rising. In order to reduce water costs, when installing a pool outdoors, the water surface can be covered with a special removable screen to protect it from debris. This can be a PVC film with the sheet rolled manually or a protective platform folded mechanically.
An outdoor pool can be covered with PVC film to protect it from debris
It is also no secret that the pool requires periodic cleaning and water replacement. There are three types of drugs for water disinfection:
- chlorination is the simplest method, however, chlorine can cause allergies and has an unpleasant odor;
- bromine preparations are odorless, but require precise dosage, since bromine is hazardous to health in large doses;
- Ozonation is the safest method with no contraindications.
There are also complex preparations for disinfection, disinfecting, preventing the germination of algae and cleaning from particles of grease and dirt, which reduce the cost of maintaining water quality by 40–50%.
Video: water purification using hydrogen peroxide
A swimming pool in a country house or in a country cottage is an excellent means of healing and relaxation, but its construction requires financial investments, engineering knowledge and a lot of hard physical labor. Before you start construction, evaluate your capabilities and, perhaps, you will come to the conclusion that a wooden font in a bathhouse is the best replacement for a swimming pool.
- Author: Valeria Teterevkova
Hello! My name is Valeria, I am 60 years old. Profession: architect, now retired. Rate this article:
- 5
- 4
- 3
- 2
- 1
(4 votes, average: 4.8 out of 5)
Share with your friends!
How to build a sauna at your dacha yourself.
Sometimes you really want to leave the hustle and bustle of the city and go to the country. Silence, walks, doing your favorite things - what could be better! If comfort is provided at the dacha, you want to come again and again. One of the comfortable living conditions at the dacha is a bathhouse.
Construction can, of course, be entrusted to professional builders. However, it is quite possible to build and improve a bathhouse on a summer cottage on your own. This eliminates additional expenses and allows you to carry out finishing and landscaping in full accordance with your desires and preferences. Therefore, this task is not easy, but quite within the capabilities of a novice builder. A self-built bathhouse will delight the owners even more. So, how to build a bathhouse yourself?
Firstly, as with any construction, you first need to decide on the project and the materials from which the bathhouse will be built. The choice of the main material for construction depends on the geographical location and operating conditions, as well as on one’s own capabilities.
Bathhouses are made of brick, aerated concrete and other stone materials; some prefer frame bathhouses, however, many novice builders prefer to build a bathhouse from wood. This lightweight and durable material does not require a serious and expensive foundation, but has excellent characteristics. With proper care, operating the bathhouse will not cause much trouble.
And of course, preference should be given to timber - a bathhouse made of this material will retain all the advantages of a wooden structure and eliminate the problems and additional costs that may arise when building walls from logs. Building walls from timber is similar to working with a construction set - it can have different geometric dimensions and cross-sections (rectangle, square, semicircular), and also, in the case of profiled timber, there are grooves for fastening. Building from timber is easy and convenient - what could be better for a novice builder!
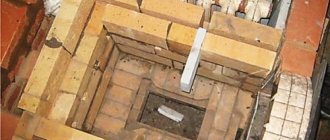
What kind of pit is needed?
It should be 25-35 centimeters deeper than the maximum limit and 50 centimeters wider. The laying of drain pipes is carried out along a pit with a slight slope in the direction of the location of the sewer well or drainage pit. The bottom is covered with a layer of sand, the height of which, when compacted, should be 10 centimeters.
The next layer of the same height is compacted gravel. If a stationary installation of a swimming pool in a bathhouse is planned and the tank is large in size, then at the next stage the filling of the bottom holes is carried out. They will be designed to collect water for filtration. Pipes are laid to the holes, and places for installing screamers are determined in the walls. It is also necessary to provide an area for special equipment intended for water purification and filtration.
Since the tank is a permanent structure, care should be taken to ensure external waterproofing to ensure its protection from groundwater. For these purposes, special materials with good waterproofing characteristics are used: roofing felt, PVC films, roofing felt and others.
After the entire pit is covered with them, it can be filled with a layer of concrete mortar 10-15 centimeters high. To ensure maximum reliability of the bottom, it is recommended to use a solution of high grade cement and sand in a ratio of 2:1 (where two parts are cement). At the next stage, the reinforcing metal mesh is laid. Another similar layer of concrete mortar is poured on top of it.
But this material will require additional pressure protection: another layer of reinforcing mesh and/or geotextile will be required. In this case, the waterproofing is laid after the protective layer, and only then the concrete solution is poured.
The walls of the tank are erected simultaneously with the construction of the bottom. It is recommended to provide a reinforcing iron frame around the entire perimeter and install formwork. The filling of the walls must be continuous and of the same thickness. For this reason, you should make sure you have a concrete mixer in advance.
Manual kneading is not suitable in this case, since we are talking about a large area. As an alternative to a concrete mixer, a ready-made solution delivery service can be considered. If the latter option is preferred, the solution class W8 should be indicated in the application. Pouring the walls and bottom with ready-made concrete takes no more than two hours.
Order a ready-made project or make it yourself
Nowadays, various versions of ready-made standard projects are posted on the websites of construction companies. It is not difficult to find the right one among them. It is only recommended to make sure that there is a schematic drawing of the object with a detailed description of the materials required for its construction and calculations.
Unfortunately, such services are not very cheap (if you order only a project). If the company is engaged in turnkey construction, then all documentation comes as a gift. When constructing it yourself, you need to take into account that it will be extremely difficult for one person to erect the structure.
Features of care
To keep your racks clean and extend their service life, you must:
- Serious stains and dirt should be removed with a brush.
- For easy regular dust cleaning, use laundry soap.
- The use of any chemical detergents or washing powder is not allowed.
- After each visit to the steam room, thoroughly dry the benches and the entire room, and monitor the proper functioning of the ventilation.
You can make benches in the steam room yourself, following the instructions of the masters
It is important to take a responsible approach to choosing the type of wood, carefully consider the shape, size, location and treatment of the shelves so that being in the steam room is comfortable and safe for health.
Briefly about the main thing
The wastewater drainage system for the bathhouse is organized before the start of the main construction.
There are 3 ways to make floors in a bathhouse with a drain: pouring, leaking and continuous. The last 2 coatings are most often used.
They choose a drainage system for a specific area, guided by the wishes for the operation of the steam room.
There are 4 main ways to organize a water drainage system in a bathhouse: pit, drainage and drainage wells, ground filtration. All methods are suitable for different requirements for the operation of the bath.
Arrangement of shelves in the steam room for comfortable movement
It is considered standard to install three-tier shelves in a bathhouse. The lower one will be cooler, the upper one will be the hottest.
To do this, it is important to take into account recommendations regarding the main dimensions of the product
Height
There are a number of optimal height indicators:
- 40‒60 cm. Distance between the first and second benches.
- 1.1 – 1.2 m. Height between the lowest step and the second shelf.
- 20 cm. This is the minimum allowable distance from the floor to the first step.
If among the regular vacationers or owners there are people of non-standard height, then the height and distances between the shelves should be selected individually.
Length
The recommended minimum range is from 1.5 to 1.8 m. With a length of 1.5 m, a person will be able to sit on a bench with their legs bent at the knees. On a 1.8 m shelf, most vacationers will be able to lie down at their full height.
Width
For the lower tier, which most often acts as a footrest, 40 cm is enough.
The standard width is 60 cm. With this size of the flooring, it will be comfortable to sit, but not to steam while lying down.
But on a 90 cm shelf it is already comfortable to lie down and sit with your legs bent.
There are benches 150 cm wide. Here the choice is individual. If the area of the room allows, then why not make them wide.
Design
A bathhouse is, first and foremost, a place for relaxation. Therefore, it is illogical to use bright colors and go far from the classics. It is better to exclude details in the form of fancy furniture or interior items just “for show”. The main task here will be to create a calm, relaxing atmosphere.
For the dressing room and steam room, the most popular decoration is the classic Russian style - a massive table, benches/loungers, wooden lining on the walls and ceiling. You can already improvise in the rest room, because there are no generally accepted standards for it.
You can successfully integrate interesting forged elements, carved baseboards, antique household items, and a fireplace into the interior. Also often, oak or birch brooms and dried bunches of aromatic herbs are hung on the walls as decoration.
The lighting should be warm and dim. With the help of lampshades that diffuse light, it is easy to achieve the desired effect.
Opinions differ about the decor in the form of animal skins and carpets: on the one hand, it looks modern and rich, on the other hand, this is another reason for the appearance of fungus.