Do-it-yourself bathhouse bed: requirements for materials, types of beds
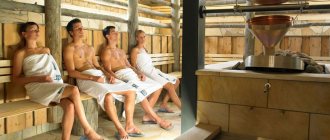
After completing the construction of the bathhouse, another, no less important, stage begins - arrangement of the premises. For maximum comfort, you need comfortable furniture that will give you the opportunity to spend time with benefit and pleasure. It should be simple, but functional, so the first possible step for the owner is to make a sunbed for the bathhouse with your own hands, since the ready-made benches presented in the store will not be cheap. These designs are elementary, therefore they are not too demanding for the master, but on such a lounger you can sit comfortably anywhere: both in the “heart of the bath” - the steam room, and in the dressing room, in the section intended for relaxation, as well as in the fresh air.
Folding the oven
For a mobile bathhouse, you can make a stove directly at your resting place.
If you have a car, you can make a more advanced version from a pipe and a potbelly stove. Where can you get stones? It is better to purchase them in advance in the store, and find a few more cobblestones of not very large size on the spot. Stones bought in a store heat up instantly, but also quickly give off heat. Therefore, the stones you find will help retain heat longer.
There are three masonry options:
- Solid.
- Vaulted.
- With jumper.
It is worst to use the “solid” option, since the fire does not reach the top stones. The easiest way is to fold the stove with a jumper.
You can heat hot water for the bath on the stove using a metal bucket. It will boil within 3 hours. All that remains is to take a broom and pour water over the stones. Enjoy Your Bath!
Requirements for sunbeds for a bath
Making benches for a bathhouse is an easy process, but such products must fully correspond to their purpose. Therefore, they have several requirements:
Typically, loungers in steam rooms are not mounted flush against the wall. A gap of approximately 100 mm is needed for water drainage and better circulation of hot steam. Large distances between adjacent boards and a slight slope of the seats are required. To protect wood forced to stay in the steam room, water-repellent, antifungal compounds are used, which have an exclusively natural base. Synthetics are absolutely prohibited.
Big difference: bathhouse and sauna
A Russian bathhouse is a functional room, so it not only does not need extra “pretty things”, they are often harmful. In saunas, unlike real steam rooms, people warm themselves with dry air. It is the images of sauna bench-beds that are most often found, but such multi-stage structures-beds are not at all ideal for a traditional Russian bath. There are several explanations for this “rejection”.
Therefore, close acquaintance with such “ideal” designs often ends in various alterations. The reason is inconvenience and shortcomings that the owners of the bathhouse were not even aware of.
Choosing material for the lounger
In this bath case, hardwoods become the favorite. The advantage is that at high temperatures they do not release resins that can cause skin burns. There are other requirements for the wood used to make benches, as well as shelves for the steam room.
Strict requirements for a steam room
The material must withstand high temperatures and high humidity with honor, otherwise the furniture will not be in danger of a long service life. Low thermal conductivity is also necessary for a comfortable rest, since there will be no need to spread a sheet on the sunbed. The list of suitable breeds includes:
Other breeds have more weak points. Birch and oak are difficult to process due to the fact that their wood has a high density. Beech, maple, ash are materials that are not indifferent to moisture, so they begin to rot relatively quickly. African oak, mahogany, and Canadian cedar look great, but few owners of a “wet place”—a bathhouse—are willing to pay such a large sum for beauty. Especially for the latter coniferous (and therefore resinous) plant, which requires special treatment. Regardless of the choice of wood species, when purchasing material, you must make sure that it does not contain knots, as well as other defects - cracks, nicks, signs of rotting.
Washing room, dressing room, rest room
In this case, there is no direct threat to the wood from high temperatures, so the range of candidates expands slightly. In the washing department, which is characterized by a constant and large abundance of water, the only suitable option is coniferous wood, since it is the resins that are able to protect the wood from moisture and not give it a chance to rot.
The cheapest material is pine, but not only it can withstand humidity: deciduous trees are also suitable, but they definitely need high-quality water-repellent impregnation. There are absolutely no restrictions on materials in the waiting room and rest room. Any wood can be used for furniture here. To protect it from moisture, all kinds of impregnations and varnishes are allowed.
Prepared boards designed specifically for shelves can be purchased at the store. This option will greatly simplify the work, since these materials are already completely ready for installation: they are sanded and the corners of the boards are rounded. If you plan to cut boards with your own hands, then you need to take into account their careful processing. There is one more point: to prevent the wood from cracking or warping in the near future, it is necessary to “notch it at the nose”: the width of the board cannot exceed four times the width.
Kinds
First, you should decide on the type of sun lounger. It can be made of wood, aluminum, plastic and synthetic fabrics. We will focus on a practical and easy-to-manufacture option - a wooden chaise lounge.
The wood for the product and its design is selected depending on:
- your preferences;
- availability of available materials;
- financial capabilities;
- style of your garden.
When choosing wood for a future sun lounger, you should take into account the physical and mechanical properties of certain types of wood. For example, beech, ash, larch or oak will last the longest. These are strong and durable materials, and they also have an aesthetic appearance. But this type of wood is quite expensive and weighs more than other types of wood, which makes the finished products more difficult to move.
A chaise lounge made with your own hands will not only save your money, but will also improve the garden and give it exclusivity. There is a varied variety of wooden chaise lounge designs.
Sizing
They depend only on the area of the bathhouse, on the room in which the sunbeds will have to be located. It would be ideal to select sizes in exact accordance with the parameters of the room. Therefore, the first step in the manufacture of bath furniture is to measure the area that is intended for it.
Height
It is also chosen more based on the height of the room. If we talk about the lower lounger, then its average height from the floor is 500-600 mm. To make it convenient for everyone (those who are soaring and those who are doing it), it is recommended to distance the upper bench from the ceiling at a distance of 1200 mm. However, the master in this case is the owner.
Length Width
To determine these parameters, it is better to refer to the standards, which can be slightly changed if required by any features of the room. When choosing the width, you need to consider that:
The usual length of sun loungers is 2100-2400 mm, but more often they are made to cover the entire wall of the steam room, so the owners choose (measure) this size themselves.
Step by Step Actions
Builders know how to make a sunbed using available materials. They recommend setting up 1 shelf 280 cm long. This will require 8 boards 13.5 cm wide. An additional board is placed on the front side (an angle of 45° is maintained). The total width of a hand-made sauna bed should not exceed 130 cm.
Homemade frame for bath shelves
It is recommended to install wooden sheathing on the floor. Its thickness should not be more than 5 cm. The shelves are installed at a level of 105 cm from the floor and about 100 cm from the ceiling. You will need to make 2 steps with your own hands. One is opposite the entrance (to quickly climb onto the shelves), the second is long, for the steamer. The first step should be made at a height of 45 cm, and the other - 25 cm from the floor.
Experts recommend making frameless shelves yourself. This bath lounger rests not on the floor, but on bars attached to the wall. 2 boards are screwed to the side surfaces in relation to the structure using screws. Gaps are created between them and the wall. It is recommended to use nuts for this.
Boards of the main structure are laid on such ribs. To give the lounger greater strength, the slats are fastened with cross beams. In this case, a gap of 1 cm is maintained. Thus, you should get a sunbed-shield, which is fixed to the side supports with self-tapping screws.
Advice from the master!
The next step involves assembling the steps. Each step in the steam room is made of 3 boards. An important point when creating a lounger is its impregnation with a special protective compound. In the bathhouse you can also install a more complex shelf, made in the form of the letters “G” or “P”.
Board fastening options
It must be reliable, but safe, therefore, when creating bath structures, several methods of fixing elements are often used.
The first method of fixation is the most popular, as it does not involve unusual actions. Connecting elements with dowels is recommended by experts, but this technology requires precise calculations and also leads to a greater loss of time, which is now worth its weight in gold.
Making a sun lounger
Making a bathhouse bed with your own hands is not a very puzzling operation, but the first test of strength in this “field” does not pass without questions, but they are all solvable. The work is divided into several mandatory stages. The first of these is tool preparation. The required set includes:
Drawing up a drawing
Almost any design requires preliminary drawing up of a drawing. This work does not promise any special difficulties, but if you wish, you can use the result of someone else’s work: optimize it to “your” size. If you are going to make the diagram yourself, then first determine the height, length and width of the structure. Then all the parameters are carefully transferred to the drawing.
Manufacturing and installation of the frame
Having a detailed drawing in hand, we begin to cut out all the blank beams (50x70 mm). The number of support elements depends on the possible load on them; the recommended step is 1000 mm. When making racks, take into account the thickness of the boards (maximum 30 mm) that will become the seats. If you take material that has a smaller thickness, then the supports are placed at a distance of 600 mm from each other. Then all parts are carefully sanded.
Leg stands placed vertically are checked with a plumb line. Wall elements are often attached to walls using dowels and screws. Intermediate supports are attached to the floor, and they are fixed on top using crossbars. If a two-tier structure is planned, then the outer racks of the upper deck are combined with the inside of the outer step.
Fastening boards and processing
The seat is made of boards, which are fixed parallel or across, leaving a gap of 10-20 mm between the elements. The last operation is to protect the tree. Several compounds are suitable for wood processing, including:
The latter composition is applied heated, its optimal temperature is from 35 to 45°. After application, the wood is polished with a thick cloth.
Any synthetic ingredient can behave unexpectedly when the temperature rises - it can begin to release substances harmful to humans. For this reason, it is better to choose completely natural products, the safety of which is beyond any doubt.
Kentucky chair
Let's consider the original version - the Kentucky chair, which is assembled entirely from bars. If necessary, the chair can be folded at any time and put away where it is needed for storage.
Kentucky chair
In order to make a chair you will need the following material:
- Galvanized wire with a diameter of 4 mm and 16 galvanized staples to secure the wire.
- Hammer and wire cutters.
- Fine grit sandpaper.
- You also need to take 50x33 mm bars, which are obtained if you cut a 50x100 mm board into three equal parts. If all the bars are put together, you should get 13 meters.
Build process
When the bars are ready for assembly, they need to be processed for strength (and protection from ultraviolet radiation, moisture, weathering) and to give them additional beauty.
Size and quantity table
To do this, the tree is treated with a stain called Beitz. To treat a sun lounger, you need to buy an external stain, the best of which are based on oils and wax). Among other things, you can use parquet oils, which are ideal for all wooden products.
Assembly diagram
You can apply a protective coating to the bars either with a brush or with a spray gun (the best option).
Assembling the chair
The diameter of the holes should be made one and a half to two millimeters larger than the thickness of the wire used.
We thread the wire into the bars
After preparing the required number of bars, it is necessary that the edges be carefully processed with fine-grain sandpaper. We begin to assemble the structure.
Raise the chair
You can also use galvanized studs (the edges are secured with eight nuts and washers) instead of staples and galvanized wire.
Grinding
After assembly, carefully lift the chair
Frameless lounger
This option for “weaponizing” a bathhouse is quite simple to implement, since the usual frame is not needed for it. This model will be a salvation for small steam rooms. The entire structure rests on boards or beams fixed to the walls. The following instructions will help you get acquainted with the stages of this work.
Using a similar scheme, you can build a structure of any shape, if the size and area of the room allows. For example, an L-shaped lounger, or shelves in the shape of the letter “P”.
Simple travel lounger
This is the most convenient option - a bench that can become an additional seat in the steam room during the “invasion” of Russian bath lovers. It’s quite easy to move such a lounger to the dressing room, rest room or terrace.
To make a mobile structure you will need boards and timber of the following sizes:
First, all the workpieces are cut out and polished. In the parts for fixing the seat, grooves are cut out from both edges in which the legs will be installed.
It is quite possible to make any sunbed for a bathhouse with your own hands, however, for such work, accurate calculations and reliable fastening of all elements are most important. To know what possible difficulties the master will encounter in the process of “creating a useful creature,” it is better to first look at this operation from the outside. For example, you can watch this video:
Source
Tips for caring for headrests
- After bath procedures, leaving the product in a heated steam room is not recommended. It is best to bring them in immediately before visiting the steam room. In this case, the headrest will not overheat, and the procedure will be comfortable.
- The accessory must be stored in a well-ventilated area.
- Headrests for a bath should be made from well-dried wood. Then the product will retain its original shape and last a long time.
- All metal fittings must be placed on the internal surfaces of the accessory or recessed deep into the wood.
- Every detail of the structure must be carefully polished.
- Do not use paints that release toxic substances when heated.
Handmade wooden headrests look very beautiful even without additional decoration. If desired, they can be carved or painted with enamel paint, which is not afraid of temperature changes.
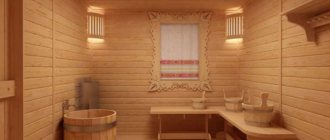
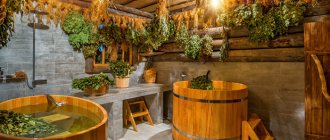
Bath beds - how to make them yourself?
The steam room is the main room of the bathhouse, where people relieve fatigue and relax under the influence of therapeutic hot steam. Therefore, it should be equipped with comfortable shelves made of high-quality wood, designed for visitors to relax and take bath procedures. You can make bath beds yourself by choosing high-quality wood and strictly following the rules for their manufacture.
You can make sunbeds for the bath yourself. The illustration for the article is taken from open sources
Briefly about the main thing
In order for the steam room in the bathhouse to be comfortable to use and to function effectively, it is necessary to adhere to certain rules when arranging the bathhouse. And, in addition to competent construction of walls, considerable attention will need to be paid to interior decoration.
The main conditions for proper arrangement:
- The basis of the building is a reliable foundation. A ribbon or columnar version is perfect for a bathhouse.
- It is important to choose a productive and safe stove.
- For it, as well as the water tank, you need to choose the right place.
- Thermal insulation of the steam room should be of the highest quality.
- The room must have good ventilation.
- Before construction, it is necessary to make a design and calculate the size of the premises.
- We must not forget about the convenience of using the premises.
When arranging a steam room, it is better to adhere to minimalism. In addition to the stove, the room should only have shelves for sitting or lying down when taking hot air procedures. When decorating a room, at least metal should be used. All the main material is high-quality wood with the lowest resin content.
Ratings 0
Choosing wood for making sun loungers
To make shelves, you need to choose wood that, when heated strongly, does not emit harmful resins, is resistant to temperature changes and moisture, and also has low thermal conductivity.
It is better to give preference to aspen, linden, birch or oak wood varieties. Accordingly, pine, spruce and other conifers are not suitable for steam rooms.
The loungers will be installed in a room with the highest possible temperature and humidity level, therefore, before their manufacture, all boards must be treated with special antifungal and antiseptic agents that protect against the appearance of fungi and the proliferation of pathogenic microorganisms.
To make sunbeds you need to have the following tools:
The entire structure is secured using wooden wedges or pins. If self-tapping screws are used, they must be placed only on the underside of the products or deepened into the recess. All boards for assembling shelves must be well cleaned with a plane and sanded.
The procedure for assembling sun loungers
First you need to prepare the boards by sanding all the corners with a sander. Instead of hardware, it is better to use oak wedges so that visitors to the steam room do not get burned on the metal elements of the shelves. If you make the structure of the sunbeds collapsible, the boards can be taken outside for regular drying. This will extend their service life.
Lounger with frame
Shelves without frame
The standard dimensions of shelves for a steam room are 180x90 cm. There should be a distance of at least 1.25 m between the ceiling and the top shelf, and it should retreat from the wall by about 10 cm to create a ventilation duct. If 2-3 tiers of sun loungers are installed in the steam room, they should have a distance between them of 40 to 60 cm so that people can sit on them without bending their back.
Mobile sun loungers and removable benches must be installed on rubber pads, which will ensure their stability on the floor surface. The bottom boards of the shelves should be at a distance of 10-15 cm from the floor. This will ensure good ventilation and the ability to clean.
If the bathhouse has windows, the sun loungers should be located at some distance from them so that accidentally cracked glass does not fall on people. This may happen due to high room temperature. Therefore, windows cannot be installed in the steam room, but only in the relaxation room or in other rooms of the bathhouse, where the temperature does not rise above +25...+30˚C.
Source
Design features and differences from a standard steam room
People have learned to make bathhouses from car booths, sea and railway containers, and refrigerated trailers. A cabin is a small container that is loaded onto a trailer for transportation. Such designs are manufactured at industrial enterprises and have certain features:
- Standard sizes are 2.3x6 meters, 2.45x5.8 m, 3x6 m, 2.8x6 m. The standard ceiling height in cabins is up to 2.3 m.
- The box is a metal frame, which is sheathed with sheets of galvanized steel or aluminum.
- The inside walls are lined with sandwich panels.
- The floors are reinforced with metal profiles and covered with liquid waterproofing. They can be supplemented with a layer of foam plastic, which acts as insulation.
- More often the entrance is located on the wide side of the structure. In large trailers, a door divides the interior space into two rooms.
Containers with pine timber floors are not mounted on trailers. Cranes and trucks are used to move them.
Wood selection and processing
You need to choose wood (preferably hardwood) so that no resin is released when heated. The wood must not only be resistant to elevated temperatures and moisture resistant, but also have low thermal conductivity so as not to burn the skin. The most accessible types of wood are aspen, poplar and linden . You can also use African oak , but it is expensive.
Steam room conditions require fluctuations in high temperatures and high humidity, therefore, before making furniture for a bath, the wood must be treated with special means to avoid possible rotting or proliferation of microorganisms in the wood.
It is strictly forbidden to treat bath furniture with paints, varnishes, or impregnate with drying oil.
To make shelves for the steam room you will need the following tools :
To secure the structure, you must use pins or wooden nails. If the fastening is made with self-tapping screws, they need to be placed on the inside or the screw should be deepened into the countersunk part. Boards for deck chairs must be carefully sanded.
The thickness of the boards should be 4 times less than the width
Lounger assembly process
All corners of the prepared wood must be smoothed. For fastening, instead of metal parts, oak wedges . The assembly process will be more labor-intensive, but it will protect the bathhouse visitor from touching the hot metal. It is desirable that the structure of the sun lounger can be easily assembled and disassembled. This is useful for periodically drying the elements.
Sauna beds are assembled from support posts and a frame . The support posts are made of thick beams placed vertically. Between them, crossbars are attached, which are inserted into the beams in the upper part, maintaining an interval along the entire length of about 50 cm. The thickness of the planks is determined by the number of supports. For example, with a board thickness of 22 cm, the distance between the supports should be about 60 cm.
For the frame, take a beam with dimensions of 50x70 mm. It is sheathed with boards in increments of 1-2 cm for good ventilation and water drainage. The seat should have a slight tilt, also for better water drainage.
You can attach the flooring to the frame either longitudinally or transversely, although it is advisable to make the backrests longitudinal
The most optimal dimensions of a sun lounger are 180 cm in length and 90 cm in width. It is necessary to take into account that there should be at least 125 cm between the upper lounger and the ceiling, the distance to the wall should not be less than 10 cm - this is a kind of ventilation gap. Each subsequent level can be lowered by 40-60 cm. All portable sun loungers and benches must be reinforced from below with rubber gaskets. For ease of floor cleaning and ventilation, the lower structures should be as open as possible.
It is important to remember that if the bathhouse has windows, then you cannot place sun loungers along them. Glass can crack due to high temperature and injure people from fragments.
As you can see, setting up a bathhouse with your own hands is not at all difficult, even without certain construction skills. By following the tips, you can make excellent steam room loungers yourself.
Source
Layout
The area of the bathhouse is an important factor for determining the location of the canopy and the number of its tiers. After all, when they create a canopy in a bathhouse with their own hands, they focus on the longest wall. But with the obligatory consideration of the absence of direct steam from the stove into the steaming space, as well as drafts. Depending on the size, the bath canopy allows you to sit, recline or lie down.
Typically, canopies are made of two or three levels to allow you to choose a more comfortable temperature zone. In the classic three-stage version, the middle tier is made stationary. The collapsible design, where the upper and lower shelves are removable, allows for better drying of the wooden parts of the bathhouse.
Along one wall there can be stepped and compartment options for the arrangement of shelves. The most economical option for arranging the canopy is like in a sleeping car compartment, one shelf above the other. They are attached with the ability to fold, freeing up space in the bathhouse if necessary. With the third L-shaped method, one of the shelves is located on the adjacent wall.
The ideal length for the canopy so that the average person can lie on it freely at full height without bending their legs. Typically the minimum bench length dimensions used are:
- sun lounger – 180–220 cm;
- recliner – 150 cm;
- seat – 40–90 cm.
The most important dimensions for the height of the canopy tiers are the distance from the floor and ceiling of the bathhouse, the optimal location of the upper and lower shelves. The main point of these dimensions is that there is enough space so that an average adult can sit down without hindrance when taking a steam bath. And also so that the steamer or massage therapist does not take uncomfortable, crooked positions during the procedures. Recommended height:
- from the ceiling to the top canopy – 110 cm;
- interlevel height – 60–80 cm.
The standard width of the canopy is considered to be 60 cm, but the upper bed should have a larger transverse dimension - 90 cm. It is quite acceptable to reduce or increase all dimensions to suit the existing standards of the bathhouse room. If the width of the main canopy is designed for two steamers, then this will already be paid. How to make a canopy in a bathhouse to suit the needs of a particular family is up to the owner to decide.
The constituent elements of any standard canopy are:
- frame - support post made of beams;
- the surface of sun loungers, seats made of boards;
- backrest for sitting on the top bunk.
All parts of the canopy must be from the same type of wood.
It is not advisable to use material made from coniferous trees, since with constant heating they begin to release resins that will stick to the bodies of vacationers. The minimum resin content of such popular hardwood species in our country:
- Linden - healing properties, homogeneous structure, darkens over time under the influence of steam and humidity.
- Aspen is relatively inexpensive, has a healing effect, is resistant to moisture, and never rots.
- Alder is a dense wood with healing properties.
- Poplar has a uniform texture; after drying, the wood becomes hard.
The wood of these trees tolerates high humidity, frequent temperature changes, and has a low level of thermal conductivity. Despite all these wonderful properties, they are additionally treated with special natural oils to protect against mold. Under no circumstances should it be impregnated with any chemicals or varnished.
Experienced craftsmen know that wood material is classified by quality. We recommend making your own canopy only from “Extra” or “A” quality wood. In appearance, this smoothly planed wood is distinguished by the absence of knots, chips and cracks. The more knots there are on the material, the more susceptible it will be to rapid destruction under extreme steam room conditions.
In sanded wood, all sharp corners should be smoothed with a chamfer to protect the skin of bathhouse visitors from possible cuts. Boards for flooring sunbeds and seats will last a long time if their width does not exceed four times the thickness. That is, in order for the boards to dry quickly and not crack, they must be thin enough.
To prevent the structure from swaying and creaking, the racks-bars for the canopy frame should have a cross-sectional size of 50×70 mm or 65×15 mm. Fasteners must be made of galvanized iron. When choosing the old fastening method, it will be necessary to drill holes at the joints for oak wedges - tenons. To avoid burns, the heads of metal screws - self-tapping screws or anchor bolts - are buried deep in the wood and protected with special decorative caps.
How to make a sun lounger for a Russian bath with your own hands: first-hand personal construction experience
At the final stage of the interior decoration of the bathhouse, the time comes to think about shelves - sunbeds on which you can lie down and steam with a broom. I also had to overcome this difficult path. I’ll say right away: I reviewed a lot of information about the construction of these same regiments, and almost made the mistakes that most beginners make when they want to build their own bathhouse. But, nevertheless, having separated the wheat from the chaff, I built good shelves in my Russian bathhouse. Moreover, I am ready to share all my achievements - read and learn.
What is the main difficulty in arranging shelves?
It is no coincidence that I emphasize that my bathhouse is Russian. This is not a dry-air sauna, where people come only to sit and warm up. In the Russian steam room, the main event was and remains a broom massage on the shelves. Therefore, their design should provide a comfortable approach for the steamer to the body of the steamer. The most important axiom: convenience in a Russian steam room should come first, and beauty and design are all secondary. The width and length of the shelves should allow a person to stretch out on them at full height, and the height should allow them to freely enter and exit them.
Most of the multi-stage static structures that we see on advertising brochures or on the Internet are shelves for saunas. These sun loungers are not suitable for a Russian bath and here's why:
A typical example of a dry-air sauna: closed narrow shelves do not allow for a high-quality broom massage
And this is what a real Russian steam room looks like. Feel the difference, gentlemen!
Unfortunately, many new bathhouse owners, without fully understanding the theory of Russian steaming, go along with the design delights that sauna manufacturers helpfully provide them with. They buy expensive shelves made of fashionable abashi wood (to be honest, I held it in my hands - it was somehow unnatural, like plastic, not alive), with curly cutouts and lighting. And then, after suffering with them for some time, they remake everything to suit themselves.
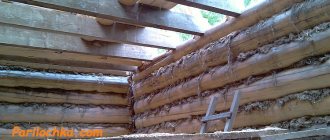
Construction process of pouring floors
Organization of underground space
This is the most important thing in poured floors, take my word for it. It is imperative to ensure a quick outflow of used water into the sewer system so that the subfloor dries quickly, if possible. Otherwise you will get rot, mold, fungi and other “delights” that have no place in the bathhouse. I did this: I removed the fertile layer inside the log house, poured clay into it, and then a gravel-sand cushion, spilled it with water, and trampled it down. At the same time, the surface sloped towards the wall with a drain below. Then it was time for waterproofing. I used roofing felt - I laid it in one layer on the surface of the subfloor, and I tarred the seams with hot bitumen. In theory, the subfloor has already been waterproofed. The water will go down the drain without being absorbed into the soil, but the surface of the subfloor will remain wet. And this, again, will lead to dampness and fungal growth.
The subfloor must dry completely, and this requires ventilation, that is, a constant flow of fresh air to the space under the bathhouse. My log house stands on a strip foundation, so I initially provided for the presence of holes in it - vents. Through them, air penetrates perfectly into the “basement”. The vents should almost always be kept open, closed only when heating and steaming in the bathhouse. Otherwise, all the hot air will safely go outside.
Installation of posts to secure the joists
The height of the underground space, from the ground (covered with roofing felt) to the wooden planks of the pouring floor, should ideally be 200-300 mm. Thus, the logs of the wooden floor should not lie directly on the roofing material, but should be raised. This is done by laying them on posts. I installed columns with a height of 270 - 300 mm from brick, placing them in increments of 80 - 100 cm. After this, the bricks were completely plastered with ordinary cement mortar.
Waterproofing
I covered all surfaces of the underground space (columns, surface of the subfloor) with hot bitumen. The result is a smooth surface to which leaves, soap flakes and other bath waste do not cling. The purpose of this action was to provide additional waterproofing and ensure the rapid flushing of all kinds of bath waste into the sewer system, so that nothing remained under the floor.
Attaching joists to posts
I used metal channels as joists and covered them with bitumen - it seems to me that they will not be demolished. In general, beams made of hard wood, for example, larch, are traditionally used for lags. They must also be covered with bitumen, otherwise they will rot after a couple of weeks of use.
Metal logs will last longer than wooden ones
Creating a boardwalk
For the boardwalk, I used 40 mm thick larch boards. They were previously planed on both sides so that drops of water would not stagnate on the fibers.
Plank flooring pouring floor
I laid the boards on the joists with the convex side up (they were slightly warped when drying) with gaps of 5-6 mm. Several floorboards above the drain and near the opposite wall are removable. This solution allows me to lift the boards after washing and clear the subfloor and drain of debris. Additionally, dry the space under the floor so that the floor can last longer.
The boards closest to the wall are removable; they can be placed on edge while drying and cleaning the subfloor.
Determining the size and location of the shelves
The height of the working shelf should be such that the person lying on it is comfortable, and the steamer can wield a broom without strain. Go to your kitchen table - its height corresponds to the level of the top shelf. It should be comfortable to work on while standing, without straining your back. Accordingly, its height is selected individually, based on the height of the bather. On average, the distance from the shelf to the surface on which the steamer will stand (grid, step, floor) is 75-90 cm. Moreover, there must be at least 20-25 cm of free space above the head of the person sitting on the shelf, otherwise he will sit on it impossible - “your ears will fry,” as one of my friends says. The shelves of the lower tier (in a Russian bath they are folding or sliding so as not to interfere with the broom massage) or steps are located approximately 40 cm from the “working” shelf.
The ceiling height in my steam room is 205 cm, the floor has a wooden grid about 5 cm thick. I planned to install the shelves at a level of 105 cm from the floor (or 100 cm from the ceiling). It’s quite high, so you can’t do without steps here – we had to make two of them. One is opposite the entrance for jumping onto the shelves (at a height of 45 cm), the second is long, for the steamer (at a height of 25 cm from the floor).
Finishing touches
To give the bathhouse a finished look, we equipped the porch with a canopy and a homemade staircase. The height of the steps on the stairs is 18 cm, the parts were assembled using mounting angles and self-tapping screws.
A path leads to the bathhouse
brooms
Relaxation corner
I made a path from the gate to the entrance, and near the bathhouse I managed to collect a compost box and a decent firewood rack. We brought furniture inside the bathhouse, hung shelves, curtains, and hung brooms. In the future, I plan to arrange a front garden near the bathhouse and build an outdoor barbecue.
8 cubes of firewood
- https://derevyannie-doma.com/materialy/karkasnaya-banya-proekty-i-chertezhi.html
- https://dekoriko.ru/banya/proekty/karkasnaya/
- https://obustroen.ru/banya-i-sauna/karkasnaya-banya.html
- https://svoimi-rykami.ru/stroitelstvo-doma/banya/karkasnye-bani-proekty-svoimi-rukami.html
- https://okarkase.ru/drugie-postrojki/banya/karkasnaya-banya-4×4-svoimi-rukami-poshagovaya-instrukciya.html
- https://tolkostroyka.ru/banya/karkasnye-bani-proekty-svoimi-rukami/
- https://bouw.ru/article/proekt-karkasnoy-bani-5h5
- https://2proraba.com/malye-postrojki/xozpostrojki/karkasnaya-banya-5×5-proekty-i-chertezhi.html
- https://stroyday.ru/istorii-polzovateley/kak-ya-stroil-karkasnuyu-banyu.html