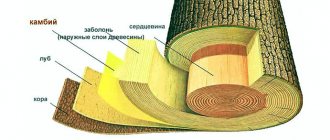
Korovin Sergey Dmitrievich
Master of Architecture, graduated from Samara State University of Architecture and Civil Engineering. 11 years of experience in design and construction.
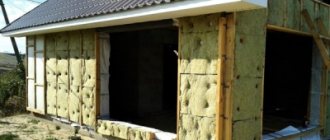
Insulating walls from the inside in wooden houses makes them more comfortable and economical. In addition, good thermal performance of the walls allows you to save on heating. The issue should be taken seriously, since the result will depend entirely on the chosen material and compliance with the technology.
Subtleties of plating
The cladding inside a timber house can be horizontal or vertical. Everything depends on what style you want to give to the room and, of course, on personal preferences.
In this case, if you plan to install the finishing material horizontally, we advise you to understand the usual rule. The tenon must certainly be placed in the upper part, and the groove, accordingly, in the lower part. This will allow you to avoid severe problems if moisture occurs. If the groove is placed on top, then water can accumulate in it, causing deformation and a high risk of mold or mildew.
It is best to start installing the lining from the ceiling to the floor, this will be much more convenient. Naturally, the opposite is possible. The slats are attached to each other using nails, which should be carefully driven into the groove. Everything must be done as carefully as possible so as not to destroy the surface of the panel itself and not to deform the back wall of the groove.
And you can also nail the finishing material with special staples, which craftsmen call “clasps.” Such brackets are usually fastened with screws.
The first panel should be mounted with a small distance from the ceiling of approximately one centimeter. This way, there will be natural ventilation of the walls, which will help avoid deformation of the finish.
The same indentation should be made at the bottom of the wall.
strengthening the lining tightly, because there should be a slightly noticeable gap between the elements - one or two mm. This is necessary so that in case of high humidity in the room, the cladding does not deform.
After the entire lining has been strengthened, the final step follows - this is strengthening the baseboards. Naturally, this is only necessary in this case if you yourself want it. The plinth can be floor or ceiling. Everything depends on what design and style you want to give to the room.
External and internal corners can be decorated with special corners made of wood. This will give the finish a finished look and will also help hide defects and flaws. Door openings can be decorated with platbands.
It is recommended to do the same with window openings.
How to cover a room with clapboard
Tip: When lining a house with wooden clapboards, before starting work, you must leave the material in the room for 24 hours so that it gets used to the microclimate.
The technology for covering a house with clapboard is as follows:
- The installation of the material is carried out on the lathing (see Lathing under the lining according to all the rules) or a supporting structure. The slats for it can be purchased ready-made or cut to the required length from one-inch boards of small cross-section using an electric saw.
- The sheathing is rigidly attached to the wall with self-tapping screws at even intervals of approximately 50 centimeters.
- During the construction of the sheathing, using a plumb line or building level, the supporting structure should be leveled.
- In order for the clapboard cladding to serve for a long time after finishing the house, you need to leave a gap between the wall and the material, which will be a ventilation space.
- To insulate the room and increase noise insulation, special material is laid. In this case:
- insulation is installed;
- covered with a vapor barrier.
- The sheathing for laying the lining is assembled.
Advice: The lathing should be coated with a special anti-fungal primer to prevent mold, which can ruin the entire look of the cladding.
How to secure material with nails, staples and clamps
If a house is clad with clapboards, the technology provides for the choice of fastening the material. In this case, everyone chooses the most convenient and familiar option for fixing the panels.
Advantages and choice of lining
Lining attracts many specifically because it is a natural material, with the help of which it will be pleasant to be in the house. The material is completely harmless, does not emit any harmful substances, is relatively cheap and always looks great.
In addition, using this material you can solve many problems. Since this finish can withstand temperature changes well, it will last for many years. At the same time, it does not deform and does not lose its original appearance. Thanks to this covering, sound insulation is increased.
In addition, this is a kind of good insulation, which can be appreciated in the cool season.
Lining is a universal material, because it is suitable for any room and for covering not only walls, but also the ceiling. Since this type of material is very durable, its choice must be approached with knowledge of the matter so that the decoration of the house lasts for many, many years.
When choosing a material, be sure to pay attention to its class. Extra-class material is, of course, the best. Class “A” lining is also a high-quality raw material. Others, “B” and “C,” are a lower class, which means they cannot boast of such impeccable quality. For interior decoration, it is recommended to choose panels with a width of no more than sixteen mm.
With all this, remember that panels thinner than twelve mm can be very fragile.
What else you need to pay attention to is the type of wood from which the cladding is made. It can be pine, birch, oak, ash or larch. They are all great for interior wall or ceiling decoration.
If you prefer pine material, then remember that over time such lining will acquire a nasty black color if it is not coated with a special varnish or paint. Ash is very resistant to temperature changes and is perfect for rooms with high humidity. As for oak, this material has no obvious shortcomings.
Installation of slopes and window sills
First you need to decide on the desired color of the future window sill, as well as its width, depending on the method of laying the brick. Now you need to install it, well foaming the window stand, the rest of the brick parapet to prevent the window frame from freezing.
The easiest way to make a straight cut on slopes is to use an angle cutter. You can also use a jigsaw to fill a thin strip on top. Having unraveled the 20×40 rail along the length, you need to drill it and attach it with self-tapping screws to the frame so that it is located evenly with the lining, in this case the lining itself will be laid on the slopes at a right angle. First you need to level the upper part, in this place the slope repeats the lining of the ceiling and walls, and then lower the slopes down, approaching the window sills.
Preparatory stage
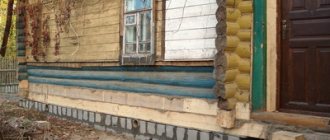
Sheathing the inside of a timber house is only possible in this case if all external work has already been completed. A timber house, despite all its obvious advantages, has several shortcomings that should definitely be taken into account before starting finishing work.
Of course, first there is high humidity, which means the appearance of mold and other harmful organisms. Therefore, before you begin covering, the walls must be carefully prepared.
The lining is always mounted on dry and completely level walls, otherwise any flaw will spoil the final result of the whole work.
If necessary, before installing the lining, you can additionally insulate the walls and take care of additional sound insulation. For example, you can use a material based on mineral wool or use a special vapor barrier film.
Any heat insulator or special foil must be installed overlapping directly onto the wall itself. You can strengthen them using a special stapler. The bars will need to be strengthened on top of this material, and not opposite.
After the walls are prepared, you can move on to the next step - the production of the frame, onto which the lining itself will then be attached.
The frame can be made of metal profiles or wood. If you plan to install the lining vertically, then the frame beams should be fastened horizontally and oppositely.
It is recommended to prepare the slats in advance, which will become the base of the frame. Choose them less than 30 mm wide.
The frame must certainly be made in one plane, otherwise the final result will not amuse you.
The first rail, regardless of how the lining will be attached, must be installed strictly vertically. When securing the rail, for example, with screws, be sure to use a plumb line. In order for the entire frame to be made in a single plane, you can use threads that need to be pulled between the slats. Using the threads as a guide, you can simply install other elements for the frame.
When carrying out the sheathing, remember that the distance between the slats should not be more or less than fifty cm. After everything is ready, the sheathing must be treated with a special antiseptic.
So, the preliminary step is completed. Next you should begin installing the lining itself.
Finishing the loggia with clapboard
Installation of lining on walls is carried out using the “from complex to simple” method. The process begins parallel to the ceiling on the wall adjacent to the apartment. This wall is the most problematic because... there are a large number of slopes, cuts and detours. Installation is carried out from the window, moving parallel to the ceiling, bypassing the window sill. The clapboard that fits the window must be sawed down so that subsequently the slope can be positioned at a right angle. The clapboard above the window is attached in the same way.
It is most reliable to use self-tapping screws and clamps as fastenings. Installation must be carried out in such a way that the joints of the lining are not noticeable. In addition, please note that it is not fixed from the side of the room all the way through, but from the side of the frame; due to the absence of any finishing elements, its edges must be perfectly filed and fit tightly to the frame.
Tips and tricks
Experts share their experience in installing lining, and it is better to follow these recommendations for successful work with your own hands.
- Before starting installation of the lining, it is recommended to leave it open in the room for one day. Thus, natural wood material will be able to adapt to the room conditions, acquire the same temperature, which will help avoid deformation. If installation will be carried out during the cold season, the material should be left indoors for at least two days.
- After the installation of the lining itself is completed, it is worth taking care of its protection, namely, what to cover the material on top with. Processing of facing material is an essential part of the repair. Thus, it will be possible to protect the lining from external damage and more. You can simply coat it with varnish. And if it is installed in a room with high humidity, then it must be treated with a protective compound.
- Before installing the frame, be sure to mark the areas where switches and sockets will be located.
- After treating the walls with an antiseptic solution, be sure to wait until they dry completely, and only then continue working.
- If the room does not need insulation, then it is quite possible to use beams less than five centimeters thick for the frame.
- To ensure that the nail heads do not spoil the appearance of the lining, you need to hammer in the nails with a special tool called a hammer.
READ Insulating the walls of a wooden house from the inside
Do not recess the nail heads more than three millimeters.
- If there is a need to cut the lining , then it is best to do this with a regular hacksaw. Just choose a tool with fine teeth.
- If the installation of the lining is carried out in a room with high humidity, we recommend treating all panels with a special moisture-resistant varnish. The panels can be mounted only after the varnish has completely dried.
- When choosing a cladding method, remember that vertical wall cladding can visually give the room additional height, while horizontal cladding makes the room visually much wider than it actually is.
You can find out more information on this issue in the video below.
The essence and problems of internal insulation
When insulating a house from the inside, you need to take into account some features.
Most experts really believe that insulating the inside of a house is only worth it as a last resort, recommending insulating the outside. What is meant in this case by the word “inside”? This refers to the direct covering of the walls of rooms with any materials. And if floors, ceilings and some other areas can be easily insulated, it is with the insulation of walls that many problems arise.
The main difficulty is the transition of the wall surface to the cold zone. Typically, if there is no insulation of any kind, warm air from the room passes through the walls, heating them. If insulation is laid from the inside, air masses will collide with them, unable to escape outside. In this case, all walls remain cold, and there is a risk of cracks.
For this reason alone, it is worth considering whether it is necessary to insulate a private house from the inside instead of insulating it from the outside. It’s logical: why waste money and your energy if the result is only cracked walls and a cold room? But this is only part of the difficulties. In addition to damage to insulated surfaces, there is condensation and other troubles that will appear in a minimum time if even a small mistake is made during the insulation work.
Insulation under the lining in bathhouses built from different materials
How does wall material affect the choice of thermal insulation? Let's take a consistent look at the options of what we can build a bathhouse from and compare the material and insulation technology.
Which insulation to choose
What is the best way to insulate a house? It’s worth starting from the material of the walls. The tree has gained well-deserved popularity due to the fact that it is able to “breathe”. Wood allows air to pass through well, providing excellent ventilation in rooms.
To preserve the beneficial properties to the fullest when working from the inside with your own hands, you need to use materials that are similar in breathability to wood. To insulate a house, it is better to abandon such heat insulators as:
- Styrofoam;
- extruded polystyrene foam (or more simply “Penoplex”);
- penoizol.
They are highly airtight, so they can create a greenhouse effect in a building. This will require expensive forced ventilation or installation of air conditioners.
The best material for thermal insulation is mineral wool.
- high efficiency;
- the ability to pass air without interfering with natural ventilation;
- safety for human health and the environment;
- I'm not sorryHonor;
- ease of installation;
- availability;
- low cost.
But when using cotton wool, it is worth remembering its disadvantages. The material absorbs moisture well, but ceases to perform its main function. To avoid getting wet, it is also worth purchasing a vapor barrier and wind-waterproofing.
Layer diagram for mineral wool insulation
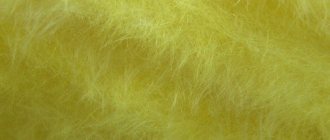
There are several types of mineral wool. The best option would be basalt (stone) insulation in slabs. You can also choose glass wool, which comes in the form of mats rolled into a roll. The second option may cause installation difficulties. The material is very itchy, and particles getting into the lungs or on the skin cause itching. To avoid unpleasant consequences, all work with glass wool is carried out in special clothing and masks.
The most undesirable, but inexpensive option would be slag wool. But when insulating your home, it’s better not to save money. Cotton wool is made from industrial waste. Manufacturers are responsible for safety, but it is not always possible to check which slags the insulation is made from. You can easily come across low-quality material or a fake, with which insulating a wooden house from the inside will be dangerous to health and life.
Brick
Brick baths are cold and non-flammable. The first circumstance prevents them from becoming traditional, because a cold bath (almost made of stone) needs to be heated for a long time, which is not particularly welcome in our fast-paced age.
But the fact that it won’t burn is a big plus, considering that bathhouses burn most often.
So, it is precisely in order to reduce the disadvantages that thermal insulation should be used - it is most effective in buildings of this kind.
IMPORTANT! Thermal insulation of a brick structure can be not only internal or external, but also located between two layers of brickwork.
The latter circumstance increases the possibility of choosing insulation. Filling with expanded clay or ecowool is an excellent solution. Ecowool, for example, is used in “double timber” structures, and it works great for decades.
You can also fearlessly fill the gap with polyurethane foam - this is expensive, requires hiring a team with equipment, but it is reliable and safe, because polyurethane is flammable, and in the gap between the layers of brick nothing threatens it, including ultraviolet radiation, which destroys it.
In other cases, traditional mineral wool is used - most often because, despite all its shortcomings, it does not support combustion, and high-quality material does not emit volatile organic matter, which is harmful to health.
You can learn more about the technology of insulating a brick wall from this article.
Tree
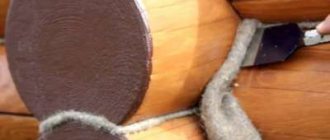
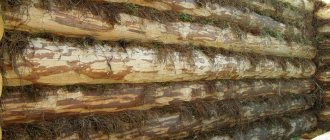
Wooden baths are either log houses, that is, they are built from cylindrical logs, or from timber - logs with a square or rectangular cross-section.
Traditionally, such baths do not require additional thermal insulation at all if the inter-crown insulation is properly installed and the cracks between the crowns are caulked. Tow, moss, and flax wool can be used as caulking material. But for laying between the crowns at the construction stage, it is most often recommended to lay strips of jute.
Natural insulation in a bathhouse is preferable, but in addition, you can use modern wood sealants, which have a certain elasticity, which allows them to change dimensions along with the wood, which “breathes” even after the structure has completed its final shrinkage.
If, during the operation of the bathhouse, it turns out that the thickness of the timber or log house does not correspond to the severity of the climate, then additional insulation has to be done. This is also a standard “pie”, consisting of lining, lathing, vapor barrier and insulation, the latter being attached directly to a wooden wall.
In what cases it is impossible to carry out insulation on the outside of walls
It is always better to install a layer of thermal insulation coating on the outside, unless there is a visible reason not to do so. These include:
- The proximity of the house to an unheated room where insulation is problematic
- Decorative finishing has been done on the outside of a wooden, brick house or foam block building, which is expensive and labor-intensive to dismantle
In all other situations, insulation along the outside of the walls will be preferable. The only option that requires high-quality internal thermal insulation, laid at the construction stage, is frame construction.
In other cases, it is better to select materials that are characterized by vapor and waterproofing properties, and are also installed without seams.
Types of suitable insulation materials
In our opinion, it makes sense to divide the types of thermal insulation materials for baths into sheet, roll and backfill. In addition, there are insulation materials that are applied to the walls in the form of foam or a moistened mass - these are polyurethane foam and ecowool, which are sprayed using special equipment.
Mineral wool can be purchased in rolls or sheets. It all depends on its density and the binders used.
BY THE WAY! We rarely name specific brands, but do you understand that the names Rockwool or Isover hide the same mineral wool produced by different companies?
Basalt wool is a type of mineral wool, a literal reference to the similar mineral used. There is practically no difference.
But you shouldn’t confuse mineral wool and glass wool - these are different insulation materials, made from different materials and with different properties.
Glass wool should no longer be used anywhere, because it is extremely unpleasant for humans - if it gets on the skin, it causes itching, and it is hazardous to health if it gets into the eyes or respiratory organs. Yes, and fiberglass crumbles during operation, turns into dust, and it penetrates through the cracks, and you breathe it.
Does not like fiberglass insulation and elevated temperatures typical of a bathhouse.
Polystyrene foam and extruded polystyrene foam are good insulation materials, especially the latter, but using them in a bathhouse is dangerous. They are absolutely not suitable for a steam room, but could (theoretically) be used in other rooms, but we will not recommend them, since they are a fire hazard.
ADVICE! In the bathhouse, polystyrene foam and penoplex can be used in floors under concrete screed - there they do not pose any danger.
So, sheet insulation is mineral wool, foam glass (excellent, but expensive insulation), calcium silicate and magnesium silicate sheets, non-recommended polystyrene foam and extruded polystyrene.
Roll insulation is again mineral wool (lower density), glass wool. foamed polyethylene, with or without foil (penofol, isolon, etc.).
We have already spoken about fiberglass, now about foamed polyethylene. It is often used as additional insulation in residential buildings, but polyethylene does not tolerate high temperatures, so it should not be used instead of foil to insulate a steam room.
IMPORTANT! Polyethylene already melts at a temperature of one hundred degrees. By the way, it supports combustion.
In general, it is quite possible to insulate other rooms of the bathhouse with it (as a second layer).
We will divide bulk insulation for baths into those that can be moistened and “glued” to the wall, and those that cannot. Expanded clay and vermiculite belong to the second category, ecowool - to the first.
READ How to grout seams on decorative bricks
Expanded clay and vermiculite can be used to insulate floors and ceilings, where they adhere perfectly and retain heat indoors. In order to insulate the walls of a bathhouse with them, it is necessary that between the two layers of the main wall material there is a gap, a cavity that can be filled with insulation.
Ecowool is waste paper (cellulose) crushed into dust, impregnated with fire retardants so that it does not support combustion. And it really doesn’t support it - this is a good material for insulating baths where it is on sale. Ecowool is used in dry and wet form. In dry conditions - for insulating floors and ceilings, as well as for filling cavities. When wet - for application to walls.
Insulating the roof with ecowool using the wet method. Cromwell Photos
Wooden houses
In this case, everything will depend on what material the building was built from. These are logs or beams. In the first case, there are many difficulties, because there will definitely be gaps between the logs that need to be sealed. For this, various insulation materials are usually used, for example, felt, linen inter-crown heat insulators, etc.
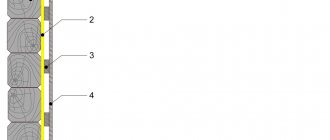
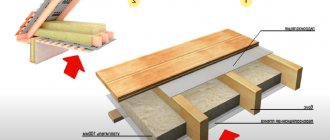
Insulation of a wooden house from the inside - photo and layout of materials
But internal thermal insulation in any wooden houses is carried out only along the frame. In principle, this technology is no different from installing mineral wool insulation over the sheathing. But there is also a significant difference.
First of all, the sheathing is made through the wall. It can consist of vertical slats or a cellular frame. In the first case, the lathing is used for rolled material, in the second case for slab material. But in any case, it is necessary to pay attention to the exact dimensions of the structure, which must coincide with the dimensions of the insulation itself.
A very important moment comes - it is necessary to leave a small gap, no more than 30 millimeters, between the insulation cake and the wall. This is a kind of ventilation that will help remove moist air vapors penetrating from the outside.
Note! A special diffuse film must be stretched. This is protection against moisture, which negatively affects the insulation.
But now you can lay the heat insulator itself. As mentioned above, it is necessary to insert it into the sheathing with tension, so as not to create cold bridges. The next stage is the installation of a vapor barrier. And the last thing is the installation of finishing material.
Frame
A frame structure, in essence, is insulation between slats, covered on both sides with OSB boards, boards, and other sheet material.
In other words, insulation is the main one of the two or three materials that make up the wall. Therefore, there is no need to carry out any additional work on thermal insulation if the initial calculation was made correctly and you selected the right insulation thickness.
Frame wall pie. Read more about insulating frame walls here.
The standard “pie”, that is, the layers that make up the wall of a frame structure, is as follows:
- if you start from the inside , then the first layer will be finishing, for example, lining;
- the lining is nailed onto the sheathing, which is attached to the frame posts;
- under the sheathing there is a mandatory layer of vapor barrier, that is, a material that is one hundred percent impenetrable to water vapor - this can be plastic film or foil;
- the vapor barrier directly covers the insulation, which is most often mineral wool, but can also be reed slabs, a mixture of sawdust and gypsum/cement/clay, or ecowool;
- the insulation is located between the frame posts, equal in layer thickness to them;
- Next comes, for example, an OSB board, covering the thermal insulator from the outside and imparting rigidity to the structure;
- a membrane or waterproofing film is mounted on top of the wall panel, which is permeable to water vapor on the insulation side and impenetrable on the other side;
- External wall trim is attached on top of the waterproofing.
Features of the thermal insulation process
Insulation for walls in private housing, as in the case of any other object, is best laid on the outside. If thermal insulation is installed from the inside, the walls will remain cold, and due to the shift in dew point, condensation will form on the internal surfaces. This will lead to the constant presence of moisture, which is especially dangerous for a wooden house.
In a situation where the main frame of the building is made of brick or other material, for example, foam blocks, it is the thermal insulation that will suffer to a greater extent, especially when it comes to mineral wool insulation. But even under such conditions, it is possible to build the safest possible structure that will trap heat in the house.
Insulation with mineral wool video instructions
Brick or stone house
These houses are more often found in modern versions than others. These building materials are chosen only because we associate them with the postulate - “my home is my fortress.” No one will argue that the thicker the walls of such a building, the warmer it is to live in it. But, as practice shows, this is a very large financial investment, and the majority of developers do not have that kind of money.
Therefore, you can do things differently. We build a house using a small amount of bricks or stone, that is, we reduce the thickness of the walls, but use thermal insulation, which will increase the heat resistance of the entire structure.
But now is the time to return to the question of how to insulate the house inside?
Internal thermal insulation of a stone house with polystyrene foam - instructions for use
You can use polystyrene foam, its price is the lowest today. But keep in mind that in this case the dew point will move to the plane of contact of the foam with the wall. And if the entire insulation process is carried out incorrectly, then consider that you have thrown money down the drain. Firstly, it won’t get warmer, and secondly, the insulation and finishing will disappear on their own in a couple of months.
Therefore, polystyrene foam, as insulation for the inside of a house, can only be used in conjunction with a special glue made on a polymer base (it is better if it is a silicone base).
- First of all, a thick layer of polymer glue is applied, which must dry.
- A second layer is applied, thinner, on which, until it dries, foam plates are installed. You need to wait for the glue to dry completely.
- Another adhesive layer is applied on top of the foam.
- Until it dries, a synthetic reinforcing mesh is installed on top of the insulation. Again, it takes time for the glue to dry.
- And one more layer of glue. Everything, with this insulation of the house inside with polystyrene foam, can be considered complete. All that remains is to finish the walls.
With mineral wool everything is a little more complicated, because this material is mainly installed on the lathing. But scientific and technological progress does not stand still. Firstly, modern mineral wool is not only rolled materials, it is also mats that have a denser structure. Secondly, to attach the mat to the walls, you can use special polymer adhesives, as is the case with foam plastic.
Experts today are trying to move away from the frame method of insulation with mineral wool, because it hides much-needed centimeters from the total volume of room space, especially for such a process as insulating a loggia.
But in order to glue the mats to the walls, it is necessary to carry out a number of preparatory processes. And this is leveling the walls, strengthening their outer layer, creating a surface with a high degree of adhesion. That is, you will have to use putty, primer, and this again is an expense.
Attention! When using mineral wool in a process such as insulation inside a house, one very important point must be taken into account, this is the protection of the insulation itself. Therefore, the presence of a vapor barrier, which is installed on top of the heat insulator, is a simple necessity.
By the way, mineral wool is an ideal option as insulation under lining inside a house or under drywall. Here two birds are killed at once, that is, the sheathing will be a structure for two materials at once: for insulation and for sheathing.
Convenient in terms of the process and economical in terms of no additional costs. In principle, this is how you can answer the question of how to insulate a stone house inside.
Causes of moisture
Dew point offset results
In the winter season, with the onset of frost, the walls of our houses freeze. In a correctly calculated wall thickness, the transition point from sub-zero to positive temperatures, called the dew point, is located inside the wall and condensation does not occur. That is why they used to build houses with walls made of stone no less than 80 cm thick. Today, with the use of the latest construction technologies and innovative materials, it has become possible to build houses with thinner walls, but such buildings require the installation of additional thermal insulation structures.
The question arises: should insulation be carried out from the outside or inside?
The issue of exterior finishing disappears when the house is made of timber and does not require external finishing. If the house is made of stone, then it would be more competent to insulate the facade, but this does not exclude carrying out internal work.
There is the only exception - the internal insulation of the walls of an apartment in a multi-storey residential building, where the use of any type of thermal insulation material will not give tangible results.
Types of vapor barrier materials
The most common vapor barrier material is polyethylene film. It is available unperforated and perforated. The second option is more suitable for waterproofing. Film is the cheapest material, is easy to install, has good qualities, and has a long service life.
Polypropylene film is a more durable material compared to the previous option. When used, condensation forms on the walls of the film, so now it is produced with an additional layer of viscose and cellulose, which is designed to absorb moisture.
Diffuse membranes are the highest quality and most expensive vapor barrier material. Made from artificial fibers, the main advantage of the material is the ability to “breathe” - which is more typical of natural products.
Liquid rubber - this material has recently become more famous. Essentially it is a water-based liquid bitumen-polymer emulsion. It applies well to almost any surface, even uneven surfaces. The surface treated in this way becomes impenetrable to steam and water, and heat and sound insulation also increases.
READ Which substance is explosive when mixed with oxygen?
Do I need to insulate my garden house?
The main purpose of a house in a garden or vegetable garden lies in the formation of living conditions outside the city, as close as possible to those at home, for living or relaxing in a suburban area. Many gardeners extend the gardening season until late autumn, and sometimes even willingly come to their dacha in winter.
Such a vacation in cold weather is often impossible, since the houses have a simple and not insulated structure - a frame made of beams covered with clapboard. The interior is finished with plywood or fiberboard. If such a home does not have proper thermal insulation, then it will be very difficult and expensive to maintain heat in the summer garden house.
Heating costs increase significantly as all the heat escapes through the walls, attic and floor. You need to think about insulating the house yourself; besides, the work is not particularly difficult. To save materials and fuel for heating the room, you can not insulate the entire house, but only one or two rooms.
Only after this can you spend your weekends in early spring and winter in comfort, without rushing to get work done. But before that, remember that all thermal insulation work for living in winter should be carried out when it is warm outside - in this case, you will insulate your country house inexpensively and efficiently.
How to properly insulate a steam room
A steam room is the main bathing room from which visitors expect certain properties, in particular long-term heat retention. To do this, the steam room is insulated, but this must be done taking into account the preferences of certain traditions.
The fact is that in a Russian bath, long-term heating and retention of heat is carried out due to long-term heating by the same brick oven. Slowly heated wooden surfaces give off heat for just as long. If the thickness of the walls is not small and there are no cracks in them, then additional insulation is not required.
In addition, the Russian bath does not strive for high temperatures. If you make a “thermos” in it, this may become an obstacle to maintaining fairly low temperatures (40-70 degrees) characteristic of this type of national bath. Thermos is made using foil.
As for the Finnish bathhouse - sauna, the task here is precisely to reach the set high temperature in the steam room in the shortest possible time and maintain it until the end of the procedures, subject to intensive air exchange.
It is worth insulating the steam room only if there are real problems with heat loss.
ADVICE! Focus on the material of the walls: in a brick bath, thermal insulation of the steam room is required, in a frame bath the thickness of the walls is included in the design, in a block bath it can be moderate, with a greater emphasis on waterproofing, and in a wooden bath it may not be necessary at all.
About the “thermos” a little lower, but otherwise the insulation scheme looks standard - most use mineral wool, because in fact there are not so many options for insulation in the bathhouse under the steam room lining But even if it is mineral wool, you need to pay attention to the fact that it is intended strictly for saunas and baths - this means that it contains low phenols and other harmful substances in the bond for stone fibers.
In addition to mineral wool, ecowool, clay with sawdust and some other materials that are harmless to health can be used in the steam room of the bath.
You already know that insulation is placed directly on the wooden walls of a bathhouse; in other cases, it is separated by a vapor barrier on one side and a waterproofing barrier on the other. This applies to insulation materials that are afraid of moisture and lose their insulating properties due to its action.
You can read more about materials and technologies for thermal insulation of steam rooms in this and this article.
Basalt wool, specially designed for baths and saunas
Thermal insulation of brick housing
Brick walls must be insulated, since in order to reduce heat loss with just a brick frame at home, you will need to use a large amount of this material (the increase occurs due to the thickness of the walls).
Moreover, as in the case of other types of buildings (made of wood and foam blocks), it is advisable to insulate brick walls from the outside.
Overview of suitable materials
- One of the popular options is warm plaster, the thickness of which should be 30 mm. It is attached to a woven mesh, which will provide good adhesion. To achieve high efficiency, you need to insulate the ceiling and floor. If the old plaster begins to crumble, it must be removed so that the installation of a new coating can begin.
- It is not advisable to insulate walls with polystyrene foam from the inside of a brick home, because this material is susceptible to combustion, and, in addition, it is not resistant to moisture
- And expanded polystyrene has all the necessary qualities for highly effective thermal insulation. It does not absorb moisture, is characterized by a low thermal conductivity coefficient and is multi-tasking, as it can also be used to insulate the ceiling, as well as to reduce heat loss when installed outside the house. Polystyrene foam is attached with glue
Another option is mineral wool material. It is freely used for insulating ceilings and for thermal insulation of walls and roofs. This covering is installed between the sheathing profiles. You can use metal or wood material to create the frame. To protect the walls from moisture, a film is used. A vapor barrier is also laid on top of the insulation layer.
Layer Insulation
What material should I use for this? The most popular is polystyrene foam, but their use for insulating, for example, baths can be questioned. An alternative could be basalt wool, because it has excellent properties and does not burn, which is very useful for a bathhouse.
How to secure the insulation ? These can be blocks of wood measuring 8x8 cm. They can be mounted on the wall vertically in increments of about 60 cm, which is enough to install cotton wool between them. At the same time, the insulation is slightly larger in size, which allows it to be held in place by bars.
Foil
Foil always causes fierce debate. The debates themselves are divided into two: whether foil is needed in a Russian bath and what is its effectiveness in reflecting heat.
Let's start with the fact that mirror surfaces have long been used to focus and redirect various types of radiation, including infrared - remember the design of the same reflector. The lining in the bathhouse does not interfere with infrared radiation.
IMPORTANT! But there is an essential condition for the mirror surface to work as a reflector - there must be air in front of the foil. The contact of other material to the foil on the reflection side is unacceptable. The ventilation gap from the foil to the lining is just right.
As for the use of foil in a Russian bath, there is, of course, no categorical prohibition, but it is advisable that you have ways to regulate the temperature, for example, using ventilation and the stove itself. In a steam room with an iron stove without a brick or stone lining, with foil insulation, you will get a hard version of the sauna, which does more harm than good.
We have two articles in which we analyze the types of foil and the arguments for and against its use in the bathhouse - the choice of insulation with or without foil, types of foil and arguments.
Useful video
Of course, this is an advertisement from TechnoNIKOL, but they didn’t lie anywhere in the instructions; the pie is shown clearly and correctly:
***
Insulate yourself better and subscribe to our Telegram channel to stay up to date with all the site news!
We recommend that you read other articles that provide information on the construction and arrangement of a bathhouse:
- application and features of the production of impregnated wood;
- a list of the best antiseptics for baths and saunas;
- bath furniture;
- bath windows;
- bath painting options;
- bathhouse roofs.
Types of suitable insulation materials
In our opinion, it makes sense to divide the types of thermal insulation materials for baths into sheet, roll and backfill. In addition, there are insulation materials that are applied to the walls in the form of foam or a moistened mass - these are polyurethane foam and ecowool, which are sprayed using special equipment.
Mineral wool can be purchased in rolls or sheets. It all depends on its density and the binders used.
BY THE WAY! We rarely name specific brands, but do you understand that the names Rockwool or Isover hide the same mineral wool produced by different companies?
Basalt wool is a type of mineral wool, a literal reference to the similar mineral used. There is practically no difference.
But you shouldn’t confuse mineral wool and glass wool - these are different insulation materials, made from different materials and with different properties.
Glass wool should no longer be used anywhere, because it is extremely unpleasant for humans - if it gets on the skin, it causes itching, and it is hazardous to health if it gets into the eyes or respiratory organs. Yes, and fiberglass crumbles during operation, turns into dust, and it penetrates through the cracks, and you breathe it.
Does not like fiberglass insulation and elevated temperatures typical of a bathhouse.
Polystyrene foam and extruded polystyrene foam are good insulation materials, especially the latter, but using them in a bathhouse is dangerous. They are absolutely not suitable for a steam room, but could (theoretically) be used in other rooms, but we will not recommend them, since they are a fire hazard.
ADVICE! In the bathhouse, polystyrene foam and penoplex can be used in floors under concrete screed - there they do not pose any danger.
So, sheet insulation is mineral wool, foam glass (excellent, but expensive insulation), calcium silicate and magnesium silicate sheets, non-recommended polystyrene foam and extruded polystyrene.
Roll insulation is again mineral wool (lower density), glass wool. foamed polyethylene, with or without foil (penofol, isolon, etc.).
We have already spoken about fiberglass, now about foamed polyethylene. It is often used as additional insulation in residential buildings, but polyethylene does not tolerate high temperatures, so it should not be used instead of foil to insulate a steam room.
IMPORTANT! Polyethylene already melts at a temperature of one hundred degrees. By the way, it supports combustion.
In general, it is quite possible to insulate other rooms of the bathhouse with it (as a second layer).
We will divide bulk insulation for baths into those that can be moistened and “glued” to the wall, and those that cannot. Expanded clay and vermiculite belong to the second category, ecowool - to the first.
Expanded clay and vermiculite can be used to insulate floors and ceilings, where they adhere perfectly and retain heat indoors. In order to insulate the walls of a bathhouse with them, it is necessary that between the two layers of the main wall material there is a gap, a cavity that can be filled with insulation.
Ecowool is waste paper (cellulose) crushed into dust, impregnated with fire retardants so that it does not support combustion. And it really doesn’t support it - this is a good material for insulating baths where it is on sale. Ecowool is used in dry and wet form. In dry conditions - for insulating floors and ceilings, as well as for filling cavities. When wet - for application to walls.
Insulating the roof with ecowool using the wet method. Cromwell Photos
Sources:
https://isanshop.ru/sovety/paroizolyaciya-i-uteplitel-pod-vagonku-2.html https://isanshop.ru/sovety/paroizolyaciya-i-uteplitel-pod-vagonku.html
Insulation with mineral wool under drywall
Before directly insulating the walls from the inside with mineral wool plus plasterboard as a final finish, it should be taken into account that the walls will increase in thickness to 5–10 cm, which will be needed to place the heat-insulating layer. All other work is carried out in accordance with the following stages:
If the finishing layer is plasterboard sheets, then first a sheathing of metal profiles is installed, which are placed at a distance from the wall corresponding to the thickness of the mineral wool. As the first layer, a vapor barrier is laid - polyethylene film or a membrane equivalent. It is important to properly seal the joints of adjacent vapor barrier strips to completely prevent the penetration of moisture. For this, standard tape is most often used. Between the fixed profiles, rolls of pre-cut mineral wool are rolled out to the required sizes.
It is also important to take into account that wool has an insignificant degree of shrinkage and therefore its length should be 10–15 cm greater than the height of the insulated wall. The insulation is placed between the profiles and spread evenly throughout the entire volume. A vapor barrier is again laid on top of the thermal insulation, which can be fixed using self-tapping screws to the metal profiles. At the final stage, sheets of plasterboard are screwed to the profiles, and the final finishing of the walls is performed.
It is very convenient that after attaching drywall to metal profiles, the wall surface is perfectly flat and suitable for finishing with any decorative materials.
Why do you need a vapor barrier?
To protect against water from the outside, wind and waterproofing is used. It prevents the insulation from weathering and exposure to precipitation. An air ventilated layer approximately 50 mm thick is also usually provided, which allows dangerous condensation to be removed from the surface of the insulation.
Purpose of wall vapor barrier
But when designing the walls of a house, it is necessary to take into account that moisture can also come from inside the building. This is especially true for a wooden structure or any other built from vapor-permeable materials (for example, frame). To protect against moisture from the inside, a vapor barrier is used. It is needed to prevent the movement of vapors inside the walls of the house and prevents the mineral wool from gaining moisture.
Application
More and more residents of private houses are choosing the interior of walls made of lining inside the house. This is explained not only by the comfort and magnificent beauty of the interior, which are achieved through the use of wood, but also due to the presence of certain properties that the lining has.
- Excellent sound insulation;
- The surface does not require further leveling;
- A wonderful aroma of wood that will appeal to all residents;
- Biological features and high environmental friendliness of the tree;
- Various methods of laying the lining, as well as its different widths and other basic parameters of the panels, allow you to visually change the proportions of the space.
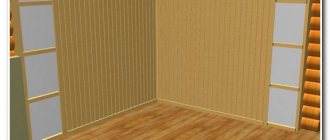
This is what clapboard cladding on the inside of a house looks like
. Let’s say a few words about the space-changing properties of clapboard:
- To begin with, it is worth noting that any decorative lining for interior decoration is made of wooden panels, the width of which is usually 8.8 cm, this in turn is the standard working size. The length of the slats will vary (from 1 to 6 meters), their variation depends on the dimensions of the room and installation methods. Before purchasing sheathing material, it is necessary to make accurate preliminary measurements;
- Another important point is the method of laying the slats on the walls. They can be located vertically or horizontally. The horizontal position expands the space of the room, while the vertical laying increases the height of the room.
Insulating a house made of timber from the inside - choosing a material
First of all, the insulation must be safe. Many people will think that thermal insulation material, first of all, should have poor thermal conductivity. That is, the better the material prevents heat from escaping from the premises, the more priority it has in terms of choice. But that's not true! First you need to pay attention to non-flammability and environmental friendliness.
Imagine that you have chosen good insulation. It is better than other types in terms of thermal insulation characteristics. But you neglected safety.
As a result, the material will release harmful substances. This will have a bad effect on your health. For example, you will periodically have a headache or feel nauseous. The house will be warm, but this will be accompanied by more serious problems. In addition, you need to select a material so that it is light, vapor-tight and does not shrink. Below we will consider all the advantages and disadvantages of insulation and summarize.
Comparative analysis
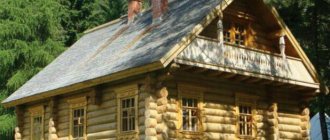
And the last thing on the topic. This is a comparison of different types of finishes. For example, how much does it cost to decorate a log house with fur coats? Firstly, this is the finishing of the facade of a wooden house. Secondly, it is carried out using wet technology. And since all kinds of solutions are difficult to glue to wooden surfaces, a plaster mesh is mounted on the latter, which itself is attached to the wooden walls with screws or nails. Then a layer of plaster is applied in several layers, and its front surface is formed into a fur coat.
Finishing with clapboard may be more expensive. But, firstly, this process is not wet, which means it will not damage the wooden structure. Secondly, there is no need to wait for the applied layers of plaster to dry. That is, the installation process is faster.
Thirdly, the lining is a kind of insulated ventilated facade, which cannot be said about a fur coat. At the same time, it has increased maintainability.
Which is better – plaster or lining, or maybe a combined approach Source volga-decking.ru
Is it necessary to install it?
Sometimes you may not need to install a vapor barrier. If the frame is built from durable timber, dried to a minimum level of humidity. The connecting elements must fit as tightly as possible. This way the structure will be protected from moisture.
A number of risks remain:
- Due to the specific nature of wood as a material, fibrous and porous, at high humidity it serves as a medium for the development of pathogenic microflora.
- If you varnish, after a few years the treatment will become ineffective. After 5-10 years, moisture will begin to penetrate deep into the timber.
- If the house is for permanent residence, installation of waterproofing is required. This will prevent the walls from rotting from the inside from moisture generated during cooking and other household needs.
Some features of installation work on insulation
There are some features of installation work and certain technological “tricks”, the observance of which will allow the work to be completed correctly.
When installing a vapor barrier, it is advisable to create an air gap necessary to remove excess moisture from the surface of the vapor barrier material.
When carrying out work, it is necessary to take into account that, after some time, the wood used in the construction of the house will dry out and cracks may appear in the hydro- and vapor barrier system, which will need to be eliminated.
It is undesirable to insulate the walls on both sides, isolating them from the air, in this case the moisture will concentrate and this will negatively affect the structure.
Direct upholstery of the frame with clapboard
There are several ways to attach lining units to the frame:
- The first method is to drive the nail obliquely from the side of the tongue. In this case, the nail head is completely cut off so that the attachment point is almost invisible. Wall upholstery with clapboard will have a more uniform appearance.
- The second method involves using a clamp (the so-called “clip”). This option provides a useful advantage: you can remove the lining at any time and fix it in another place.
- The third option is only possible with a short external latch. In this case, the nail is driven into the inner latch.
Approximate costs
Calculation of the cost of work on external hydro- and vapor barrier using the example of a residential building as part of a ventilated facade.
Initial data:
- residential building 10x10 m, one-story;
- building perimeter, 40 m;
- wall height, 300 cm;
- insulation - mineral wool, 10 cm;
- insulation density, 30 kg/m3;
- cost of insulation, 1500 rub./m3;
- cost of dowel “fungus”, 4 rubles;
- window area, 3.6 m2;
- door area, 2 m2;
- total insulation area, 114.2 m2;
- lumber consumption for sheathing, 1.2 m3;
- membrane consumption, 115 m2;
- construction tape consumption, 265 m;
- total weight of insulation, 343 kg.
Cost of work
| № | Name of expense item | Quantity | ISOSPAN price of work per m2, rub./total | Ondutis price of work per m2, rub./total | JUTA SP-1 price of work per m2, rub./total |
| 1 | Installation of step lathing, m2 | 115 | 200/23000 | 200/23000 | 200/23000 |
| 2 | Installation of insulation, m2 | 115 | 380/43815 | 380/43815 | 380/43815 |
| 3 | Installation of hydro-vapor barrier film and counter-batten, m2 | 115 | 120/13800 | 145/16675 | 150/17250 |
| 4 | Ventilation gap installation, m2 | 115 | 150/17250 | 150/17250 | 150/17250 |
| 5 | Cladding with clapboard, m2 | 115 | 300/34500 | 300/34500 | 300/34500 |
| Work, rub. | 132365 | 135240 | 135815 |
Preparing for installation of the premises
Cladding inside the house with clapboard is carried out after purchasing the necessary materials and tools:
- Wooden slats.
- Material for thermal insulation.
- Fastening elements – dowels, screws.
- Electric jigsaw.
- Nails, staples, clamps.
- Hammer.
- Screwdriver.
- Electric drill.
- Building level.
- Materials for coating: antiseptic, primer, varnish.
Before installing it yourself, you need to prepare the lining.
- Boards of the required size are selected.
Tip: Fresh or damp boards should be thoroughly dried first.
To cover the room, boards of the same width are selected, usually from 6 to 10 millimeters.
- Places for cutting are marked on the board. A factory part can serve as a stencil.
- Excess edges are sawed off.
- Grooves are made on both sides of the board using a milling cutter.
- The outer side of the panel is chamfered.
- The material is treated with a special solution to increase its moisture resistance and durability.
Types of vapor and waterproofing
All vapor barrier materials are divided into groups: A, B, C and D. It is important for a developer who plans to perform high-quality hydro- and vapor barrier of wooden walls to understand the difference between them, since their installation location - outside or inside, the type of installation and direction of installation, since some protective membranes have a one-way operating principle.
Areas of application of insulating material for the protection of wooden wall structures by material group:
And, it ensures the passage of steam, on the one hand.
They can only be installed for external installation, since the membrane can allow vapors to pass through from residential premises without allowing atmospheric moisture to pass through. The verticality of the wall allows drops to easily roll off and evaporate, thanks to the ventilation gap.The AM modification has a complex multilayer structure - a double layer of spunbond and a diffuse membrane. This material is installed on the insulation without lathing the ventilation gap.
- B, a budget classic double-sided vapor barrier, prevents the condensation process due to the fact that moisture is absorbed into its rough surface and evaporates during the day. Therefore, this type of membrane is laid with the smooth side facing the thermal insulation. Used on walls indoors. This group includes multilayer and foil modifications.
- C, a two-layer reinforced type vapor barrier membrane with a waterproofing agent, has a greater film thickness than that of protection category B. It is also installed indoors, but works well in unheated cold buildings. Vapor barrier C is similarly laid with a rough surface inside the room.
- D, ultra-modern polypropylene insulation, made of especially durable polypropylene fabric with a one-sided lamination coating, is indispensable for objects with particularly high humidity levels. An additional laminated coating gives special strength to the material and is well suited not only for walls, but also for floors and roofs. It can withstand average snow cover without damage or installation of roofing material.
Reference . The market for hydro- and vapor barriers for wooden walls is saturated with materials of both domestic and Western origin. The key Western manufacturers of high-quality membrane protection are French and Czech companies, although their prices are significant. The final choice of films for hydro- and vapor barrier will be influenced by the price, side of insulation and type of thermal protection.
The most popular materials for hydro- and vapor barrier for wooden houses:
ISOSPAN produces 3 modifications of membranes, among which the highest quality material of group D, which belongs to a high-strength universal type of protection, with an anti-condensation coating.
Main characteristics: density 90 g/m2, width 1.6 m, area 70/35 m2, water resistance 1 m, vapor permeability 7 m2 hour Pa/mg, temperature range -60 to +80 C, transverse/longitudinal gap 890/1068 H/5cm, UV stability no more than 4 months, price 1700 rub./70 m2.No deficiencies identified.
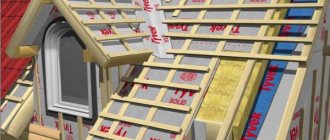
- TechnoNikol a large Russian manufacturer of waterproofing materials with 22 representative offices abroad in 18 countries. For external installation, as a rule, three-layer grade ALPHA VENT 95 is used.
Main characteristics: laid on top of insulation, density 95 g/m2, width 1.5 m, area 75 m2, water resistance 0.001 MPa during the day, vapor permeability sd 15 m, temperature range -60 to +100 C, UV stability for at least 2 months, price 5900 rub./75 m2.For internal installation, four-layer energy-efficient vapor barrier TECHNONICOL ALPHA BARRIER 4.0 is used. Installed in bathhouses and frame wooden walls, it is capable of reflecting 50% of the heat into the room.
Main characteristics: laid on top of insulation with the heat-reflecting side facing the inside of the room, density 180 g/m2, transverse/longitudinal gap 450/450 H/5cm, width 1.5 m, area 75 m2, water resistance 0.001 MPa for 3 days, vapor permeability sd 150 m , temperature range -60 to +150 C, UV stability for at least 2 months, price 6300 rub./75 m2.
The advantages of the material include the highest vapor permeability, non-biological influence, UV resistance, strength, ease of installation thanks to self-adhesive strips, and long service life. The disadvantage is the high price.
- ONDUTIS, budget vapor barrier membranes from the French manufacturer Onduline. The company produces several modifications of membranes. For internal protection of the walls of wooden houses, Ondutis R70 Smart is most suitable, which works perfectly with any type of insulation and has an integrated adhesive tape that reliably connects both joints and membrane overlaps.
Main characteristics: density 70 g/m2, transverse/longitudinal gap 80/110 H/5 cm, width 1.5 m, area 75 m2, water resistance 1 m, vapor permeability sd 5.4 m, temperature range -40 to +80 C, UV stability no less 2 months, price 1250 rub./75 m2.The advantages include good strength, easy installation, wide range, and budget-friendly. Users consider the disadvantage that the adhesive tape is located only on one edge.
- JUTA — three-layer film from a Czech manufacturer of protective membranes. Among the most popular for internal protection of wooden walls is the Juta brand Jutafol N 110 Special.
Main characteristics: density 110 g/m2, transverse/longitudinal gap 190/220 H/5cm, width 1.5 m, area 75 m2, water resistance 1 m, vapor permeability sd 40 m, temperature range -30 to +60 C, price 3900 rub./ 75 m2.The advantages of JUTA membranes include high strength, durability, biological inertness and the use of a self-extinguishing reagent that does not support combustion of the material. Users consider the high price to be a disadvantage.
- ECOLIFE environmentally friendly vapor barrier from a Russian plant. For external protection of wooden walls in thermal systems with ventilated gaps, the Ecolife D waterproofing membrane brand would be better suited.
Main characteristics: density 98 g/m2, transverse/longitudinal gap 870/1100 H/5cm, width 1.5 m, area 75 m2, water resistance 1 m, vapor permeability resistance 7.0 sq.m*g*Pa/mg, temperature range -30 to + 60 C, UV resistance over 6 months, price 1370 RUR/75 m2.The advantages include low price with high strength indicators, versatility of use, ease of installation, long service life and high tensile strength. No deficiencies identified.
Installation instructions for vapor barrier coatings
The installation method is different. It depends on the type of construction of the house. For frame structures and timber buildings, different methods are used.
Installation is best done inside and outside the building. External vapor barrier is required for protection from wind. It must be installed on old buildings with cracks.
Installation process
Vapor barrier from inside
When installing an insulating layer inside rooms, it is worth considering that after water circulates over the surface, it must be discharged somewhere. Therefore, it is necessary to provide a small gap between the insulation and the vapor barrier.
To ensure vapor barrier you will need to do the following:
- If the structure is built from cylindrical timber, due to the rounded shape of the components, no gap is required for fluid movement. It is enough to attach the membrane to the logs.
- Then a wooden sheathing is built and interior finishing, such as plasterboard sheets, is attached.
- If the house is built of rectangular timber, when installing the insulating layer, the vapor barrier membrane should be attached to the sheathing. It is mounted to the walls at small intervals. It is required to install vertical or horizontal rows that hold the insulation. This method is suitable for frame houses.
Vapor barrier outside
If wind protection is needed, a vapor barrier layer must be placed under the surface of the sheathing. It is necessary to ensure a tight fit to the insulation.
The work process looks like this:
- The vapor barrier is mounted on a round beam in the same way as for internal installation.
- All joints must be secured with construction adhesive tape; if foil film is used, with metallized tape.
- In frame buildings or structures made of timber, it is necessary to erect a counter-lattice.
- Then secure the film with wooden slats at the same intervals as on the sheathing.
A special feature of external vapor barrier is the requirement for sufficient air permeability. Therefore, it is undesirable to use film made of polyethylene or propylene. Due to the inability to allow oxygen to pass through, the steam escaping from the house will be blocked by the external barrier and settle on surfaces, which promotes rot.
External waterproofing
General rules for arranging a vapor barrier for the walls of a wooden house
For the vapor barrier to work effectively, you must adhere to a few simple rules, such as:
- The film must be overlapped. The foil film must be laid end to end.
- Adhesive tapes are used to join sheets of film.
- When using film, fiberglass and roofing felt, it is necessary to lay the strips of the material used overlapping. To connect the foil material, it is necessary to use adhesive tape with a metallized coating.
- It is better not to use construction tape. Because it tends to come off after some time.