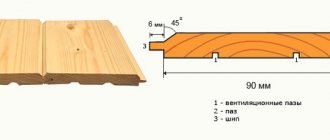
The structure of lining
Lining is a popular type of decorative design for the walls and ceilings of balconies, loggias, bathrooms, residential and office premises. This type of finishing is characterized by durability, ease of installation, a variety of colors, and attractive appearance. To obtain the expected result, it is important not only to choose high-quality material, but also to follow the fastening technology.
Features of lining installation
In most cases, lining panels are not attached directly to the wall, but to the sheathing, which eliminates the occurrence of deformations and premature destruction of the finish.
The distance between the bars should not exceed 60 cm
Between the beams of the sheathing, as a rule, heat and waterproofing material is laid.
The thickness of the bars depends on the thickness of the insulation
Several lamella layouts are used:
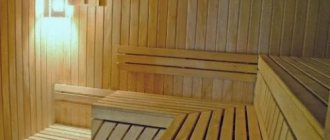
- Vertical. Laying begins from any corner (preferably in the direction from the light, so that the joints of the panels are not obscured), the first board is installed with the groove outward.
This scheme is used when finishing rooms with high humidity (baths, saunas, opening verandas), since moisture is less likely to accumulate in vertical seams. - Horizontal from bottom to top. The panels are positioned so that the groove points up and the tenon points down.
- Horizontal from top to bottom. The groove looks down and the tenon looks up.
- Diagonal and combined. Complex designs can give a unique look to a room, but require professional execution.
Fastening elements must not only securely fix the parts, but also be as inconspicuous as possible so as not to spoil the appearance of the decorative coating. In practice, several types of fixing the lining to the sheathing are used.
Fastening the lining in different ways
What are the stages of installation of this facing material?
Lathing. It would be a wrong decision to nail the lining directly to the base of the room; for this, experts advise making a frame or sheathing. After all, the surface must be flat, contain an insulating layer, all its elements must be nailed down carefully, at the same level, so that the lining fits correctly and beautifully.
The frame creates an air space between the two layers, ventilation is formed as one of the foundations for high-quality operation of the product. The timber for the sheathing is thoroughly dried and nailed to the walls with dowel nails. You can use corners with vertical holes for a sliding type of structure in a wooden house. If the walls in the house are crooked, then you need to fix the frame with dowels, bolts or screws. During the installation process, it is advisable to use a level to carry out horizontal and vertical control of the plane.
Attention: the step between the fixed bars (50*50) should be 40 cm; if you plan to insulate the wall, then the distance will be equal to the insulation layer.
Fastening with finishing nails
Finishing nails are special nails of small thickness. They easily enter the material without causing cracking. Their distinctive feature is a reduced cap, which is easily recessed into the thickness of the part. Unlike construction nails, finishing nails cannot withstand increased loads and are used only for hidden fastening of finishing materials in structures that will not be subject to shrinkage, tearing and bending. This installation method is not suitable for installing temporary coverings, since it is almost impossible to remove a thin nail from the panel.
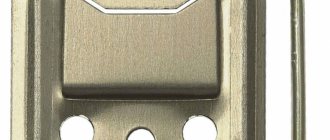
An alternative to nails - clamps
Not only clapboard nails can be used during installation. There is also such a fastener as a clamp.
Kleimers are metal plates that have holes for nails/staples, as well as a tongue of a given shape. The latter allows you to hold the lining by its groove.
Clamps or clamps are suitable for installing lining and ventilated facade systems, including PVC panels, MDF panels, chipboards, wooden block houses, etc. The fasteners are reliable, ensuring hidden installation of finishing.
Claimers are good because high-carbon steel is used for their production. Then comes the galvanized coating on top. This allows you to withstand severe loads from water, moisture, temperature, etc. Plus, due to the special design, the fasteners are invisible, but at the same time strong and reliable. Here it is important to choose the correct size of the clamp.
Mounting on clamps
Clamps are special stamped brackets with a hook and holes designed for fastening finishing panels.
Products are available in several standard sizes for various types of lining and finishing panels. This type of installation is more labor-intensive and expensive, but has a number of advantages:
- Durability of the structure. The clamps are rigidly fixed to the sheathing, and not to the lining. The structure of the panels is not damaged, which eliminates the occurrence of cracks and other damage. The likelihood of mechanical defects is reduced and the overall service life of the skin is increased.
- The lamellas on the brackets can be easily removed without damaging the material.
- High aesthetics - the clamp connection ensures a tight fit of the panels to each other, while the fastening elements themselves remain invisible.
The clamps remain inside the connection
The work is performed in the following sequence:
- Place the first plank with a tenon in a corner (for vertical mounting), in the ceiling or floor (for horizontal mounting) and firmly attach it to the sheathing beams through nails or self-tapping screws.
- Place clamps on the edge with the groove and secure the panel through the holes with self-tapping screws.
- Insert the second part with a tenon into the groove of the previous one and press it tightly along its entire length, using a tamper and a hammer.
- Place clamps on the free edge with the groove and attach it to the sheathing beams. Insert the next lamella, etc.
- Every 7-10 panels, check that they are installed correctly with a level.
Useful video on choosing clamps and attaching them to self-tapping screws:
Current prices for your city:
Advantages and disadvantages
When choosing nails for lining, you should consider what strengths and weaknesses this fastening material has.
Let's start with the plus:
- Light weight
. The fasteners will not load the structure. The weight of 1 thousand fasteners with a length of 20-50 mm is 350-800 grams; - Decorative effect.
Due to the fact that the cap is driven into the material, it remains almost invisible. This allows you not to disturb the appearance of the lining; - Corrosion resistance
. Relevant for all types except black nails.
But there are also certain disadvantages.
To be more precise, clapboard nails have two disadvantages:
- Dismantling without damage is impossible
. It is impossible to pick up the recessed small head with anything. The panel will probably be damaged; - Use of a puncher
. Without using a hammer, you won't be able to drown the head. An ordinary hammer or air gun is not enough. A combined approach is needed. Using 2 tools requires more time and care.
But judge for yourself how significant these shortcomings are. I think if you know how to nail it correctly, these disadvantages can be avoided in practice.
Self-tapping installation
Through fastening with self-tapping screws through the entire board, and not through a groove, is the simplest, fairly reliable, but not the best solution for wooden lining. With this method, the integrity of the material is compromised, so the holes must be regularly treated with special protective mastics to prevent destruction and rotting of the wood. Despite all efforts, over time, the installation sites of fasteners may become noticeable, which significantly impairs the aesthetics of the decorative finish. Usually the first and last panels are mounted this way for reliability, and for the rest they use fastening with finishing nails or clamps.
There are four ways to fasten the lining
How to nail clapboard
Here you need skill and accuracy to hide the caps of the fasteners; they are placed in the grooves. You can use a thin drill to drill holes for the foot of the nail so as not to split the wood.
How to nail clapboard to a wall with screws
Its essence is that you need to make holes for screws in the strip tenon. After this, the hole is closed with a dowel.
How to nail wooden lining with a clamp
The brackets are attached to the back of the lining and fixed to the wall using nails. A clamp is first attached to the next board, and then it is joined and secured.
How to nail lining with self-tapping screws
If the material is plastic, then self-tapping screws are suitable for it; it is inserted into the upper part of the board, and the cap is flush with the tenon. And so on in order, until the last board.
How to attach plastic lining
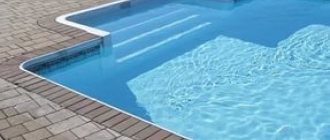
Plastic slats are a more popular type of material for finishing balconies and bathrooms than their wooden counterparts for a number of reasons:
- lighter weight, which reduces the load on the base plate;
- affordable cost;
- ease of installation;
- resistance to temperature and humidity changes.
Since PVC panels are not subject to rotting, any methods and fasteners can be used to fasten the lining. Plastic does not require impregnation and processing, unlike wooden boards. Lightweight PVC panels can be mounted with glue without constructing a sheathing, provided the surface is level.
Fastening plastic lining with self-tapping screws
With the help of lining, you can relatively easily and quickly give an auxiliary room an attractive residential look. Knowing the installation features will help you make the right choice of mounting method depending on the type of panel material and the purpose of the room.
Subscribe
Types of nails
First, about clapboard nails, which can be bought at almost any hardware store.
They come with virtually no caps and are mounted vertically as well as horizontally. Sometimes at an angle. Depends on the design of the building itself.
Lining is not only an external finishing material. It is also used to cover interior spaces, terraces, dressing rooms and many other buildings and structures.
There are 6 types of lining nails available.
- Galvanized
. They are not afraid of corrosion, which allows them to be used in wet rooms; - Copper-plated
. Resistant to moisture. They are distinguished by a reddish tint. Suitable for installation on a terrace, in a steam room, as well as in a sauna; - Brass
. Or rather, with a brass coating. This is a decorative nail with an attractive appearance. Used when installing high-class planks; - Chrome plated
. Widely used when installing skirting boards and glazing beads. Upon contact with water, rust does not begin to form; - Black
. The most affordable. Prone to corrosion. Suitable for dry rooms only; - Bronze
. The heaviest and most expensive. Only suitable for decorative panels.
You can also use a clapboard stapler. But usually this type of fastening is used for plastic lining. This is due to the lighter weight of the PVC-based material.
All these nails for lining are regulated by GOST. That is, the sizes are standard. Most often, the head diameter is 1.4-1.8 mm, and the length is from 20 to 55 mm. But you can find nails of other sizes. It all depends on what kind of lining and where we attach it.
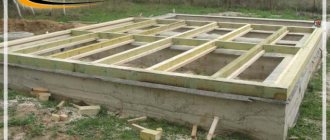
Preparing the balcony for covering
Any repair work is not complete without preparatory measures. To ensure the reliability of the structure, first the surfaces are rid of all old coatings - tiles, paint, plaster that is ready to fall off.
- After this, a thorough check of the walls is carried out. All large cracks, crevices, chips are blown out with foam or covered with a solution. Small defects are first expanded and then filled.
- Before the operation, all cracks and grooves for better adhesion (adhesion) must be treated with a primer designed for a specific base material.
- Using a level, check the degree of curvature of walls and ceilings. Depressions are leveled using plaster (putty), protruding areas are removed with a hammer.
- To protect against mold, a primer is applied to the entire surface area. The operation is performed in several layers. Before applying the next one, wait until the previous one has completely dried.
While they are waiting for the primer to dry, they treat the lining and timber with an antiseptic in the same way.
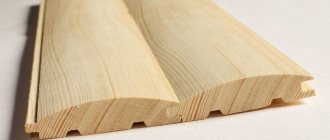
Types of lining for cladding
Usually, when lining is mentioned in a conversation, they mean wooden products. Much less commonly, plastic PVC panels are called this way. The point here is a very similar, convenient installation of such material: both are long boards with a tenon on one side and a groove on the other. The choice of two candidates is influenced by their cost and the desire of the owners: they proceed from practical or aesthetic considerations. Therefore, the first question is not about how to cover a balcony with clapboard, but about its preferred type. You need to get to know both candidates better.
Plastic variety
The raw material used to make these panels is polyvinyl chloride (PVC) or vinyl. Due to its structure, the material has good sound and heat insulation characteristics. The assets of this type include a low price, a decent service life (they promise 30 years), and a wide range of colors. Other “virtues” of plastic lining include:
- Quite nice looking. Such panels are produced not only in different colors: imitations of wood, natural stone and metal are very popular.
- No fear of precipitation. This is a great advantage for balconies if the owners open the windows very often for ventilation.
- Economical. Artificial material is not too fancy, so there are no extra costs. Plastic lining will not require protection or paint coatings.
- The ideal combination with the same plastic windows makes it possible to get a solid, harmonious interior on the balcony.
- Easy to install and maintain.
Along with its advantages, plastic cladding has serious disadvantages, especially for balconies. This list includes:
- Fragility of the material. The panels cannot withstand impacts; mechanical stress causes cracks to form on them.
- Color change. Over time, the lining will fade, and under sunlight, light-colored models will begin to acquire a yellowish tint.
- Deformation due to high temperature. If the balcony is on the south side, then this is not a good option.
- The release of an unpleasant odor in the summer heat is one of the most unpleasant properties of artificial material.
- Fire hazard. Plastic is very flammable and when it burns it releases toxic substances. This is a huge drawback of this lining.
If you handle the material with care, avoid force majeure situations and protect it from harsh sun rays, as well as from high temperatures, then plastic lining will provide a nice appearance to the balcony with minimal costs for its covering.
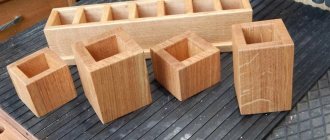
Wooden lining
The average service life of the material is 10 years, but its “life expectancy” depends more on the quality of protection. These panels are made from different types of wood. To cover the balcony, they buy lining made of oak, linden, alder, ash and other hardwoods. Finishing materials from spruce, larch and pine are rarely used where there is a lot of sun and high temperatures. The reason is the release of resin in such uncomfortable conditions.
Everyone knows the benefits of wood.
- Environmental cleanliness is the main advantage. Thanks to him, the tree often wins the “battle” with other, unnatural, contenders.
- Versatility. The material allows you to cover not only the walls of the balcony, but also the floor and ceiling.
- Amazingly beautiful, noble appearance.
- Excellent sound and heat insulation properties.
It is necessary to bring all the qualities, even those that are negative. This category includes:
- Installation is much more labor-intensive compared to covering with plastic lining.
- The need for wood processing. She needs protection from moisture, mold, rot, insects and fire.
- Costs for paints and varnishes, which are used to refine the lining and additionally protect the wood.
If we compare the disadvantages of plastic and wood, the disadvantages of the second material are less serious and relative: most of them can be easily dealt with with your own hands. That is why wooden lining is much more often the winner when choosing material for cladding a balcony.
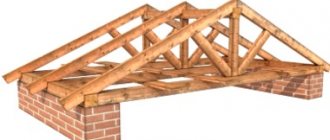
How to prepare a frame for mounting material
The video in this article will show you how to nail the lining and how best to position it on the surface.
The direction of the panels can be:
- Vertical. In this case, the boards are placed in the direction from floor to ceiling, the room visually becomes narrower and higher.
- Horizontal. The slats are placed from one wall to another, the room looks wider, but lower.
- At an angle or diagonally. This is a more complex method of laying material, and also with increased consumption.
- Combined. A combination of the first three methods in any variant.
With a perfectly flat wooden surface, the lining can be nailed directly to the wall, which is very rare. In other cases, the lathing is made from planed pine slats with a cross-section of 20x40 millimeters (see Lathing for lining according to all the rules), with a pitch of elements up to 50 centimeters.
Tip: Before installation, all wooden parts should be treated with an antiseptic.
The further procedure for installing the frame is as follows:
- The first rail is installed vertically in the corner of the room, its position is controlled by a plumb line. To install screws, plastic dowels and wooden spacers are used.
- Similarly, another rail is mounted in the opposite corner.
- At the top and bottom of the wall, two cords are stretched between the bars to facilitate installation of the panel at the top and bottom.
- Horizontal elements are fixed: one under the ceiling, and the other closer to the floor, their position is controlled by a cord.
- In increments of 50 centimeters, the remaining slats are installed horizontally.
Advice. To check the correct installation of parts, a cord or rule, which is a flat wooden block, is used, stretched between the outer slats, resting it on horizontal panels located at the top and bottom of the structure.
When the lining is placed horizontally, the slats for the sheathing are installed vertically. For diagonal laying - to the lining at a right angle.
Rules and recommendations for covering walls with clapboard
When using this material for exterior or interior decoration, it is recommended to follow the following rules:
- If you can’t cover the wall with a solid board, then you can use a “mushroom” profile to hide the joints.
- Joints in internal and external corners are masked with appropriate corner profiles.
- Sheathing is often associated with the creation of an insulating pie, so you need to remember the rule of increasing the throughput of the material from the inside out. This means that each subsequent layer, starting with the interior lining, should allow steam to pass through better than the previous one. This determines whether condensation will accumulate inside the “pie”.
- You can start painting or varnishing the installed lining no earlier than after two days.
- Before applying the second coat of varnish, the surface is sanded to eliminate possible hairiness.
Even a non-professional can do the finishing of a home or cottage with clapboards, and the prices are so low that they are affordable for even the most budget-friendly construction or renovation. This finishing material is simply doomed to remain among the most popular.
Vapor barrier and insulation in the lining of the lining
Regarding the place and method of installing vapor barrier and insulation in the lining of the lining, different opinions are expressed and often opposite to each other.
Vapor barrier is a protective material, the purpose of which is to create a barrier to the penetration of moisture that has already arisen to certain areas of the building structure. In our case, the area that we want to protect is a wooden paneling that is not resistant to moisture. The name of the material, vapor barrier, is a little confusing, because it does not actually insulate vapor. Steam can form in any part of the wall pie, during the interaction of cold and warm air, where it is converted into condensation. The place where condensation forms is called the dew point. Where the dew point occurs depends on many factors. Learn more about dew point formation.
vapor barrier finishing
That is, before installing a vapor barrier material, it is necessary to find out in which part of the wall a dew point can form. And install the vapor barrier in such a way that it protects the wooden paneling from the resulting moisture.
For example, if the dew point is formed in the structure of the rough wall of the house, then the vapor barrier should be installed directly on the wall, the reflective side should be pressed directly against the wall with the sheathing, and insulation should be installed on top of the vapor barrier.
If a dew point forms in the internal wall frame and insulation, which is an extremely unfavorable case, and if you cannot fix it in any way, then a vapor barrier should be installed on top of the insulation to protect the lining from moisture and mold formation in the future. In this case, if the insulation is installed after a vapor barrier and a dew point appears in it, then it will absorb the resulting condensate like a sponge. Without the ability to release the absorbed moisture through the rough wall, the insulation and lining will rot, with the formation of fungus.
o dew point is indicated
vapor barrier over insulation
Installation of a vapor barrier to a wall is carried out using ordinary dowels and nails with plugs when installing a frame, on a stone wall, and with wood screws when working with a plaster or wooden wall.
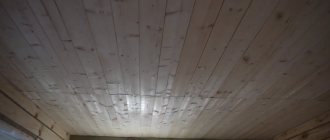
There are currently a large variety of insulating materials for walls. Read more about types of insulation. The most common wall insulation is mineral wool. The choice of material for insulation should be selected based on the technical characteristics of the room, the material and the thickness of the sheets.
The insulation is laid into the frame quite quickly. Holds securely without additional fasteners. To cut the insulation to size you will need a construction knife.
insulation - mineral wool in wooden lathing