After purchasing a stove, some of our clients make a firm decision to install it themselves. We support such initiatives and, whenever possible, help with consultations, because if a person has the time and desire to do something with his own hands, that’s always wonderful. We treat cases with less confidence when clients entrust the installation of a furnace to cheap builders and installers...
The critical difference between these two cases is that the owner will always double-check several times in Yandex: “how to properly install a stove for a bath.” But one-time specialists more often rely on their logic than on SNiP standards - after all, studying the standards is not included in the cost of their work. In this article we will tell you exactly what needs to be checked and taken into account if the installation of the furnace is carried out independently or through dubious specialists.
Why did we decide to write this article? The fact is that about 3 years ago, the government of our country decided that installers of stoves and fireplaces are no longer required to license their activities (Resolution No. 1219 of October 6, 2017).
This means that it’s enough to make a website, fill it with water about your mega-experience, set the price 2-3 times lower than competitors and order advertising. As a result, clients, tempted by the low price, hire such unfortunate masters, after which they find themselves in extremely bad situations. Moreover, the easiest of them is the need to purchase a new stove. But there are worse consequences. You can learn about such “worse” from fire department reports: “The installation was carried out in violation of the standards...”
We recommend not to chase the lowest cost in this matter and either trust professionals, or delve into it and figure it out yourself. It was for the second client case that we decided to prepare a series of articles. This is how this article appeared.
The first piece of advice from our experts is:
If you want to save money on installing a stove for your bathhouse, then understand the basics and supervise the work of hired workers.
If you don’t want to control it, then delve into the issue entirely and install the stove yourself.
If you don’t want to get involved, then leave the issue to a specialized company.
So, you have already built a sauna with a steam room, chosen and bought a stove, and even stocked up on oak brooms. It’s just a matter of little things, well, almost - all that remains is to install the stove and you can enjoy the healing properties of a real Russian wood-fired bathhouse. But to prevent your long-awaited dream from turning into a nightmare, consider the following...
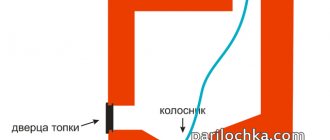
What to install a sauna stove on
A sauna stove, like no other, requires installation on a non-flammable base, because its combustion center is practically on the floor. This means that the temperature load on the floor is greater. We recommend that you use only one of the four base options listed below for sauna stoves.
A metal sheet
Most often, stainless steel or galvanized sheets are used, but painted flood sheets look more beautiful. They come in different sizes, shapes and colors. The options are presented here.
Thermal insulation must be laid under the metal sheet, because... it conducts heat very well. Ordinary basalt cardboard will do, but it is better to additionally use a fiber cement board: faspan, mineralite or flamma.
Agglomerate tiles
This is a tile made from pressed granite chips. Due to the dense structure, the weight of one tile measures 600x600 mm. is 20 kg. As a rule, several pieces are used for the agglomerate base, which are laid on a sheet of CBPB or the same fiber cement board. It is also necessary to use basalt cardboard.
Fig. 1. Base for a sauna stove made of agglomerate tiles
Installation on ordinary porcelain tiles is allowed - the base design will be the same as with agglomerate tiles. But porcelain stoneware is thinner and more fragile, it can burst under the weight of the stove, especially with stones.
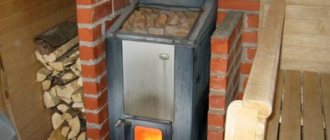
Bricks
Installing a sauna stove on bricks is only possible on a flat floor. If a sheet of metal and agglomerate tiles allow for slight unevenness, then the bricks will not “forgive” them - they will move higher and lower. In this case, you will need to level the floor first. If the bricks are laid on a concrete floor, then no thermal protection is required, but if on a wooden floor, then the above-mentioned basalt cardboard can be used.
Fig 2. Grill'D Cometa 180 Vega sauna stove mounted on bricks
Ready bases
Some manufacturers of sauna stoves produce special podiums on which they recommend installing their products. Such podiums, as a rule, do not require additional thermal protection, because have convection channels that cool the floor underneath.
But we consider it not unnecessary to use additional thermal protection under ready-made substrates.
Thermal insulation materials are presented in our section of the website here.
Fig 3. Vesuvius Legend sauna stove installed on the “original” metal base
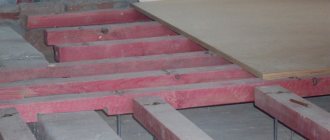
Preparing the floor before installation in a wooden bath
When the total weight of the furnace is less than 7 centners , the need for a foundation disappears, but a kind of “pedestal” of brick is still erected. It's good when this happens during construction. You can again calculate the position so that the base lies between the lower beams under the floor . But it happens that you have to redo the old base for a new stove in an old bathhouse. Then you can't do without opening the floors and checking their strength . We advise you to read the relevant paragraphs of this article, where you will find tips on strengthening beams and joists, and tables for calculating their “endurance”.
Safe distance from the stove to the flammable wall
A stove is, first of all, a fire, which means there are regulated standards for its installation and operation for fire safety.
The current rules (SNiP dated April 2, 05-91) state the following: The safe distance from the stove to the flammable wall (including wooden shelves) must be at least 500 mm.*
*Appendix 16 (mandatory). Dimensions of grooves and offsets for stoves and smoke ducts.
How to reduce the distance from the stove to the wooden wall and comply with safety standards?
In practice, the distance is 500 mm. You can't always stand it. You will not rebuild the bathhouse. Fortunately, progress is moving forward every day, and modern thermal insulation materials are appearing on the market, which provide much greater protection than those provided for in SNiP itself. Using such materials, the distance can be reduced to 250 mm. We will talk about them below.
How to check the standards in an accessible way?
To make sure that you have maintained a fire-safe distance, test the wall with your hand. If installed correctly, the wall should be warm at the level of the stove.
Of course, the question of the safe distance from the stove to the flammable wall may be a little late if, during the construction of your bathhouse, you did not particularly compare the dimensions of the future stove with the area allocated for it. And if you still made a slight mistake in this matter, now it will be difficult to cram in what you can’t fit in. In any case, we do not recommend compromising your conscience. Call us and we will advise you on what can be done in your specific situation.
Video on how NOT to install a sauna stove
Please note that incorrect installation consists not only of errors in the distance from the furnace to nearby objects, but also of errors in the installation of electrical wiring, its operation, incorrect arrangement of chimney passages through the ceiling, etc. - all this can cause a future fire, but we will talk about this in the following articles.
Ceiling preparation and chimney installation
Many fires have started in the area of the ceiling where the chimney runs. There are many mistakes associated with arranging the passage of a chimney through ceilings. The cause of the fire may be:
- pipe overheating;
- cracks in the pipe through which sparks escape;
- errors in the distances between the pipe and the combustible ceiling.
Not the most competent way to pass the ceiling for a bathhouse
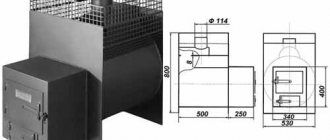
If you did not design the position of the stove in advance, there may be a beam above it. In this case , you will have to cut out part of the beam and fasten it with jumpers to adjacent beams. The empty space above the center of the pipe passage should be about 90 cm in diameter.
The ceilings are cut out square to install a cutting box , which is a tin box closed at the bottom and top with stainless steel sheets in which a hole is made for the pipe (see photo above).
The chimney is mounted from the pipe coming out of the stove. If the monopipe is larger in diameter, you will have to put an adapter . But in any case , the first pipe running through the steam room will be a monopipe. A gate is mounted on it , then it continues again, but before reaching the ceiling (this is important!), a “start” is put on it - an adapter from a mono to a sandwich pipe that will go through the ceilings. Pipe connections must not penetrate into ceilings.
It is worth noting here that sandwiches, of course, are the most common, but this is a dangerous type of chimney - so what if the gap between the two pipes is clogged with thermal insulation? This will in no way prevent the inner pipe from burning out if the owner is often in a hurry to heat the bathhouse. And the properties of the insulation, when condensation forms in it, will not be the same as stated - it will transmit heat perfectly, overheating the outer pipe.
An alternative to sandwich pipes is ceramic or brick-lined chimneys , but both are heavier and more expensive. Therefore, the majority prefers to risk the entire bathhouse.
OK. This means that through a hole in the stainless steel the sandwich pipe enters the cutting box.
There is still space around it that can be filled:
- expanded clay;
- mineral wool;
- sand.
Attention! The height of the box must be several centimeters greater than the thickness of the ceiling
The outside of the box can be wrapped with basalt cardboard so that it does not touch the wood.
Next, the pipe is brought out through the roof, through a hole of a larger diameter than the pipe. On the outside, the area nearby is coated with sealant, a master flush , secured to the roof with self-tapping screws at intervals of up to 5 cm, and the connection between the flush and the pipe is also sealed. All that remains is to install an umbrella or deflector.
master flush
Do not forget! It is necessary to constantly check the vertical position of the chimney with a plumb line, and also secure it for greater stability using a clamp with a bracket to the wall or other stable structural elements.
Operating a stove in a brick wall
Is the operation of a stove in a brick wall different from a conventional one, which is installed in residential buildings together with a gas heating system? Firstly, switching the fuel type physically cannot occur here. Secondly, the heating must be distributed over the entire wall to prevent burning of the brick in the rough (this can even cause a fire). Thirdly, the combustion chambers that are installed in such stoves have a shallower depth, but a larger width for convenient stacking of firewood. Those that are placed in the bathhouse have a greater height. The reason is similar, that is, for the convenience of stacking firewood and other solid fuels.
Installation
If the house is gasified, as a rule, a pipe branch is made for the stove and other devices.
Most homes have additional ventilation ducts in the kitchen. If there are no devices connected to them, for example, a hood, you can completely connect a fireplace.
Fireplace in the kitchen
It is important to understand that any operations that involve a centralized gas supply are carried out either in the presence of employees of the city (district) gas service or by themselves. It is imperative that when calling specialists from other organizations, it is necessary to notify the gas service about the upcoming work
Only with authorized installation can you be sure of safety.
Fireplace insert
When building a firebox, it is very important to ensure that it is perfectly horizontal.
The firebox for open fireplaces is placed using refractory bricks, and for closed ones - from metal. The firebox for open fireplaces is placed using refractory bricks, and for closed ones - from metal.
For metal fireboxes, a window made of fire-resistant glass is provided. Fireplaces with closed fireboxes are more efficient and convenient to use, and allow you to control the combustion process.
This affects not only the efficiency of the heating structure, but also its safety.
Masonry must be carried out at positive temperatures to ensure the reliability and strength of the structure.
The first row should be perfectly straight. The outcome of the work directly depends on this.
Installation of a hanging tank and heat exchanger
In the absence of hot water supply at the dacha, autonomous water heating becomes relevant. A boiler is not needed in a bathhouse; the stove can easily cope with the needs of washing and heating.
You can read about what options there are in the articles: about stoves with a tank and about stoves with a heat exchanger.
You can install a remote tank connected to the heat exchanger in the furnace as follows:
- Choose a place so that the tank hangs above the stove. The specific height is related to the angle of inclination of the pipes.
- Do not mount the tank directly to the wall. Make a sheathing from slats and attach it to it.
- In addition to the top fastening, you can screw brackets from below.
- The tank has three or four pipes. Two of them will connect it to the heat exchanger. Another one is needed to supply hot water to the washing or heating system.
- The latter can be replaced with a hole and serves to fill the tank with cold water. If there is one, then you need to install a non-return safety valve on it.
- The tank is connected to the heat exchanger using corrugated steel or copper pipes, which are connected using fittings.
- A tap must be provided on one of the pipes to completely drain the water.
- The heat exchanger is placed inside or outside the furnace (depending on the design), its fittings are connected by fittings to the tank pipes.
- If the heat exchanger is of the samovar type, it is placed on the monopipe of the chimney and secured with sealant and clamps.
Sometimes bathhouse owners, without further ado, make everything simpler and, oddly enough, this also works. See how a stove with a heat exchanger in one bath is made:
On a note! If it is not possible to install pipes at the desired angle, you can consider the option of forced pressure in the system.