The complete system includes rafter legs that expand and support all additional elements (bolts, struts, support braces and posts, side girders). At the top of the ridge beam, these rafter legs are connected, their lower edges usually rest on the one fixed to the load-bearing side Mauerlat walls.
Of all the listed elements, the highest load falls on the Mauerlat, so a strong, powerful beam is used for its manufacture.
[contents]
What cross section should it be?
It is determined by the size and weight of the rafter system, but most often its size ranges from 150 by 150 mm and, depending on these factors, up to 200 by 200 mm.
This element contributes to the uniform distribution of the mass of the entire roof structure on the walls of the home.
Rafters can be attached to the mauerlat in different ways. The choice of a specific method depends on the type of system (hanging or inclined), on its massiveness and complexity, on the total magnitude of the loads that will act on the entire roof structure.
General information
To better navigate this topic, you need to know what rafters are, what they are, what they are attached to, and in what cases one or another type of rafter system is chosen.
Rafters are the load-bearing structures of pitched roofs, which take on the entire load from the roof and the snow cover on it, transferring it to the walls of the building. In private housing construction, they are most often made of timber or large-section boards placed on edge. Much less often, metal structures are used in the form of prefabricated elements or ready-made trusses. What and how to make the rafters from is decided based on the calculated load on them and the customer’s preferences.
Metal rafter system Source dawaihati.com
Structurally, rafters are divided into hanging and layered:
- Hanging rafters are installed on small houses, garages and other outbuildings, in which the span between the walls is no more than 5-6 meters. Their upper ends are connected to each other without additional support, and the lower ends, resting on the walls, are tightened with horizontal elements - ties. Tightenings reduce the bursting loads from the rafters on the walls, taking them upon themselves.
Additional tightening increases the span to 8 meters, and struts resting on the tightening - up to 10 meters Source obustroeno.com
- Layered rafters are installed on buildings with large spans over 10-12 meters with an average load-bearing wall or supporting columns. Their upper ends rest on the ridge girder, which in turn is supported by racks resting on the bench - a horizontal beam lying on columns or an internal wall. If the problem of how to install rafters on a pitched roof is being solved, then a layered structure is also chosen, since in it the role of a ridge girder is played by a higher wall.
In this case, tightening is not necessary due to the absence of tensile loads Source remoskop.ru
Construction of a complex hip roof
The frame of a complex hip roof is erected in a similar sequence, but with minor modifications. For example, diagonal rafters should be fixed in a more durable way, with the installation of additional supports. The ridge part is installed after installing the support frame, which includes a bed at the bottom and a ridge girder at the top.
It is much more difficult to erect a hip roof truss system than a conventional gable roof structure. However, a hipped roof looks more attractive both over the house and over a light building.
Having tested your strength in erecting a hip roof over a gazebo or other domestic building, you can achieve good results in independently building a hip roof over a residential building.
Fastening the rafters at the bottom
At the bottom, the rafters can rest directly on the wall if it is made of logs or timber. They cannot be supported on walls made of piece materials (brick, concrete, aerated concrete blocks, etc.), since rafters can only be placed on solid foundations that do not transmit moisture.
But this is not the only reason. The roof should be supported by a structure that evenly distributes the load across the walls. Therefore, on their upper part along the entire perimeter, a mauerlat is mounted - a thick wooden beam, eliminating point loads on the masonry elements. Waterproofing must be laid between it and the wall material.
The roofing system can also be attached to floor beams. This is done in the case of frame buildings or mansard roofs. Often floor beams are used as ties for hanging rafters. They must protrude beyond the outer plane of the walls by at least half a meter to form a cornice overhang. And the rafter leg is installed on the edge of the beam.
Frame structure with rafters attached to the floor beams Source krovlyakryshi.ru
It is important. You can do without a Mauerlat or top trim only if the walls have sufficient strength and can withstand a point load. Therefore, on frame buildings, the rafters are installed exactly above the vertical load-bearing posts.
Mounting to a wooden wall
Before installing rafters on log or beam walls, you do not need to do any strapping on them - installation is carried out directly on the supporting structures. In this case, the method of fastening depends on the expected shrinkage of the structure:
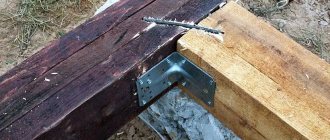
- If the house has already shrunk or in the case of reconstruction and replacement of the roof on an old wooden house, the fastening is made rigid by cutting grooves in the upper log for the rafters and rigidly securing them with brackets or metal corners on both sides.
Rigid fastening with notches and metal corners Source filartbel.by
When installing roofs on new wooden houses, sliding fastenings are used. When a building shrinks, its geometry can change, causing excess stress in places of rigid fastening and deformation of the roof structure. To prevent this from happening, the rafters are allowed to move in the transverse direction, adjusting to the shrinkage. To do this, they use special fasteners that allow them to do this. This could be a steel angle with a long slot on one shelf instead of mounting holes. Or a sliding support, as in the next photo.
Mounting on a sliding support Source stroika-1.ru
See also: Catalog of projects of houses with a gable roof
Attaching to the Mauerlat
You need to think about how to attach the rafters to the Mauerlat of a gable roof even at the stage of installing the Mauerlat itself. If it is fixed to the side of the wall using staples driven into wooden plugs, then it is not able to normally absorb thrust loads. Therefore, the fastening of the rafter system must be rigid, preventing shifts or rotations of the elements relative to the Mauerlat and each other.
For reference. A non-thrust Mauerlat is simpler and cheaper to install, but the entire roofing structure is not very resistant to wind loads. Therefore, it is installed only on small buildings - garden houses, garages, bathhouses.
Possible options are shown in the diagram:
Rigid fastening to the Mauerlat Source mercabadom.ru
- At the end of the rafter, a “saddle” is cut out, with which it is put on the mauerlat, after which the connection is strengthened with two steel angles installed on both sides, or with three nails, two of which are driven in from the side at an angle and crossed in the body of the mauerlat, and one is driven vertically into the rafter .
- Instead of making a cut, a support block is sewn to the rafter leg, its end resting on the mauerlat. This is what they do if there are difficulties with how to cut the rafters at the right angle and the right size. Further fastening is also carried out on crossed nails or corners.
- A notch or support block restricts the freedom of movement of the rafter, preventing it from sliding along the supporting plane. And additional fasteners do not allow it to move horizontally. If you increase the degree of freedom of this unit without making a “saddle” or using a bracket as a fastener, then you will have to make the connection of the rafters in the upper part as rigid as possible.
Fixing the Mauerlat using wire
Before attaching the Mauerlat to aerated concrete using steel wire, it must first be fixed in the thickness of the wall. This should be done while laying the last rows of gas blocks - the wire is placed under them.
The installation technique in this way looks like this:
- A couple of rows before the end of the masonry, a twisted wire of several thinner wires with a cross-section of 6 mm is placed between the blocks.
- In this case, the central piece of wire will be placed in the thickness of the masonry, and the ends will hang down on both sides of the masonry. The length of the ends is made such that they are enough to wrap freely around the beam.
- There should be so many pieces of wire that it is enough to tie all the rafter legs.
By chemical anchor we mean a liquid injection mass made on the basis of a polymer resin, which quickly hardens and firmly fixes the metal rods in the thickness of the Mauerlat.
The advantage of this material is the absence of bursting stress, so fragile aerated concrete does not collapse. If mechanical anchors fix parts by expanding the dowel, then the adhesive composition of a chemical anchor fills the pores of aerated concrete and holds the rod motionless.
The process of attaching liquid dowels looks like this:
- A recess for the anchor is drilled in the gas block. The size of the recess should be larger than for a regular anchor bolt.
- Remove dust and debris from the hole, for example, with a vacuum cleaner.
- The adhesive composition is poured into the hole.
- Next, a threaded metal rod is inserted into the glue - an M 12-14 pin or a piece of reinforcement.
- Complete crystallization of the polymer composition occurs in 1/3 hour if the ambient temperature is above 20 ℃.
- Once the glue hardens, the pin will be securely fixed. It is noteworthy that such fasteners are stronger than mechanical ones.
We suggest you familiarize yourself with How to sheathe the outside of a bathhouse with your own hands. Installing a roof plate on a wall made of aerated concrete using liquid dowels has a number of undoubted advantages:
- The fastening does not lose strength for more than 50 years.
- Due to the polymer structure of the glue, this method of fixation is widely used at the edges of walls, where there is a risk of the gas block splitting.
- The chemical anchor has good chemical resistance.
- Even damp weather and wet surfaces of the joining elements do not prevent the installation of these fasteners.
- The installation of the roof mauerlat on aerated concrete blocks can be carried out without pouring an armored belt, since the reliability of fastening a chemical anchor is much higher than that of a mechanical one.
- The chemical composition of the anchor is ideally combined with the porous structure of aerated blocks.
- To install liquid dowels, holes of a shallower depth are required than in the case of mechanical anchors - there the depth is 2-3 rows.
However, welding work cannot be carried out on anchors installed by this method - overheating of the metal rod will lead to disruptions in the polymer structure of the material, causing it to lose strength.
Before attaching the Mauerlat to aerated concrete using steel wire, it must first be fixed in the thickness of the wall. This should be done while laying the last rows of gas blocks - the wire is placed under them.
By chemical anchor we mean a liquid injection mass made on the basis of a polymer resin, which quickly hardens and firmly fixes the metal rods in the thickness of the Mauerlat.
The advantage of this material is the absence of bursting stress, so fragile aerated concrete does not collapse. If mechanical anchors fix parts by expanding the dowel, then the adhesive composition of a chemical anchor fills the pores of aerated concrete and holds the rod motionless.
However, welding work cannot be carried out on anchors installed by this method - overheating of the metal rod will lead to disruptions in the polymer structure of the material, causing it to lose strength.
Video description
More about this in the video:
Houses built from gas silicate blocks, foam blocks and other relatively fragile materials are necessarily reinforced along the upper perimeter of the walls with a monolithic concrete belt. Without it, reliable fastening of the Mauerlat is impossible, since such materials do not hold the fasteners well. As a rule, even while pouring the concrete belt, studs are installed vertically into it, onto which the Mauerlat is subsequently “attached” and secured with nuts.
In this case, the wooden lining of the walls is more reliable and can withstand thrust loads well. In addition to the methods already described on how to attach rafters to the Mauerlat, you can use others. For example, using an overhead perforated plate with or without a rafter cut. Or on a staple or three crossed nails without sawing. It is only important to cut off the supporting part of the rafter so that it exactly coincides with the plane of the Mauerlat.
Fastening with a plate without cutting Source krysha-expert.ru
See also: Catalog of companies that specialize in roofing work
Please note that when installing without cutting, the rafter legs will have to be lengthened by extending them with fillets to form an outlet for the eaves overhang.
To reduce the bursting load on the Mauerlat of a gable roof, sliding (hinge) joints are used. These can be special fasteners, one vertically driven nail, or fastening to a bracket with multi-directional teeth.
Hinged joints of the lower part of the rafter legs are most often used when it is necessary to decide how to fasten the rafters on a pitched roof. But in this case, the upper part is firmly fixed to the ridge beam or the wall of the pitched roof, which performs its functions.
What is better - logs, beams or boards?
The rafter system must be strong, but not heavy. Of course, for the load-bearing foundation of the roof of large industrial buildings and high-rise buildings, you have to use metal or reinforced concrete. But for ordinary private houses this is an unnecessary excess. In this case, the rafters are made of wood - from boards, timber (regular or glued), logs.
Logs are rarely used, exclusively for log houses. This material is too heavy, requiring high professionalism from the carpenter and the ability to make complex cuts in the fastening areas.
Timber is the best option from which you can mount strong and durable rafters. The only drawback of the timber is the high price.
Cheaper boards with a minimum thickness of 40-60 mm are often used as a replacement for timber. The list of their advantages also includes low weight, ease of installation and a high margin of safety.
The following requirements apply to the selected lumber:
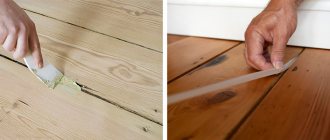
- The minimum acceptable types of wood are 1-3. The presence of knots is allowed in small quantities (it is better to do without them at all!), no more than three knots, up to 3 cm high, per 3 m.p. Cracks are also acceptable, but they should not penetrate right through the wood, and their length cannot exceed half the length of the material.
- It is allowed to use dried wood with a moisture content of up to 18-22%. If these indicators are higher, the rafters, as they dry, may crack or bend and lose their shape.
- The load-bearing parts of the rafter system are made of material with a thickness of 5 cm and a width of 10-15 cm.
- The length of elements made of coniferous species is up to 6.5 m, and of hardwood – up to 4.5 m.
- All wooden parts of the rafters, before use, must be treated with protective compounds to prevent them from rotting, fire and damage by wood-boring insects.
Video description
Video about the construction of a rafter system for a pitched roof:
Modern steel rafter fasteners greatly facilitate the work of creating a roof frame. When using them, you should use the following tips and recommendations:
- all fastened wooden elements must have a thickness of at least 50 mm;
- The shaped fasteners should be fixed with galvanized screws or nails. Moreover, the nails should not be ordinary, but rough - with notches on the trunk, at least 40 mm long;
- symmetrically located fasteners can be additionally tightened with studs, tightening the nuts on both sides of the rafters.
Fastening with M12 studs Source mercabadom.ru
The main nuances of installing a rafter system
Installation of the rafter system can be divided into four main stages:
Installation stages
A few words about design
Roof design consists of determining the most suitable structure and its further calculation. As for the design, it is selected individually in each individual case. I talked about the main nuances of the structures above, so next we’ll look at how to perform the calculation.
Slope angle . The calculation begins with determining the angle of the roof slope. To choose the right angle, you need to consider the following requirements and recommendations:
- The gable roof must have a slope of more than 5 degrees;
- In regions with heavy precipitation, the angle of inclination should be made at least 30-40 degrees, since when the angle of the slope decreases, the snow load increases;
As the slope angle increases, the snow load decreases, but the wind load increases
- It is better not to make a large slope unless absolutely necessary. The fact is that as the angle of inclination of the slopes increases, the windage also increases, i.e. wind load. In addition, as the angle of inclination increases, the price of the roof increases, as the area of the slopes increases and, accordingly, the amount of materials increases.
Mounting at the top
In the upper part, the structural elements are also fastened differently depending on its type and the need to create a rigid or movable connection.
Hanging rafters can be attached end-to-end or overlapped. The butt joint is quite rigid, as they rest against each other. To do this, the upper ends are cut at such an angle that when installed, the sections take a strictly vertical position and fit tightly together.
Butt connection Source srub-banya.by
Lumber sorting
Sort all the boards available on the construction site into three piles. Mark the hump of the board with arrows. Place relatively flat boards in the first stack. They will be used for constructing frames and frames. Place moderately humped boards in the second stack. Use these boards to construct beams and rafters that operate under a load directed perpendicular to their longitudinal axis. Direct the hump of these boards towards the load (towards the top), then over time these boards will straighten and receive less deflection than if they were initially flat. Place the crooked boards in the third stack. They can be used to make ties and spacers, and when cross-sawn they are suitable for making small building parts.
Summary
It’s not enough to know how to install rafters and secure them to the walls of the house. First you need to calculate the loads and choose the optimal fastening method, taking into account the length of the spans, the possibility of shrinkage and other factors affecting the stability and durability of the structure being created. And most importantly, you need to have experience working with wood and be a perfectionist in order to achieve the perfect identity of each pair of rafters and install them in the same plane.
You can take on such work yourself if you have a detailed project in hand and an experienced assistant nearby. Otherwise, it makes sense to turn to professionals.
Ratings 0
How to create the ridge of a rafter pair with your own hands?
The roof is considered a rather complex element, and not everyone knows how to construct it correctly, even with experience in building houses. The ridge of the roof is the horizontal upper edge of the roof, which is formed by the intersection of its slopes. The ridge also consists of other elements attached to this rib.
Making a roof ridge with your own hands, calculating its height - this is all you need to know when designing and building a roof with your own hands.
The manufacture of the corner from which the roof ridge is made is carried out as follows: a piece of zinc sheet is laid along the marked line on a solid base and tapped with a mallet until the required profile is obtained. A hammer should not be used because it may damage the zinc trim.
For a gable roof, the corner can be 2000 millimeters long and 240 - 300 millimeters wide.
Mounting method
Now you will need polyurethane foam. It needs to be used to foam the area between the roof and the corner of the zinc sheet. Previously, a special solution was used for this.
A skate is needed for:
- Preventing precipitation;
- Ventilation of insulated roofs.
About the types of fastening of rafters to the base
Let's talk about modern fasteners. For the strength and durability of the support units, a variety of metal fasteners are used: beam holders, equilateral, fastening, anchor, reinforced corners, plates, supports, profiles, connectors, anchors, etc. All these parts are made of high-quality metal. For dynamic units (types 1, 2 and 3), sliders, angles and perforated plates are used. For rigid fastening, stationary connectors, anchors and corners are used.
Such fasteners for the rafter system are most often used:
For self-assembly, perforated fasteners are more suitable than others, since they have many holes for self-tapping screws and bolts.
Materials
The rafter legs, which distribute the weight of the waterproofing coating and thermal insulation of the roof between the load-bearing walls on which the slopes rest, must have high load-bearing capacity and excellent strength properties. In addition, they must be light so that, despite their considerable length, they do not bend under their own weight. The optimal materials for making rafters are:
- Tree. Wood is a lightweight, durable building material that can be easily processed by hand with the most primitive tools. Rafter legs made from this timber with a cross-section of 100x100 mm or 150x150 mm can withstand up to 500 kg/m2. Due to the fact that the standard size of lumber does not exceed 6 m, the tree is used for the manufacture of private rafters, because when the length of the slope exceeds 6 meters, it is necessary to build up the boards. The disadvantage of wooden rafters is considered to be poor resistance to rotting, so they are treated with antiseptic compounds.
- Metal. Metal rafters are used mainly in industrial construction, since household, commercial and industrial buildings, as a rule, are large in size. The high load-bearing capacity of the metal profile allows the use of elements of a smaller cross-section. In addition, the metal is highly resistant to corrosion.
Complex roofs
The more slopes and, accordingly, their intersections a roof has, the more complex the rafter system becomes. Thus, in multi-gable structures, part of the rafters rests not on the ridge (purlin), but on the valley beam. Such beams are called sloped valley rafters; they must be adjusted to the location and firmly fastened to prevent distortion of the structure as a whole.
For a hip roof, not only straight rafters are used (located at right angles to the ridge and mauerlat), but also diagonal rafters - along the lines of intersection of the slopes. Some of the straight rafters rest on them. A rigid fastening unit is also optimal here.
In hip roofs, most of the rafters are diagonal, and all straight ones (springs) rest on them. Due to this, precise fit of cuts and reinforced fastenings are especially important.
In arched roofs, instead of straight rafter beams, curved frames assembled from individual lamellas are used. The number of vertical posts with this design increases noticeably, since it is necessary to more evenly distribute the load over the curved composite element. The support of such arched rafters is only rigid, with a notch.
When do you need to make moving connections?
Here we come to dynamic support nodes - connections that can change their position. What is it for? Let's remember the physical properties of materials - many of them shrink or swell. First of all, this applies to buildings made of pure wood - timber, logs, etc. Natural wood necessarily shrinks, due to which your roof can not only be deformed, but also completely collapse. To avoid such fatal consequences, craftsmen recommend sliding fastenings of rafter legs with a mauerlat (or the upper crown of a log house).
A prerequisite when installing sliding units is to support the rafter frame on a strong ridge beam. Since the supporting lower nodes are dynamic, maximum rigidity should be achieved at the roof ridge. The upper edges of the rafters are sawed down for a tight connection between themselves and the ridge beam, connected and reinforced with crossbars, metal strips, plates and corners. It is better to connect the rafter element already fixed in the ridge to the crown of the log house.
Splicing methods
There are several ways to splice, there is definitely no better or worse. Craftsmen make decisions taking into account their skills and the specific location of the joint.
Table. Methods of splicing rafters.
| Splicing method | Brief description of the technology |
| Oblique cut | It is used on boards with a thickness of at least 35 mm. A rather complex method that requires practical experience in carpentry. In terms of strength, the connection is the weakest of all existing ones. The advantage is saving lumber. In practice, it is used very rarely on construction sites. |
| Butt-butt | The length of the rafter legs is increased with the help of an overlay. The cover can be wooden or metal. If the length of two sections of boards is not sufficient according to the parameters of the rafter system, then this method allows you to increase them. Butt joints have the highest bending strength and are widely used during the construction of various structures. |
| overlap | Overlapping. Two boards are fixed with an overlap. The simplest method is in the middle in terms of strength. Disadvantage - the total length of the two boards must be greater than the design length of the rafter leg. |
Scheme of paired rafters
In this article we will look at the two simplest and most reliable splicing methods: butt and overlap. There is no point in touching the oblique cut; it is almost never used due to a large number of shortcomings.
Calculation features
The pitch of the rafter legs is no more than 60 cm. If you build large spans between them, the roof will “play” from wind, hail and rain. The snow will cause the roof and sheathing to sag. Some craftsmen place rafters much more often. The above does not mean that thick boards or beams should be placed too close - the weight of the roof together with the ceiling, horizontal, vertical and diagonal beams may be too high, and walls made of foam or gas blocks may begin to crack and sag.
One board for a rafter leg - extended or solid - reaches a weight of up to 100 kg. 10-20 extra rafter legs can add a ton or two to the entire structure, and this leads to accelerated cracking of the walls during hurricanes, during the passage of teams of workers servicing the roof, during rainfalls and snowfalls.
Let, as an example, build a small country house from foam blocks with the following parameters.
- The perimeter of the foundation and walls (external) is 4*5 m (occupied area of the site is 20 m2).
- The thickness of the foam blocks from which the walls are built, as well as the strip foundation outside, is 40 cm.
- There are no partitions in the building - the internal area of the house is similar to a studio apartment (one room zoned into kitchen, bathroom and living blocks).
- The house has one entrance and four windows - one in each wall.
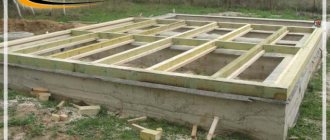
- A 20*20 cm beam was used as a mauerlat - a wooden element encircling the top of the perimeter walls.
- As horizontal floor beams - a 10*20 cm board placed horizontally on its edge. Vertical stops and diagonal reinforcing spacers (“triangles”) are made from the same board, preventing them from sagging. All elements are connected using studs and bolts of at least M-12 (nuts, press and lock washers are included). The ridge (horizontal) spacers are laid out with a similar board – also with “triangles” (diagonals).
- The same board – dimensions 10*20 cm – lays out the rafter legs.
- The sheathing is made of 5*10 cm boards or timber, for example, with a section of 7*7 or 8*8 cm.
- The thickness of the roofing sheet is 0.7-1 mm.
- Steel cladding was installed around the perimeter and gutters with storm water were installed.
Conclusion - the cross-section of the rafter leg should be 1.5-2 times smaller than that of the Mauerlat. For the final calculation, the density of the wood species used in the construction of the ceiling-attic and roof structures is taken. Thus, according to GOST, larch has a specific gravity of 690 kg/m3. The total tonnage of the roof assembly is calculated by cubic meters of boards and timber, calculated during the project and ordered at the nearest lumberyard.
The following must be calculated.
- Subtracting the height of the beams from the meter, we get 80 cm - the length of the ridge stops. We make markings as we proceed further.
- According to the Pythagorean theorem, we calculate the length of the rafters from the ridge to the edge of the front or rear wall - 216 cm. With offset (to prevent precipitation from getting on the walls), the length of the rafters is, say, 240 cm (24 constitutes an allowance), by which the roof will extend beyond the perimeter of the building.
- A board with a length of 240 cm and a cross-section of 200 cm2 (10*20 cm) occupies a volume of 0.048 m, taking into account a small margin - let it be 0.05 m3. It will take 20 such boards per cubic meter.
- A gap between the middles of the rafters is maintained at 0.6 m. It turns out that for a structure 5 m long you will need 8 rafters on each side. This is equal to 0.8 m3 of wood.
- Larch with a volume of 0.8 m3, spent purely on rafters, weighs 552 kg. Taking into account the fasteners, let the weight of the rafter subsystem - without additional supports - be equal to 570 kg. This means that a weight of 285 kg presses on the Mauerlat from either side. Taking into account a small margin of safety, let this weight be equal to 300 kg per mauerlat crossbar. This is how much the rafter legs will weigh.