Penoplex or extruded polystyrene foam is an innovative heat-insulating material that is installed on the walls of a brick house to reduce overall heat loss.
The popularity of this insulation is explained by its excellent heat-resistant characteristics. A 100 mm layer of Penoplex protects the house in the same way as a brick with a masonry thickness of 1500 mm.
In addition, the material exhibits resistance to alkaline and acidic environments, which allows it to be processed with water-based mixtures. The technology for installing this insulation is not complicated and is accessible to most home craftsmen.
We will tell you in the article how to insulate a brick wall with Penoplex and how to fasten the material.
Calculation of material for insulating a brick house
In order to properly purchase insulation, first determine the minimum layer of insulation. It depends on climatic conditions, brick characteristics, thermal protection area and is determined by the formula: Sp= (Rq - S1/ Kt.s.) x Kt.u., where :
- Sp - minimum thickness of the insulation layer in m;
- Rq - temperature coefficient for climatic zones, Rq = 3.3 m2 * K / W for the city of Kerch;
- S1 - brickwork, m;
- Kt. With. — thermal conductivity coefficient of the wall material, for solid red brick, Kt. With. = 0.81 W / (m * K);
- Kt.u. — coefficient of thermal conductivity of the insulation material, for Penoplex Kt.up. = 0.04 W / (m * K).
For example, for the city of Kerch, the thickness of the wall is 1.5 bricks - 380 mm, density 1800 kg/m3, plan 10 X 10 m and height 3 m, the insulation thickness will be equal to SP = (2.8 - 0.380 / 0.81.) x 0.04 = 10.26 cm.
Next, select packaging with a thickness of Penoplex slabs equal to 100 mm:
- number of slabs per package - 4 pcs.;
- area of slabs in a pack - 2.8 m2;
- number of packs with a safety factor of 15%, 120/2.8/0.85= 49 packs.
For a more accurate calculation, you will need to remove the area of the glazing and door blocks.
Additional Tips
The fungi are placed at the joints of the sheets, this will help to avoid the presence of additional holes in the insulation. That is, with such work, the thermal insulation properties are preserved and cold bridges are not formed.
When installing a dowel into a metal coating, a self-tapping screw is attached to the rod of the fungus. Using a self-tapping element, the fastener is immersed in the heat-insulating material so that it reaches the main surface. Then the dowel is screwed into the metal surface with a screwdriver, the depth of the hole for the screw is made about 15 millimeters. When the installation of the thermal insulation material is completed and the sheets are properly secured, all connections are closed with aluminum tape.
With the right choice and counting the number of dowels, the penoplex will be securely fixed. Before you start fixing sheets with dowels, you need to calculate the number and required length of fasteners.
The choice of method for insulating buildings remains an urgent problem. When heat passes through walls unimpeded, heating efficiency decreases and costs rise. Penoplex sheathing is considered one of the simple and inexpensive methods of insulation. To save money, many people prefer to carry out repairs themselves. To perform high-quality insulation, you need to know how to properly attach penoplex to the wall.
What is required for installation?
Types of tools and volume of consumables depend on:
- insulation brands,
- specifics of work - external or external,
- selected heat-protective cake,
- number of storeys of the object,
- technical condition of the walls.
External thermal protection
For external protection, the master will need to purchase Penoplex in packs from the retail chain.
What should I use to glue the material to a brick wall? Depending on the manufacturer of the insulation, you will additionally need to purchase consumables according to factory recommendations; usually their list includes:
Primer solution to increase the adhesion of the material to the brick; you can use a product with deep penetration of the solution at the rate of 300 ml/m2.- The starting profile for fixing the 1st row of slabs is calculated based on the perimeter of the building.
- Profile fasteners according to the number of joints, 2 pcs. at the junction.
- Dowels for fastening supporting parts, every 30 cm.
- Adhesive for fixing slabs, first layer 5 kg/m2, additional layer for reinforced mesh - 10 kg/m2.
- Mushroom dowels for Penoplex, 6 pcs/m2.
- Fiberglass mesh for reinforcement, 1.1 m2 per m2 of insulation.
- Plaster mixtures and paint for finishing, according to the recipe of the manufacturer of the finishing material.
In order to perform high-quality work, the master must have a set of tools, which includes:
- construction level,
- ruler,
- plumb line,
- pencil,
- different spatulas,
- sandpaper,
- needle roller,
- hacksaw,
- knife,
- hammer drill,
- Bulgarian,
- electric drill,
- ladder.
Internal
Consumables for internal thermal protection of walls are selected especially carefully, since they must meet, first of all, environmental safety, be inert, and not release microparticles into the environment.
The insulation must have a minimum thermal conductivity coefficient of no higher than 0.04 W/ (m * K) and a low vapor permeability coefficient so as not to absorb moisture from the room. In addition, before purchasing, you need to pay attention to how the heat insulator is combined with finishing materials.
Additionally, the master will need to purchase:
- starting metal profile,
- slats on the sheathing,
- screws,
- foil tape,
- adhesive compositions,
- soil and antiseptic fungicidal impregnation.
In the standard kit for a heat insulator for interior work, you will additionally need to purchase a carpenter's tool for installing the sheathing and a screwdriver.
What functions does the dowel perform?
Penoplex is light in weight, so many people think that it is enough to secure it with glue. But when fully assembled, the system of thermal insulation materials, together with glue and external finishing, will weigh a lot, so it is worthwhile to provide for additional fastening of the penoplex using dowels. Decorative finishing and glue puts a lot of stress on the insulating material itself, so after some time, it can peel off from the surface of the walls or completely fall, this happens in the absence of reliable fastening. To avoid such problems, penoplex is secured with dowels that have a spacer system.
Fastening elements can be of various types, the quality of the spacer system depends on this. Fastening dowels are fixed to various types of surfaces, their holding capacity depends on this. For example, porous hollow materials make it difficult to attach the dowel. That is, before purchasing, it is necessary to calculate the holding capacity of the dowel, that is, how much material is needed for one square meter; this indicator depends on the material of the wall structure.
How to properly insulate?
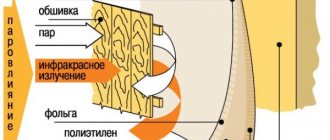
This installation technology will depend on the chosen method of insulation - external or internal, the thickness of the insulation and the method of fastening. For example, if Penoplex is covered with siding, you will have to install a sheathing made of wood or metal profiles. In this case, there will be a ventilation gap between the finish and the protective layer, so there will be no need to use a vapor barrier.
Sometimes the insulation of brick walls is carried out in the form of a curtain wall, which requires preparation of the base. For internal thermal protection, insulation is also often installed on the frame.
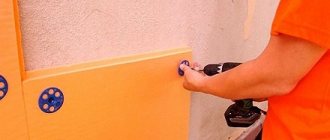
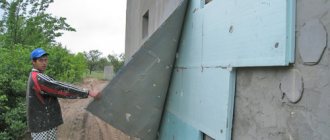
How to glue on the outside?
Before insulating the house, both slabs and wall coverings are carefully prepared . In the first case, the slabs are processed with a needle roller to achieve surface roughness. In the second case, the wall is cleaned of dust and all old layers of dirt; if there are cracks, they are carefully sealed. It will also be necessary to treat the surface against biocontaminants with fungicides.
After completing the preparation of the surfaces, check the verticality and horizontality of the base, and if any deviation is detected, correct it with cement mortar. All metal parts are treated with anti-corrosion agents.
Installation of insulation can be carried out when the prepared surfaces are completely dry and have reached their final hardness.
Technology for external installation of Penoplex on a brick wall:
- Mark the “0” line.
- Install the starting profile at the lower level 30 cm below the 1st floor along the entire perimeter of the house. The level is struck with a laser tool.
- Penoplex slabs are prepared and cut, adhering to the rule that the pieces should not be narrower than 200 mm. In the area of openings, the elements are made in the shape of the letter “L” and have allowances for precise joining on slopes.
Prepare adhesive solutions according to the recommendations of the board manufacturer, which is indicated on the packaging. Typically, the shelf life of the adhesive solution is no more than 2 hours and is used at a temperature not lower than +5 C.- Glue is applied around the perimeter of the insulation with a width of 100 mm and a layer thickness of no more than 2-5 mm, while the surface of the sheet must be covered with an adhesive composition of at least 40% of the area.
- The first row is installed on the starting metal profile.
- Each sheet is pressed tightly to the base, excess glue is removed and the vertical and horizontal levels are controlled.
- The position can be adjusted by tapping with a grater.
After 72 hours, the slabs can be additionally secured with special dowels, after which a layer of plaster can be applied to the reinforced mesh and decorative finishing can be performed.
How to secure from the inside?
This is a very rare installation scheme for thermal protection, since Penoplex almost does not allow vapor to pass through. With the right approach, such an installation is possible if there is no thermal insulation system on the outside of the building. In this case, the insulation layer is assumed to be small.
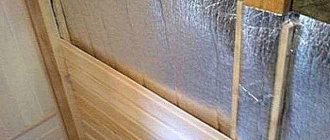
Technology for installing Penoplex on an internal brick wall of a room:
- Clean the brick wall surfaces from dirt and deposits.
- Seal cracks and chips, remove protrusions so that the surface is smooth.
- Treat the brick wall with antiseptics.
- Mark the insulation boards and check their quality by level.
- Install the lower starting profile horizontally.
- Mix the glue.
- Begin installing the insulation from the bottom up with the seam offset, forming a staggered laying order.
- Liquid nails are applied crosswise and along the perimeter of the slab.
- The joints between the sheets are coated and sealed with foil tape.
- If necessary, after 72 hours they are additionally secured with dowels.
- They carry out finishing that is acceptable according to the standards for interior work.
Fastening methods
Surfaces made of different materials can be insulated in different ways. The process of covering a building includes several steps:
- surface preparation;
- insulation fastening;
- finishing.
In order to perform high-quality thermal insulation, penoplex should be installed correctly. First, the starting bar is screwed strictly horizontally. The bottom row of insulation is laid on it.
It is recommended to install a factory additional element (perforated, metal). You need to buy a strip that matches the width of the insulation and the required number of corners.
Before installing penoplex, a horizontal level is drawn along the walls of the building. The starting bar is screwed to the line. It holds the insulation and maintains the “geometry” of the installation.
Possible difficulties and errors in the process
Insulation with Penoplex is not difficult, but if the master does not follow the installation rules, then the resulting insulation system will not be able to provide high-quality protection for the house from heat loss.
The most common mistakes made during the installation of Penoplex on a brick wall:
the insulation was not pressed tightly against the wall during installation;- dew point violation;
- the brick wall was not treated with a primer;
- the adhesive solution was spoiled because it stood for more than 2 hours;
- the glue was not leveled properly with a spatula;
- the drying period was not waited for the installation of umbrella-type dowels;
- The dimensions of the dowels are incorrectly selected; they do not protrude beyond the insulation;
- The plaster is made without reinforced mesh.
Types of dowels for penoplex
To secure the insulation to the wall, three types of dowels are used; they can be produced with a nail made of polymers or metal; there is a type of fastener with a thermal head. For plastic dowels, nylon or polypropylene is used; the main advantage of the material is low cost, but its strength is slightly lower than metal elements.
- Plastic mushrooms for fixing insulation, installed on brick or concrete surfaces. Such elements are not used for heavy types of insulation, and they are also not suitable for walls made of foamed concrete. The material has a low affordable cost.
- Metal dowels differ from polymer materials in their strength. When using them, the significant thermal conductivity of the metal material is taken into account, this affects the quality of the thermal insulation. Metallic fungi create cold bridges, which form areas with high thermal conductivity. Dowels with a metal nail can become corroded if they are exposed to moisture. Such elements are more expensive than plastic fasteners.
- A replacement for metal fasteners can be a dowel with a thermal head; the rod is made of steel, and the head is coated with a metal that has low thermal conductivity. The coating is an impact-resistant polyamide; its thermal conductivity is almost equal to that of the insulating material. Also, the metal nail is covered with a cover, so the dowels do not become corroded. But it is necessary to take into account that the cost of such material differs from plastic and metal dowels.
Advantages and disadvantages of insulation
Recently, construction work has often begun to use Penoplex insulation, both for external and internal brick walls. This is explained primarily by its unique heat-shielding characteristics with a thermal conductivity of no higher than 0.03 W/m*C.
Users who have chosen this building material note the following advantages:
- The highest degree of thermal protection.
- Very reliable protection against vapor formation.
- Optimal moisture protection, which allows it to be used even in baths and saunas.
- High compressive and tensile strength.
- Good noise protection properties.
- Non-flammable material.
- High biological resistance.
- Light in weight and easy to install.
- Does not require expensive equipment for installation.
- Extended service life of 50 years or more.
The disadvantages home owners include:
- its toxicity when heated, it does not burn, but melts with the release of hazardous substances into the environment,
- afraid of directed sunlight,
- breaks down under the influence of solvents.
Which side should the penoplex be attached when installing from the inside and outside?
Using extruded polystyrene foam for external and internal insulation, users wonder which side to attach the insulation to correctly. Both sides of the slabs are the same, so there is no difference. The presence of a pattern does not change the situation, since after thermal insulation the finishing is carried out. There are nuances when using smooth sheets. To improve the adhesion characteristics, the surface of the penoplex is pre-treated with a rough roller. In this case, the glue will better adhere the slabs to the surface. If additional fastening with dowels is used, this procedure is not necessary.
Costs for building materials
Today, the construction markets of Moscow and the Moscow region can offer buyers the following materials at prices:
Penoplex in packs, thickness 100 mm for outdoor use, RUB 1,550;- Penoplex in packs, thickness 50 mm for interior work, RUB 1,250;
- primer solution 10 l, 300 rub.;
- plaster mixtures, 25 kg, 360 rubles;
- fiberglass mesh for reinforcement, 35.50 rub/m2;
- profile fasteners, packaging, RUB 740;
- glue for fixing plates, 25 kg, 230 rub.;
- mushroom dowels for Penoplex, 3 rub. /PC.;
- dowels for fastening supporting parts, packaging, 740 rub.;
- starting profile, 120 rub.;
- facade paint for finishing, 15 kg, 513 rub.
Cost of work in the Russian Federation
The technological process of installing Penoplex on brick walls also consists of many separate operations that determine the total cost of work per 1 m2 of brick wall area.
Prices for finishing work depend on the region where the property is located, transport links and the height of the building.
Average prices by region of the Russian Federation for different types of work:
- Insulation of external brick walls, RUB 380. /m2.
- Internal protection of brick walls, RUB 310. /m2.
- Reinforcement of a brick wall with fiberglass mesh, 410 RUR/m2.
- Rubbing walls with glue, 220 rub. /p.m.
- Primer of walls, 80 RUR/m2.
- Application of decorating plaster, 380 RUR/m2.
- Wall painting, 110 RUR/m2.
If you are interested in how and with what you can insulate brick walls from the inside and outside, take a look at this section.
Features of fixing thermal insulation to the wall using dowels
The technology for fastening materials such as penoplex, polystyrene foam, and polystyrene foam is the same. First, the thermal insulation material is prepared, then the sheets are fixed to the walls using an adhesive composition. When the solution dries, they begin to fix the penoplex with dowels; before this, all seams must be processed so that cold bridges are not created through them. After this, the thermal insulation material is finished with a finishing coating, this can be various panels or plaster.
What are the advantages of using foam in the case of penoplex?
Penoplex is used as a soundproofing material, and polyurethane foam is used to blow in the seams between the plates. At the same time, it qualitatively seals the seam. Another useful function offered by foam is gluing the foam board to surfaces, even vertical ones.
Even an inexperienced builder can do this kind of work. The slabs are glued unnoticed, however, the penoplex is securely fixed and they proceed to the next stage.
Application of foam with penoplex
Using this product instead of glue will help save money, applying the foam is much easier and requires less time to dry completely than glue. The use of foam is in no way inferior to specialized glue in terms of adhesive properties. Why do they buy it to simultaneously use it both for gluing penoplex and for blowing in seams and joints.
Design differences
Some of the types of Penoplex have structural differences:
- Penoplex Wall slabs have a rough surface; stripes are applied to the surface of the slab using a router. All this improves adhesion to the wall and/or finishing materials.
- Penoplex Comfort is distinguished by an L-shaped edge, which during installation guarantees the absence of through seams.
- Penoplex Roofing has a U-shaped edge, which increases the reliability of the connection.
This is what concerns external differences. Next, let's look at the technical specifications. First, let's pay attention to what is common to all types, then to what distinguishes them.
Video text
Mixtures for facades and glue for penoplex here - https://goo.gl/scmdUv How to attach penoplex to the wall! The more videos we make, the more topics are reflected on our all-knowing channel. And don’t say anything, but the topic of facade insulation, and simply wall insulation, will always be relevant, because we live in snowy Russia, and not on the hot Canary Islands! And there, for example, our eighty-seventh (No. 87) video - “How to attach penoplex to the wall”, hardly any beachgoers started watching about penoplex! And in our cold expanses they will! Right?! Briefly about penoplex itself. This is a special type of expanded polystyrene (a close relative of polystyrene foam) - extruded or extruded. A material with amazing thermal insulation properties. You can mount it both inside your favorite apartment, or maybe a country house, or outside on an ever-freezing facade. And you, the audience, should not be frightened by either concrete walls, wooden partitions, or classic brick ones. Penoplex or technoplex will insulate everything correctly, as required by the Russian winter! Max will show you how to attach it in this video! Let's look at the fastening of extruded polystyrene foam (the so-called penoplex-technoplex), and get ready to insulate the walls! Winter is coming, but a video on how to attach this type of foam is just around the corner! Inside our channel!
And the channel from Volgograd has a new exciting video about attaching penoplex to the concrete walls of Brezhnevka - https://www.youtube.com/c/Guysstone Kraftool facade spatulas for insulating penoplex on the outside of the facade - https://goo.gl/mW8Ur9 What if is on the channel, then on the page on your favorite VKontakte you can take a look at how to attach penoplex or polystyrene foam - https://vk.com/guysstone Our Instagram with photos from the world of repair and finishing - https://www.instagram.com /guys_stone_/
Then it would be logical to familiarize yourself with our other videos on the given topic of penoplex (technoplex) and winter insulation: No. 25 – How to fix drywall and with what –
No. 27 – How to use a hammer drill without angering your neighbors -
No. 34 – How to insulate a wall with mineral wool. and not penoplex -
Kraftool facade spatulas for insulation with penoplex outside the facade - https://goo.gl/K4T2EL
Insulating walls with penoplex is correct and reliable. What's outside, what's inside. On the floor, on concrete, on wood or penofol with drywall.
How to fix penoplex to the wall! The more we remove the video, the more those are reflected in our omniscient channel. And what it does not say, but the theme of the facade thermal insulation, and a wall insulation, will always be true, because we live in the snow Russia, rather than the hot Canary Islands! And there, for example, our eighty-seventh (No. 87) Video – “How to fix penoplex to the wall”, hardly anyone from beachgoers turned pro penoplex watch! And will our Frigid open spaces! Correctly?! Briefly about the Penoplex. This is a special kind of polystyrene (Styrofoam native relative) – extrusion or extruded. A material with amazing insulating properties. #Penoplex #Expanded polystyrene #Facade
General characteristics
Since the production technology of all types of Penoplex is similar, they have many of the same characteristics:
- water absorption is very low;
- when immersed in water for a day, no more than 0.4% of the volume;
- when immersed for 28 days, 0.5% of the volume.
- fire resistance - G4. The material is flammable and should not be used in areas where there is a risk of heating above 80°C
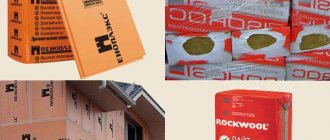
- thermal conductivity coefficient 0.032 W/(m×°K). This is 9 times lower than that of Rockwool mineral wool mats (0.30 (m×°K)), which is considered one of the best in its group.
- specific heat capacity 1.45 kJ/(kg.°C). Low heat capacity - it takes little time to heat up after, for example, freezing.
- sound insulation of the partition (GKL-PENOPLEX® 50 mm-GKL) - 41 dB. EPPU is not a very good sound insulator. Most of this bundle is made up of gypsum boards.
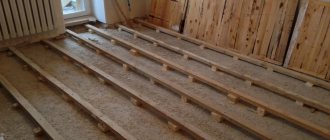
- when used in a floor structure, structural noise insulation is 23 dB. When laying XPS of sufficient thickness on the floor, sounds (including percussion) will become less clear.
- vapor permeability - 0.005 mg/(m.h.Pa). Vapor permeability is very low. That is, moisture almost does not pass through it in a vapor state.
- temperature range -70°C to +70°C.
As you can see, according to temperature indicators, any type of Penoplex can be used in any part of the country - from the south to the north. Moreover, if you leave it to “winter” unprotected, nothing will happen to the material. This is not the merit of Penoplex, but a general property of extruded polystyrene foam.