The bathhouse has two rooms - a steam room and a dressing room. Insulating the dressing room is an important task that can be entrusted to specialists or done independently. Thermal insulation of this room is as important as the washing area. This will improve the functioning of the entire structure, eliminate the risk of cold air entering the steam room and allow you to keep the heat in the bathhouse for a long time. Also, the dressing room often serves as a locker room, so drafts and cold are unacceptable in it. There are different types of insulation that need to be selected based on efficiency, resistance to temperature and moisture, and other important criteria.
Features of the problem
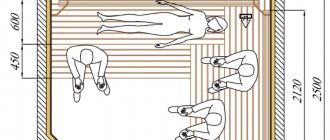
The dressing room is considered a mandatory section in any bathhouse, even the smallest one. It is the link between the street and the steam room. A person entering a bathhouse first of all enters this room. Here he undresses before the procedure and dresses after its completion. As a rule, it is in this part of the bathhouse that the furnace firebox is located. In addition, if it is necessary to save space, a rest area (rest area) is also equipped in the waiting room.
What conditions arise in the waiting room? The presence of an entrance door means that the frosty winter air rushes into the bathhouse along with the person, and dirt and moisture from the street are carried onto the shoes. Another door opens the steam room, and superheated water steam rushes out from there, which, reaching colder surfaces, condenses in the form of water droplets. Finally, smoke enters the room from the furnace door.
In general, these conditions suggest the appearance of the following factors affecting the floor covering:
- significant temperature gradient;
- steam;
- moisture;
- dirt;
- high temperature near the stove and in the area of the entrance to the steam room;
- mechanical load (wear and tear when walking in shoes).
All this is important, since during the arrangement it will be necessary to provide and comply with the following parameters:
- resistance to low and high temperatures, as well as sudden changes;
- resistance to steam;
- moisture resistance;
- wear resistance;
- the ability to effectively clean dirt;
- no slipping of wet feet.
Attention! One of the most important conditions: the floor in the dressing room must be warm.
A man, after a steam room and shower, is hot and steps on the flooring with his bare feet. If it gets cold, then it won’t take long for you to develop colds and joint pathologies. Based on this condition, floor insulation in the bathhouse vestibule is an important design element, and the floor covering must have increased heat capacity. Other equally important requirements include sanitary and fire safety standards.
Functions of the waiting room
This room in the bathhouse can perform different functions, but the main ones are:
- Water procedures after the steam room. Everyone knows that after a steam room you need to plunge into cold water or douse yourself with it, as this has a positive effect on human health. If the bathhouse does not have a pool, then you can douse yourself with water from a barrel in the dressing room.
- Shower room. There you can wash off the dust in a day and don’t have to go to the bathhouse.
- Storage of utensils. You can store smells, gangs, brooms, etc.
Therefore, this room must be built as comfortable and warm as possible, so that you can relax there after a steam room, drink tea or douse yourself with ice water.
Structural elements
To meet the requirements, the floor in the bathhouse's vestibule is structurally a “layer cake”. The design includes the base of the floor (subfloor), thermal insulation, waterproofing, vapor barrier and finishing (floor) coating. In different bath rooms, the floors are in different conditions, and the level of their surface often helps to ensure operability.
The photo shows the characteristic floor height in the bathhouse and dressing room. The lowest floor is provided in the washing compartment. Here the water flows in streams, and it must not be allowed to pass into other rooms. The highest level is in the steam room, where moisture is collected and removed underground. The height of the flooring in the dressing room is also too high, which is due to the need to lift it from the ground and lay insulating layers.
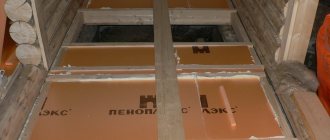
A Russian bathhouse is most often built of wood, and therefore the main problem is how to ensure insulation of the floor in the dressing room of a wooden bathhouse. Like the entire structure, in this case the floor structure is made of wood. The subfloor is made of logs, between which waterproofing, thermal insulation and a vapor barrier layer with foil are laid alternately. The question of how to cover the wooden floor in the bathhouse's dressing room from above can be solved in different ways. The most common option is plank flooring, but other floor coverings can also be used.
The second common option for a subfloor for a dressing room is a concrete screed. It is a fairly cold surface, and therefore requires reliable thermal insulation. The finished floor or flooring in this case is usually made of wood.
Purpose of the room in front of the steam room
In compact baths, the dressing room mainly serves as a changing room, where there is some special furniture. In structures of a substantial size, the dressing room can be:
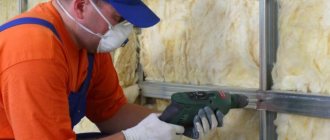
The process of insulating walls in the dressing room
- a fairly spacious room, equipped at the request of the owners;
- combining a shower and a swimming pool in a bathhouse;
- hydrobox.
When choosing insulation material and floor covering, you need to pay attention to the functions of the dressing room and always remember that this room is exposed to strong moisture.
Insulating elements
The layered structure of the insulating floor coverings of the dressing room includes the following elements:
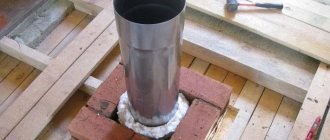
- Waterproofing. It is necessary for protection from groundwater and flood waters from the ground, i.e. from below, and to prevent the accumulation of moisture coming from the inside (steam condensation, from shoes in wet weather, from bare wet feet after washing procedures). Waterproofing layers are formed from moisture-proof roll materials (roofing felt, polyethylene film), in the form of a coating of bitumen or mastic. The second component of waterproofing protection is the impregnation of wooden parts, which eliminates the risk of rotting of the material. In addition, the so-called gluing method is used, when the joints of the elements are sealed with tape with an adhesive layer.
- Vapor barrier. When the doors to the steam room are opened, steam penetrates into the dressing room, affecting the material of the floor structure. Taking this into account, the “layer cake” includes a layer that is not permeable to steam. As such protection, films with aluminum foil are widely used. The base of the film can be polyethylene, PVC, polypropylene. In addition, in principle it is possible to use membrane materials that provide vapor tightness.
- Thermal insulation. Reliable thermal insulation of the dressing room floor is considered an urgent need. The thickness of this layer depends on the material used, but on average it is 10-15 cm. The most popular thermal insulation materials are: mineral wool, ecowool, expanded polystyrene, extruded polystyrene foam, expanded clay. One of the cheapest options is sawdust. It should be taken into account that the thermal insulation properties of mineral wool or expanded clay are significantly reduced when moisture penetrates, because It is due to the air gaps that they retain heat. Thus, when using them, the role of waterproofing increases.
Technical solutions
As noted above, an important condition for arranging a dressing room is the provision of a warm floor. Thermal insulation provides relatively good heat retention, but the greatest comfort is achieved by installing a truly warm floor covering using technical solutions.
In bath conditions, the water floor option is most easily implemented. Floor heating is carried out by pipes laid under the floor covering. Hot water is passed through them, which is heated in a sauna stove. Water supply can be provided from a central water supply or your own system fed from a well or borehole.
Another method is electric floor heating. To install a heated floor of this type, special heating cables are installed underneath it, having a high electrical resistance of the current-carrying conductors.
An infrared panel is recognized as a modern heated floor. It can be placed under the outer covering over the entire floor or in a specific area. When electrical voltage is applied to such a panel, infrared rays are emitted, which heat not the air, but directly the person caught in the field of their propagation.
A warm floor in the dressing room requires additional financial costs, but it provides comfort and eliminates colds.
The floor in the dressing room has its own specific characteristics compared to floor coverings in other bath rooms. The most important role is played by the presence of a heated floor, which creates comfortable conditions after the bath procedure and in between visits to the steam room. You can make floors with your own hands, but you must take into account all the requirements for such structures.
We can do it ourselves, with our own hands.
If we are not talking about an ambitious project, but about a simple village bathhouse for a summer cottage or a country house, then with today’s possibilities in the construction market, you can build it with your own hands.
Let’s assume that you did just that, erected a free-standing log house according to a traditional design, of which there are so many “walking around” on the Internet.
How to reliably protect this room from the severe winter frosts of the middle zone, if the cold spreads from the bottom up, from the frozen earth along the walls? There is only one answer - insulate the floors. How to insulate the floor in a bathhouse?
To choose the best insulation option, you need to evaluate the type of bath floor :
- clay floors (do not provide insulation);
- earthen floors (do not provide insulation);
- wooden floors (leaking and non-leaking);
- concrete floors;
- warm water;
- and the principle of obtaining and maintaining heat in a Russian bath.
And after reading this article, you will learn how to make a garage roof.
A few important points
Before we move on to considering materials for insulation, let’s decide what kind of floor will be in your bathhouse.
*We take as a basis the option that you do everything initially. Although, as I wrote above, you can redo the floors. The technology is the same, but the costs are higher.
Depending on the design of your steam room, you should also focus on insulation. After all, what is ideal for wooden floors is sometimes not suitable for concrete. However, this statement also works in the opposite direction. True, there are options that, if used correctly, will serve you equally well in both cases.
In addition, it is worth considering the structure of the floor itself. If the floor of your bathhouse is made according to the “leaky” design (which is most often found in the southern regions), then most likely you should not worry about its insulation. Well, “dry” and concrete floors require an individual approach.
How to insulate a wooden floor in a bathhouse?
- Modern baths are placed on a foundation, which requires the construction of a rough and finished floor.
- The finished floor (impermeable) is made with a slope towards the drain;
- The finished floor (leaky), laid on joists with a gap of 3 cm at the walls, requires air drying - the convenience is questionable.
- The groundwater level determines the type of vapor or waterproofing barrier used: if low, it can be a vapor barrier membrane; if high - glassine or roofing felt.
- The waterproofing should, covering the entire surface of the subfloor, protrude upward along the surface of the wall by 15 cm, overlap, and fasten with tape or a stapler.
- The best insulation is polystyrene foam. It actually does not absorb moisture. Plates of this material are laid between the floor joists so that a 2-centimeter ventilation gap is formed on top. Perlite or expanded clay can also be used as insulation.
- The next layer of waterproofing protects the insulation from water ingress.
- The finished floor is laid from well-fitted planed tongue-and-groove boards and impregnated with a special water-repellent and antiseptic impregnation.
- The edges of the waterproofing are cut above the installed baseboards.
What materials are suitable for internal thermal insulation?
- Non-toxic. In a bathhouse, under the influence of extremely high temperatures, harmful substances contained in the material are quickly released, so toxic insulation can cause poisoning.
- Non-hygroscopic. You should select a material that does not absorb moisture.
The insulation for a bath should be:
- resistant to high temperatures and steam;
- fireproof;
- environmentally friendly;
- durable.
There are several groups of insulation materials that can be used in a bathhouse:
- Organic. These are natural materials that can ignite from high temperatures, so they only insulate the rest room and dressing room.
- Mineral. These materials are suitable for insulating the steam room and any other parts of the bathhouse.
In accordance with the above requirements, the best heat insulators for a bath are described in the table:
Insulation of a concrete floor in a bathhouse
- The subfloor is represented by a rough screed.
- As a waterproofing material, a thick polyethylene film with a rise of 5 cm along the wall or a layer of bitumen coating is sufficient (the rolled material is held together when overlapping).
- On top of the waterproofing, frames are made of wood, which are fastened with self-tapping screws on dowel plugs to the rough screed.
- Polystyrene foam is placed into the frame structure and fixed with mortar.
- The entire structure is reinforced with reinforcing mesh and concreted with a thickness of 2 cm.
- A self-leveling mixture 5-8 cm thick completes the floor installation. A needle roller removes air from the mixture.
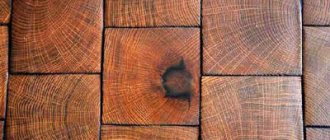
- The floor covering can be wooden or tiled, with a wooden grid for the feet.
And this article talks about how to make a chain-link fence.
Foundation for frame construction
As a foundation for a frame dressing room, a lightweight foundation should be used: pile or shallow foundation.
Creating a shallow foundation is done as follows:
- The area is being planned and marked.
- In places where the walls of the building should be located, half-meter trenches with a width of 30 centimeters are dug.
- Sand is poured into the trench in layers and also compacted layer by layer with water wetting.
- Formwork is created along the perimeter of the trench.
- The base of the formwork is reinforced.
- The concrete solution is poured according to the level of the formwork.
- After the concrete hardens, waterproofing roofing felt is laid.
Time-tested material
As many years of practical experience show, in the competition of thermal insulators, expanded clay wins in many respects :
- The base of expanded clay is a natural material, clay;
- during the firing process, it acquires the structure of porous, but closed with a sintered crust, granules;
- it is fire resistant;
- its 15 cm layer is superior in thermal protection to 25 cm of wood, 60 cm of foam concrete, 1 m of brick;
- withstands loads up to 300 kg/sq.m. m;
- cheap.
The sequence of work when insulating the floor in a bathhouse with expanded clay is the same as with other insulation materials:
- a thick layer of plastic film is spread on the rough screed, extending onto the wall;
- beacons are placed at the finishing level;
- expanded clay (preferably a mixture of two fractions - gravel and sand, without splitting the granules) is filled in using the “wedging” method; (also, the method of insulation with expanded clay directly in bags, with pre-made holes, is used);
- The top layer of leveled expanded clay backfill is held together with cement “milk”;
- if necessary, lay a reinforcing mesh;
- a screed of 3-4 cm is poured onto the surface of the expanded clay, gripped with cement; (concrete will dry for 28 days, polymer - 7);
- Air bubbles are removed from concrete using a special roller.
Heating
Gas equipment is more suitable for commercial use, where the bathhouse operates constantly, or in houses where the heating system is the same (all rooms, including bathhouses). In some cases, heating is used:
- water - the disadvantages of such floor heating remain, antifreeze and pumping equipment are required, it should be heated in advance;
- steam - based on the movement of steam, the room heats up faster, there are no bulky devices, it is safe;
- convector - they do not heat cold rooms well, are ineffective in rooms with high ceilings, expensive;
- from IR heaters - a wide variety of models, you can choose them for different interiors, stone ones are considered optimal;
- using a separate stove - used if you need to install heating after the fact, electric options consume a large amount of energy, wood-burning models would be a suitable replacement.
If the dressing room is still under construction, you can competently design the location and energy costs.
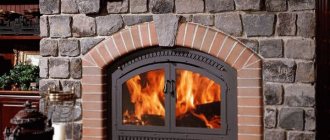
A brick or metal stove can be used as the main heating device. The first option is often installed with a firebox in the dressing room - it is convenient to store firewood and load it without the need to enter the steam room (relevant at the kindling stage). If you install a closed fireplace, the room will have a special atmosphere. Heating the waiting room is a necessary element that cannot be ignored. After the fact, a separate oven will do; at the design stage there are more options.
This is interesting: Ground flooring requirements, nuances, manufacturing technology
Warm floor. His device
The invention of heated floors (liquid and air) is the merit of ancient civilizations. Nowadays, only a few improvements are being made due to technological progress (electric heating).
The essence of a heated floor is that under the finishing coating there is a distribution for heat carried by water, air or a heating element. This flooring is suitable for small rooms with low load-bearing loads.
- A heat insulator is laid on the leveled surface of the subfloor (subfloor) - mineral wool mats, polystyrene foam. To enhance the effect, aluminum foil is laid.
- Pipes for heated water are laid (“snail” or “snake”) on the reinforcing mesh with a certain freedom, no closer than 10 cm to the wall; when laying, the probability of deformation is taken into account.
- Through the outlet manifold, the pipe system is connected to the heating system. The connection points are fixed with a coupling and winding.
- A leak test is carried out.
- A rough screed is poured, and then a self-leveling screed.
- An absorbent layer is placed under the finishing coating.
- The front finish is tiles.
And here is an article about insulating a bathhouse ceiling with expanded clay.
In this section of our website https://ru-house.net/postrojki/banya/ you will find a lot of useful and interesting information about the bathhouse.
Which thermal insulator to choose?
The choice of suitable insulation is made taking into account various factors:
- subfloor material;
- design of the subfloor and water drainage system;
- room area;
- personal preferences of the owner and his financial capabilities.
Choosing a heat insulator is not so complicated, but requires careful consideration of operating conditions and possible loads. In principle, the main subject of consideration is usually the strength of the insulation, the ability to withstand possible loads. In this regard, all types of insulators behave differently.
Polystyrene foam under prolonged mechanical action crumbles and crumbles into individual granules. Penoplex wrinkles. Foamed polyethylene turns into a thin dense layer, and liquid polyurethane foam becomes denser and loses its porous structure.
In terms of the combination of price and performance qualities, penoplex is in the lead, and polystyrene foam is in second place.
Of all the factors, the material of the subfloor has the greatest influence. The most common types of floors are concrete and wood floors. Let's take a closer look at the ways to insulate them:
Insulation of a wooden floor
Most owners prefer wooden floors, as they correspond to the traditional idea of the design of bathhouse elements. Insulation of such a floor is carried out by laying a heat insulator over the subfloor.
In this case, you must first make a plank flooring and sew a vapor barrier underneath to protect the boards from contact with water vapor from the ground. In addition, it is necessary to think over a water drainage system and organize its drainage into the sewer or to a discharge point.
Thermal insulation is laid between vertical strips laid on edge. They act as joists for the finished floor and at the same time serve as sides for thermally insulated compartments. Penoplex slabs are laid tightly next to each other, the joints are glued with aluminum tape or filled with polyurethane foam.
A polyethylene film is laid on top of the insulation, which forms additional moisture protection for wooden parts. After this, you can begin laying the final floor covering (finish wood flooring).
Insulation of concrete floor
Insulation of a concrete floor is carried out according to the usual method for concrete floors and screeds. A waterproofing sheet (polyethylene or waterproof membrane) is laid on the rough concrete floor.
Then slabs of polystyrene foam or penloplex are placed tightly next to each other, immediately filling all the gaps with polyurethane foam.
After this, the pipes of the water drainage system are laid and the embedded parts of the drains are installed. Now you can start pouring the screed. Its thickness must be at least 50 mm to ensure sufficient strength. After the screed has hardened, the tiles are laid.
Insulation of the floor in the dressing room
The stability of the temperature regime of the soap bar and steam room depends on the preservation of heat in this room. The entrance to the dressing room is equipped with a vestibule in order to preserve heat. A thoughtful arrangement of doors in the bathhouse will also work for this purpose. A small door frame and a high threshold are essential conditions for heat conservation.
The dressing room does not interact with water to the same extent as the main rooms of the bathhouse, and therefore does not require serious efforts to waterproof the subfloor.
A proper rest is impossible without a cup of tea in good company. A visit to the bathhouse is no exception. In addition, for the proper organization of the bathing process, you need to provide:
All this is located in the dressing room area. Therefore, insulating the dressing room is an important process for creating comfortable conditions for visitors.
Choice of insulation
The insulation of the dressing room and steam room must be done with material that is resistant to moisture and high temperatures.
When creating thermal insulation in the dressing room, you need to carefully select the material for insulation. Thanks to high-quality insulation, the room will maintain a suitable temperature at any time of the year. You need to choose a heat insulator based on the following characteristics:
- Moisture resistant. A bathhouse is a room with a high level of humidity, so the insulation should not lose its properties under the influence of water.
- Fire safety. High temperatures and the presence of an open fire source also impose their own criteria on choice. The insulation must have a wide temperature range and be fire resistant.
- Environmentally friendly. When exposed to high temperatures, various materials can release toxic substances. The insulation in the dressing room must be completely natural and not release harmful components into the environment.
In most cases, craftsmen prefer foil-coated polyethylene. It is able to equalize temperature changes. It is important to remember that the walls, floor and ceiling have different thicknesses and are made of different materials, therefore, different insulation materials are chosen for each type. The general algorithm for insulating a dressing room from the inside with your own hands does not depend on the type of material.
Thermal insulation can be done at the construction stage or during finishing. If the bathhouse is being built from scratch, you can also insulate the foundation.
Insulation materials
When choosing insulation technology, you need to consider:
- wall material;
- wall thickness;
- climatic region;
- time of use of the bath;
- waiting room appointment.
Thermal conductivity readings, for example, are different for brick and wood. Therefore, when insulating wooden walls, a material with a smaller thickness will be required. Unless you calculate the thickness of the brickwork taking into account the thermal insulation features.
Heat retention is necessary for all climate regions. Its essence comes down to retaining heat flow in both directions. The selected materials have low conductivity. In cool times, heat does not leave the dressing room, and in hot weather it does not get inside. Thus, a comfortable microclimate is always maintained in the building.
You can choose insulation from several types:
- slabs;
- mats;
- bulk products;
- reflective insulation.
There are also insulating paints and plasters. Although they are easy to apply, they do not give the desired effect. Such materials should be used only in combination with full insulation.
Bulk insulation is suitable for roofs and floors. It is convenient to use them in walls only when laying wells.
Final works
At the final stage, insulation of windows and doors is carried out. A lot of heat can escape through improperly installed doors and cracks in window openings.
The door to the steam room should be made as low as possible and with a mandatory threshold. It should open into the dressing room. It is not advisable to have a large window in the steam room, and it should also be placed as low as possible. The frames should be double or triple - air is an excellent heat insulator. The use of double-glazed windows is encouraged.
Low window location in the steam room
Insulation of cracks in window openings can be achieved by caulking with natural materials - tow, jute. But you can also use sealing with mineral wool and silicone sealants - in a steam room. Polyurethane foam is also suitable for sealing window and door openings in the dressing room.
Wall insulation
The walls constitute the main area for insulation. Therefore, large expenses fall on them. Although only 15% of thermal energy is lost through the vertical fence.
The material of the walls plays an important role. The dressing room, built from masonry, is insulated with polystyrene foam as a priority. This is a relatively cheap and easy-to-install material.
Often, a separately built bathhouse is built on one, or maximum two, floors. Therefore, it is more expedient to insulate the walls of the dressing room from the outside. In this case, the following is excluded:
- freezing of wall material;
- condensation formation inside the wall;
- formation of mold and mildew;
- destruction of walls due to expansion of liquid.
Polystyrene foam is attached to the frame or continuous flooring. The first method is necessary when tiling a bath:
A wooden beam acts as a frame. The frame is mounted in increments depending on the width of the future cladding. The vertical or horizontal placement of the beams also depends on the sheathing material.
If the pitch does not match the size of the foam board, it will have to be cut. When cutting, the foam crumbles, so you need to calculate the margin for crumbling.
What it is?
The functions that the waiting room performs are:
- maintaining optimal temperature and humidity, protection both from adverse street influences and from the influence of hot or humid indoor air (a kind of gateway);
- providing rest after and before bath procedures, creating a favorable microclimate (rest area);
- creating conditions for changing clothes and storing them in normal conditions;
- providing opportunities for collective leisure (the leisure area may include a media zone - a stereo system, TV, etc.);
- providing conditions for drinking drinks and food, storing dishes (kitchen unit);
- creating a positive psychological atmosphere and comfort (comfortable design and decoration);
- ensuring the heating of the bathhouse, possibly maintaining a small supply of firewood or other fuel (furnace combustion area);
- storage of accessories (racks, cabinets).
Insulating a dressing room with your own hands is not at all difficult.
An iron door can make this room warmer.
Floor insulation
Since the bathhouse is a small structure, the foundation is created:
- solid slab;
- on stilts;
- monolithic shallow depth.
In the first case, insulation is created using wooden logs. The bars are attached to the slab with self-tapping screws, and the selected material is placed between them. It can be in the form:
- bulk layer (sawdust, expanded clay, foam);
- hard boards (polpan, polystyrene foam, polystyrene foam);
- mats (stone wool, glass wool, basalt fiber);
- polyurethane foam.
In the first three cases, a waterproofing layer is installed before laying the insulation. When covering with foam it is not needed. It itself is both a hydro- and vapor barrier.
The waterproofing coating is also installed after the insulation installation. They are served by:
- thick PVC film;
- sheets of plywood with joints taped;
- insulation with a reflective foil layer.
In the latter case, the joints between the canvases are glued with foil tape.
With a pile foundation, the floors are laid on wooden or steel beams. Pre-treatment of load-bearing elements with antiseptic or anti-corrosion solutions is mandatory.
The bottom of the products is hemmed with a waterproofing membrane. For lightweight insulation, awning fabric is used. If the weight of the layer is large, the base is additionally covered with board or plywood.
Insulation is placed in the space between the joists. It fills the entire height or there is an air gap between it and the finish coating. The insulation material must be laid as closely as possible to the beams. The gaps are filled with polyurethane foam.
The top insulation of the bathhouse vestibule is covered with a vapor barrier membrane. Its purpose is to prevent condensation of vapors inside the insulation. An overlap of at least 10 cm is created at the membrane joints.
When laying a floor on the ground, thermal insulation is laid under a cement-sand layer. The floor pie in this case is as follows:
- Rammed base;
- Waterproofing. Film materials with a density of at least 50 microns are used. The edges of the film are placed 25 cm on the wall;
- Concrete base 10 cm;
- Insulation. A bulk base made of expanded clay or slab insulation with a product density of at least 40 kg/m3 is used;
- Waterproofing with PVC film;
- Reinforcement with masonry mesh;
- A cement-sand base with a thickness of at least 5 cm. Pipes can be laid in the body of the screed to effectively insulate the floor in the dressing room;
- Laying the finishing coating.
When insulating a floor with expanded clay, 100 mm granules are used. They are mixed with smaller fractions to create density. The uniformity of the filling is determined by pulling the fishing line between the beacons.
Step-by-step instructions for repairing a cold floor
First, let's consider the most labor-intensive option for floor repair; it requires not only a loss of time, but also money. With a properly organized process and practical experience, it will take approximately two to three days to complete the work. The floor was made without insulation from edged boards; water drained through the cracks between them. In winter, cold air entered through the cracks, which created inconvenience during water procedures. Insulation work is carried out in several stages.
How to insulate the floor in a bathhouse
The first stage is the dismantling of old coatings
Step 1. Remove the old floor. If the boards are screwed to the load-bearing beams with self-tapping screws, they will have to be unscrewed. Use an electric drill or cordless screwdriver. Hardware can be reused; use a handkerchief cup to collect them. If the floor is on nails, then use a nail puller. To reduce damage to the boards, place pieces of boards under the metal part of the tool when pulling out nails.
Dismantling the floor - unscrewing the screws
Expert opinion
Afanasyev E.V.
Chief editor of the pol-exp.com project Engineer.
When unscrewing the screws, firmly press the sprocket against the heads; do not be afraid that the hardware will turn on the threads. Problems arise when the tool is not pressed against the head enough. The star rotates in the recesses of the cap and smoothes its edges. It becomes very difficult to unscrew such a self-tapping screw, and it is impossible to pull out the threaded part using a nail puller without damaging the wooden elements. In the best case, the head will tear out a piece of the board; in the worst case, the joists or supporting beams will have to be changed.
The boards have been removed
Step 2. Remove the boards and inspect the condition of the wooden floor structures. In most cases, problem areas will be visible, eliminate them before starting work. If serious damage to the beams is discovered, they will have to be replaced with new ones.
If there are problem areas, they need to be eliminated
Step 3: Unscrew the floor joists. They are fixed with metal squares and self-tapping screws; removing the structures is not difficult. As before, collect old screws in a container; the hardware will come in handy in the future, and you won’t need to buy new ones.
The logs are unscrewing
Step 4. Using an electric planer, remove the top damaged layer from the beams, process the lumber until completely healthy wood appears. There is no need to specifically control the thickness of the logs; lumber may differ slightly in size. All the same, in the future their planes will not be located on the same line, but will lie at an angle.
Removing the damaged layer from beams
Step 5. Remove mold from the wall trim boards around the perimeter of the bathhouse. To do this, you can use toilet cleaners that contain acid. It perfectly disinfects lumber and destroys mold roots. To enhance the effect, you can repeatedly wipe the surfaces of the boards with ordinary table vinegar.
Mold around the perimeter needs to be removed
Step 6. Install a heat gun and thoroughly dry the surface of the floor and walls. If desired, dry boards can be soaked again with factory-made antiseptics and dried.
Heat gun
Everything is coated with used antiseptic.
After repairs, it is recommended to drain the water into the sewer; this method prevents the surfaces of the lumber from getting wet and is strongly recommended by professional builders. Do not rush to start repairs, give time for all surfaces to dry. If everything is normal, then you can lay a new, now insulated floor.
Stage two – laying a new floor
The floor will be laid with a slight slope, the water will be drained into a special tray located at the far wall.
Step 1. Determine the angle of the floor. To do this, use a long, flat board. Place it along the room from the bathhouse door to the drain tray. First, determine the position of the skirting boards; you can use ordinary cheap plastic elements with flexible rubber sides at the bottom. The sides will prevent water from getting onto the wooden cladding of the walls of the bathhouse.
The position of the plinth is determined
Practical advice. It is much easier to work with a laser level. If it is not there, then the markings can be made with a water level, but you will have to work with an assistant and lose more time.
It is more convenient to use a laser level for work.
The upper plane of the skirting boards should be 1–1.5 cm below the threshold level, otherwise they may be damaged when walking. Find these lines and subtract the height of the baseboard from them. This will be the floor level at the front door. The slope of the floor should be within a centimeter per meter. There is no need to do more; too much of a slope creates inconvenience when walking on the floor.
Step 2. Decide on the installation location of the tray, measure its length and cut the adjacent boards to size.
The installation location of the tray is determined
Step 3. Install the logs with an inclination towards the tray. To do this, first put the two outer ones in place, stretch the rope between them and secure all the remaining ones along it. Instead of a rope, you can use a long, flat strip or board, but it is more difficult to work with them. Fix the logs not only to the lower rim, but also to the concrete strip of the foundation; use metal corners and dowels for this. The optimal mounting option is two corners on each side of the joist and one at the bottom. If the design does not allow the logs to be lowered for tilting, then they need to be sawed at the bottom; the depth of the cut must correspond to the angle of inclination of the floor. If deviations from the plane are detected, you can use shims. There is no need to worry that they will sag over time; the logs are firmly held in place by three metal corners.
The joists are fixed using metal corners
The logs must also be attached to the concrete foundation strip
Practical advice. If you do not have a special tray for floors, then you can use an ordinary street one. To do this, before installing the grinder with a metal disc, remove the vertical stiffening ribs, this will make it possible to place the boards under the tray.
Removing vertical stiffeners from a street tray
Step 4. Place the prepared tray in place. If its width is less than the distance between the joists, then the gap should be closed. You can use boards or durable extruded polystyrene foam for this. The second material is much easier to work with, and great strength is not needed to fix the tray. Check the slope and position of all joists again with a laser level. If all parameters are within normal limits, then you can continue working on flooring.
The tray is put in place
To install the tray on the boards, their ends should be prepared and chamfered. The width and depth depend on the size of the sides of the trays. Before installation, the ends of the boards and all fresh cuts must be treated with antiseptics; you can soak them several times in sunflower oil. Before fixing the boards, coat the landing sites with a high-quality sealant. The fact is that it is very difficult to make perfectly even seats; it is much easier to use sealant for these purposes. The tray is screwed to the boards with small self-tapping screws. After fixing, it is also recommended to seal the drain perimeter. Pay great attention to these places. This is where water accumulates and lingers for a long time. Getting the boards wet at the ends is a very unpleasant situation. Moisture travels through capillaries to great depths, drying takes a long time, and there are not enough breaks between bath procedures. As a result, the boards rot, the tray collapses, and the floor in the bathhouse requires repair.
The slope of the future floor is shown
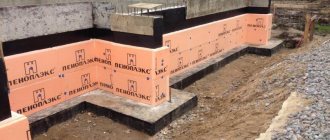
Practical advice. It is strongly recommended to insulate the side surfaces of the foundation along the perimeter; fix polystyrene foam on them using any method available to you. Do not forget to leave holes for ventilation, this is a prerequisite for the long life of the bath.
The foundation is insulated with polystyrene foam, a hole was left
Step 5. Attach drain pipes to drainage containers. These can be metal barrels with a capacity of 100–200 liters dug upside down. Use a grinder to cut holes on the sides of the barrels to allow water to drain out. In order to completely prevent freezing of water in pipelines, insulate them with soft polystyrene foam. But it is not necessary to do this; warm water and pipes do not have time to freeze during water procedures. Moreover, the angle of inclination of the pipelines is large and the water quickly goes into the barrels.
Example of a prepared drain
Connect drain pipes to drainage containers
The third stage - floor insulation
To insulate the floor in a bathhouse, it is better to use expanded polystyrene rather than mineral wool. The fact is that mineral wool is very afraid of increased humidity, a wet heat insulator sharply increases thermal conductivity, and the insulation efficiency approaches zero. In addition, wet wool takes a long time to dry; all this time, wooden structures are operated in very difficult conditions. As a result, the appearance of mold and rot, the need for extraordinary repairs not only of the flooring, but also of nearby wooden architectural elements.
Extruded polystyrene foam for floor insulation
Expanded polystyrene does not have the above disadvantages; it does not absorb moisture at all, even with direct, prolonged contact with water. The only problem with polystyrene foam is that the material is damaged by rodents, but to prevent damage there is a simple way - to cover the ventilation holes with metal grilles.
Step 1. Nail any pieces of boards, slats or OSB boards of appropriate sizes to the bottom plane of the log; the insulation will lie on them. The distance between the boards does not matter, the main thing is that the boards have a stop in at least four places.
There are slats nailed to the bottom of the joists for installing insulation.
Important. The thickness of the insulation layer should be at least ten centimeters; if it is less, the effect of insulation will be minimal. Professionals recommend laying two layers of slabs, each 5 cm thick. To minimize heat loss, joints should be placed in a checkerboard pattern.
Using polyurethane foam, seal all gaps between the slabs and walls. After hardening, it must be carefully cut with a mounting knife.
Insulation is laid, joints are sealed with polyurethane foam
Step 2. After all layers of thermal insulation have been laid, you can continue laying the floor. You should start with one of the walls, fasten each board with self-tapping screws that remained after dismantling the old flooring. The thickness of the floorboards is approximately 20 mm, specific values are selected taking into account the distance between the joists. The boards must be tongue-and-groove and as even as possible.
Laying boards
Step 3. Seal the gaps between the floor and wall trim around the perimeter of the bathhouse with foam. Once hardened, trim off excess.
Excess foam is removed
Practical advice. If the walls in the bathhouse are covered with clapboard, then there is no need to remove foam from the profiled grooves. In any case, these cracks need to be sealed with silicone, and foam will significantly save the amount of silicone. The baseboard must be hermetically sealed not only to the floor, but also to the walls. Remember that water that gets into the gap will never dry out, and the lumber will inevitably begin to deteriorate prematurely.
Step 4: Sand the floor using an electric sander. Be sure to connect it to a vacuum cleaner, this will reduce the amount of dust and make final cleaning of the bathhouse much easier. During sanding, make sure that sharp protrusions between adjacent boards are removed; as for the evenness of the surface, there are no strict requirements. If there is no special tool, then you can grind it manually, especially since the bathhouse floor area is small. Prepare the device, attach sanding paper number 25-N or more to a medium-sized smoother. According to the international classification, sandpaper must be class P60 or less.
Floor sanding
Alternatively, you can sand the floor by hand.
Step 5. Clean the floor from dust, cover the surface with durable acrylic varnish. Buy only high-quality material; the varnish should not be afraid of high humidity and release harmful chemical compounds into the air. You can cover the boards with an ordinary brush. The number of layers is at least three, each subsequent one is applied only after the previous one has completely dried.
The floor is covered with wear-resistant acrylic varnish
Step 6. Along the perimeter of the bath, treat the cut foam with sealant, try to completely close all open pores. Give the sealant time to set.
The foam around the perimeter must be treated with sealant
Step 7: Install baseboards. They are fixed with self-tapping screws, first a mounting plastic plate is attached, and a decorative plinth is snapped onto it. Carefully seal all gaps between the baseboard and wall trim with sealant. The sealant should be matched to the color of the boards.
Skirting boards installed
Sealing cracks with sealant
At this point, the repair of the cold floor is completed, give the materials time to dry and you can use the bathhouse.
We looked at the most complex, expensive and time-consuming option for floor insulation, but there are also very simple, but no less effective, methods of dealing with a cold floor.
- Make an ordinary wooden grate about 10 cm high on the cold floor. After each wash, you can lift it for better drying. Such a simple device will significantly increase the comfort of staying in the bathhouse at minimal cost. The grate can be made only under the feet, and not over the entire surface area of the floor. True, if the floor in the bathhouse is not only cold, but also made with gross violations, has begun to rot, etc., then it is better to redo it. And the faster, the fewer negative consequences will have to be eliminated. Accordingly, the cheaper it will be to repair the bathhouse.
Wooden grates on the floor in the bathhouse
- Install a fan in the room, mount it as close to the ceiling as possible. It will direct hot air to the floor, the boards will warm up perfectly. During the water procedures, the floor will not have time to cool down. The fan can be turned on only during the flow of the room, and then turned off, which will eliminate the appearance of uncomfortable zones. Keep in mind that the fan housing must have reliable protection against moisture penetration.
Installed fan
You may find recommendations to close the underground ventilation holes during cleaning. This method can be used to solve the problem, but do not forget to open the vents again immediately after washing. Lack of ventilation is the main problem with bathhouse flooring.
Another misconception. To improve the microclimate in the bathhouse, there are experts who recommend taking air into the stove firebox from the underground space. They are sure that in this way the movement of warm air is improved, it is drawn from the underground into the oven, and warm air is lowered in its place. This is not true, there is no need to do such experiments. The fact is that new air in the underground will not come from the room, but from the vents in the foundation, that is, from the street. As a result, the floor will not warm up, but will cool down even more.
Homemade metal stove in the bathhouse
Real insulation due to the blower can be done only when the stove is located directly in the bathhouse. Place it in such a way that the air vent is as close to the floor as possible. In this case, the effect will be that instead of the used cold air, warm air will fall and warm the floor. But moving the stove just for this effect is not economically feasible. And the increase in floor temperature is not so significant as to break the stove for the sake of it. Above we have given examples of more effective and less expensive methods.
Stove in the bathhouse
Prices for the Ballu BKX-3 heat gun range
heat gun ballu bkx-3
Ceiling insulation
The thickness of the insulation depends on the number of storeys of the building.
| Location | Insulation thickness (mm) |
| Under a heated room | 50 |
| Under an unheated room or attic | 100 |
| Ceiling-roof | 150-200 |
The ceiling insulation in the dressing room is carried out with moisture-resistant materials. Warm steam rises and condenses in the upper part of the room. The greater the temperature difference on the surface, the more intense the release of moisture.
Insulation is carried out from inside the room or by insulating the attic floor. In the first case, it is advisable to use:
- polystyrene foam;
- expanded polystyrene;
- foamed polyethylene.
All materials have a low moisture absorption rate. When sealing seams, they eliminate the use of hydro- and vapor barriers. This reduces installation costs.
- embedded in the space between the rafter beams;
- fills the cells of the frame;
- attached to the ceiling by gluing.
The finishing also needs to be low-hygroscopic. Suitable:
- moisture-resistant drywall;
- plywood;
- plastic;
- lining;
- suspended ceiling.
To create natural, effective and useful attic insulation, you need to use seaweed. As insulation, they are sold in the form of mats. The product is rolled out on the floor of the attic or in the space between the load-bearing elements.
Ladders with a thickness of 200 mm are used. They do not require moisture insulation. Seaweed:
- are not afraid of moisture;
- fireproof;
- not susceptible to mold and mildew;
- hypoallergenic;
- have a healing effect.
You can create insulation yourself. In coastal areas, the material costs pennies. It is enough to dry the seaweed and cover the surface with it.
Ecowool is becoming more and more popular, as it tends to release absorbed moisture. To do this, it is enough to ventilate the insulation layer. Cotton wool can be installed dry or wet. The second method is more common due to adhesion to the surface and the ability to insulate inclined slopes.
Due to the good adhesion and integrity of the insulation, polyurethane foam is often used. It is also waterproof. Due to the integrity of the coating, it can also be used to insulate metal roofing elements. Thanks to this, the cold bridges that serve as metal are removed.
The disadvantage is the high cost and the need for specialized equipment. The foam is applied with a special sprayer.
Indoor arrangement
This room can be provided with convection heating in winter or other heating can be connected. There must be a steam outlet.
Insulation
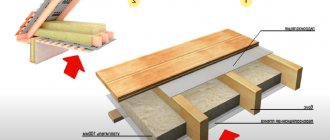
If the floor is wooden, then the standard insulation technology is as follows:
- The subfloor is attached underneath the joists;
- wooden elements are treated with an antiseptic composition to prevent damage to the wood;
- a vapor barrier film is laid, releasing excess water and protecting the insulation from getting wet;
- the selected insulation is placed (mineral wool, polystyrene foam, polystyrene foam, etc.);
- waterproofing material (roofing felt or film) is laid down;
- boards are laid.
If the floor is tiled, then an expanded clay concrete screed is made under the tiles. The tiles are laid on this screed. However, it is better to install a heating system to avoid a cool floor.
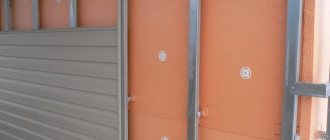
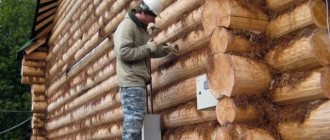
For internal insulation of the walls of a log dressing room, foil foam, expanded polystyrene or mineral wool are used.
For insulation from the inside, sheathing bars treated with an antiseptic are attached to the wall in half-meter increments. Foiled polystyrene foam is attached with a stapler to the walls and bars with a shiny layer inside the room. Electrical communications are carried out in plastic corrugation. The lining is attached on top of the bars.
Insulation from the outside under the facing board is carried out as usual: the lathing is made using bars with a cross-section of 50 by 50 millimeters, a forty is placed below and above, to which the bars are attached using metal fasteners. Mineral wool is laid between the beams, then a vapor barrier is made. A sheathing is made on top for the cladding. For exterior cladding, you can also use different types of siding. This solution is used for brick or other non-wooden walls. To attach siding, it is advisable to use specially designed fasteners and fittings.
Ceiling insulation is similar to floor insulation. There is insulation between the joists, and polyethylene on a foil base is overlapped with thin strips underneath. The joints are sealed with tape and the whole thing is covered from below with a beautiful lining.
If the ceiling serves as a ceiling and is the floor for the floor above, then a high-quality floor covering is laid on top of the joists. And if this is a little-used attic, the insulation over the joists is covered with boards, along which, if necessary, you can move and store various utensils.
Insulation of dressing room windows and doors
30% of all heat loss in a room occurs through openings. To eliminate drafts, plastic double-glazed windows and insulated double door panels are used.
You can insulate the door yourself:
- A lath is placed on an ordinary wooden door;
- Insulation is inserted into the cells of the sheathing. Often, mineral wool plays its role. Less commonly, the dressing room door is insulated with foam plastic;
- The mats are secured at the top with a thin strip;
- A waterproofing film is attached to the frame using a construction stapler;
- The inside of the door is sewn with finishing material.
The windows in the dressing room are installed plastic or wooden. Be sure to open the doors. It provides natural ventilation. Single or double glazed windows filled with insulating gases are selected.
Before calculating the cost of thermal insulation of the dressing room, it is worth making a thermal technical calculation. It will allow you to optimally select the material and its parameters for a specific construction case. For proper operation of insulation in the dressing room, it is necessary to create functional ventilation.
Which walls are the most durable for a waiting room?
Considering that there is increased condensation in the dressing room, due attention should be paid to the material’s resistance to moisture.
Natural materials withstand moisture best. If it is not possible to purchase just such raw materials, because they are usually expensive, then you can give preference to any material and choose a good product to protect the surface. If it is not possible to purchase just such raw materials, because they are usually expensive, then you can give preference to any material and choose a good surface protection product.
There are quite a lot of similar products in construction stores; you just need to consult with an experienced specialist. Let the bathhouse please you with its aroma and warmth. Only proper preparation for the process of building a bathhouse can make the space complete.