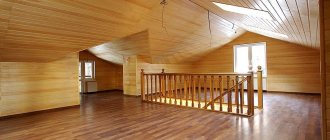
Lining is one of the most popular finishing materials. It is environmentally friendly, durable, and has beautiful external characteristics. You can install lining slats using different fastening devices. But the most convenient and reliable of them is the clamper. What kind of hardware is this, what are its advantages and disadvantages, how to install it - you will learn about this from our article.
What is a kleimer?
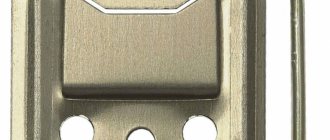
A clamp or clamp is a fastening bracket. It is made from a special type of steel – spring. Can also be produced from galvanized metal. Belongs to the hardware category of building materials. Designed for hidden fastening of elements. When using a clamp, connecting and fastening parts are not visible from the outside of the material.
Kleimer is a German word. Translated from the original language, klammer means “bracket, clip, clamp, clamp.” Used for various purposes:
- fastening different types of lining;
- installation of seam roofing;
- fixing deck boards;
- fastening siding, plastic panels;
- fastening MDF and other panels.
Previously, nails or screws were used to fasten lining, boards, baseboards and other finishing options. This type of fixation had a lot of disadvantages. The most important of them - on the surface @ [email protected] ???U?)??U?'??U????U` [email protected] `???U? was subject to corrosion over time. As a result, it became less reliable, and unaesthetic rusty streaks appeared on the material. For this reason, nails and screws were replaced by a hidden and reliable fastening - a clamp.
Pros of use
Fasteners for clamps have become so popular due to the fact that with their help, hidden work on the lining is carried out perfectly.
Advantages of construction fasteners:
- The kleimer holds the parts as tightly as possible.
- It does not damage the surface, and the work is much faster.
- The work happens very quickly, because the master does not spend time adjusting fasteners using metal plates or bent various parts.
- Clamps are sold in different sizes and are easy to match to the required fasteners.
- The material of manufacture can also be different, making it easy to select them according to the load.
- Claypers are especially good because they do not allow the products to become loose, they tightly bind them, gripping them and the part is very securely fastened.
- Fastening with clamps is very economical. There is no need to purchase additional materials for installation.
- To make the staples last much longer, they can be lubricated with anti-corrosion spray or ointment.
- The clamps do not bend and are made from high-strength materials.
Nothing complicated and at the same time incredibly simple and convenient to work with.
Peculiarities
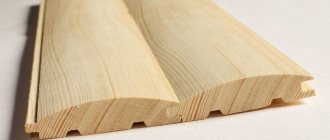
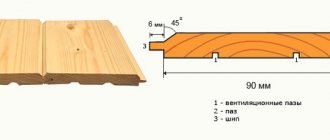
The clamp is ideal for fastening lining. Its configuration and design are made in such a way that the lining is securely fixed to the sheathing. The fastening form factor is perfectly combined with the shape of the lamellas, which have a special tongue-and-groove system.
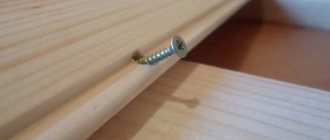
The bracket is attached to the sheathing or rough base using two holes. To fix it on different surfaces, different types of fasteners are used:
- self-tapping screws;
- screws;
- nails.
Deep hooks on the brackets help strengthen the board. There are models that are additionally equipped with spike hooks. They serve to strengthen the fixation of the material and give additional strength to the fasteners.
Today, all kinds of clamps for lining are produced: sizes, models, materials can be different. This allows you to select hardware building materials for different types of work.
What to choose
What is better for attaching wooden, PVC or MDF lining? It’s worth starting with the characteristics of the room and the weight of the materials. To ensure maximum strength - definitely clamps. This is an expensive fastener for lining, which ensures durable installation of even heavy wooden lining in problem areas.
Traditional fasteners are only relevant for those rooms that do not require perfect interior design, but the overall style of the house must be consistent. Also, traditional fasteners are indispensable for finishing problem areas.
Types of clamps
All types of clamps are made of spring steel or galvanized iron. But they differ in purpose:
- for fastening plastic;
- special - for work on building facades: when laying tiles, porcelain stoneware slabs;
- for fixing lining and other wood facing materials.
Clasp clips may vary in size. Height is the main parameter by which hardware is selected. The parameter is the distance from the base to the clamping tail. The height of the staples is divided into 6 types. Each of them is designed for use with certain types of materials:
- No. 1. Used when working with lining and plastic panels.
- No. 2. Used for fixing lining, panels and MDF.
- No. 3. Clamps for eurolining and chipboard.
- No. 4. Most often used for eurolining.
- No. 5. Ideal for linden and aspen lining.
- No. 6. The largest type of brackets for linden and aspen lining, as well as for block houses.
Among all those listed, this is the most popular clasp for lining. The dimensions and configuration of the hardware are well suited for almost all types of lining. Clamps for eurolining are selected separately: the size is 4 mm, and for a block house – 6 mm. For plastic panels and thin lining, it is advisable to purchase staples 2-3 mm high.
There is one more parameter - the thickness of the plate. It can be different - 0.2 mm, 0.3 mm or 0.4 mm.
Price issue
Q: How do I identify strong mounting brackets?
A: If it is possible to familiarize yourself with the product passport, all the characteristics of the product should be there, including the boundary load, installation method, type of lock on the lining, etc. If the purchase is made in a retail store, you can try bending the tab of the staple with your hands. Durable ones (for wooden lining) will not give way under the force of your fingers and will retain their shape.
Q: Choosing self-tapping screws for clamps - how not to go wrong?
A: The product passport must indicate the type of fastening of the bracket to the mounting frame. Usually these are standard galvanized self-tapping screws 10-20 mm long. Only the cap plays a big role here - it should be flat, without protrusions. When choosing self-tapping screws, you can try on different types on a regular clamp. The screw head should not extend beyond the upper plane of the bracket.
Q: What tools are needed to install panels on brackets?
A: Water or laser level, tape measure, mallet, self-tapping screw, screwdriver or hammer (depending on the method of attaching the clamp to the frame), drill. To accurately drill holes, a center punch is sometimes used to mark the location.
Q: How can I save on installation?
A: Staggering the mounting brackets, replacing self-tapping screws with nails, and using traditional installation methods can reduce the overall cost of repairs. However, safety is an important factor - poor fasteners will cause wall destruction, sheathing deformation, chips, and cracks. It's better not to save money on this.
Q: Is a special coating required for fasteners?
Oh no. There is no need to apply protective agents to any type of installation. The main thing is to take into account that the nails, staples, and screws were coated with a layer of zinc or powder paint at the factory. Only this material can be used in conjunction with sensitive wood or MDF panels. Plastic is not afraid of rust - you can use ordinary nails for it.
Q: What form of clamp is preferable for wooden lining?
A: Rectangular or square. The optimal number of holes for self-tapping screws is 2. For light types of finishing, installation on a clamp with 1 socket for a self-tapping screw is possible. In this case, you should take care of maximum adherence of the sheets to the frame.
Q: Is it difficult to install lining for a beginner?
A: If you have sufficient knowledge of power tools, understand the algorithm and choose the right fasteners, it’s quite simple. PVC sheets are best suited for amateurs - they are light in weight, can be mounted in different ways, and allow a lot of play. The most difficult thing to install is wooden slats - the problem is their heaviness and low margin for error.
How justified is the overpayment compared to finishing nails? The answer is in the table below.
| TYPE | Price, rub. * |
| Kleimer thick. 2 mm 100 pcs. packaged | 88 |
| Claymer for thick lining. 3 mm 100 pcs. packaged | 120 |
| Clamp for lining thick. 4 mm 100 pcs. packaged | 128 |
| Copper-plated finishing nails 1.2x25 price per 100 g | 45 |
| Galvanized finishing nails 1.4x30 price per 100 g | 40 |
* Prices are valid for autumn 2022.
As you can see, the cost of clamps is 2-3 times more expensive than finishing nails.
Is it worth overpaying? After all, many take on the cladding of bathhouses and balconies on their own just because they want to save on work.
It's still worth paying extra for several reasons.
Advantages
Claymers are in constant demand in the construction market. This is due to the following advantages of construction hardware:
- Simplicity of design. Even a beginner in construction can figure it out. Installation is very simple and does not require high professional skills.
- No mechanical impact. When fixing, you do not need to hit it with a hammer, use a screwdriver or other construction tools to install the lining. This eliminates the possibility of damaging the slats. Cracks, chips, and delamination of the material during fastening are excluded.
- Selection of models. A wide range allows you to choose a bracket that is suitable for a specific material.
- Neat appearance of the canvas. On the front surface, the fastening of the lining to the clamps is completely invisible. The result of the work is a neat, seamless fabric that is not externally damaged by fasteners.
- Strong fixation. The brackets securely fix the slats. Due to this, the coating does not shift or deform during operation.
- Resistance to the external environment. The staples withstand the aggressive action of environmental factors, including high humidity. Therefore, they can be used for external construction work, as well as for internal cladding of baths and saunas.
- Inexpensive price. The cost of clamps is low compared to other types of hardware. This makes repairs less expensive.
To the listed advantages you can add versatility. The design of the brackets allows them to be mounted on any surface: wood, cinder block, concrete, cement, lathing.
Combined fastener
The use of all possible types of fasteners is relevant in cases where the geometry of the room plays against the builder. A large number of protrusions, inclined surfaces, recesses or niches in the walls can become a problem for attaching the lining to clamps. In such cases, it is possible to use traditional lining fasteners.
A common problem is the finishing of door or window openings. Often there is not enough space on the door jamb to place a clamp, or the lining lamella has to be cut lengthwise. In such cases, two solutions are possible: fastening with screws and nails or modifying the clamp.
Self-tapping fasteners can be hidden under plastic plugs; galvanized nails will not be visible under the lining sheet on the adjacent wall. In addition, special corners made of plastic or MDF are available for sale - their function is similar to the function of a plinth, only for hard-to-reach or problem areas - external or indirect corners, recesses.
Modifying the clamp involves bending the tongue to the side. In this way, you can move the fasteners beyond the wall to an adjacent one. Often, in such cases, part of the clamp is cut off with a hacksaw or metal scissors. It is important during the modification process not to damage the integrity of the clamp - it may break. It should only be bent at right angles.
How to choose clamps for lining
Before choosing a clamp for lining, you need to know a few simple criteria that will help you buy high-quality hardware material.
- Bracket size. The basic rule is to accurately select the dimensions of the clamps for the lining. It should ideally match the type and width of the lining being fixed.
- Coating integrity. This applies to galvanized staples. There should be no scratches or cracks on the surface. Otherwise, corrosion will quickly damage the metal.
When purchasing, it is important to correctly calculate the number of screws or other fastening accessories. Everything is simple here - 2 screws per 1 clamp. If you save money and buy 1 fastener each, the finishing material will not be firmly fixed and will eventually become deformed.
In addition, you need to calculate the number of clasps themselves. The calculations are simple: about 20 staples are needed per 1 m2. When calculating, you need to take into account that the step between hardware on a flat surface is 45 cm, in the extreme zones - 35 cm, and in the corners it is the smallest - 25 cm. Do not forget also that the consumption of hardware also depends on the length of the form factor of the finishing material. The longer the length, the larger the step between the clamps, the fewer of them there will be in number.
Calculation of staples
If the distance between the beams of the mounting frame is 0.5 meters, and the height of the room is a little more than 2 meters (standard Khrushchev), then for one sheet of lining you will need 5 clamps. For a wall 3 meters wide with a lining width of 10 cm, you will need: 5 * (30010) 5 (for the first sheet) = 155 staples. Completely finishing a 2x3 room, excluding doors and windows, will require about 500 staples.
A similar algorithm with traditional fasteners. It is important that the lamella is pressed tightly against each beam of the mounting frame, therefore the number of fasteners for 1 sheet of lining is equal to the number of points of contact with the mounting frame.
For all the advantages of clampers, you will have to pay for careful preparation for installation. This is a labor-intensive stage on which the quality of the entire work depends. Firstly, it should be noted that the staples are selected in accordance with the standard size of the boards. Secondly, if you plan to vertically fasten the lining using clamps, then the fixation should be carried out at a distance from the wall equal to the width of the plank.
If horizontal installation is carried out, then the staples must be installed 2-3 millimeters from the floor so that there is room for attaching a nail or tightening a self-tapping screw.
The calculation of the number of clamps can be determined by the following proportions:
- 4 elements with a standard size of 1-2 mm, if a flat surface is to be covered. The step in this case is approximately 40-50 cm;
- 5 elements per 1-2 mm, if finishing the extreme areas. The step will be 35 cm;
- 6 elements with a tongue height of 1-2 mm, if you plan to cover corner areas. The step will be 25 cm.
When using parts with a large standard size, accordingly, the step will either increase or the number of elements used will decrease.
Installation features
The process of installing clamps is not complicated. The bracket can be easily inserted into the standard grooves of the material. Then it is attached with nails or self-tapping screws to the frame.
For work you will need the following tools:
- level;
- screwdriver;
- roulette;
- marker;
- square;
- hammer;
- screwdriver
Installation of brackets on the lining consists of several stages.
The scheme of work is as follows: Preparing the base
The surface is leveled: protruding parts are removed, and cracks, chips and depressions are sealed with a special sand-cement mixture. The leveled area is then checked with a level or laser.
If necessary, lathing is used for leveling.
To form it, a wooden or metal frame is used with a pitch of no more than 0.5 mm. Antiseptic treatment and marking
The surface is treated with an antiseptic composition.
Then you need to wait until the material dries completely. After this, a marker is used to mark the places where the clamps will be installed. If the lath is mounted vertically, the bracket is mounted, retreating the width of the lamella from the adjacent wall. When fastening the lamellas horizontally, only 2-3 mm are given off, which will be needed to screw in the self-tapping screw. Installation
It is important to pay special attention to the installation of the first clamp. The quality and appearance of the finish will depend on how correctly it is installed. Fasteners and lamellas are installed alternately. In this case, it is necessary to ensure that the planks are placed parallel to each other, and the clamps are mounted correctly. For installation, it is better to choose self-tapping screws or dowels. Nails are the worst option and are only used on wood sheathing.
Installation is done according to the following scheme:
- Secure the first hardware.
- Secure the remaining staples in the row.
- After installing the first row of hardware, install the first rail.
- At the same time, secure the next row of staples.
- Mount the first lamella into the hook of the bracket. Insert the next planks with a groove into the ridge.
- Do not fix the next clamp until the first lamella is completely level.
- Press the end part of the rail with the ridge tightly to the base. At the same time, install a bracket on the back side in the groove and secure it with self-tapping screws.
When performing such installation, it is necessary to check the accuracy of the work from time to time using a level. When the last rail is installed, the metal parts of the fastening are covered with a wooden edge. If dismantling is necessary, it is done in the reverse order.
Useful tips
Beginning builders often encounter typical problems during installation. You can avoid this by adhering to the following recommendations:
Wooden lining joints cannot be sealed with liquid sealant.
This can lead to corrosion of the clamps and affect the condition of the decorative panels themselves.
Installation work is carried out only under suitable temperature conditions: the difference in temperature outside and indoors should be a maximum of 10 degrees. If wooden lining is used, installation is carried out only in positive temperatures. For plastic panels, the temperature regime is also important: the thermometer should show at least 10 degrees Celsius.
To prevent rotting of the panels and corrosion of fasteners, after installation is completed, the lining must be treated with a special coating (wax, stain, varnish).
To maintain the beautiful appearance of the finishing material, installation of the planks in a horizontal manner begins from the top corner. This way, if it becomes necessary to cut the last plank, the cut area can be covered with a wooden plinth.
If there are sockets and switches in the room, holes for them are made only after installing the lining, but before covering it with varnish.
The finishing material, immediately after purchase, must be left in the room for a couple of days so that it “gets used” to the atmosphere in the room. This will help avoid difficulties from contraction (expansion) of the tree due to changes in the microclimate.
Decorative panels cannot be attached directly to the wall (ceiling). Otherwise, it will impede free ventilation and lead to mold, dampness and mildew. Especially if the lining is installed in a room with high humidity.
When purchasing fasteners, pay attention to the material from which they are made. It must be similar in type to the finishing materials and be immune to temperature changes and high humidity. This is especially true for the interior decoration of baths, saunas and steam rooms, or the exterior cladding of a building.
Tips for use
A few simple tips will help extend the life of the lining and preserve its attractive external characteristics for a long time:
- Buy hardware from trusted construction stores with quality products and good reviews.
- Do not use liquid sealants for joints, so as not to cause corrosion of hardware.
- After installation is completed, treat the lining with varnish or oil composition.
Clamps are easy to install, inexpensive, provide high structural stability and long service life. For these reasons, fastening lining with clamps has become so popular in our time.
Dimensions
Fasteners are available in several types, which depend on the thickness of the groove into which the bracket is to be attached. The sizes of clamps for lining are as follows:
- No. 1 – used for fastening PVC lining and panels 5 mm thick;
- No. 2 – used for panels 8 mm thick made of PVC or MDF;
- No. 3 – purchased for installation of eurolining and wall panels made of chipboard;
- No. 4 – mainly used for fastening eurolining;
- No. 5 – used for installation of clapboard boards;
- No. 6 – recommended for indoor block houses.
The ease of installation work and the reliability of the structure as a whole depend on how correctly the size of the metal plates is selected.
If you plan to cover the walls with unusual materials, for example, laminate, it is advisable to purchase another type of clamps, more powerful and designed specifically for heavy structures.
Fastening trim
DIY clapboard ceiling
There are several methods of fastening, which differ in both labor intensity and cost, as well as the aesthetics of the result. The simplest solutions involve fastening with nails from the front of the board. More complex and interesting options include installation in a groove, tenon or in the front part, made hidden, when the fasteners are invisible. In some cases, so-called clamps can be used.
Fastening with nails
The cheapest and easiest way is to nail the imitation from the front part with ordinary construction nails: one fastener to each sheathing bar. Nails must be galvanized, and their length must be no less than the thickness of the trim + ½ the thickness of the sheathing bar. The solution is unaesthetic (the hats are conspicuous) and will not allow you to fully achieve the effect of simulating timber.
You can use finishing nails (also galvanized). They are distinguished from construction nails by their miniature heads, which are completely embedded in the wood. Such fasteners are driven into the tenon or groove of the board at an angle of 45 degrees. Screw nails are also suitable for these purposes, which guarantee protection of fasteners from extrusion during the process of changing the linear dimensions of materials.
Fastening with self-tapping screws
For high-quality installation of the imitation, it is recommended to use galvanized universal screws and self-tapping screws that provide hidden fastening. Fastening is carried out in a tenon at an angle of 45 degrees or in the front part with preliminary drilling of holes for plugs. After fastening with screws or self-tapping screws, the holes are covered with glue, sealed with wooden plugs and sanded.
An alternative solution is to use so-called SPAX screws - fasteners for solid floors. You can read about their advantages on the sellers' websites. Let us only note that they are more expensive than ordinary self-tapping screws, but it is worth it if imitation extra timber is used for finishing.
Using clamps
For interior decoration, you can use clamps - stamped steel products that are mounted on the sheathing. The finishing board is simply hung on the clamps. Manufacturers position such fasteners as simple and reliable, but in reality it turns out that their use is expensive and not always ineffective - this is evidenced by reviews and recommendations of people who independently attached the imitation.
Installation cost
If you decide to entrust it to third-party workers, keep in mind that their services in relative terms (per square meter of finishing) will cost approximately the same amount as materials (see table).
Approximate prices for installation work on imitation timber
| Job | Approximate cost per 1 sq. m of surface, rub. |
| Installation of waterproofing (vapor barrier) | 100–150 |
| Fastening the sheathing | 150–200 |
| Antiseptic treatment of sheathing | 50–100 |
| Wall insulation | 50–100 |
| Installation of imitation timber | 300–400 |
| Painting imitation timber | 200–300 |