Are you building a bathhouse with a sauna or want to create a cozy natural atmosphere at home? You should think about lining your walls with environmentally friendly wooden lining. The installation principle is very simple: tongue and groove. Therefore, even an inexperienced craftsman can finish the room himself by carefully studying the instructions.
Not so long ago, the choice of fasteners for sheathing was limited to either self-tapping screws or nails. With this method, the fastener heads are visible on the surface and may become rusty over time, and if they are hammered or twisted, there is a risk of cracking the wood.
As fasteners when finishing walls with clapboards, it is convenient to use metal staples - clamps. This is a special fastening for hidden installation of eurolining, clapboard boards, block houses and wall panels made of PVC, MDF, chipboard.
Installing sheathing using brackets has undeniable advantages:
• simplicity and high speed of work without the use of special tools • no visible fasteners on the surface • high reliability and durability of the structure • eliminates the risk of cracking and damage to wood during installation • makes it possible to dismantle without damaging the material • fasteners are resistant to corrosion in a damp environment (galvanized steel )
Peculiarities
Clamps for lining are special brackets that are made of spring or galvanized metal. The entire design of the clamp is aimed at providing reliable fastening for the lining to the sheathing. The form factor of the fastener perfectly matches the shape of the lamellas, which have a special tongue-and-groove system. In addition, clamps are convenient to use for fixing MDF sheets, siding and plastic panels.
The bracket has special holes with the help of which the clamp is mounted on a rough base or sheathing. Depending on the material on which the bracket is attached, the following fasteners are used:
- nails;
- self-tapping screws;
- screws.
In order to grip the lamella, the clamps have deep hooks that ensure reliable fastening of the lining. There are models of fastening brackets on the market that are equipped with additional hooks that further enhance the fixation of the slats. In addition, these hooks provide additional rigidity to the clamp.
These fastening devices are available in a wide range, which covers almost any type of lining. Speaking about the systematization of the model range of clasps, we can say that it is done according to the height of the tongue and the thickness of the metal from which the fastener is made. The minimum height of the tongue of the bracket is 1 millimeter, and the maximum is 6 millimeters.
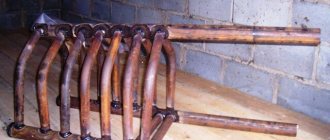
How not to fasten the lining Source vplate.ru
The most commonly used are clasps with a tongue height of 5 millimeters. They are suitable for most types of lining, but for eurolining it is better to use staples with a tongue height of 4 millimeters, and when working with a block house, 6 millimeters. When working with plastic panels or thin lining, use fasteners with a tongue height of 2-3 millimeters.
Fastening the lining with clamps
Before starting installation, we calculate the number of clamps required for the work according to the above algorithm. Next, depending on the type of hardware with which we will attach the lining to the sheathing, we select a tool.
To install using nails we will need:
- Construction level and square
- Mallet or hammer with a rubber head
- Hammer with metal head
- Yardstick
Installation using self-tapping screws instead of a hammer with a metal striker will additionally require a screwdriver or screwdriver.
Tool for installing lining
Prices for popular models of screwdrivers
Screwdrivers
Antiseptic treatment of walls and wooden surfaces of materials
The wall on which we will create the frame, as well as the lining itself, is pre-treated with special antiseptic agents. This will help us avoid many unpleasant consequences, such as rotting of materials and the development of fungal formations.
Quite often, lining manufacturers treat its surface at the production stage, covering the wood with a protective layer. Purchasing such building materials that are completely ready for use greatly speeds up the finishing process.
Wood is treated with antiseptic agents according to the following algorithm:
| We clean surfaces from dirt and dust. In the case of boards, sandpaper does an excellent job of this task. For deeper cleaning of wood, we use special bleaching agents for lining or stain. | Cleaning wood with sanding paper |
| We prime the surface using acrylic, alkyd or polystyrene primer. Remember that polystyrene primer is used only for exterior work, and acrylic primer is used exclusively for interior decoration. It is advisable to check with the seller regarding alkyd primers, since their range is very wide. | Wood surface primer |
| We apply an antiseptic. For interior finishing work, we will need a water-based impregnation. Any type of antiseptic is suitable for outdoor work. Remember that the durability of the entire structure depends on the quality of the product, so purchase only certified impregnation. | Applying antiseptic to the lining |
| At the final stage of processing, the wooden surfaces are varnished. If the installation of the lining is carried out indoors, then alkyd or acrylic varnishes are suitable for us. Work outside the house must be carried out using acrylic-polyurethane varnish. | Varnishing wood |
Prices for wood preservatives
Impregnation for wood
Installation of sheathing
Before you begin assembling the frame, you need to outline the level according to which further lathing will be carried out. After this, we determine the direction of fastening the bars. Remember that their orientation must be perpendicular to the installation vector of the lining.
Facade lathing
The subsequent algorithm of actions will look like this:
- We level and fix the guides along the wall, marking the wall for future sheathing. It is most convenient to do it using chalk. This makes it possible to initially imagine how all the structural elements will be located.
Checking the sheathing level
- We fix the bars for our frame with an interval of no more than one meter. When working with wooden lining, an interval of 0.5-0.6 m is optimal.
- Next, we fix the sheathing elements onto the bars and level them. If the level is not correct, we use pads where necessary.
The sheathing of rounded surfaces has its own characteristics and is made from parts of timber. You can see the appearance of such a sheathing in the photo below.
Lathing rounded walls
Installation of lining
It is necessary to start work only when favorable conditions exist. If you attach the lining in the cold, when the temperature drops below + 10 C, this will lead to its deformation.
The technique for carrying out work on vertical and horizontal wall cladding with clapboard differs somewhat. However, in both cases it is necessary to ensure that the tenon fits tightly into the groove using a tamping board and a mallet.
The installation process itself is as follows:
Installation of lining in a horizontal direction
| According to the level markings, we fasten the starting board of the lining with nails or self-tapping screws | Attaching the starting board (horizontal mounting) |
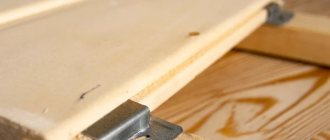
| Insert the clamp hook into the groove of the first panel. Use a screwdriver to tighten the self-tapping screws into the nail holes of the clamp, securely fixing it to the sheathing. | Installing the clamp into the groove of the lining |
| We place all subsequent boards with a groove on the ridge of the first, additionally securing them with brackets. To tightly join the lining panels, we hammer them in using a mallet and a tamping board. | Tapping the lining with a mallet |
| We cut the last board with a hacksaw, measure the required width with a tape measure and nail it to the sheathing. | Cutting lining |
| The nail heads of the starting and finishing boards can be covered with a decorative corner or cut off with side cutters. | Decorative corner |
Installation of lining in the vertical direction
| We press the end of the first panel, on which the ridge is located, close to the sheathing and nail it with nails. After completing the work, we bite off the nail heads with side cutters, or close them with a decorative corner. | Fixing the starting board |
| We insert the brackets into the groove of the first board and fix them with screws (or nails) | Fixing clamps with self-tapping screws |
| We insert the next lining panel with a tenon into the groove of the previous one. We hammer it tightly using a tamping board and a mallet (or a rubber mallet). | Using a tamping board |
| After the lining is tightly joined to the first board, we again insert the clamps and fasten them to the sheathing. | Fixing the installed lining with a clamp |
| Every ten panels we check the correct installation of the lining with a plumb line (level). | Checking the quality of lining installation by level |
| We repeat this sequence of actions until we complete the sheathing process. If necessary, cut the last board to size with a hacksaw. | Trimming the lining |
Note. In order for the clamp to securely hold the lining, it is necessary to attach it to at least 2 nails (screws). Otherwise, there is a risk of deformation of the finishing surface during further use.
Prices for lining, imitation timber, block house
Lining, imitation timber, block house
You can see the lining installation process more clearly by watching the video instructions below.
Advantages and disadvantages
Clamps for lining are in stable demand among buyers and there are several objective circumstances associated with this:
- The simple design of the fasteners allows installation of the lining even by a person with low professional qualifications. By punctually following installation technology, operating time is significantly reduced.
- Fastening the lining to clamps allows you to avoid drilling or other physical impact on the finishing material, which in turn protects them from chipping and cracking.
- A wide range of clamp models allows you to create a seamless connection of the lining even at the junction of other materials.
- The fasteners securely fix the lining to the base and eliminate the risk of material deformation and shifting.
Clamp dressed on lining Source www.stoydiz.ru
- The clamps are resistant to aggressive environments and humidity, so they are successfully used both outdoors and in baths or saunas.
- Unlike other types of hardware for lining, clasps have an affordable price.
- The design of the fastener allows for universal installation on almost any base. This can be a concrete wall or a sheathing for lining made of metal profiles.
Perhaps the only drawback of clasps is their lack of resistance to increased physical stress. For this reason, in places where serious vibrations of the walls are possible, it is advisable to use more powerful fasteners.
See also: Catalog of companies that specialize in finishing materials and glazing
Differences and features of clamps compared to other types of fasteners
Typically, when carrying out most facing work for various materials, nails, screws or clamps can be used as fastening. Usually, such a choice lies with the master himself, especially if all the work is carried out not independently, but with the involvement of specialists.
The reasons for the popularity of this type of fastening are the following factors:
- The first is a fairly significant increase in installation speed.
- Next, and quite important, is the complete absence of any damage, which can be various chips and cracks, which is quite common when using nails and self-tapping screws.
- This type of fastening is well suited even for installation in rooms with high levels of humidity, which cannot be said about the use of a stapler, screws or nails.
- Even the most inexperienced worker can understand the principle of operation, which greatly simplifies the entire process and makes it accessible for implementation with one’s own hands, without the involvement of specialists.
- Fastening elements are selected strictly for the type of lining, in accordance with its characteristics.
- They have a high level of reliability, which helps to avoid “wearing out” of the finish over time.
- The installation process does not require the use of additional components.
- They are absolutely not subject to corrosion, which makes use even more reliable and efficient.
- The cost differs significantly, and the overall finish will cost about the same, but will be much more durable.
Choice
The main condition that must be observed when choosing hardware is that the size must correspond to the type and width of the lining being fixed. If the clamps are made of galvanized steel, the integrity of the protective coating is checked. If it is damaged, the anti-corrosion resistance of the fastener drops sharply.
Self-tapping screws or other fastening accessories are purchased at the rate of at least 2 pieces per bracket. Installing the clamp on one self-tapping screw is unacceptable - such savings will inevitably lead to deformation of the finishing material in the future.
Self-tapping screws for clamps Source lesobirzha.ru
Calculating the required number of staples is quite simple. On average, about 20 hardware is required per square meter of surface to be finished. It is worth considering that on flat areas the step between them is 45 centimeters. In the extreme zones it is reduced to 35 centimeters, and in the corners to 25 centimeters. The longer the form factor of the finishing material, the larger the step between the staples and, accordingly, their consumption decreases.
How to calculate clamps for fasteners
You can correctly calculate the number of clamps needed as follows:
- Measure the length of the lining with a tape measure.
- The location of the clamps is usually calculated at a distance of 40-60 cm. 5 cm is possible. It is better not to do less or more.
- The division works like this: the length is divided by the distance, plus one. Visually: 200 cm: 40 cm 1 = 6 clamps per lining.
- Then you can calculate how many of them will be needed for all the linings and work.
- Example: 10 linings X 6 clamps = 60 clamps.
- Usually 100 staples are sold per package, but you can also find them sold individually in regular hardware stores.
It is very easy and quick to calculate how many clamps are needed for the job.
Installation
In order to install the clamps you will need the following tools:
- marker;
- hammer;
- screwdriver;
- roulette;
- level;
- square;
- screwdriver
At the first stage, the base is prepared, which consists of leveling the surface. Evenness is checked using a level or laser. Protrusions are removed, and depressions and cracks are sealed with suitable material. As a rule, sheathing is installed to simplify leveling. When constructing it, wooden blocks or metal profiles are used, the spacing between which should not exceed half a meter.
Next, the surface is treated with an antiseptic composition and the time is waited until it dries completely. After the antiseptic has dried, they begin to mark the places where the clamps will be installed. In the case of a vertical arrangement of the finishing material, the hardware is attached, retreating from the adjacent wall by the width of the lamella.
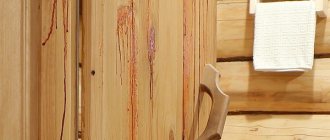
Fastening lining to clamps Source ingushetia.org
Practical advice
In order to increase the service life of the lining and preserve its original appearance, it is advisable to follow a few simple rules:
- The purchase of clasps must be carried out only in stores that have the appropriate specialization. This will allow you to buy high-quality fasteners that will not suffer from corrosion or fail.
- It is not recommended to use liquid sealants to form joints. This negatively affects the hardware and leads to their rapid corrosion.
- Upon completion of installation work, it is advisable to take measures aimed at protecting the lining. For this purpose, it is coated with varnish or other protective honeycomb. This coating also improves the appearance of the finishing material. Also, impregnation of the lining with paints and varnishes helps protect it from exposure to dampness and direct solar radiation.
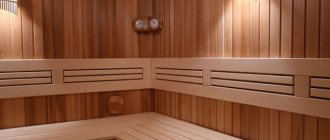
The final stage of finishing Source www.owatroldirect.co.uk
- During finishing work, it is advisable to exclude direct contact of the lining with the base. This can lead to rotting and fungal damage as it will impair the ventilation of the walls. To solve the problem, vapor barrier substrates are used.
- Holes for sockets and switches are made after completion of installation work and before applying paint and varnish coatings. This can be done using a special flared saw or a drill attachment.
- All spaces remaining near the walls or floor are covered with skirting boards that match the color of the lining.
These simple rules help not only speed up the progress of work, but also increase the service life of the finishing material.
How to attach?
Before starting work, you need to decide how exactly the boards will be fixed: in a horizontal or vertical position.
In any case, you first need to take measurements and outline the approximate location of the products with a simple pencil. After this, the wood is immediately sawed according to the intended instructions and the necessary tools are prepared for installation.
To make a reliable and durable frame structure from the clamps, they should be properly secured to the surface. You can attach the parts either to a flat, cleaned wall, or to a prepared sheathing.
If you plan to fix the clamps with nails, then you should use a building level and a hammer. If you are attaching them with screws, you will need to take a screwdriver and a screwdriver.
Fixation of fasteners and the wooden panels themselves is carried out alternately. During the work, it is necessary to maintain accuracy when calculating the position of fasteners
In this case, special attention should be paid to the very first part, because it is this that determines the position of further planks
Remember that nails to secure the clamps can only be used if the sheathing has been installed in advance. It can be mounted using dowels or self-tapping screws.
To make the sheathing, use small blocks of wood. They must provide a gap of at least 5 centimeters. Only after this the clampers themselves are installed.
Each clamp is attached in such a way that the board can lie on it as evenly as possible. If you used self-tapping screws, then it is also recommended to make the sheathing from the bars in advance. It can greatly simplify fixation.
After this, you should prepare small holes (their diameter should be less than the diameter of the screw), you can also gradually screw the screws into the base at the designated points. When the first part is attached, you should begin installing the first board and at the same time you need to fix the remaining brackets.
The first sheet is always mounted in the hook of the latch; subsequent elements will be installed with a groove in the tenon. After joining, the coating must be carefully inspected. It should be smooth, not deviate from the surface, and press tightly against the wall. When several boards are secured, knots will form. They can be fixed using ordinary nails.
If necessary, decorative corners can be used during installation. They make it possible to hide all imperfections after installation work and give a beautiful and neat appearance to the finished coating.
For information on how to use the clamper, watch the video below.