Over time, stove heating is replaced with a more modern one, and the old stove must be dismantled. This task is also present when replacing an unsuitable one with a new one. Partial analysis is also possible. This is how the structure is rebuilt into a fireplace. There may also be options where the main part of the stove is left, using it as a bed. Alternatively, use it for storage space. The technology for laying out the furnace masonry depends on the final goals.
How to disassemble the stove
Well, first of all, I’ll say right away that this matter is dusty and even very dusty.
Therefore, to prevent soot from flying in all directions, it is necessary to cover everything possible with plastic wrap and newspapers, including the floor. It will also be very cool if you, in addition to this, stretch plastic film around the entire perimeter of the stove from top to bottom. This way you will reduce a little space into which dust and soot can reach. Secondly, since soot will fly in all directions, as I already said, you should protect your respiratory organs from it, because it is very harmful to the body, and it will be very difficult to breathe from the dust.
A respirator will help you with this. It is best to wear old clothes. And you shouldn’t forget about gloves either.
So, now we move directly to the disassembly of the stove itself. You should start disassembling it from the pipe. After you have disassembled the pipe, you can leave the bricks in the attic. Well, if you don’t need them there, then you can remove them, of course, just suddenly you decide to install a new stove. They will be useful to you for a new pipe if they are in more or less decent condition.
Toyota Camry 1997, 140 l. With. - with your own hands
Cars for sale
Toyota Camry, 1997
Toyota Camry, 1996
Toyota Camry, 1996
Toyota Camry, 1995
Comments 18
I cleaned everything, there was compressed dust just like I pulled the felt out of there, this is the first time I’ve seen this... If you have a compressor, you can also blow it out with it!
So a toothbrush is not a problem, I asked the guy to go look for a bottle for me while I was at work! And there is a remedy called a thousand, can it replace this remedy if it is not available?
And of course, if you remove the dashboard and remove all the pipes and channels and rinse them with hot water in the bathroom at home, and blow out the radiator with a compressor - this is of course the best and most effective option!
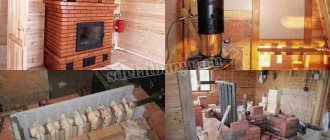
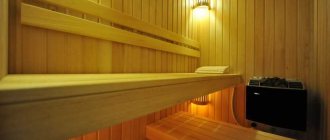
How to disassemble a brick oven: procedure and features of dismantling oven equipment
Now let's start disassembling the stove in the room. To do this, open windows and doors to allow fresh air to enter. We take a bottle of water, put a spray bottle on it and spray water on each brick of the row that we will disassemble. Sprayed? We don’t spare water in this matter, it’s better for us, less dust will fly. Now gently tap with a hammer and slowly remove brick by brick. You can, of course, use a sledgehammer) This way the whole stove will quickly fall apart. BUT it’s too dusty, and suddenly you’ll need these bricks for something later, you never know what happens. The more carefully you do everything, the better off you will be. Well, and so on until the very end. The idea is simple: spray, disassemble. And yet, before you start directly breaking down the stove, take care in advance of where you will put the old bricks so that you don’t have to drag them from place to place later. That's basically all. After all this, all you have to do is clean up and take out all the trash. Good luck!
No matter how good the old stove is, sooner or later many of its owners come to the conclusion that it needs to be disassembled. The reasons are different: the desire to expand the living space, the acquisition of an alternative heating system, the desire to change the interior design. In general, there are many reasons. The stove can be partially disassembled by converting it into a fireplace or simply rebuilding several partitions.
If you decide to disassemble your old stove, inspect it carefully. Any work begins with the head; at the stove it is the chimney.
Open the ceiling above the stove and make sure nothing is resting on the chimney. Don't forget to cover or take things out of the room; there will be a huge amount of dust and ash. Carefully, starting from the roof, widen the hole around the chimney and dismantle the masonry brick by brick, gradually descending into the house. Be careful not to stack too many bricks on the roof, otherwise you risk falling. In the attic and indoors, masonry can be broken with a sledgehammer or something heavy, but be careful not to damage beams and walls that will still be useful. Carefully fill the holes in the ceiling and roof left by the chimney with bricks.
Next, we proceed to disassemble the central and largest part of the stove, on which many people liked to soak up the heat when the stove was still in use. The main part of the oven can not be completely disassembled; just one wall can be removed. Adapt the remaining walls for niches or shelves.
If you decide to disassemble the entire stove, then again check whether the body of the stove is supported by something, and also dismantle the floor around the stove and inspect its foundation. Check how the walls are folded and how the bricks are connected to each other (clay or cement). If you later plan to build a new stove, you will need a price list for building bricks. If the oven is lined with clay, then everything is simple, the walls are quite easy to disassemble, but if cement is involved, then you will have to sweat.
Cleaning the inside of the oven
Place old newspaper on the floor in front of the stove. Do this as a protective measure before you start digging ashes out of the stove, as they may fall to the ground. Newspaper will make cleanup much easier. Open the air damper to allow trapped ash to fall into the firebox.
The air damper will be a small handle on the front of the cast iron stove that you pull outward to open. If the stove is still warm, use a piece of hooked metal to open the air damper.
Clean out the ashes from the firebox. Open the glass door at the front of the cast iron stove and, using a metal shovel, dig out any remaining ash from inside the stove. Place shovels of ash in a bucket of metal ash.
Before you start digging out the ashes, make sure the fire is completely out and there are no live coals in it. If there are still hot coals, wait for them to cool and extinguish them before shoveling them.
Cover the ashtray. After you've finished scooping the ashes out of the firebox, place the lid back on the ashtray. Place the can on a non-flammable surface, such as brick or tile. It is important to allow the ashes to sit for at least 48 hours before disposing of the ashes if there are still live coals in the ashes.
It is important to keep the can closed as a slight breeze can lift the ash and soot from the can and send it into your home.
After you have disposed of the ashes, you can also pick up the newspapers that you first laid on the floor.
If it's windy outside, wait until the wind dies down before throwing out the ashes. Dormant coals can ignite again in strong winds.
Cleaning the outside of the oven
Scrape off any rust using a wire brush. Depending on how old the stove is and how much rust and dirt has accumulated on its exterior, this may require some serious cleaning. Focus on applying the wire brush to the top of the cast iron stove and other areas where rust is visible.
Rust is especially likely if you put metal on the top of a cast iron stove. People often leave kettles on top or use the heat of the oven to cook food or rise dough. This use will promote the formation of rust and dirt on the slab.
Apply sandpaper to the surface of the oven. Once you have removed most of the rust and accumulated dirt with a wire brush, you can use sandpaper to remove any remaining rust and generally clean the exterior of your cast iron stove. Start with coarse sandpaper. Then move on to finer-grit sandpaper.
Sand the entire outside surface of the cast iron stove. This will remove any marks or scratches made by the wire brush or coarse sandpaper.
Wipe the oven with the cleaning mixture. After you've finished sanding your stove, you can remove any remaining ash or dirt from the outside surface using a cleaning solution. Spray the solution onto the surface of your cast iron stove and wipe it with a clean rag. Let the stove dry before lighting it.
To make a cleaning solution, find an empty spray bottle and mix two parts water with one part vinegar, then add a small amount of dish soap. Shake the spray can and the cleaning solution is ready to use.
Glass door and chimney cleaning
Buy a glass cleaning solution. Glass doors on a cast iron slab often turn completely black due to soot and smoke buildup and are difficult to clean. The best product to use for this task is a glass cleaning solution that has been specifically designed for cleaning wood stove front doors. Spray the steam cleaner onto a cloth to wipe down the glass door.
Glass cleaning solution contains ammonia, so be careful not to get it in your eyes. Do not inhale the solution.
Clean with a mixture of vinegar, water and soap. If you prefer to use a non-toxic glass door cleaning solution, find or buy an empty spray bottle. Mix two parts water with one part pure vinegar, and then add a drop of regular soap. Shake the bottle to mix the ingredients. You can then spray the vinegar solution directly onto the glass and wipe it with a cloth.
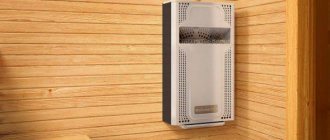
Dismantling car heaters
If the stove has ceased to function well, then it is imperative to identify the cause of the poor performance. The initial stage is not disassembling the device, but checking the stove. The most typical problems that negatively affect the operation of the device:
- airing of the cooling system
- radiator malfunction
- Incorrect installation/dirty cabin filter
- poor quality/delayed replacement of antifreeze
- thermostat malfunction
Thus, for the smooth operation of the device, every car owner must regularly diagnose the stove.
Dismantling a car heater in Moscow
Where to disassemble the stove - in a big city such a question does not arise, since in Moscow there are quite a lot of inexpensive car services that offer this service. The price of the issue is not high - about $50. All that remains is to choose a suitable service, where, if necessary, they could not only disassemble the device, but also carry out high-quality repairs of the stove.
It is believed that the stove works well if, at an outside temperature of 25 degrees below zero, the car warms up to a temperature of +16 in 15-17 minutes.
Do-it-yourself car heater disassembly
If it is not possible or there is no desire to seek help from service specialists, you can try to disassemble the car’s heater yourself. The entire process of removing the stove can be briefly described as follows:
- the shield is removed from the instrument panel;
- all LEDs and lamps are removed, screws are unscrewed;
- the heater control unit is removed, including the switch for this device, etc.;
- The stove is removed.
To disassemble the car heater itself, you will need the following tools: a hammer, wire cutters, screwdrivers of various types, pliers, wrenches, etc. First, the torpedo is removed from the device, all cables and hoses are attached. The next stage is removing the heater (by the way, if everything is not in order with the stove, it is recommended to disassemble the car heater for preventive purposes). By unscrewing the nuts connecting the heater cap to the electric motor, the cap is removed and the fan and sealing gasket are removed. The final stage of disassembling the stove is removing the resistor and protective casing.
As you can see, disassembling this device yourself is not difficult.
Dirty cabin filter
A clogged cabin filter greatly affects the operation of the air conditioner in the summer, but can be the reason why the stove does not heat in the winter. It is good when the filter is located in an accessible place (for example, behind the passenger glove compartment) and is changed regularly. But sometimes it is hidden deep in the depths of the center console, and the car owner does not even know about its existence. As a result, instead of a filter, a “bed” of dust, leaves and insects is formed there.
Regularly replacing the cabin filter is important not only for the heater, but also for human health, because passengers breathe the air passing through it. Car manufacturers recommend changing the cabin filter every 10,000 km. And if you often drive on dusty dirt roads, then the replacement interval should be halved.
How to dismantle an old brick stove
Disassembling a car heater
During self-disassembly, this process can be divided into the following stages (condition: the heater has already been removed):
- the brackets holding the front casing of the device are unfastened, the lower screws are boiled;
- the casing is removed, the electric motor is released;
- remove the brackets and unscrew the screws holding the heater air intake housings;
- the housing is removed (first the front, then the rear);
- the brackets holding the rear casing are unfastened;
- The radiator and damper are removed.
If you do not have the appropriate skills, then you can contact any car service center to disassemble the heater in Moscow.
So, high-quality stove care implies constant monitoring of its operation, and diagnostics should be carried out before the onset of cold weather. Often, it is during preventative work that hidden problems are revealed. In older cars, experts recommend monitoring the operation of the stove more closely, since timely elimination of breakdowns allows you to avoid replacing the stove motor and its other components.
Advertisements on NN.RU - For children
Children's playground for the dacha. Children's play complex made of natural wood is for sale. Can be supplemented with slides and stairs. Price: 48,000 rub.
Romper size 62. Excellent condition Shipping within Russia is possible Price: 50 rub.
In excellent condition Shipping within Russia is possible Price: 430 rub.
Price for all 3 pcs. In excellent condition. It is possible to sell individual items. Possible delivery throughout Russia. Price: 420 rub.
How to disassemble the stove
Over time, stove heating is replaced with a more modern one, and the old stove must be dismantled. This task is also present when replacing an unsuitable one with a new one. Partial analysis is also possible. This is how the structure is rebuilt into a fireplace. There may also be options where the main part of the stove is left, using it as a bed. Alternatively, use it for storage space. The technology for laying out the furnace masonry depends on the final goals.
How to disassemble a brick oven: procedure and features of dismantling oven equipment
Now let's start disassembling the stove in the room. To do this, open windows and doors to allow fresh air to enter. We take a bottle of water, put a spray bottle on it and spray water on each brick of the row that we will disassemble. Sprayed? We don’t spare water in this matter, it’s better for us, less dust will fly. Now gently tap with a hammer and slowly remove brick by brick. You can, of course, use a sledgehammer) This way the whole stove will quickly fall apart. BUT it’s too dusty, and suddenly you’ll need these bricks for something later, you never know what happens. The more carefully you do everything, the better off you will be. Well, and so on until the very end. The idea is simple: spray, disassemble. And yet, before you start directly breaking down the stove, take care in advance of where you will put the old bricks so that you don’t have to drag them from place to place later. That's basically all. After all this, all you have to do is clean up and take out all the trash. Good luck!
No matter how good the old stove is, sooner or later many of its owners come to the conclusion that it needs to be disassembled. The reasons are different: the desire to expand the living space, the acquisition of an alternative heating system, the desire to change the interior design. In general, there are many reasons. The stove can be partially disassembled by converting it into a fireplace or simply rebuilding several partitions.
If you decide to disassemble your old stove, inspect it carefully. Any work begins with the head; at the stove it is the chimney.
Open the ceiling above the stove and make sure nothing is resting on the chimney. Don't forget to cover or take things out of the room; there will be a huge amount of dust and ash. Carefully, starting from the roof, widen the hole around the chimney and dismantle the masonry brick by brick, gradually descending into the house. Be careful not to stack too many bricks on the roof, otherwise you risk falling. In the attic and indoors, masonry can be broken with a sledgehammer or something heavy, but be careful not to damage beams and walls that will still be useful. Carefully fill the holes in the ceiling and roof left by the chimney with bricks.
Next, we proceed to disassemble the central and largest part of the stove, on which many people liked to soak up the heat when the stove was still in use. The main part of the oven can not be completely disassembled; just one wall can be removed. Adapt the remaining walls for niches or shelves.
If you decide to disassemble the entire stove, then again check whether the body of the stove is supported by something, and also dismantle the floor around the stove and inspect its foundation. Check how the walls are folded and how the bricks are connected to each other (clay or cement). If you later plan to build a new stove, you will need a price list for building bricks. If the oven is lined with clay, then everything is simple, the walls are quite easy to disassemble, but if cement is involved, then you will have to sweat.
We disassemble the Russian stove ourselves
To perform the work you will need a tool. Here is his list:
- pickaxe, crowbar;
- chisel;
- steel wedges;
- sledgehammer or heavy hammer;
- hammer drill with a set of strikers;
- gloves;
- respirator.
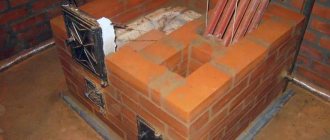
A Russian brick stove in a house should be dismantled from top to bottom.
Techniques for stove laying: a – leveling the bed; b – applying the solution; c – end to end; d – indentation; d – trimming.
It is necessary to dismantle the section of the roof near the pipe and begin dismantling the bricks. The metal pipe is removed after it is loosened to the sides. The brick pipe must be dismantled. The chimney is dismantled one by one, brick by brick. Gradually, dismantling the stove moves into the house. If the masonry was done using clay-sand mortar, then a chisel and hammer are well suited for the job. It is more convenient to disassemble the masonry in horizontal rows in a circle from top to bottom.
It will be more difficult when the stove in the house was built many years ago using cement mortar. In this case, you need to use a hammer drill. Using the tool correctly, you can significantly reduce operating time. The blade-shaped striker must be directed along the seam between the bricks. You always want to save building material for reuse, so you need to try to prevent strong chipping of the brick from the impact of the tool.
If you use only a crowbar, it is very difficult to carry out accurate disassembly along horizontal rows. The impacts of the crowbar will inevitably cause a large amount of broken bricks. It is very difficult to hit the seam exactly, which is why there are a lot of chipped bricks. We dismantle a stove built on cement mortar. To dismantle brickwork made on durable cement mortars, steel wedges are used. The technology is as follows: in several places in the upper part of the masonry you need to drive steel wedges into horizontal seams. In the case of particularly strong masonry, wedges can also be driven into vertical joints.
Defects must be eliminated in a timely manner, since any violations in the furnace structure can cause a fire.
It is better to do the work of driving wedges with an assistant. One person places a steel wedge in the holder and guides it into the seam of the furnace masonry, and a partner, using a sledgehammer, drives the wedge into the seam between the bricks. Next, using a hammer drill or very carefully with a crowbar, the masonry is dismantled. The bricks are separated and dismantled in rows from top to bottom.
When working in the attic and indoors, you need to be careful when working with a sledgehammer, you need to try not to damage the walls and beams that will still come in handy. The holes in the ceiling are carefully filled with bricks.
After the chimney has already been disassembled, the work is performed sequentially in a circle, starting from the top and moving down. The stove, doors and grates are dismantled as they are cleared.
Preparation
The job of dismantling the stove is dusty and dirty. Furniture and things from the room must be removed or covered with film. If repair work on the floor is not planned or it is new, it should also be covered.
Before disassembling a brick stove, you need to inspect its chimney. It can be iron or brick. The technology for dismantling it depends on the design of the furnace. If the stove is old, then there is a chance that its chimney is being used as a support for the ceiling. They did this before, building Russian stoves at the same time as the house. If this is the case, then you won’t be able to disassemble it yourself. A specialist is needed here.
Return to contents
Advice on the job
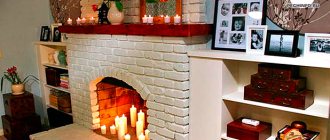
As an option, you can suggest not completely disassembling the central, largest part of the stove, which was used as a stove bench. You can remove just one wall and use the remaining ones for niches and shelves. Here a lot will depend on your imagination. Perhaps you get excited about the idea of building a fireplace and use part of the design of an old Russian stone stove.
The final stage is dismantling the furnace foundation. If the design is such that the base of the stove can be removed from the support and taken out without completely disassembling it, this should be used. You'll have to find helpers, because you can't do it without outside help.
If the furnace foundation does not interfere with your plans, then you can leave it. Holes in the floor should be patched with boards. The work of dismantling the furnace ends here.
Tools
The set of tools depends on what solution was used when making the stove. For comfortable dismantling, you should wear gloves and a respirator, because there will be a lot of dust and ash, and they can make breathing difficult. You need to take care of your work clothes, which would be better to throw away later. Clay masonry is easier to disassemble. To make work easier, it can be moistened with water. Then she will be more pliable. If the brick is laid on cement mortar, then soaking will not help. Here you will need a hammer drill, since dismantling will be difficult.
To disassemble the structure you need a sledgehammer.
For cutting you may need the following equipment:
Return to contents
Subtleties of dismantling a brick oven
First of all, you need to decide on the scale of work and assess the current situation. In cases where it is planned to replace the stove with a new one, you should inspect the chimney and consider the option in which it will remain. If it becomes possible to supply gas, the stove equipment can be completely dismantled or a small fireplace can be built based on the chimney.
Where to start: the preparatory stage of work
Work begins with a careful inspection of the structure in the ceiling area. In old houses, Russian stoves, as a rule, were built along with the house and used as additional ceiling supports. You can begin dismantling only after making sure that the roof does not rest on the chimney, and its structure will not be damaged after dismantling the ducts.
Outdated stove
Dismantling a stove is a dirty and dusty job. If you have to do it not at the stage of a major overhaul, you need to remove everything that is possible from the room and cover the remaining pieces of furniture with film. You can also build something like curtains from thick polyethylene, separating the desired area from the rest of the room.
Tools: necessary tools
The set of tools for dismantling brickwork depends on the composition used for the construction of the mortar. Here is a list of tools that will most likely be needed for the job:
- heavy hammer or sledgehammer;
- scrap;
- pick;
- chisel;
- perforator;
- steel wedges.
It is recommended to work in a respirator and use gloves to protect your hands. It’s better to choose clothes that you don’t mind throwing away. During disassembly, not only dust will fly, but also soot, and washing it off is very problematic.
Helpful information
The easiest way to work is with buildings made of clay, which becomes pliable after preliminary soaking. Depending on the strength of the masonry, a suitable tool is used in the work, for example, a chisel and a hammer. The point should be directed into the masonry joints - this will not only simplify the work, but also reduce the amount of debris, and also help preserve building materials for later use.
The most difficult thing to disassemble is cement masonry; in this case, soaking the seams will not help. For dismantling, steel wedges are driven into the horizontal seams with a sledgehammer, violating their integrity. After this, the masonry is dismantled row by row using a hammer drill, and if there is no such tool, then they use a crowbar.
Brick stove repair
What happened before the renovation
? A brick stove, in comparison with a fireplace, is considered a more complex device, since it can serve not only for heating a room, but also for cooking. Due to the intensity of its use, it is required from time to time.
Soot accumulates inside the stove and chimney, which must be removed periodically. The masonry is constantly exposed to temperature changes and may crack. Because of this, the draft becomes weak and the stove stops performing its functions properly. In some cases, such malfunctions can cause a fire or poisoning by combustion products.
Features of dismantling
Dismantling the chimney pipe
Dismantling work starts from the top. First - the chimney. It can be simple and come from the roof or wall, or complex where the smoke passes through ducts in the interior wall of the house. A complex option is used as additional heating of the room. The iron pipe coming out of the house is removed by loosening it at the base. If it is made of brick, then we dismantle the masonry brick by brick, gradually going down.
After the external chimney, the part in the attic is dismantled, having previously closed the resulting hole with slate or a metal sheet. Here the work will go easily, since this area is done with sand-clay masonry mortar. To prevent the plaster from falling off the ceiling during work, it is worth placing a board on the beams, on which it will be convenient to stack the disassembled bricks.
Return to contents
Destruction of the structure itself
The masonry of the building begins to be dismantled from the top, moving to its bottom.
Next you should start cutting the central and most massive part of the furnace. The work is also carried out - from top to bottom, moving in a circle. The part near the pipe is disassembled first, gradually expanding. It is better to clean the plaster. If the stove is tiled, that should also be removed. For the job to go better, the chisel should hit the seams between the bricks. The wall, under the influence of vibration from a blow with a hammer or sledgehammer, will collapse. If you plan to use the resulting brick, you should be careful, because the wrong blow can break the brick.
The difficult part is cutting the vault. To prevent it from collapsing ahead of time, it is recommended to use the following trick: place a sheet of iron on supports under the arch. It is better to start disassembling work from the back wall and gradually move towards the front of the oven. The iron plate and doors are dismantled last. Don't rush or remove them prematurely. It is better to keep them closed, this will reduce the amount of soot that gets into the house.
Return to contents
How to disassemble the base of a brick oven?
The last stage remains - dismantling the furnace foundation. There are stoves that stand on supports. Their base can be simply removed and stored without disassembling. But here one person cannot cope. Others need to be dismantled, since their foundation is also laid with bricks. If the base does not interfere with the interior, it can be left alone. The top is simply covered with linoleum.
Main stages of work
The stove can only be dismantled from top to bottom; all other options can lead to serious consequences.
How to disassemble a chimney
Most often, in one-story houses, the pipe leaves the furnace and is led outside through the ceiling and roof. Less common are complex smoke circulation channels located in the walls of a building. Sometimes you can find an external chimney rising next to the wall.
The easiest way is to dismantle the pipe coming out of the furnace. It will not be difficult to remove the metal pipe, after first loosening it in different directions.
If the pipe is made of brick, it is carefully disassembled brick by brick, moving from top to bottom and trying not to damage the ceilings and walls. Dismantling begins from the area rising above the roof. To lay the outer part of the pipe, cement is always added to the solution, so it will be more difficult to work here than with other areas. It is even more difficult to disassemble plastered bricks, but what should add strength is that further work will go faster and easier.
Having completed disassembling the outer pipe, they smoothly move into the attic. But first, they cover the resulting hole in the roof with a sheet of roofing iron or cover the roof with the same material that covers the entire roof. To prevent the plaster on the ceiling from collapsing, it is recommended to make grooves around the perimeter of the pipe from the side of the room. Seams made of sand-clay mortar can be easily broken with a chisel and hammer.
Features of dismantling the furnace walls
Having completed the work in the attic, they proceed to dismantling the stove in the house. There is no need to rush to remove the doors - it is better to close them tightly to prevent soot from entering the room. Some inexperienced craftsmen make a common mistake and try to speed up the process by breaking the masonry at the bottom of the structure - this cannot be done, since the heavy brick structure can collapse and damage the floor covering.
Another mistake that is also made by non-professionals who want to speed up the process is removing the stove from the room without dismantling the masonry. Indeed, if the hearth is on a foundation and the first row is made without mortar, this is possible. But a standard stove weighs several tons, so only a few people can lift it and carry it without dropping it. In this case, you need to carry the load correctly so that the structure does not fall apart along the way. Considering that during operation, the masonry weakens significantly, the risk that the stove will collapse and cause damage to the floor is very high.
It is better to act slowly, gradually dismantling the walls, moving in a circle. If the structure is tiled, you will first have to get rid of the cladding using a hammer drill. You don’t have to completely remove the plaster, but you will have to clean it at the seams. Naturally, the smaller the stove and the simpler the design of the heating center, the faster the process will go.
When working with a Russian stove, difficulties arise when dismantling the vault - here it is recommended to place a sheet of iron and make supports so that the structure does not collapse prematurely. It is best to disassemble the vault from the rear wall.
If the furnace has a separate foundation, then it should also be dismantled. A brick or stone foundation can be easily destroyed with a crowbar, and a concrete slab can be broken with a jackhammer.
Before you begin dismantling the stove in your home yourself, it is recommended to weigh all the benefits and risks. Sometimes calling a professional with special equipment is cheaper than eliminating the consequences of trying on your own.
Dismantling stove heating in a private house
The article describes the process of dismantling stove heating in a private house. I will share my observations about why gas heating is better than stove heating, and why the decision was made to dismantle stove heating. After reading the article, everyone will be able to decide for themselves whether they need stove heating, and if so, gas heating. If the choice is in favor of dismantling stove heating, then the knowledge gained from the article will help you do the dismantling yourself.
In Soviet times, most houses were heated by stoves. Now the situation has changed and many have switched to gas or steam heating. Therefore, the choice is whether to leave stove heating in the house when switching to alternative gas heating? In my case, there was no choice as such, because the house was uninhabited for a couple of years, which affected the stove heating system. Due to dampness and cold, the structure became unusable. An attempt to light the stove ended in clouds of smoke in the house. Smoke came from all the cracks, even from under the floor. It was impossible to enter the house for a couple of days; everything was saturated with smoke. The house was not previously famous for its successful implementation of stove heating, and over time it completely fell into disrepair. At first there was an idea to make a fireplace with heating, but in the end it was decided to install gas heating in the house, so dismantling the stove heating was on the agenda.
In my house, I do almost everything with my own hands. Armed with a pair of gloves, a change of clothes, a crowbar, a shovel, an ax and other equipment, I got to work. First I disassembled the stove itself. To do this, I removed all metal structures. If they are in good condition, then they can be sold. If it is in poor condition, then send it for scrap. My option is the second one.
Then, brick by brick, from top to bottom, I dismantled the stove. Brick has a specific smell, so when dismantling the stove, it is better to open all windows for complete ventilation. The brick should be immediately taken out into the yard so as not to clutter the space.
We had a homemade stove with a bed that my grandfather made... I took everything apart from the top row to the bottom row. There is more space in the room, and fewer unnecessary structures. He took construction material out into the yard.
The next stage was dismantling the wall with the furnace heating passages. Using a crowbar and an ax, I completely dismantled the wall where there is a stove heating duct. Moving from top to bottom, dismantling one row, he moved on to the second. He took the brick out into the yard.
In the future, the brick will not be suitable for construction work in residential premises and even for courtyard buildings; it is completely saturated with smoke. But in my case, it found a use - I subsequently made a sewer hole underground from it. Therefore, the smell of brick was not a problem.
I did not dismantle the pipe that goes to the roof. It doesn't play any role in the house, there is no smell from it. So I decided not to complicate my life and leave it. If desired, you can then use the chimney and create a fireplace for beauty and comfort in the house.
When all the stove heating structures were dismantled, the house became one large room. Convenient, but not practical. It is necessary to build interior partitions. There are many options for partitions: from reliable brick to walls made of plywood or plasterboard. I chose reliability, so in my case the walls will be made of brick. To save money, I bought a used brick rather than a new one. But it is suitable for partitions.
Subsequently, it was decided to redesign one of the room partitions, in the direction of enlarging one of them. Therefore, the foundation for the partition was laid along the outer edge of the former bench, and was made to a depth of 50 centimeters, using ordinary bricks and fittings.
I connected the 10-centimeter reinforcement to the main foundation of the house using holes made with a hammer drill. All other places, under the dismantled furnace structure, were filled with screed, to the level of the existing floor in the rooms, using beacons. The surface was leveled and left to dry. In the summer it took about three days. The resulting hole in the ceiling (chimney) was hermetically sealed with a metal sheet of the required diameter. I took it from the decorative lining of the stove. This sheet should be slightly larger than the diameter of the chimney. Along the perimeter of the protruding parts of the sheet, from the chimney at a distance of five centimeters, into pre-made holes, screwed 100 mm self-tapping screws.
To prevent moisture from entering the house and the formation of drafts, the chimney on the roof was sealed with old concrete tiles of the required diameter.
Next it’s time to lay out the interior partitions from brick. There are a lot of video tutorials on the Internet on how to do this. I turned to an expert in this matter - my father-in-law. In a couple of days he laid out the partitions. Finished partitions must dry before plastering. This took less than three days.
Then you can start plastering the walls. This is not an easy task and it is better to entrust it to professionals so that the wall is level. There is an auntie living next door to me who makes a living from this business. In one day, she did her job, and the walls were plastered. The plaster dries faster; after just a couple of days it was possible to prime the surface and glue wallpaper.
Now the walls look smooth, beautiful and have no smell, as they did with stove heating. Gas heating does not cause inconvenience, but rather makes life better. Just as I started the system during the heating season, I turned it off at the end. I only regulate the temperature. It’s not even worth comparing with stove heating. There are no foreign odors in the house. Walls with wallpaper look great even after five years. Therefore, the decision to dismantle the stove heating was successful and justified.
Minor problems
Heating systems should be inspected regularly. This will allow you to detect minor defects in time and timely repair the stove in the house, without waiting for serious damage. There are several types of small problems. You can handle all of them yourself. To do this, you will need tools - a trowel, hammers, a plumb line, a tape measure, a level, a container for preparing repair mixtures.
Lack of traction
Such a defect can occur for various reasons. Most often, traction is lost due to violation of operating rules. For example, the stove has not been used for a long time, and a plug of cold air has formed in the chimney.
Interesting video of restoring an old stove with your own hands:
Failure may also be caused by:
- Insufficient air flow. If there is a lack of oxygen, the wood will not burn.
- There is too much wind outside, causing reverse draft.
- The chimney is thoroughly clogged with soot.
If there is no draft, you can try to solve the problem using simple methods or clean the chimney.
Getting rid of an air lock is very simple. You just need to light the firewood not with paper, but with rubber or dry fuel. Until the defect is eliminated, it is prohibited to use special ignition fluids.
If the chimney is clogged, the firebox is first lit, and then a handful of coarse salt is thrown into it. It is important to remember to close the damper immediately. After this, lumps of soot will fly out into the chimney.
If this method is ineffective, you will have to clean the chimney manually using knockout bricks. They can be identified by their special location - they always protrude slightly from the general masonry.
Violation of seam tightness
Detecting a defect is as easy as shelling pears: smoke enters the room, and soot stains appear on the masonry. Stove repair begins with identifying the exact location of the defect. To do this, you need to thoroughly heat it and mark the places of damage.
If the room is filled with smoke, this may indicate cracks in the walls
Repair activities are carried out in the following order:
- The seams are soaked with ordinary water and cleared to a depth of several centimeters.
- The walls around the defect are thoroughly washed with a brush. The water needs to be changed several times during the cleaning process.
- A solution is prepared from sand, clay, salt and asbestos fiber. The resulting mass should have medium viscosity. You don’t have to make the solution, but purchase it ready-to-use.
- The seams are filled with the prepared mixture and sealed. It is important to fill in all existing voids.
After repair, the seams need to dry. The oven must not be used during this time. After drying, the walls of the structure can be plastered or tiled.
Laying fallen bricks yourself is not difficult
In old heating appliances, bricks often fall out or burn out. The damage appears severe, but repairing the brick kiln will not be difficult. The problem area is cleaned, moistened and covered with a clay cake. Then a new brick is prepared. It is also wetted and coated with the same solution as for repairing seams. The new block is placed in place of the old one and securely fixed.
.
Clean the microwave in 5 minutes - 7 express methods
- A quick way to clean a microwave
- Method 2. Cleaning the microwave with citric acid or lemon juice (for medium and heavy soiling)
- Method 3. Cleaning the microwave with soda (for medium dirt)
- Method 4. Cleaning with vinegar (for severe stains)
- Method 5. Cleaning the microwave using a sponge and Fairy (for light and medium dirt)
- Method 6. Cleaning the microwave with a glass cleaner (without a “bath”)
- Method 7. How to clean a microwave with orange peels
- And some more useful tips
- Question answer
All of the most effective and fastest ways to clean the inside of a microwave are based on one principle - creating a steam bath and a trap for cleaning agent fumes. The trap effect will be created by the stove itself, but our task is to make an effective cleaning solution from products that, fortunately, you probably already have in your kitchen cabinet.
Average defects
For more serious damage, more effort will have to be made to repair the stove. It may be necessary to strengthen individual structural elements.
Gaps around the firebox
This element is constantly exposed to physical stress and temperature changes. Over time, cracks appear around it, dangerous because carbon monoxide from the firebox can begin to penetrate into the room. To prevent trouble from happening, it is important to repair the brick oven in a timely manner. We are talking about compacting damaged areas.
The cracks must be sealed as quickly as possible to prevent carbon monoxide from entering the room.
You need to act in the following order:
- Thoroughly clean the surface around the door.
- Remove all old solution.
- Prime the cleaned surface with heat-resistant glue.
- Lay asbestos cord around the door. It will act as a thermal protector and prevent the destruction of the clay solution in the future.
- Seal the cracks with repair mortar.
After restoration, the stove cannot be used for 24 hours. After this, you need to heat it thoroughly and check that the door is securely fastened.
Using exactly the same principle, gaps around the hob are eliminated. The only difference is that the asbestos cord can be replaced with other fire-resistant materials.
Strengthening the frame and replacing the grate
If cracks appear around the entire perimeter of the oven, its walls will need to be strengthened. The most reliable way is to completely go through the masonry, but for many people this work is beyond their capabilities, so you can resort to tightening the frame with metal wire.
The screed is carried out as follows:
- Horizontal channels with a depth of no more than 20 mm are cut into the outer walls of the furnace.
- Wire is pulled along the grooves.
- The required quality of the screed is ensured by the beard. You need to act carefully so as not to damage the wire.
After the work is completed, the wall is plastered or improved in any other way.
After completion of the repair, the stove can be plastered or tiled to suit your taste.
When replacing the grate, you should pay attention to the fact that you need to leave a gap between it and the walls of the oven . The new element should not differ in size from the old one. After installing the grate, the gap between it and the brick walls must be filled with sand.
The easiest ways to remove
The choice of the optimal method for removing whitewash from the ceiling depends, first of all, on the total area of the room in which the work will take place. If its square footage is small, the traditional dry method is quite suitable.
Dry
A spatula is the simplest and most effective tool in the fight against outdated whitewash
It requires the use of a wide metal spatula, thanks to which it will be possible to remove the whitewash from the ceiling layer by layer. In this case, any irregularities that arise can be smoothed out with sandpaper. The advantage of this method is its simplicity and the absence of the need to purchase additional means for removing the old coating. But the disadvantages are labor-intensive, time-consuming and a huge amount of dust.
However, you can get rid of them:
- placing a special box on the spatula. It can be purchased at a hardware store along with the spatula or scraper itself, or you can make it yourself. The uniqueness of this device is that it allows you to avoid dust settling on all surfaces. You can replace it with any container.
- using a grinding machine. It allows you to speed up the whitewash removal process without losing quality and is ideal for large areas.
- gradually applying water with a spray bottle or a wet sponge to the layers of whitewash. Once they are soaked, they can be easily removed with a spatula, thus avoiding the appearance of a cloud of dust. In this case, you can replace the spatula with a scraper.
When choosing this method, you should not soak the entire ceiling area at once. It is much wiser to divide it into several sections and process them in turn. As a rule, the process of wetting the whitewash layer takes 5-10 minutes.
This method is best used in small rooms or in rooms with a small layer of whitewash to avoid the appearance of a large amount of dirt. Meanwhile, its occurrence can also be prevented by simply wiping the swollen layer of whitewash with a damp cloth.
- “tapping” evenly with an ordinary hammer on the old whitewash, especially if it is calcareous and thick. Peeling pieces can be easily removed with a spatula.
Wet
For many years, a wet sponge has remained one of the most popular tools for removing whitewash.
Serious problems
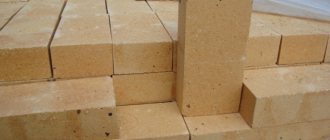
Sometimes the damage to the brickwork is so serious that in order to restore the functionality of the heating system, individual parts will have to be completely replaced. Most often, craftsmen have to change the lining of the firebox, which consists of fireclay bricks.
If there are serious faults, you should entrust the repair to specialists
If the damage is not global in nature, then you can cope with the task directly through the firebox window. For restoration you need to use a fireproof mixture. All defective areas are carefully covered with it.
In case of serious damage, some of the bricks will have to be replaced. This must be done in the following sequence:
- Prepare the repair mixture in advance.
- Soak and remove the old mortar in the area where the brick will be replaced.
- Remove damaged lining elements.
- Thoroughly clean the vacated areas, moisten them with water and lubricate them with the repair mixture.
- Install new fireclay bricks and carefully seal the seams with refractory mortar.
When replacing individual lining elements, you need to ensure that the new brick is homogeneous with the old one. Otherwise, due to the difference in thermal expansion, the destruction of the furnace protection will continue.
It is possible to completely replace fireclay bricks in a firebox only by completely disassembling the wall. This is a difficult job that should not be performed without experience, as there is a risk of serious damage to the underlying masonry.
Serious repairs also include repairing the chimney and switching the brick stove to a different type of fuel. In the first case, you will have to go through the masonry and re-plaster it. In the second, you will need to completely redo the firebox.
What to do if the cravings are gone?
Repair of brick stoves often begins with the chimney, since it is this that is exposed to both external and internal loads. It was mentioned above that one of the reasons why a stove smokes is the accumulation of a layer of soot inside the chimney pipe.
But why does this happen? The reason for this may be the use of coniferous wood as fuel. Due to the high resin content in wood, combustion products are formed that clog the chimney.
When repairing brick stoves, we often advise completely abandoning pine or spruce firewood, so that the next chimney cleaning will not be needed soon. But if you don’t light the stove at your dacha very often, you can occasionally use coniferous wood. If we are talking about a private home, it is better to take care of the availability of good and safe fuel.
Try to light the stove more often. This will avoid stagnation of cold air in the chimney and ensure good draft.
Furnace repairs are often required due to debris trapped in the pipe. In this case, the thrust becomes insufficient to maintain stable combustion of the fuel.
Solution
Some people hastily begin to repair the stove, dismantling the masonry. We recommend resolving the situation in another simple way:
- Try to light firewood using a piece of old tire or roofing felt, despite the poor draft. Your task is to eliminate the accumulation of cold air inside the chimney. It is strictly forbidden to use gasoline or kerosene to avoid fire.
- Light the wood and close the damper, after throwing about 200 grams of table salt into the fire. Soot will begin to peel off from the inner walls of the chimney pipe and fall down.