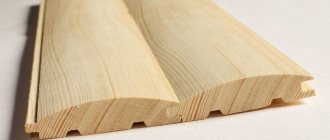
Lining is a popular finishing material, which consists of equivalent profiles with spikes and special grooves for durable fastening.
It is made of wood or plastic and has a smooth surface. Recently, lining has become widespread, because with its help you can sheathe almost any surface, achieving ideal smoothness. In addition, the material has a lot of other significant advantages:
- Easy to install. Even a person who does not have any construction experience can cope with the installation of this material.
- Low price. Compared to many other materials, it is inexpensive.
- Environmental friendliness. Wooden lining is an environmentally friendly material, which is made from wood with high decorative properties. Throughout its entire service life, it retains the properties inherent in wood.
- Natural beauty, pleasant smell.
- Good performance characteristics.
- Large selection of colors and shapes. You can choose lining for any room, be it a living room or a barn.
- Using this facing material you can regulate the humidity inside the room.
Which lining to choose?
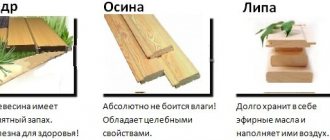
This material can be made from:
- plastic;
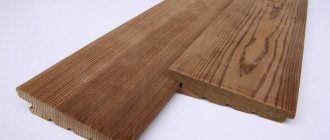
- softwood;
- deciduous wood.
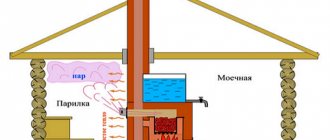
If you intend to decorate a room in which there is high humidity, then it is preferable to use hardwood or durable plastic.
If you are finishing an ordinary living room, then it is better to use pine needle lining. When heated, coniferous wood begins to decompose, which leads to damage to the finish coating, and, as a result, the need for new repairs.
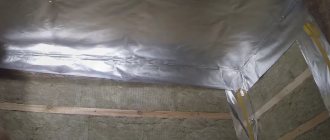
Preparatory stage
At this stage, the lining must be treated with protective compounds that prevent the formation of mold and the development of fungus, the appearance of bluish and black spots on the surface of the material, and they also provide the wood with resistance to insects. Impregnation with antiseptics is an important protective measure that gives the material additional protection and increases the degree of resistance of the lining to adverse environmental factors, such as high humidity, ultraviolet rays, and temperature changes. Such protective substances also increase the fire resistance of the wood base by reducing its flammability.
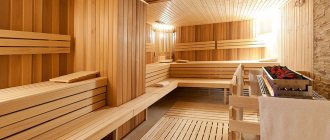
The upholstery material must be soaked on each side and then left to dry completely. The lining is also covered with decorative paint bases to achieve the optimal color effect of the surface. If a colorless protective composition was used, then at the preparatory stage, the material can be coated with stain or varnish. Painting is done in several layers on each side; it is important to cover the entire surface of the workpiece, including grooves, ends and tenons. Applying paint to a horizontal area allows you to achieve its most uniform distribution over the surface, thus avoiding drips and giving the lining an aesthetic appearance. It is not advisable to use paint bases for processing workpieces that will be used in conditions of a combination of high temperatures and high humidity, for example in a bathhouse or sauna, in which harmful vapors are released into the air.
Is it possible to install the paneling yourself?
Yes, you can. The corresponding Internet sites are full of all kinds of photos of lining installation. But to do this, you must first carefully study the instructions for installing the lining. In our article we will try to briefly highlight the main stages.
Technologically, the process is divided into two large stages - installation of sheathing and installation of lining.
Processing and protection
This is the final stage of lining installation, which involves covering the installed material with additional layers of a protective or decorative composition. At this stage (beginning of installation activities), initial antiseptic treatment can also be carried out if it was missed at the preparatory stage.
- Varnish compositions help preserve the original color and texture of wood over a long period of time.
- Thanks to the stain, the required color scheme of the cladding material is achieved; the number of layers of this composition can change the shade of color.
- Impregnation with wax gives the material a certain shine. After its use, the lining can be treated with paints and varnishes.
- Glaze with a UV filter is transparent, due to which the original texture of the wood is preserved and transmitted, and the wax and oil contained in its composition preserve the natural breathable properties of the material.
Lathing for installing lining
Structurally, it is a frame made of wooden blocks, mounted on the walls or ceiling and serving as the basis for fastening the lining boards.
Another important function is the maximum elimination of surface irregularities. You should not use lining without sheathing.
What kind of timber to use for sheathing
It all depends on whether additional insulation of the wall is planned or not. If it is assumed, then the block should be thicker. Mineral insulation boards have a standard thickness of 50 millimeters. This means that the thickness of the bar should be the same.
If insulation is not expected, you can purchase thinner material, limiting yourself to a section of 30X20 or even 20X20.
Stages of lathing manufacturing
During the work you will need to take the following steps:
- purchase the material and place it in the room in which it will be installed for 2-3 days. It must be dry; purchasing lumber with natural moisture is undesirable, since it can “lead” during the drying process;
- make markings. The optimal step between the bars is from 40 to 60 centimeters. If the sheathing is attached to the walls of a frame house, then the block must be attached to the frame posts. Thinner lining requires a shorter pitch between the sheathing elements;
- treat lumber with an antiseptic. This will protect against rotting and harmful insects. It would also be useful to treat it with a fire retardant compound.
- Using self-tapping screws, attach the bars to the walls, carefully checking the location of each level. If there is a need to compensate for the unevenness of the wall, this should be done using plywood backings or pieces of the block itself.
Do-it-yourself lining installation (step-by-step instructions)
This operation also takes place in several successive stages:
- acquisition of material;
- acclimatization of the material. To do this, it must be kept for 2-3 days in the room in which it is intended to be used, so that the wood gets used to the microclimate;
- direct installation. The process usually starts from one of the corners of the room; if the ceiling is being sheathed, then from the window. Each subsequent board is driven into the groove of the previous one so that its ridge is not visible. This must be done very carefully.
To ensure that the board fits perfectly into the groove, you need to use a wooden or rubber mallet. It should not hit the board itself, but through a special spacer, which can be a piece of clapboard or a small strip. It is advisable to control the position of each board using a level.
Types of nails
The main criterion when choosing nails is the type of protective coating. Not only the appearance, but also the durability, as well as the cost of fasteners, depends on this.
| Type of nails | Description | Application |
| Steel nails without protective coating. They are the most inexpensive, but are susceptible to corrosion | Used exclusively for finishing dry rooms | |
| Coated with a thin layer of zinc 6 microns thick. This is the most popular type of nails, because at a low cost it is highly resistant to corrosion. | Suitable for finishing all types of residential and industrial premises, as well as structures not exposed to direct contact with moisture | |
| Products coated with brass are absolutely not subject to corrosion and have high aesthetic properties. They have a spectacular golden hue and are distinguished by the highest price | They can be used in any conditions, but due to their cost they are most often used when finishing with expensive materials, where the main emphasis is on the decorative and aesthetic appearance of coatings | |
| They have excellent anti-corrosion properties and have a pleasant silver-mirror shine | They are used for fastening platbands, coverings with increased decorative requirements, as well as for assembling furniture | |
| Nails with a bronze coating are not subject to corrosion, and thanks to their dark color with a greenish tint, they become completely invisible in the wood. They are distinguished by greater weight compared to other types and a fairly high price | Used for finishing wet rooms, open terraces, balconies, door and window openings |
Prices for nails for air guns
Fasteners for lining (types)
A separate issue is the choice of fasteners. The simplest and most common option are finishing nails, sold at any hardware store. They have a reduced cap and a very small thickness, which allows them to enter the tree without destroying its fibers. But they have significant disadvantages - in case of an error, it is almost impossible to pull out such nails without damaging the material; they cannot withstand heavy loads.
Sometimes the lining is fastened with self-tapping screws. They require preliminary drilling of holes. A significant drawback is that their hats will be visible.
The most optimal type of fasteners are clamps. This fastener is a bracket that is attached to the sheathing with nails or screws. The hooks of the clamps reliably fix the lining, while allowing you to completely hide all fasteners. Their main advantage lies precisely in this. The main disadvantage is the relative high cost.
Option 2 – use of clamps
Let's figure out how to fasten wooden lining using clamps. This is the name for special staples that are placed on the tenon of the elements and secured with nails.
For lining, option No. 4 is used, and for block house and imitation timber - No. 5.
The products are sold in packs of 100 pieces and cost 40-50 rubles per pack, carnations are included
Instructions for doing the work yourself include the following steps:
- STEP 1: First, calculate the number of fasteners. You need to multiply the number of ribs of the structure by the number of lining panels. For example, it is better to attach the lining to the ceiling to each element of the sheathing so that it does not sag over time. If you are covering the walls with clapboards, then to save money you can not use them on every edge of the frame. But their cost is so low that it’s not worth saving.
The photo clearly shows how fastening is done using clamps
- STEP 2: Fasten the paneling vertically. The location of the clamps does not matter when the elements are arranged vertically, but if the finishing is located horizontally, then they should be at the bottom.
It is important to position the fasteners correctly
- STEP 3 : The lining is put in place, fits well with the previous element, after which clamps are placed and secured with small nails. To make it more convenient to hammer them in, use a spacer - the lining may lose its appearance under hammer blows.
Advice! If you want to ensure higher fastening strength, then instead of nails you can use self-tapping screws to attach the clamps. The best option is 3x20 mm.
Clamps can also be screwed on with self-tapping screws
How much does it cost to install lining?
The price for installing lining varies depending on the region and can reach several hundred rubles per square meter. Therefore, the best option would be to install it yourself. In this case, you will only have to pay for the material itself and for the fasteners.
Lining is a modern and very beautiful finishing material. If wooden lining is used, environmental friendliness and aesthetic pleasure from the perception of the natural structure of wood on the walls are added to the positive properties.
Any home craftsman can install it on walls or ceilings, provided that all technological steps are strictly followed and carefully.
Option 3 - use self-tapping screws
If you are thinking about how to fix the lining to the wall as securely as possible, then self-tapping screws are best. Their use is associated with some difficulties, but the strength of fixation will be maximum.
If necessary, the finish can be disassembled without damaging it, which is also important.
For work, fasteners of small thickness are selected.
The work process in this case looks like this:
- STEP 1: In the groove connection of the lining, holes are drilled at an angle of 45 degrees with a 3 mm thick drill;
- STEP 2: The element is placed on the sheathing, tightly joined, after which a self-tapping screw is screwed into it.
The work should be done very carefully: the cap should sink into the material so as not to interfere with the joining, but at the same time you should not press too hard so that the wood does not crack.
In this case, accuracy is important.
What to attach the PVC lining to - in this case, all the above options are suitable. In addition, you can use a simpler option - a construction stapler, it is perfect for plastic.
Before attaching PVC lining, stock up on a stapler and staples