A bathhouse is a functional building that combines special sections for health procedures, relaxation and rest. A separate room that requires close attention when arranging is the washing room in the bathhouse.
How a bath sink is designed and what available materials should be used to decorate the interior in order to create optimal conditions for procedures are questions that are of interest to many.
Advantages of the washing compartment
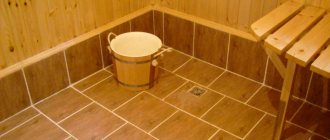
The washing compartment in the bathhouse is arranged in a separate area, fenced off from the steam room, dressing room and relaxation room. In small baths, all rooms are combined, and the washing area is separated from other functional areas by a decorative partition.
The combined option of a washing compartment with a steam room provides significant space savings, but makes the room less convenient to use.
The advantages of a separate sink include:
- the ability to create a unique and practical interior;
- possibility of accommodating a large number of people;
- the possibility of using wear-resistant and durable materials for internal lining;
- simplicity and accessibility of washing machine maintenance.
In a small-sized private bathhouse there can be two rooms: in one there is a dressing room with a relaxation area, in the other there is a steam room with a sink. A stove for a bath and an area for storing bath accessories are located in the steam room, a shower and benches for relaxation are located in the washing bath.
This design has some advantages, including:
- Economical consumption of fuel material for heating combined rooms.
- A laconic and practical interior, when a heater with an extended firebox can be installed in a steam room and washing room. This will provide simultaneous heating of the premises and hot water supply.
Ventilation
Before you start using any bathhouse, you need to take care of a high-quality ventilation system. There are two types of similar systems that are relevant for wooden showers:
- Natural - two windows located at different heights. Through one, the flow of fresh air enters the room, through the other it is discharged outside.
- Forced - the design resembles a natural system, but a fan is installed at the exhaust vent, which speeds up the process of air circulation in the room.
The second ventilation option is suitable for large showers. The first is sufficient for small buildings.
Requirements for the washing department
Distinctive features of a washing room in a wooden bath are changes in temperature conditions and high humidity, which leads to the creation of comfortable conditions for long-term visitors.
For this reason, such a department must have a reliable ventilation system for good air exchange.
The results of insufficient ventilation are overheating of the body, the appearance of mold and mildew, and the concentration of unpleasant odors and moisture.
The washing room in the bathhouse must meet the basic technical requirements:
- Equipped with forced ventilation of supply or natural type with an air duct pipe. The pipe is equipped with protective flaps to regulate the air flow.
- The air pipe is brought out through a special hole in the ceiling to the roof.
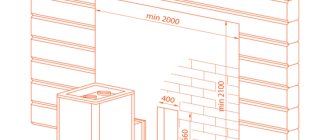
- Installation of the supply pipe 200 cm above the soil level.
- Arrangement of hot and cold water supply systems.
- Carrying out various types of massage using bath cosmetics. For this purpose, a standard massage table or trestle bed is installed in the department.
Hot water options
A shower in a bathhouse needs not only cold, but also hot liquid. The type of equipment depends on the frequency of operation of the steam room and the technical features of communications. Among the popular designs there are 5 models.
Stove heating
Hot water is obtained from a heater designed for use in a bathhouse. Cold moisture entering the heat exchanger heats up and passes into the storage tank under high pressure. When you open the tap, warm liquid flows to the shower faucet.
Stove heating for shower Source texnotoys.ru
During consumption, users must ensure a constant supply of cold water. Comfortable conditions are only available when the stove is running. If there is no electricity in the bathhouse, then a hand pump or motor pump can be used to supply moisture.
Gas
In an area connected to a centralized supply of blue fuel, you can install a column. A flow-type gas heater quickly heats water for a shower in a bathhouse and does not depend on the availability of electricity in the steam room. To install the equipment, follow the operating rules.
Gas shower heater Source master5.kiev.ua
Features of finishing material for washing
The washing room in a wooden bath is practically not subject to heating, but is in contact with water, which eliminates the possibility of using wood for interior decoration. To maintain the overall design of the premises in a bathhouse made of timber, you can use its high-quality imitation.
When choosing materials for the interior decoration of the washing compartment, the following parameters are taken into account:
- resistance to high humidity;
- environmental safety;
- practicality and durability;
- convenient and affordable installation;
- ease of maintenance;
- price.
The most popular finishing materials include wood, tiles, stone, paint, and plastic.
According to their purpose, they are divided into types: for finishing floor, wall and ceiling surfaces. Each of the available options has its own advantages and disadvantages.
Water supply installation
The simplest, cheapest, but also not very convenient way is summer water supply. To install it, you need to lay hoses along the entire area from the water supply point to the bathhouse. At the same time, the hoses will need to be cleaned every winter to prevent them from cracking. This is a “cheap and cheerful” option. Winter water supply is much more convenient - after all, there will be water in the bathhouse and shower all year round. However, its price increases noticeably with the previous version. The arrangement of the winter option includes the installation of pumps, a lot of excavation work on the site, pipe wiring, and so on. However, in practice it is clear that summer water supply is a kind of “transfer point”. And people sooner or later still switch to winter. And if water is already supplied to the room, it needs to be heated.
Heating from the sauna stove
This is an ancient method that was used long before the advent of electricity. Its essence is to install a special tank of water directly above the stove. This design can be built-in or remote. The water from the tank is gradually heated by the burning wood, after which it is distributed partially into the shower room and separately into the steam room. This method is used today by true connoisseurs of the Russian bath, who want to adhere to traditions in everything. If you don’t like it, feel free to choose a more progressive method of heating water for a bath - using a boiler.
Wooden panels and lining
Wood is the most sought-after and popular material used for decorative cladding of wall and ceiling surfaces. Finishing a bathhouse sink with wooden panels and lining is the best choice for those who want to get an original interior style.
Due to the high content of resin compounds, the wood is resistant to high humidity, drying out and rotting.
With additional treatment of wood with protective paints, natural oils and wax, the service life of the material is doubled.
- Oil compositions are able to penetrate deeply into the wood structure and reliably protect it from the inside. Before processing, the wooden base is thoroughly cleaned and sanded. The oil is applied evenly in several thin layers. After drying, the surface becomes resistant to the negative effects of moisture.
- Wax is an alternative option for protecting wood, more expensive and durable. It is applied in a circular motion using a piece of soft cloth. Wax is capable of creating a thin film that protects the surface from darkening, drying out and rotting.
- Paints with moisture-repellent properties are used to treat wooden surfaces. They come in matte or glossy. The paint is evenly applied to the surface to be treated with a soft brush in 2-3 layers and left until completely dry.
Finishing a shower room in a bathhouse with clapboards or panels can be made from the following types of wood:
- Larch is a material with high performance characteristics. It is strong, durable and resistant to high humidity. Despite the difficulty in pre-processing, such wood has incredible beauty and aroma.
- Linden is a wear-resistant material that can be used for high-quality sheathing of a sink. It is resistant to darkening, drying out and rotting, and also exudes a pleasant medicinal aroma.
- Cedar, pine and spruce are wood species that are widely used for cladding ceiling and wall surfaces. They are impervious to heat and high humidity, and have a pleasant pine scent.
- Abashi is an exotic wood that is distinguished by its delicate texture and aesthetics, and is resistant to deformation and damage.
Wood finishes can be combined with decorative elements made from natural or artificial stone.
We insulate the bathhouse from the inside: what do we need?
Any construction, repair and finishing activities begin with the preparation of materials, without which the implementation of the planned work will simply be impossible
Pay due attention to studying the list below: it is better to spend a little time reading and immediately buy everything you need, than to later return to the store and buy more of what you forgot
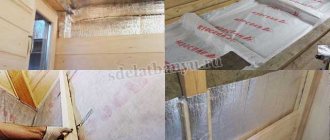
Insulation
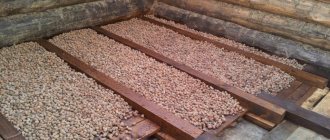
The main component of the list under consideration. The modern market offers a wide range of thermal insulation materials, but not all of them are suitable for use in a steam room - humidity and temperature may be too much for you. To insulate a bathhouse, the following are most often used: expanded clay (floor insulation), materials based on stone wool, and expanded polystyrene.
Comparative characteristics of the mentioned materials are given in the following table.
Table. Comparison of popular bath insulation
| Evaluation criterion | Expanded clay Expanded clay | Mineral wool Mineral wool | Expanded polystyrene Expanded polystyrene |
| Structure | Bulk material of natural origin. Presented in the form of granules with a cellular structure. | Fibrous structure. The arrangement of fibers is both vertical and horizontal, disordered. | Open cellular structure. |
| Moisture permeability | The material does not allow water to pass through. | Mineral wool insulation has virtually no tendency to absorb moisture. | Moisture permeability is extremely low. |
| Weight | Easy | Medium-light | Easy |
| Strength | High | Average | Average |
| Compression resistance | High | From low to medium, depending on the specific type of material and manufacturer technology. | Average |
| Toxicity | The material is safe | No toxic properties | Over time, it begins to release harmful substances |
| Possibility of use under high load conditions | Suitable | Depending on the brand of material | Not suitable |
| Tendency to decay | The material retains its original integrity for a long time | Durable insulation | Has a tendency to decay |
| UV resistance | Does not react in any way to exposure to sunlight | Characterized by high resistance to ultraviolet radiation | Prolonged direct contact with sunlight has an extremely negative impact on the performance characteristics of the material. |
As noted, expanded clay is suitable for insulating bath floors. Bulk material allows you to provide the required thermal insulation of both wooden and concrete structures. Mineral wool insulation is optimal for insulating both walls and ceilings. The best option, as noted, is a thermal insulation material based on stone wool, equipped with an additional foil coating - the key characteristics of such insulation at a higher level.
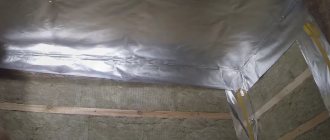
Foil tape
Foil tape
In accordance with the current provisions of the technology for carrying out the work in question, the joints of the insulation boards must be glued with foil tape. This will create a sealed surface with the highest possible thermal insulation properties.
Wooden blocks
Wooden blocks
The elements of the thermal insulation coating are placed in the cells of a pre-assembled sheathing, for the assembly of which wooden blocks are used. Select the section of the beams in accordance with the thickness of the thermal insulation. For example, if you are installing a 10-centimeter thermal insulation layer, use bars with a similar thickness or width to assemble the frame.
Choose the distance between the bars 1-2 cm less than the width of the slabs or roll of insulation. For bulk materials, the optimal distance between the bars is 45-60 cm.
Fasteners
Fasteners
The sheathing elements (bars) are fixed using dowels/screws (if the surface is wooden) or anchors (if the base is stone). The length of the fasteners is also selected in accordance with the base material: for wood - 2-2.5 cm, for permanent structures - from 4 cm.
Additional materials
If you insulate a bath using a material other than foiled mineral wool, you will additionally have to purchase a water vapor barrier film.
Vapor barrier
If you plan to pour a concrete screed, the set for work will increase to include the following items:
- reinforcing mesh;
- mixture for pouring the screed or materials for preparing it yourself (cement, sand, water);
- lighthouses;
- damper tape;
- polyethylene.
Ceramic tile
Tiles are wear-resistant, strong and durable materials that have high moisture-resistant properties. It is distinguished by a wide range of colors, texture and size variability. Floors and walls up to 1.7 meters high are tiled.
Before tiling wooden walls, the surface is thoroughly cleaned, a layer of waterproofing is installed and leveled. A moisture-resistant adhesive composition is used to lay the tiles.
In order to properly tile the floor, it is necessary to properly arrange the drainage hole and make a concrete screed. The base is made at a slight angle with respect to the drain hole connected to the sewer pipe.
Tiles have important advantages:
- resistance to high humidity;
- high strength and wear resistance;
- environmental safety and durability;
- resistance to fading and darkening;
- ease of maintenance;
- wide range of colors.
The disadvantages of the finishing material include:
- slippery surface that can lead to injury;
- the difficulty of doing installation yourself (practical skills and knowledge are required);
- susceptibility to mechanical damage.
The ceramic tile finish is successfully combined with natural moisture-resistant paint.
How to make a “leaky floor” with your own hands
You need to dig a hole equal to the size of the area from which the liquid will drain. The depth of the hole should be greater than the freezing level of the soil. It is best to strengthen the walls of the pit with concrete mortar. This will protect them from collapses. The bottom is filled with a dense layer of crushed stone, gravel, and sand. After filling, each material must be thoroughly compacted so that it does not wash out.
This option is suitable for sandy soils. If the bathhouse is located on clay and peaty soils, and it is also rarely used, choose a slightly different type of drain - a “leaky floor” with a barrel.
How to make such a drain yourself
| Stages of work | Subtleties |
| First, a hole is dug equal to the diameter of the area from which water will flow into it. | The bottom and walls of the pit are filled with concrete mortar. |
| A hole is made in one of the walls for a sewer pipe. | It will run underground under the soil freezing line. |
| A longitudinal sewer barrel with a volume of 200-300 liters is buried a few meters from the bathhouse. | At the bottom of this barrel, you need to pre-drill holes with a diameter of 0.2–0.25 cm. Through these holes, the incoming water will gradually exit into the ground. Another hole in the barrel is intended for connecting a sewer pipe. |
| The barrel and the pit under the bathhouse are connected by a pipe. | When water enters the hole, it flows through a pipe into a barrel, from where it is gradually discharged through drilled holes. |
The cesspool is very similar in principle to the drainage system mentioned above. It is advisable to install it in cases where a bathhouse with a shower will be actively used by a large number of people. But then, instead of a “leaky floor”, it is necessary to install a full drain. This point should be thought through before you start building a bathhouse.
Artificial and natural stone
Finishing the sink with stone is a practical and durable option. The material is suitable for cladding floors and wall surfaces up to 50 cm in height. An excellent solution for finishing a shower is a combined masonry made of natural and artificial stone.
Natural stone has a number of advantages:
- high environmental friendliness and safety;
- practicality and durability;
- inertness to mechanical damage;
- resistance to high humidity;
- attractiveness and aesthetics.
Among the disadvantages are:
- heavy weight;
- the difficulty of doing independent masonry;
- high cost.
An alternative to expensive natural stone is its artificial counterpart. It is less environmentally friendly, but at the same time lightweight and easy to install.
How are the baths decorated?
A variety of materials are used for finishing the interior decoration of baths, but most often:
- tree;
- a natural stone;
- and ceramic tiles.
However, natural stone or tiles are unlikely to be useful for cladding a small private bathhouse in a suburban area, since the losses will be too great. After all, in order for the stone to truly “breathe”, it will be necessary to install a complex ventilation system and raise the ceilings by 4-5 meters. In a private household, it is almost impossible to arrange this. Therefore, the only material suitable for interior decoration of a bathhouse on a personal plot is wood. Although the structure itself can be made of brick, foam, and gas blocks.
It is very expensive to invite professional finishers to arrange a bathhouse. And no more than 20-25% of the final amount will be spent on materials. Therefore, it is more profitable to do the finishing of this room yourself. Technically she should:
- eliminate the risk of injury (burns, falls on slippery surfaces, splinters, scratches, etc.);
- quickly absorb and gradually release + retain heat well after heating;
- will last a long time, despite cyclical heat shocks and high humidity;
- be visually and tactilely pleasing.
And the finishing should not emit fumes harmful to human health (including at temperatures of 70-90°).
Plastic panels
Finishing a washing room in a wooden bath using PVC panels is an affordable and cheap option. This material is characterized by high moisture resistance, practicality and ease of installation. It is used for cladding ceiling and wall surfaces. Thanks to the wide range of models and variety of colors, you can choose the most suitable option for cladding wall and ceiling surfaces.
The walls and ceiling in the washroom, lined with plastic panels or lining, can look quite presentable.
The advantages of the material include:
- affordable price;
- practicality;
- resistance to high humidity;
- easy installation on a wooden grid or adhesive base;
- attractive appearance.
PVC cashing has some disadvantages:
- susceptibility to mechanical stress;
- tendency to darken and burn out;
- short service life;
- low environmental friendliness.
Important! Plastic panels are installed after installing waterproofing on wall and ceiling surfaces. All work is carried out only after the finished bath has shrunk, in order to prevent distortion and violation of the tightness of the lining.
Installation of a shower stall
A modern washing room in a wooden bathhouse cannot function normally without at least one shower stall. Basically, standard booths with dimensions of one meter by meter, one meter and two meters are installed. To drain used water, siphons are installed in the floor under showers, which are sometimes supplemented with trays to allow water to flow directly into the drain pipes.
Any specialized store offers a huge assortment of shower stalls. They fully comply with all sanitation and hygiene standards, and are also easy to use; the only drawback is their fairly high cost.
Modern shower stall in a wooden bath
If it is not possible to purchase a ready-made booth, then you can make it yourself:
- the corner in the washing room is surrounded by a low wall made of plywood or plasterboard;
- the corners are finished with ceramic tiles;
- a large tray is used as a base - this is where the flushed water will flow;
- if necessary, the pallet is reinforced with a wooden or concrete frame and connected to the sewer system;
- Removable unscrewing legs are attached to the bottom of the pallet (for the ability to adjust the height).
Homemade shower stall
Now let's move on to examining the design of the door that leads into the stall. There are no special requirements for its design; it is quite easy to implement. Basically, doors are represented as a metal or plastic frame and a sheet of ordinary plastic attached to it with hinges.
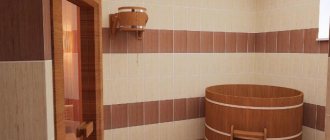
If desired, you can install a bathtub in the washing room, but it will have to be combined with a shower stall. At the same time, it should not be open; you need to surround it with a special sliding wall made of durable plastic.
Important. After each water procedure, the bathtub and shower stall must be thoroughly washed and ventilated to prevent mold.
Making a brick partition
The partition in the bathhouse between the steam room and the sink can also be made of brick. Here it is better to use ½-brick spoon masonry (or, alternatively, a whole brick). Such a structure will weigh quite a lot, so to lighten it, you can use hollow bricks.
Making a brick partition
Stage one. Preparation
Before starting work, it is necessary to prepare all working surfaces. The plank covering is removed from the floor all the way to the foundation, then everything is cleaned with a wet broom. Next, the workplace is equipped with good lighting, all items that are not needed for work are removed from the room. The contours of the structure are outlined.
Stage two. Solution
To work you will need the following equipment:
- sieve;
- Sander;
- shovel;
- mixing tank.
Tools for work
Step 1. First you need to sift the sand to clean it from foreign objects. A sieve is constructed from a fine mesh chain-link mesh and 4 beams. The sand is carefully sifted.
Sifting sand
Step 2. Next you need to take care of the mixing container. It can serve, for example, as an old iron barrel, cut lengthwise into two parts. The barrel is firmly installed for ease of operation.
Step 3. Mixing proportions – 3:1. First, you should fill in six buckets of sand and two of cement. Water is added and the solution is mixed with a shovel. This volume of solution is enough for about an hour of work.
Step 4. The solution is mixed to the consistency of thick sour cream. At the end of kneading, it will begin to harden and shrink, but there is no need to add water - just stir it once every 15 minutes.
Stage three. Construction
For this stage you need the following tools:
- level;
- pick;
- trowel;
- plumb line;
- rule.
| Step, No. | Description | Illustration |
| Step 1. | The string is stretched - it will serve as a guide. The solution is laid and leveled with a trowel, and the horizontalness is checked. Then you need to wait a little for the solution to set. | First row - diagram |
| Step 2. | Another layer is applied on top of it and the laying of row No. 1 begins. | Second row |
| Step 3. | The first brick with mortar applied to the end is laid on the surface and pressed against the wall. Next, the brick is tapped and leveled with twine, and excess mortar is immediately removed. | Bricklaying |
| Step 4. | If a doorway is planned (and most partitions have one), then it needs to be set in advance. Using spacers, you should install the door frame. It is checked for horizontal/verticality and, if necessary, its position is adjusted. | Laying a brick partition |
| Step 5. | The brick is laid close to the box. To tie the partition to it or to wooden walls, metal strips are used: they should be bent and screwed to the side surfaces so that they (the strips) are between the bricks; You can also use reinforcing bars. | Door frame |
| Step 6. | At the end of laying row No. 1, the brick is broken into two parts using a pick. The second row begins with one of these halves. The string stretched horizontally is carried higher to make it easier to navigate. The third row begins in the same way as the first. | Laying brick partitions |
- Every five rows, steel strips or pieces of reinforcement are placed in the seams - this will strengthen the structure.
- The structure is tied to the walls with steel strips, and auxiliary reinforcement can be used for the door frame (ideally, this should be a channel of the appropriate size).
- The gap formed between the ceiling and the wall is filled with small pieces of bricks previously soaked in concrete. The pieces need to be pressed as tightly as possible to each other. All cracks are sealed with tow, also treated with cement mortar.
Good advice
- If you plan to plaster the partition, then when laying it you don’t have to put too much effort into the quality of the seams.
If a brick structure serves as a design element, then the seams must be neat, so excess mortar must be removed in a timely manner. Plastering a brick partition - If the partition is to be plastered, then it is quite acceptable to use even used bricks - this will significantly reduce costs.
- If any communications must pass through the partition, it is recommended to use a piece of pipe of the appropriate diameter for this purpose. The pipe is lined with brick, but is not attached to the structure with mortar - this way, in the event of any changes, the masonry will not be disturbed. The voids formed between the trim and the masonry are blown in with polyurethane foam.
Waiting room
The room is not hot, but retains heat. Therefore, coniferous species will be an excellent material for finishing here. Their noble aroma is not only pleasant, but also incredibly useful. Phytoncides have a beneficial effect on the immune system, stimulate the body's resistance to various infections and improve overall well-being. Let's look at the main types:
- Pine is a very popular material for dressing a dressing room, because it has a number of advantages: economical, durable, environmentally friendly and quite durable. May change color slightly over time, acquiring a reddish tint. Scandinavian pine with smooth pinkish wood is becoming increasingly popular. Its annual rings have an original decorative pattern;
- spruce – has a uniform structure, does not crack when drying, and is slightly lighter in color than pine wood;
- fir - the main characteristics are almost the same as spruce, while almost no resin is released from its wood.
Birch is a good option for a deciduous tree for a dressing room. In any case, when decorating, the main thing is to follow the basic rule - the entire room should be paneled with the same type of wood.
Design of a sauna with a swimming pool
If the dimensions of the room in the house allow, it is worth adding a swimming pool to the sauna. This will give you the opportunity to plunge into coolness after the heat of the steam room, which is good for your health. Both rooms are interconnected in interior terms, usually by flooring.
If you have decided on the area for a home sauna, you need to decide how many people the steam room should accommodate at the same time.
The inside of the sauna is made of natural wood without additional varnish treatment. For a room with a swimming pool, tiles, mosaics or stone are suitable. The palette of both rooms can be made uniform by choosing a suitable shade of wood.
For one or two people you can get by with a sauna cabin, for a family holiday you need a larger area, to receive guests you need to take care of a relaxation room, in addition to the steam room in the sauna.
Country holiday
To install a new structure for a steam room, you must select a free area. The specific criteria for allocating a plot of land are determined solely by the owner himself.
For example, those who are predisposed to colds prefer to place a bathhouse closer to a residential building.
With all this, you don’t want the bathhouse to be located next to a place of discharge of natural needs (unless, of course, you have a septic tank) or a garbage pit.
Often, users prefer to place the bathhouse adjacent to the main building, ensuring the proper level of heat and vapor barrier.
Bathhouse at the dacha: photo
Another direction in planning the site for installing a building for a bathhouse comes from geological research data. Of course, if the layout of a 4x6 bathhouse involves the creation of drainage for water disposal, then the requirements for soil quality may not be so high.
Bathhouse design: photo of the location of the sink, steam room, relaxation room, bathroom and terrace
Often, a traditional project does not involve the creation of a special sewer system; in this case, a reinforced foundation is planned and a place with a low groundwater level is selected.
Areas of high moisture accumulation are usually excluded from the 5x6 project. In this case, it is necessary to maintain distance from the following objects:
- from the well - at least 5 meters;
- from the toilet and garbage pit - at least 8 meters;
- from a residential building - at least 8 meters.
If you are really lucky and your site is located close to water, it makes sense to install a bathhouse with access to a body of water. In this case, the issue of planning and installing the pool is removed; immediately after the steam room you can plunge into the cool water of the lake.
When the issue with the location is resolved, it is worth thinking about the project itself. The plan reflects such parameters as the number and purpose of premises, the size of the steam room and washing departments, the presence of additional compartments, and the number of floors.
Contrary to current stereotypes, a bathhouse project is expensive. This is true if you purchase a construction plan from a construction company. However, no one prohibits the use of template developments. In this article we provide the necessary drawings and diagrams, according to which you can develop your personal design for the location of functional elements.
For example, the layout of a 6x4 bathhouse can be easily obtained proportionally from a project of another multiplicity, where the sink and steam room will be located separately or adjacent.
Lighting
Lighting is recommended to be diffused. It does not strain the eyes and encourages relaxation. The best option: a competent combination of natural and artificial lighting. There are always windows in the rest room, so they are kept open during the day so that soft sunlight can easily enter the room. At night, spotlights scattered around the perimeter, a ceiling chandelier and a couple of sconces on the walls in the area of accent zones are used. It is not recommended to choose heavy-duty or neon lamps. The former do not promote relaxation, while the latter provide cold, uncomfortable light.