The complete door set includes the door leaf, frame and hinges. It can be difficult to purchase a ready-made complete set, so there is nothing left to do but make a door frame with your own hands from profiled timber or entrust this task to specialists. The box, most often, has to be selected separately, and it is not a structure ready for installation, but several elements that need to be adjusted in accordance with the size of the opening, the necessary cuts made and assembled. It is not so easy to assemble a door frame with your own hands, so in addition to tools, it would be nice to have at least a little carpentry skill.
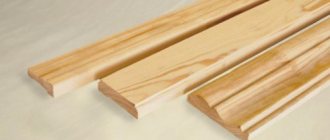
Door frame material
MDF wood
The box serves not only as a frame for the door leaf, but also as a load-bearing base. The strength of the entire structure and its durability depend on the quality of the material and installation of the product. The choice of material depends on the purpose of the door and the material of the leaf itself. Metal-plastic and metal doors are usually supplied fully equipped, so we will consider only those cases when the door frame has to be manufactured independently. As a rule, in this case we are talking about two types of material: wood and MDF.
- Natural wood has different densities and is graded into soft and hard. The cheapest and most popular product is pine, but when it comes to installing entrance doors, you should focus on a harder and more expensive type of wood, for example, oak. It will ensure durability, strength and reliability of the structure.
- MDF is used exclusively for interior doors. If you are going to assemble a box from this material, you should treat all cut edges with nitro varnish to ensure protection from moisture.
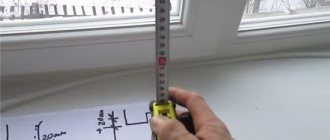
Measuring algorithm
To save on measuring, you can do it yourself. To do this you need:
- first you need to clean the walls from the door and frame so that the change is accurate;
- then you need to measure the distance from the top of the opening to the floor in the 3rd place (right, middle, left);
- then determine the distance between the walls (top, middle, bottom);
- For high-quality installation, the thickness of the door leaf of an interior or entrance door is important, not exceeding the opening. Therefore, measure the wall thickness on each side or the box with the addition of a protruding wall.
Don't miss: Finnish doors: what are their features and advantages?
Important! If it is impossible to remove the frame or door, measurements are taken along the edges of the trim.
After measurements, you need to record the largest results obtained. This will allow you to avoid making mistakes when ordering frames and doors.
Equipment and standard sizes
The door frame consists of several slats: two side, top and bottom, if the design includes a threshold. If the depth of the doorway exceeds the corresponding parameters of the timber, your kit must be supplemented with extensions that will increase the depth of the box.
Standard door block sizes vary in width and height. The correspondence of the parameters of the door leaf, block and opening is indicated in the table.
Do-it-yourself door frame assembly is carried out taking into account the following points:
- There should be a technological gap of 3 mm wide between the inside of the frame and the door leaf along the entire perimeter.
- The gap between the wall and the top of the box must be at least 20 mm.
- The gap between the side planks and the wall is 10 mm from each side. When installing on polyurethane foam, it is necessary to increase the gap to at least 20 mm.
- The gap between the bottom of the sash and the frame or floor depends on the material and location of the structure. For dry rooms, these parameters can vary between 5–15 mm, for wet rooms, in order to ensure ventilation, - 50 mm.
Box fitting
We fix the position of the door frame with previously prepared wedges (spacers) made of wood, achieving a vertical position in level. Initially, the wedges must be installed on the side of the vertical beam already attached to the end of the wall, to which the curtains will be attached, and on the horizontal upper beam.
We fill the free space between the frame and the wall with foam (from the inside of the doorway). We wait until the polyurethane foam hardens.
Options for connecting structural elements
The main difficulty in assembling door frames is the process of connecting individual elements. The joining of horizontal and vertical strips of the product can be done in two ways:
- I washed it down at an angle of 45 degrees. This process is best done with a miter saw, but in the absence of one, a miter box will do.
- At a right angle of 90 degrees. To cut the workpiece you will need a saw with fine teeth.
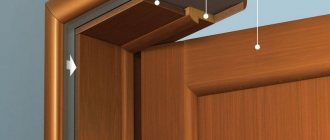
The joining of the planks is carried out using tenon joints or galvanized self-tapping screws. The figure shows options for tenon joints, which clearly show how to assemble the door frame yourself to ensure high strength of the joints.
When calculating the parameters of the length and width of the profile slats, it is necessary to take into account that the length of the tenon should be equal to the thickness of the box beam. The tenon joint provides sufficient strength to the finished structure, but if desired, additional reinforcement of the joints can be made with zinc-coated nails.
Required Tools
To make a removable box for pipes in the toilet, you will need:
- galvanized metal profile for framing;
- dowel-nails for fixing guides on the surface of the walls;
- a laser or regular building level is used for marking work;
- Serpyanka or reinforcing tape is used to securely connect plasterboard sheets;
- stationery knife;
- a screwdriver and screws or self-tapping screws for securing finishing materials to the frame;
- perforator;
- putty and spatula;
- electric jigsaw;
- tin snips or a grinder with an abrasive disc are used to cut the guides.
Door frame assembly process
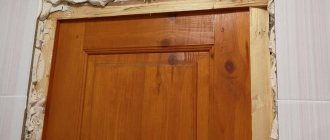
Let's look at how to properly assemble a door frame . As a starting material, we will need profiled timber made of natural wood or MDF.
The box is assembled in the following order:
- We check the parameters of the width and height of the opening. To install the box, you need to leave a gap of about 3 cm. Using a hydraulic level, we control the horizontalness of the floor covering in the corners of the opening.
- The canvas and timber of the frame must be laid out on a horizontal surface so that the outer part (the vestibules) is turned upward. The sash must be in the same plane as the beam. If the depth of the slats is greater, then it is necessary to level the planes by placing several layers of cardboard or books under the canvas.
- To ensure an even gap between the canvas and the timber, cardboard or pieces of old linoleum can be laid around the perimeter.
- Use a sharp pencil or awl to mark the control points and saw off the extra section of the crossbar in accordance with the chosen pattern.
- Since you have to work with profiled timber, the convex elements of the vestibule will interfere with the transverse joining. To get a smooth plane, you first need to mark the edges of the cut with a sharp object. Accuracy of measurements and careful work are very important here, since the slightest mistakes can ruin the appearance of the structure. The cut is made with a tool with fine teeth. Once the desired depth is reached, the remaining excess material is removed with a chisel.
- Now we lay out the prepared bars around the canvas to mark the location of the loops. To do this, measure 203 mm from the top and bottom of the vertical beam. This is the standard hinge mounting height, plus 3 mm for the gap.
- Next, we attach the hinge card with two screws in accordance with the markings, and mark the shape of the fastening. Now you need to make a recess corresponding to the thickness of the card.
- We fix the hinge flags with self-tapping screws in the prepared recess. Installation of the lock strike plate is carried out after installing the box and hanging the door leaf to prevent discrepancies.
- Now all that remains is to make sure that the structural elements are perpendicular and fasten the top crossbar to the side posts.
- If the design includes a threshold, it is customary to attach it to the sidewalls at an angle of 90 degrees. Here, too, it is necessary to carefully remove the quarter to prepare a smooth surface for the joint of the crossbars.
- Before attaching the threshold, you must once again ensure that the entire structure is assembled correctly. Place it on a flat surface, put the canvas in place, make sure there is a gap, move the racks to the desired position, if necessary.
- Now all that remains is to fix the lower cross member and the self-made box can be installed in the opening.
Purpose of the pigtail
A pigtail in a wooden house allows you to simultaneously solve several problems, including:
- Strengthen the walls in the openings. Correct distortions.
- Protect from moisture, seal window and door openings.
- Thermal insulation. High-quality casing prevents heat from escaping outside and perfectly retains it in the room.
- Protect from shrinkage, squeezing, and deformation.
- Give the structure a beautiful look. Moreover, there are ready-made elements for casing doors and windows on sale.
Photo: preparing window openings
In log and frame houses, casing is mandatory. You cannot save on it, otherwise the doors or windows will warp or bend.
What else you need to know:
- How to make a blind area correctly
- Gas holder for a private home
Step-by-step installation process
To secure the assembled frame in the opening and install the doors yourself, you must perform the following steps:
- Install the frame into the opening. To keep it in place, insert temporary spacers made of cardboard or foam plastic between the box and the wall.
- Prepare wedges that will be necessary for final installation and alignment of gaps. For them, you can use waste beams sawn at different angles.
- We begin to wedge the product. First, place the wedges directly under the hinges. They will prevent deformation of the beam when we screw it to the wall. Drive one wedge into each upper corner. To prevent the structure from moving, two wedges will be required from each corner. They are inserted from opposite sides so that the narrow parts intersect.
- Next, we check the position of the frame and each of its elements with a level. The box should be flush with the wall.
- We fasten the sidewall.
- We carry out the final installation of the cover part after we hang the canvas on the hinges. To ensure that the frame holds firmly while we screw the hinges and install the sash, we can partially foam the gap along the fixed side and in two or three places on the hinged part.
Tip: Before foaming, you need to clean the surface from dust and moisten it with water from a spray bottle. These measures can significantly increase adhesion.
- While the foam dries, we install hinges and other fittings on the canvas, then put it in place.
- We wedge the hinged part of the door when the door is in the closed position. Then we secure it and foam the cracks around the perimeter.
Another important condition in order not to disturb the geometry of the frame during the installation process is the use of spacer wedges that correspond to the width of the box and are inserted across it.
The final stage of installation of the frame and door is the decorative design of the opening with platbands.
A screen for communications or how to make plasterboard boxes in the bathroom
After completing the renovation in the bathroom, one final detail remains - a screen under the plasterboard bathtub. Most often it performs a decorative function. You can do it yourself or buy a ready-made and assembled screen in a store.
The finished box in the bathroom has a limited service life. This product quickly breaks down. In addition, among the range of ready-made designs, it is difficult to choose a screen whose design fully supports the appearance of the bathroom.
Bathtub with tiled screen
Making such a design with your own hands, of course, is not easy, but it is much more practical and profitable. And the service life of a bathtub screen made with your own hands from plasterboard significantly exceeds the service life of using store-bought products.
How to properly set up a router
Before you start working with the router, you need to prepare it for work by performing the following steps:
- The router is mounted on a frame, which is fixed to the plane of the door leaf using clamping clamps.
- The main pin, which is responsible for moving the device in the frame, is loosened manually.
Setting up the router
- The required cutter is inserted into the working head of the milling cutter, which is clamped on the collet.
- The cutter with the working head is carefully lowered to the required depth, depending on the type of plane being processed.
- On the scale responsible for the position of the cutter and the depth of the excavation, the position “0” is set.
- The bed clamping screw is firmly fixed together with the router in the selected position.
Router bed position
One of the most important preparatory stages for work is choosing the number of revolutions of rotation of the cutter. This parameter is determined individually, depending on the type of wood. For pine, 2 - 3 thousand revolutions per minute may be sufficient, and for oak or teak, the rotation speed must be doubled.