Handles, Accessories
The charm and aesthetics of wooden door handles are incomparable to products made from other materials. Similar products are used for baths, saunas, for entrance and interior paintings. A wooden door handle is easy to make even for a novice craftsman. Made with your own hands, it will please the eye for a long time and cause pride in your skills.
Wooden handle on the bath door
Accessories and devices for baths
General information
Wooden dishes for a steam room are an irreplaceable thing.
It is generally accepted that the use of wood to decorate a steam room and make all kinds of wooden bath accessories is a kind of nod towards traditions, and the objective reason for the presence of only wooden products is that at the time of the formation of traditions there were simply no other materials.
There is, of course, some truth in this opinion, but everything is not so simple. If we analyze the characteristics of the temperature regime in the steam room, as well as the dynamics of the transfer and distribution of thermal energy, we will see that our ancestors chose the most suitable material for use in such conditions.
A wooden bath handle is an original solution.
So, here are some calculations from the analysis of climatic conditions and processes associated with the thermal regime of the bath:
- The air temperature in the steam room of the bath can reach 80 degrees and above. Due to the low density of air, we do not feel the aggressive effects of heat, but as soon as we touch a material with high density and thermal conductivity, we instantly feel its temperature;
- The most dense and heat-conducting material is metal, so when entering the sauna, always remove metal jewelry. Metal products heat up very quickly to high temperatures, and upon contact with human skin they leave burns;
- Wood is a material with low density and very low thermal conductivity. At the same time, wood is strong and durable enough to be used as a raw material for the manufacture of all kinds of products, including wooden grates for baths, tubs, buckets, steamers, ladles, etc.;
- Even at the entrance to the steam room you can see wooden handles for the bath, since a reasonable person would not handle metal ones;
- Wood lends itself perfectly to processing with the simplest tools. This allows you to create products of incredible beauty: wood carving for a bathhouse can turn any interior detail or accessory into a work of art;
- An equally important feature of wood raw materials is its environmental friendliness. This is most relevant in conditions of high temperatures and high humidity, at which most modern materials begin to release all kinds of chemical compounds into the atmosphere, and this, at a minimum, is not useful;
- Many types of wood have a beneficial effect on the human respiratory and nervous systems due to essential oils and resins, as well as many other compounds contained in various tree species. It is known that conifers have a beneficial effect on the upper respiratory tract, calm the nervous system, increase skin tone and blood microcirculation in it, and strengthen hair;
- Wood can be restored, and proper impregnation and processing of this material extends its service life for decades.
A carved wooden panel for a bathhouse will decorate and enliven the interior.
Of course, in addition to decorations and dishes, wood is used to make bath furniture. Shelves, tables, chairs, stools, even wooden lampshades for a bath - all this can be found in almost any steam room.
Selection of raw materials
Certain types of wood are used to make bath products.
When choosing raw materials for the manufacture of bath accessories, they are usually guided by the following considerations: the material should have a low density if it is used directly in the steam room, since low density reduces the thermal conductivity of the product. In addition, the wood must have a high resin content to better resist the harmful effects of moisture.
To increase comfort during washing, you can use denser products, since high temperatures are not observed in the shower. A wooden bath mat that will prevent you from slipping and falling on slippery tiles is best made from species such as teak, nyato or mahogany. These materials have high strength and the necessary resin content for constant moisture.
Wooden bath furniture is not only beautiful, but also functional.
Linden is most often used to make shelves, benches, chairs and other furniture for the steam room. This material has a very low density, practically does not transfer heat and has excellent resistance to moisture. You can also choose Siberian cedar, larch or Karelian pine.
Wood carving in the bathhouse is performed on panels made of Karelian birch, oak, pine, alder, beech and other species. Here the choice is not so important, since the product performs exclusively decorative functions and there is no contact with it.
DIY Wooden Crosses (1 Dz) - Craft Kits - 12 Pieces - Walmart.com
"," tooltipToggleOffText ":" Toggle the switch to get
FREE Next Day Delivery!
"," tooltipDuration ":" 5 "," tempUnavailableMessage ":" Be back soon! "," TempUnavailableTooltipText ":"
We are working hard to get things up and running again.
- Temporarily suspended due to high demand.
- Keep checking availability.
"," hightlightTwoDayDelivery ":" false ", " locationAlwaysElposed ":" false ", " implicitOptin ":" false ", " highlightTwoDayDelivery ":" false ", " isTwoDayDeliveryTextEnabled ":" true ", " useTestingApi " ", " ndCookieExpirationTime " :" 30 "}," typeahead ": {" debounceTime ":" 100 "," isHighlightTypeahead ":" true ", " shouldApplyBiggerFontSizeAndCursorWithPadding ":" true "," isBackgroundGreyoutEnabled} ":" false " locationApi ": {" locationUrl " :" https://www.walmart.com/account/api/location "," hubStorePages ":" home, search, browse "," enableHubStore ":" false "}," "oneApp" : {"drop2": " true", "hfdrop2": "true", "heartingCacheDuration": "60000", "hearting": "false"}, "feedback": {"showFeedbackSuccessSnackbar": "true", "feedbackSnackbarDuration" ":" 3000 "} "," webWorker ": {" enableGetAll ":" false "," getAllTtl ":"
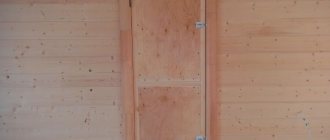
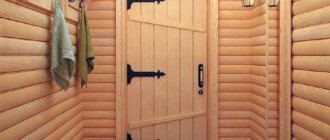
Making a wooden door for a steam room
Let's assume that our bathhouse is a log house. This is the most common and optimal design.
Choosing a door size
The door will be exposed to extreme heat and humidity
It is very important that steam not only does not escape when the door is closed, but also that it escapes to a minimum when people enter and exit. Therefore, the door to the steam room is traditionally made low
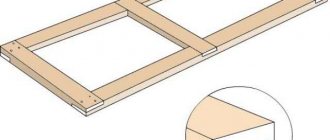
Its height depends on the height of the finished ceiling of the steam room itself, and it, in turn, depends on the height and number of “floors” - shelves. But the ceiling in the bathhouse is never very high - usually it is at the level of 220–230 centimeters.
We calculate: 230–60 = 170 centimeters, subtract the “margin” of 10 centimeters, result: the optimal door height is 160 centimeters.
Another condition is a high threshold. It prevents the coldest air, which is usually located near the floor, from entering the steam room when people enter and exit and protects against drafts when the door is closed. There is another funny advantage: when we raise our leg, we involuntarily remember the low ceiling and avoid unnecessary head impacts.
The width of the door depends not only on the above factors, but also on your convenience. Usually it is not very wide, but not too narrow so as not to squeeze through. Let's take the width to be 70 centimeters.
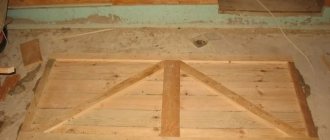
The drawing indicates the dimensions of the door and door frame
The door should not be greatly deformed, swell or dry out due to changes in temperature and humidity. Therefore, it must be made of dense, high-quality wood.
The decoration of the bathhouse is usually finished with wood. Wooden bath products not only decorate the interior, but also have a number of practical advantages and also provide health benefits to visitors.
We will tell you about the features of such products, and also show you how to make simple devices with your own hands.
The procedure for its manufacture is generally the same as for its wooden counterpart for the entrance. But there are a number of points that must be taken into account.
- The canvas should cover the opening as tightly as possible so that steam does not escape from the room.
- The threshold is low; maximum 50 mm.
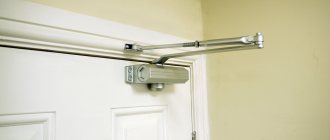
- Opening - outwards. Otherwise, the hinges (even the best quality) of the bath door will quickly rust.
- If the bathhouse is heated “in white”, then one door is enough; “in black” – necessarily two.
What are the characteristics of different types of wood?
Wood is the leader among building materials. It is distinguished by its characteristics, simple processing and aesthetics. Wood is divided according to consumer characteristics, the value of certain species and the possibility of use. But the most common classification is the division into coniferous and deciduous materials.
Hardwood
I would like to immediately note that deciduous materials are inferior to coniferous ones. However, for carpentry they are most often used because of their beautiful texture, variety and decent physical properties. Among the most popular breeds:
- Oak. Durable and valuable material - it has a beautiful texture, bends easily, and is resistant to bacterial contamination. Suitable for furniture, doors, finishing elements, floor tiles - both as solid wood and as veneer.
- Birch. Light colors, almost invisible veins. The wood is very dense in texture, which is often used in the furniture industry. However, birch is afraid of high humidity and splits along the fibers.
- Ash. It resembles oak material, but is still distinguished by complex processing; it bends, cracks and rots easily when exposed to unfavorable factors.
- Aspen. Valued for its easy processing and uniform aesthetic texture. Due to its porosity, it is suitable for the manufacture of only large elements.
The most popular breeds in construction and finishing are:
- willow;
- hornbeam;
- poplar;
- Linden;
- beech.
Valuable, rare species include mahogany, pear, plum, walnut, and apple.
deciduous and coniferous trees
Conifers
Coniferous wood materials are more durable, accessible, have a characteristic resinous odor, and are resistant to fungal and bacterial contamination. Among the popular breeds:
Pine. The tree has an even trunk, and the material itself is light, durable, and non-plastic. Pine is a very common tree species. But the ease of processing is offset by the fact that the material dries out over time and is highly resinous. If it turns blue, it means the storage technology was broken. Larch. It is distinguished by a dense structure, high strength and a pleasant aroma that will persist throughout the entire period of use of the door. In processing, larch is valued for its small number of knots. Wood has natural bacteriological protection. Wood does not rot, but only becomes stronger from the influence of moisture. Fir. Beautiful and easy to process wood
But please note that the quality of such natural material depends on the area and growing conditions of the tree. If fir wood is too soft, it is attractive to pests and quickly deteriorates under the influence of environmental factors.
Cedar. The tree has a beautiful aroma and a bright, pleasant smell. Most often, cedar is used as a decorative material. This is a durable, rot-resistant, but expensive tree. The color of the material is like light beige, pale pink and dark brown. Cedar is also valued for its pleasant aroma, healing and antiseptic properties. Spruce. The physical characteristics of such wood are very similar to pine. But processing is difficult - this is due to increased hardness and a large number of knots. Other characteristics: soft, beautiful material with a golden tint. Able to maintain natural color for a long time. Does not crack, has a slight resin content.
When choosing coniferous wood for carpentry, know that you will have to remove resin stains yourself. To do this, the wood is thoroughly dried and subjected to special antibacterial treatment.
Determine the purpose and choose the method of making a homemade pen
Most often, a handle is used to open or close a door. In this case, you can make a latch, hook or bolt from wood that will fix or lock the door.
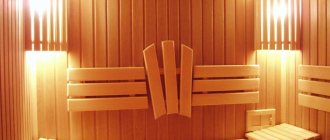
The products shown in the photo were made on a lathe. The small button-style handle consists of only one piece and is better suited for furniture.
To open a heavy door, it is better to make a full-fledged handle from three parts. I would choose the option with a crossbar that is inserted into the supports (above right), which provides the greatest strength to the craft.
Carved handles are good in their own way. There are an indescribable variety of options for such products. To make something like this, you need to have a set of cutters and artistic taste. At the same time, it is quite possible to process simple handles with a knife.
I advise you to take a close look at overhead handles: they can be simple, reliable and even sophisticated at the same time. Such fittings can be cut with an ordinary hacksaw or jigsaw.
If a three-piece handle is secured with self-tapping screws through the main element through the stands, the product will be very durable. The height of the stands should be ensured to provide sufficient clearance for fingers.
Flat handles are the most popular, and they are made from boards. I recommend the option located in the photo below right: it is the most reliable, since the handle opening is located below the screw heads. In this case, the craft will not break along the fibers.
To make fittings, you need to apply drawings of the parts on the plane of the board, and then cut the workpiece with a jigsaw. Of course, sanding will be required.
Holes for fastening should be provided. They are drilled out at the top with a large diameter to hide the screw heads.
It is very convenient to use tree branches to make your own door handles for buildings in the country. At the same time, the uniqueness, simplicity and reliability of the craft are ensured.
Accessories made from natural materials can be decorated with carving elements, applied with drawings or icons using a burner, or treated with a blowtorch. A more complex version uses linings cut with a jigsaw. To attach a handle from a branch, you need to prepare several holes for self-tapping screws so that the fittings do not wobble and are held securely.
Manufacturing methods
There are two popular ways of making products from wooden material:
- turning;
- thread.
Turned products
Such parts are made on a lathe; the product cannot be manufactured without special tools. “Balls” and “mushrooms” are made using a similar method. The manufacturing process consists of several stages.
"Mushrooms"
You will need a blank - a wooden board (block) with a section of the required size, which is selected in accordance with the parameters of the product. Leftovers from making the door frame will do. The board must be dry, intact, without cracks or other defects.
Note! The integrity of the blank board is important both for the aesthetics of the finished door handle and as a safety requirement, because such a blank can break at any time during rotation and injure your hand.
"Mushrooms" from a lathe
Manufacturing stages:
- An octagon is made from a blank board; a plane is used for this. It’s faster to work with an electric planer, but if you don’t have one, then a regular manual one will do.
- Next, the hewn workpiece is clamped on a lathe and a cylinder is formed using a chisel.
- Next, markings are applied to it for the future part. The product is formed using a semicircular or beveled cutter.
If you need to make handles for several canvases, then take a block of such length that it is enough for 3-4 copies, then saw them. The surface finishing is done manually using fine sandpaper.
Assortment of turned wooden handles
Carvings
This model is easier to manufacture and does not require special equipment such as a lathe. Tools and materials you will need:
- Board.
- The branch is of a non-standard shape and of such a size that it is convenient to grip the door handle.
- Saw, jigsaw.
- Milling cutter and attachments are optional.
- Drill or screwdriver.
- Sandpaper or sander.
- Clamp.
- Epoxy adhesive.
- Varnish.
- Nog.
Handle blank
Insulating the front door
With our harsh winters, insulating the entrance door to the bathhouse becomes a very important issue.
In most of our country, winters are very harsh, and bathhouses are usually built separately, unlike Finnish saunas, which can also be located inside a residential building.
We will tell you how to make sure that in winter the desired heat from the bathhouse does not escape into the street, and the frosty air does not penetrate into the bathhouse and does not chill the feet of those who are washing. To do this, you need to mount a certain structure with your own hands.
Insulation instructions:
- we take bars 20 mm thick and nail them along the entire contour of the existing door leaf from the outside so that the bars protrude beyond the edge of the door by about 15 mm;
- We nail insulation around the perimeter of the resulting frame, preferably felt folded in half; the insulation should protrude with its folded side 15 mm beyond the edge of the block;
- You can also install any insulation into the void of the frame that is formed between the bars;
- We stuff a sheet of fiberboard or plywood onto the frame directly to the size of the frame itself, so that the rolled felt peeks out around the entire perimeter of the door from under the plywood.
When closing the front door, the leaf fits precisely into the door block, and the insulation, bending outward, reliably cuts off the possibility of frosty air entering the interior.
Properties of wooden structures
Products made from solid wood have many positive characteristics that make them stand out among structures made from other materials. Therefore, most often they make wooden street and entrance doors with their own hands.
The main advantages of wooden systems include:
- safety for households and animals;
- beauty, aesthetics, attractiveness;
- soundproof;
- moisture resistance;
- natural origin;
- the ability to fit into any interior style;
- reliability;
- durability and strength;
- the ability to update the appearance through simple restoration;
- wooden panels impregnated with a special composition are resistant to increased temperature and fire;
- high-quality products do not deform or dry out.
Having appreciated all the advantages of wooden systems, every owner will give up on other materials and will certainly want to install such structures in an apartment or house. Fortunately, there are a huge number of similar products in specialized stores. Today, every door manufacturer necessarily presents to customers products made of natural wood that are part of a separate line of the brand. Since doors are made from wood in a wide range, anyone can choose a suitable design here, and if one is not available, then simply order it.
But the choice always comes down to price. The higher quality and more beautiful the canvas, the more expensive it will be. It will be cheaper to make wooden doors with your own hands. Therefore, if you have even a little skill in working with such material, design them yourself. This is more profitable for many reasons. Firstly, the price, secondly, the right size right away, thirdly, a stylish, beautiful design according to your desire.
Wooden door handles
In any work, especially physical work, you need a strong, reliable grip. And you can start training it with simple actions. Such as opening and closing doors. But if, in essence, there is nothing to grab onto, then there is a high probability of remaining at the initial stage of development. To avoid this, you need good, comfortable door handles that you can make yourself. As one of the execution options, I offer my own version.
Tools and materials used:
Tools: 1) wooden mallet; 2) chisel; 3) hand plane; 4) semicircular file; 5) metal square; 6) metal ruler; 7) black lead pencil;
Materials:
1) board 65 cm long, 12 cm wide, 3 cm thick; 2) thick paper for the template.
Manufacturing process:
Step 1. Cutting out the template. To facilitate and speed up the work in the serial production of handles, you should first make a template. A lid from a candy box is suitable for this. Unbend the side walls, retreat 7 cm from the top fold and draw a parallel line. Next, we draw the side and central straight lines, as well as two curved lines, according to the selected dimensions. The result is a drawing in which the length of the handle is 28 cm, and the width of its girth is 3 cm. We cut out the finished drawing using a stationery knife and scissors.
Step 2. Sawing the board.
Step 3. Outlining the template.
The resulting blank will make two handles. The photo shows that there are knots on the board, which, if the template is placed in a certain way, can “get” into the cutting areas or into the narrowest places of the handle. And this will make it difficult to process the latter or affect its strength. Therefore, you need to move the template to the most optimal place. Outline the template with a pencil. We obtain the outline of the second handle by first turning the template with the narrow part in the direction opposite to the direction of the first outlined outline. Then, using a square, we draw lines on the sides of the board from the corresponding lines on the wide (main) side of the workpiece and then, turning the template over, we outline it on the opposite wide side parts of the board.
Step 4. Sawing the board.
Step 5. Working with a chisel. Step 6. Primary processing with a file and plane. Step 7: Sanding. Conclusion.
Become the author of the site, publish your own articles, descriptions of homemade products and pay for the text. Read more here.
Door handle in Russian folk style
An example of a carved handle will harmoniously fit into an interior designed in a traditional folk style. The handle will perfectly complement an antique-style door. The design of the model includes 6 parts:
- Base;
- Intermediate bars - two pieces;
- Cubes - two pieces;
- Pen.
First you need to prepare each part separately, fit them together and polish them. Production order:
- Preparing the base: apply markings on a board measuring 36*9*2 cm in accordance with the drawing; Cut corners and semicircles with a jigsaw; If there is no tool at hand, the processing can be done with a semicircular file.
- Make intermediate blocks. In planks with dimensions 6*2*2 cm, make a longitudinal hole with a diameter of eight mm. In the future, dowels will be installed in them to assemble all parts into a single structure.
- Prepare cubes with a side of four cm: cut and polish a block with a cross-section of 4*4 cm, about 10 cm long; Saw the block into cubes; In the taken blanks, make two holes with a diameter of eight mm along the horizontal and vertical axis.
- Make a handle from a block fifteen cm long and a cross-section of 3*3 cm. Drill holes at the end sides with a depth of two cm, a diameter of eight mm.
- Perform decorative carvings on wood blanks: Base. Mark the outlines of leaves, squares and crosses on the board. Using the point of a knife, pierce the upper points of the ornament and cut out the tree, first on one side and later on the other, forming grooves of equal width. First, the leaves are cut out, and later the inner crosses. Pen. The carving is made on 4 sides using oblique lines with the same slope. The depth of the groove is about 3-5 mm. Cubes and blocks are decorated with diamonds and winding lines.
- Assembly is carried out using dowels “planted” on PVA glue. At the same time, it is necessary to cover the surface of the holes and the dowels themselves with an adhesive composition.
- Install the handle on the interior doors yourself using self-tapping screws.
Let's make a simple handle with our own hands
Regardless of whether the wooden handle will be custom-made by a carver, or all the details, from the design to the installation on the bathhouse doors, will have to be done with your own hands, first of all, you need to choose the right type of wood and the shape of the workpiece.
How to choose the right material for a wooden handle
To make a bath handle, you first need to decide on the location of its installation. If you need to equip doors to a steam room, there are few options for suitable wood. The wooden blank for the future product must be cut from linden.
Linden wood has two very important advantages:
- The structure of solid wood consists of thin layers of fibers laid in different directions, so the material is very soft, pliable, and most importantly, does not split under load, like spruce or pine;
- The surface of the linden wooden handle remains quite comfortable even when warm. After ten years, the texture will become smooth, almost polished, but at the same time it will not burn your hand like oak and, especially, larch.
A narrow, 120-150 mm board made of linden wood, without defects or dents, is ideal as a workpiece.
An exterior door will require very strong and hard wood. You cannot use beech, larch, aspen, spruce; their wood is prone to splitting and at the same time produces a large number of splinters.
A wooden handle can be made from acacia, walnut, elm, or any heavy wood with an interwoven fiber structure. To cut the workpiece, you will first need to cut one “round timber” 30-35 mm thick from the trunk or stump, mark it along the contour of the future product, and only then cut it with a jigsaw.
Cutting a wooden handle from linden
The ideal option for a wooden handle, suitable for any bathhouse door, can be considered a simple arched model with a reach of 35-40 mm and a length of 25-30 cm. If you do not have much experience in carpentry, then it is best to start by making a wooden handle from linden wood.
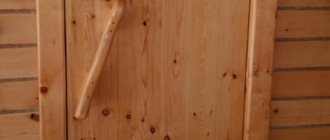
Simple option
Using this method, making a handle for a bathhouse is easy even for a novice craftsman. To work, you will need a board with approximate dimensions of 26 × 10 × 5 cm. First, you need to sketch a sketch on a sheet of paper.
Sawed blank for a bath
Note! Choose a simple handle shape so that it is easy to cut. A checkered piece of paper is suitable for the drawing.
Transfer the contours of the workpiece onto wood and cut it out with a jigsaw. Sand the product well, round it a little, so it will turn out neat. If you wish, you can make a carving, burn an image, an inscription. This handle is attached directly to the canvas, without a base. Self-tapping screws are used for this.
Artistic carving
Door installation
Installing a door for a bath room is completely no different from installing a simple door. The door leaf is installed using screw-in or brass hinges. In order to install the door leaf, it is best to use screw-in hinges, which are made of metal and have a special anti-corrosion coating. With this coating, the hinges can last for a long time. Proper rotation of the built-in hinge adjustment pins, made of durable steel, is achieved with the help of lubrication and bearings. In this case, a neat canopy is placed on the hinges of the door leaf that has undergone preliminary preparation. A door that is completely ready for operation must be supplemented with a handle made of a non-heating material.
Option one: from reinforcement and strips of metal
Cut a piece of corrugated reinforcement to a suitable length. We clamp the workpiece in a vice, and using a piece of round pipe, bend the edges at an angle of 90 degrees.
Next, you will need to cut two pieces of metal strip: one piece is narrow, the second is wide and longer.
We weld a narrow metal strip to a piece of reinforcement.
We put a wide strip on top and weld it to the narrow strip through the drilled holes.
After this, in a wide strip it will be necessary to drill four mounting holes for self-tapping screws. Using a drill of a larger diameter, we drill out the countersunk holes for the screw heads.
Doors to the sauna: fittings
Learn more about hinges and handles. Of course, hinges differ slightly from each other depending on the design and material for which they are made. The handles also have differences.
Hinges for sauna doors
Sauna hinges must be made of stainless materials. This applies to any type of canvas
In addition, when choosing hinges, you should pay attention to the maximum weight for which they are designed
For glass
There are two types of glass hinges - clamping and drilled. The former do not require violating the integrity of the canvas. The second holes should already be ready, because you cannot drill through tempered glass. However, upon purchase you receive a fully equipped door, so the choice has already been made.
However, you should know that the material for the hinges can be:
- aluminum;
- stainless steel;
- brass;
- bronze.
The surface of the hinges is usually anodized with chrome or nickel. On top of the metal parts there is also (often) a plastic plug installed, which is also chrome-plated or nickel-plated on the surface.
Hinges for wood
On sale you will find the following types of hinges:
- mounted;
- screw-in;
- mortise
Invoices
Hinges for sauna doors: overhead.
Overhead loops are not disguised; on the contrary, they are often used as a decorative element. They are located on the outside of the door, attached to the frame and leaf on the side where the door will open. See picture.
Overhead hinges are most often used in bath doors. But if the sauna is in an apartment, you are free to use any options.
Screw-in
Another name is pin. Suitable for doors in which not only the frame, but also the door leaf has a false quarter.
KEEP IN MIND! They cannot be installed on a regular door - see diagram below.
They are distinguished by minimalism - instead of a mortise hinge bar, into which a bunch of screws are screwed, the screw-in hinge has only a couple of pins, one for the box, the other for the canvas.
Photo of screw-in (pin) door hinges
The main advantage of this type of hinge is simple adjustment using a hex key: you can tighten the position of the door leaf in the vertical and horizontal direction, as well as adjust the force of pressing the door against the frame.
ATTENTION! The greater the mass of the door leaf, the more pins there are in the hinge design. There may be 2-3-4 of them
The usual material for making this type of hinge is steel. But it can be aluminum or non-ferrous metal.
Mortise
They are also called card games. They differ in that their strips are hidden in the side end of the door and the adjacent section of the frame. These are the most common hinges that are often found in interior doors. However, the front door can also be supported by mortise ones. They are also applicable in the sauna.
Butterfly (pictured right) is a type of card loop that is twice as thin as a regular loop due to its ingenious design. Its advantage is that you can make a recess only in the frame, without making it in the door, or vice versa, only in the door, leaving the door jamb untouched.
For glass
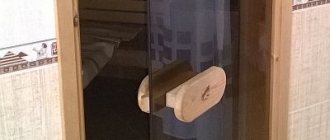
Since you are purchasing a ready-made door, you should take care of the shape of the handles when choosing a model. Manufacturers offer either handles in the form of a bracket (vertical or horizontal) or knobs. Both can be made of glass or wood, but in a sauna the second is preferable, because you can get burned on glass.
For wood
In principle, the shape of handles intended for glass may be no different from handles for wooden sauna doors, but they are designed for a certain thickness of the leaf, which for glass is usually 8 mm. You will not find wooden panels with a thickness of 8 mm. Therefore, the studs will be a bit short. So it’s better to look for options that are initially suitable for wood.
In addition, if you buy a ready-made door, it will be equipped with handles and everything else. And for those who decide to make the door themselves, it’s easier to come up with a handle for it to suit their taste.
Methods of attaching hinges and handles are analyzed in a separate article.
How to install handles and latches on new doors | Home Guides
Most pre-hung doors, whether fitted with a solid or split door jamb, already have mounting holes drilled for the door hardware.
If the flat door is not pre-hung, you will likely have to drill holes in the door and cut a groove for the strike plate in the door jamb. Choose a door without pre-drilled holes if you need to install a door handle that is different from the traditional 36 inches above the bottom of the door.
Install the door handle
Measure the desired height of the door handle from the bottom edge of the door to the edge opposite the hinges using a tape measure. Typically the handle is centered at 36 inches. Make a pencil mark at this location on the door.
Extend the mark horizontally across the edge of the door, using the combination square as a guide. Extend the pencil line 3 inches to one side of the door.
Fold the template that came with your door handle along the dotted line and align the template with the pencil mark on the door. Punch a hole through the corresponding holes in the template, marking the center of the end hole - the handle hole - and the edge hole - the latch hole - on the door with using an awl.
Set the template and awl aside.
Install a 2 1/8-inch hole saw into the drill and drill a hole through the mark on the face of the door to create the end hole. Next, remove the hole saw and replace it with a 7/8" spade bit and drill an end hole through the mark on the edge of the door. Drill this hole until the bit penetrates the side of the larger end hole.
Insert the latch into the 7/8-inch hole on the edge of the door. Align the edge of the latch assembly so that the latch plate is at right angles to the surface of the door and mark the outer perimeter of the plate with a pencil. Remove the latch and carefully draw on the four pencil lines with a knife. Cut this outline into a 1/8-inch groove using a sharp, beveled chisel.
Reinsert the latch assembly to ensure it is seated properly and flush with the edge of the door, then mark two holes for the latch plate mounting screws. Remove the latch assembly and drill a 3/32" pilot hole through each mark.
Insert the latch into the groove and secure it to the door with the two included mounting screws using a screwdriver. Insert the outside door handle spindle into the hole in the latch and slide the inside door handle onto the spindle on the opposite side of the door. Attach the two halves of the door handle with the two long screws included in the door handle kit. Check the operation of the door handle and its ease of turning, locking and unlocking.
Install the striker plate
Close the door. Make a pencil mark that lines up with the pencil mark from the door into the 1/8-inch notch of the door jamb. Open the door and push this mark through the jamb to the inside stop. Find and make a pencil mark in the middle of this line using a tape measure.
Mark a point 3/8" directly above the midpoint of the line and another point 3/8" directly below the midpoint. Drill a 7/8" diameter hole just over 1/2" deep at each of these two points using a drill. Align the two holes into one rectangular hole using a beveled chisel.
Place the strike plate from the door handle kit over the groove so that the curved edge extends over the door jamb opening. The middle of the strike plate should be aligned with the pencil reference mark. Draw a pencil outline around the perimeter of the striker.
Score the outline of the pencil mark with a utility knife before cutting a straight groove deep enough for the strike plate to fit against the door frame. Mark the locations of the two mounting holes using the strike plate as a template. Drill 3/32" pilot holes through these two holes, then install the plate using the two machine screws included in the door handle kit.
Close the door and make sure the latch engages the strike plate of the door handle while the door is flush with its mother. Adjust the striker as necessary to ensure proper operation of the door handle and latch.
door handle reviews
Features of choosing a door
Wooden doors to a sauna must meet some parameters that are worth knowing before making a purchase. There are certain requirements that are worth listening to.
For example, standard sizes are used for the rest room and the front door, but they should be different for the washing room and steam room.
Door size
A wooden door for a sauna is made according to slightly different parameters. Everything here leads to saving terla.
And first of all, this concerns the dimensions:
Doors should be smaller and they usually correspond to a height of up to 180 cm. Sometimes a size of 150 cm is even used
The width ranges from 55 cm to 70 cm; Here you also need to pay attention to the manufacture of the threshold. It is not recommended to make it less than 15 cm
These dimensions are used only for steam rooms and washing rooms.
Selecting the material
As we said earlier, wood can be considered the best option.
But you can also use combinations, for example using glass:
Washcloths
There is a wide range of sets of bath accessories, which include brushes, washcloths, peeling stones, etc. If you want an original product that satisfies all your preferences, make it yourself.
A washcloth is necessary for body cleansing and wet massage. This procedure is not only pleasant, but also beneficial for the body. Sponges can be of different hardness, sizes and shapes. You need to choose a washcloth based on your personal tastes.
To knit a washcloth from natural materials, choose the wool of goats, sheep or any other farm animals. You can also use linen. The yarn for the washcloth must be thick, since the product itself is subject to mechanical stress, so choose the appropriate size of knitting needles or hook.
Varieties
Each bathhouse has several different rooms:
- dressing room;
- locker room;
- washing room;
- steam room
There may be additional rooms, and each requires its own door design.
At a minimum, two such structures must be installed in the bathhouse:
- external entrance door for the bathhouse;
- internal door to the steam room.
Based on the material of manufacture, there are three options for choosing for the manufacture of door structures for bathhouses or saunas.
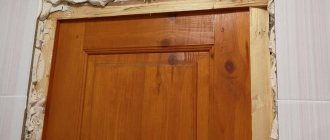
Wooden
Original carved door for a bathhouse made of linden.
The wooden door leaf is made from tongue-and-groove boards and then covered with clapboard (see also the article “Do-it-yourself wooden doors to a bathhouse - manufacturing technology”). The material for such structures must meet the stringent requirements for this product. It happens that doors are made with artistic carvings, but in this case their price increases significantly.
Let's look at the materials that can be used:
Glass
The advantage of tempered glass doors is their ability to withstand high temperatures.
Recently, door structures for baths and saunas made of special tempered glass have become especially popular. They are especially often installed in saunas and Turkish baths.
The material for such structures is durable 8mm tempered glass.
This glass has all the necessary qualities, it:
- water-repellent;
- heat-resistant, can withstand temperatures up to 300 °C;
- safe;
- inexpensive;
- easy to maintain, easy to wash and clean;
Combined
The photo shows a variant of the combined design for the entrance to the sauna.
The combined version contains wood and glass, which is very convenient and beautiful. Usually, a window insert of different sizes is made into the frame, which is made of wood of suitable species. It can be the size of almost the entire canvas or very small, as you like.
Requirements for the design of a bath handle
Like all important things, it is impossible to make a handle for a bath door at random, without knowing how the material and design will behave. It is always hot in the steam room of the bathhouse, and the entrance door to the steam room is usually built massive, with a tight fit in the frame. Therefore, the convenience and safety of using the steam room depends on how correctly the handle for the bath is made with your own hands.
Bathhouse door handles must meet the following requirements:
- The body must be quite massive and durable. In the event of smoke in a steam room or bathhouse, it is much easier to see a bulky arc than a small ball of wood;
- The material should not absorb moisture, have low thermal conductivity and not emit volatile substances when heated.
Bathroom door handles are made of wood, no plastic, rubber, much less metal, even if the hand grip area is insulated with a fabric, leather or felt cover. It is not difficult to wash the body of the handle, but it is very easy to get a burn if you accidentally grip a metal part incorrectly in a hot steam room.
Contrary to popular belief, wooden door handles for bathhouses are quite durable and can serve their owners for one and a half to two decades.
Selection of material and methods of processing wooden crafts
If you do not plan to coat the handle with anything, it is better not to use coniferous wood, which releases resin. The color and pattern of wood varies. Please take this into account if shade is a significant factor for you.
When making a wooden handle with your own hands from a tree branch, it is definitely necessary to remove the bark. The semi-finished board should be thoroughly sanded, first with coarse and then fine sandpaper.
A pen that is used outdoors is endlessly burned under the “gaze” of the sun and “licked” by the rain. Even if the craft is indoors, it will fade and become dirty with grease and sweat from human hands. So in any case, it is better to saturate the finished product with stain and cover it with several layers of weather-resistant varnish.
Sequence of work
- Clean the board from bark and sand it. Apply a drawing of the future base for the pen onto the prepared surface.
- Cut the workpiece along the contour, thereby giving it a suitable shape.
- Sand the sides and make a shaped notch along the edges using a router.
- The handle itself consists of an unusually shaped tree branch. Remove the bark from it, if necessary, trim and sand it.
- Trim the branch so that it is in tight contact with the prepared board.
- Connect the branch and the base under it using glue. For permanent fixation, clamp with a clamp.
- Drill holes in the base so that they go to the base. Drive the dowels there, pre-coated with glue. Remove the excess length of the pegs.
- Dry the assembled product overnight.
- Cover with varnish or paint after drying and mount on the door.
Carving "before" and "after"
What types of knife handles are there: size, thickness
The handle for a knife should have an individual size; the thickness, for example, should be selected personally: it should fit comfortably in the hand and not be too thick or too thin. In the first case, the knife will fall out of the hand, in the second, the fingers and the entire hand will be constantly under tension and it will not be possible to work with the tool for a long time.
As for the length of the handle, the most convenient/practical parameters are 11-13 cm.
Team, combined
Prefabricated, combined knife handles are the most popular options. In their production, the same material is used, but of different types - for example, on one handle there may be 3-4 species of trees, they are sometimes even delivered from different continents.
When such a handle is made, first a set of combined materials is made, then they are dried/glued, and only after that they begin to be processed - the master will shape the already assembled handle.
Knife handle pommel
The uppermost part of the handle, its top is called the pommel of the knife handle. It can be made of metal - brass, copper, steel and be of various shapes - from a regular ball to an imitation of a lion or owl head.
It is important that the pommel is not too heavy and massive - the knife will literally become “unliftable”; even a successful choice of material and shape of the tool’s handle will not allow it to work for a long time.
The pommel is always an independent unit from the point of view of the entire structure; it can be used to connect parts of the handle (for example, with a combined type), serve solely as decoration, or be installed to correct the balance of the product.
For edged weapons
Edged weapons are knives with handles made of any material; among modern ones, acrylic and plastic are popular because they have the following properties:
- are not exposed to aggressive external factors;
- do not rot, do not mold;
- do not absorb moisture and do not slip in the palm;
- do not absorb odors;
- easy to clean.
Melee weapons are often selected based on the blade/blade and, according to experts, this is correct. Moreover, the handle can always be replaced - plastic and acrylic are repairable.
For hunting knives
For hunting knives, wooden handles are most often made, onto which various patterns are applied. Usually the handle has a convex shape, its thickness is selected according to the size of the palm of the future owner, the length rarely exceeds 13 cm.
If it is possible to find tusks, horns or bones, then it is better to make a handle for a hunting knife from these materials - they do not absorb odors, do not slip in the hand, and do not withstand the aggressive effects of water. And you can also make patterns on bone handles.
Large hunting knife Pike-perch Small hunting knife Skinner
Form
In addition to the three standard types, the shape of the knife handle can be:
- Convex . This is the most convenient option, which is suitable for knives of various types - from hunting to professional kitchen. They may have a thickening in the middle part of the handle or a narrowing - the second option is not very practical, but many people get used to it.
- Concave . Very easy to use, they always have grooves for your fingers, a knife with such a handle always fits comfortably in your hand. The only drawback is that such handles are not suitable for all types of knives: for example, they are never used for cutting knives.
- Persistent . Their shape resembles brass knuckles, they are considered non-functional and often serve as decoration for the instrument. However, knives with persistent handles are often used for cutting large pieces of meat.
- Flat . They are never used for long work, because the edges of the handle dig into the palm, cause discomfort and force the hand to be constantly in a state of tension. But such knives take up little space and are compact.
Mounting type: mounted, overhead
The handle can be attached to the blade in two ways - mounted and overhead.
Horseback
This type has the following advantages:
- has an attractive appearance;
- using this method, any type of handle, any shape of it, is attached to the blade;
- the weight of the riding handles is low;
- they can be repaired and completely replaced;
- has a low level of heat/electrical conductivity.
With the mounting type, the handle can be attached using two-component glue, a pommel, or a pin. Professionals note that this mount has a significant drawback - it is not as strong as an overhead one.
Overhead
A knife with an overhead type of handle attachment has a long shank, which must be completely identical to the shape of the handle. Plates (linings) are attached to this shank (an extension of the metal blade) and secured with screws or rivets.
Advantages of overhead handles:
- simplicity of production;
- maximum strength of the entire structure.
This type of knife handle attachment has some disadvantages:
- the weight of the product is quite large (due to the presence of a shank);
- limited choice of handle shape and size;
- the level of thermal and electrical conductivity is very high.
It is believed that it is unlikely that you will be able to work with a knife with an attached handle for a long time, for example, in the cold - your hand will quickly freeze and get tired. But the strength of such a tool is so high that it outweighs all its disadvantages.
Why do you need a kumara on a knife handle?
Often plates made of kumaru are used on the handle of a knife, which are considered not only decoration, but also material for creating an almost eternal tool. This tree grows in South America, its second name is “iron tree”. The plant is not subject to any destruction: it does not rot, is not destroyed by insects, and is not susceptible to the negative influence of mold and mildew.
Kumara is very difficult to process due to its incredible hardness/density, so when making handles, plates that have already been pre-processed on professional machines are used. Such additional pads will protect the main material of the handle from damage.
If you believe the legends of some peoples in South America, then it is this tree that protects a person from evil spirits and negative energy. If you study any instrument with handles in these tribes, then on each you can find linings and inserts made of coumarin.
Various interesting shapes
You can also find interesting forms that are distinguished by non-standard execution.
| Knife handle shape options | Appearance |
| Convex with slots for fingers (a la brass knuckles) | |
| With a pommel in the form of an eagle's head | |
| With finger grooves | |
| With curly edges |
HOW TO CUT A BALLPEN FROM WOOD ON A LATHE - STEP-BY-STEP DESCRIPTION AND PHOTO
The direction of the fibers matters. To make the handle more beautiful, it is necessary to maintain the direction of the wood fibers on both parts: to do this, mark both segments of the workpiece with a line across the middle cut.
Secure the workpiece in the jaws of the vice to drill out the center, strengthen the vice with a clamp on the drilling machine and drill through the workpiece (You can also hold the workpiece with hand-held wooden clamps).
Glue quickly. Apply three thin strips of instant adhesive evenly along half the length of the cylinder. Insert it into the workpiece along its entire length, turning it as you go. This must be done quickly, since most instant adhesives set in about 15 seconds.
Cut the workpieces flush. Using a drill press and cylinder trimmer that matches the inside diameter of the cylinder, trim the piece of wood flush with the end of the cylinder. This will ensure straight ends and clear the cylinder of any traces of glue.
Full assembly. Install the pen blanks into the cartridge, aligning the applied marks. These marks will be removed during processing.
Select the correct machine parts. The 60° taper shank fits perfectly into the tapered end of this chuck. The cup shank version, which usually has a pointed tip, does not fit the chuck as well because it does not fit tightly; As a result, both the tip of the shank and the chuck itself may be damaged.
Recess of the handle body.
Using a turning (rounding) cutter, grind both workpieces to a cylindrical shape, slightly larger in diameter than the final size. Then carry out a fine re-turn, removing the thinnest chips and holding the workpiece with your fingers from the back to prevent it from bending. Continue working until you reach the desired diameter and shape. After you have turned a few handles, the adapters/spacers (bushings) may shrink slightly in diameter due to contact with the cutters and sandpaper. Therefore, you should not rely on the diameter of the bushings as a sample - periodically measure the diameter of the wooden parts to match the diameter of the components of the handle mechanism.
Bring it to shine. After sanding, apply a polishing paste (such as Mylands friction polish) to the wood and polish the parts with a clean paper towel. Do not use a cloth for this as it may get wrapped around the rotating parts. In this case, paper napkins will simply tear.
Align the parts relative to each other. Once polishing is complete, remove the wooden cylinders from the socket and place them on a brush (for example, to clean a smoking pipe), orienting them relative to each other according to the grain pattern of the wood. This will help you position the parts correctly during further assembly.
Start with the tip. Press the tip of the pen all the way into the front end of one of the cylinders, placing it on the shoulders.
Install the turning mechanism. Insert the turning mechanism from the other end of the same cylinder until the pressed line is even with the end of the cylinder.
The final stage. Insert the metal finial (and clip if included) into the top end of the second cylinder and press them together. Then insert the ink refill into the rotating mechanism, put on the center spacer ring and connect both parts of the cylinder with your hands, making sure that the grain pattern matches.
Link by topic: Very beautiful and original cutting board with your own hands - step by step photo