The simple technology of constructing a bathhouse, however, is associated with a large number of issues that need to be resolved during the work process. One of them is how will the pipe in the bathhouse pass through the ceiling to the outside? The operation requires close attention, since your safety and the service life of the structure depend on the correct approach.
Miscalculations made at this stage will violate fire safety requirements (FS). Therefore, it is better to prepare radically and meticulously and do everything correctly than to correct mistakes later. In the article, we propose to familiarize yourself with the nuances associated with solving the issue of how to install a pipe for a bathhouse. You can view our range of chimneys here
.
Types of pipes
If we discard the exotic options for materials for chimneys, metal and brick remain.
For the manufacture of steel chimneys, ready-made modules are used. From them you can assemble a pipe of any complexity.
Let's look at the characteristics of the pipes.
Metal
When installing heating in a bathhouse, pay attention to the heat resistance of the materials. A good option for a modern stove is a pipe made of stainless steel or an alloy of steel and titanium with increased heat resistance
A good option for a modern stove is a pipe made of stainless steel or an alloy of steel and titanium with increased heat resistance.
A titanium alloy pipe can withstand temperatures up to 850°C without losing its basic qualities.
Single wall. By design, metal pipes can be single-walled or double-walled.
A single-circuit chimney is a relatively inexpensive stainless steel pipe. These are usually used for internal chimneys.
The disadvantage of the “single-wall” is abundant condensation, strong heating, which can cause burns when touched. This type of chimney needs to be monitored while the stove is operating. The structure cannot be left unattended. The problem can be easily solved - insulate the pipe.
Sandwich. The sandwich is a two-layer structure with thermal insulation, where the inner part is a stainless steel pipe, and the outer part has a larger diameter.
The void between the pipes is filled with non-flammable basalt insulation, which reduces the likelihood of condensation and reduces heat loss.
The task of the inner pipe is to contain the onslaught of combustion products. It must be resistant to burnout, rust, and acids. GOST defines the minimum thickness of internal pipes - 1 mm!
The outer shell is a pipe made of stainless decorative steel, copper or galvanized (cheaper option).
A double-circuit chimney increases the efficiency of the stove and saves fuel.
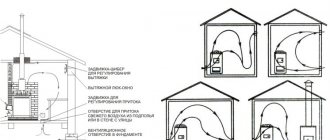
The specific installation scheme is often individual and depends on the size of the room, the location of the stove or boiler.
If you need to make a chimney faster and funds allow, use ready-made modular designs for chimneys of different configurations. A pipe is easily assembled from individual parts - pipes, tees, bends, etc., thermally insulated and enclosed in a protective metal casing.
Brick
The main function of the chimney is to remove gases from the stove using natural draft. A brick pipe copes with this function quite well. Although such a chimney is inferior to a metal one.
To understand the intricacies of materials, we will conduct a comparative analysis of their capabilities.
| Brick pipe | Metal pipe | |
| ferrous metal (prohibited by SP 2018) | stainless steel | |
| Difficult installation | Easy installation and dismantling | |
| The quality of the chimney depends on the qualifications of the specialist | The quality and modular configuration allows you to assemble the chimney yourself | |
| The chimney is difficult to maintain. Requires systematic cleaning | Simple and easy to use chimney. But cleaning and inspection are required | |
| The specific cross-section and heterogeneity of the walls prevent the removal of gases | Soot does not settle on a smooth-walled pipe | |
| High thermal conductivity and volumetric heat capacity | Low thermal conductivity when using sandwich pipes | |
| Standard scheme, strictly vertical pipe | Any installation options are acceptable | |
| Additional foundation required | No foundation required | |
| The chimney is resistant to condensation | Metal is not resistant to corrosion | The pipe is not subject to rust |
Traditionally, a brick pipe is considered the most reliable structure, although this is not entirely true.
The “life” of a brick is 15–50 years. This time variation depends on the heating mode. A 0.5 mm steel pipe with standard operation will last 10–20 years, sandwich modules - up to 30 years.
We run the chimney through the ceiling
The first thing to do is determine the exact location where the stove will be installed. Although, this issue must be resolved at the planning and design stage of all premises. What should you consider?
Firstly, the chimney passing through the ceiling should not be located near load-bearing beams and rafters. Otherwise, the question may arise: how to remove them (which is extremely problematic) or how to protect them from fire. In order not to worry about this, think about this nuance in advance.
Secondly, the stove should be located in a place convenient for you. The correct location of the firewood, some stove accessories, open doors, etc. should not cause you any inconvenience. Here you should also consider where the hot water tank will be located and whether there will be one at all (maybe you have an electric or gas boiler).
Okay, we decided on the location and installed the stove. Now we prepare or buy the chimney itself and all the “bells and whistles” that will be required. Here I mean sandwich pipes and additional elements, which you can read in detail in another article. A chimney for a bath of this type is the most practical and in demand today. We will consider this option further...
In order to accurately mark the ceiling, we take a regular plumb line (I think there is no need to explain what it is) and raise it to the ceiling. In this case, the weight of the plumb line must be in the middle of the smoke exhaust channel of the furnace. We mark on the ceiling the place that the “smart device” showed us. This is the center where the bath pipe will pass.
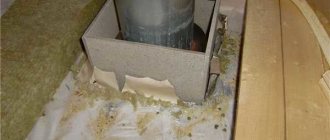
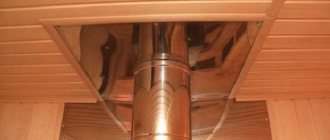
Next, we take the ceiling passage box, which is included in the “necessary gadgets” category, and mark the hole in the ceiling according to its size. This hole can be made 1-2 centimeters larger. There is nothing wrong with this, since from below everything will be closed by the design feature of the box itself, and from the attic side, the remaining cracks can be closed with the same stone wool.
Next, cut a hole of the required size in the ceiling. Here everything depends on what tool you have. The best option, of course, is a chainsaw. Fast and effective. Just first check that there are no nails, screws or other metal objects in the cutting area of the wooden ceiling. Any insulation should also be absent, especially flax or jute. Using a chain saw on these materials is unacceptable; you can ruin the tire (I already have a bad experience). Go ahead…
Basic rules and regulations
In fact, there are not so many standards in cutting. To be honest, only one thing is correct, everything else is purely recommendations obtained through long construction experience. The rule dictated by SNiP states: when making a chimney made of concrete or brick, as well as any other insulated materials, the distance to the rafter beam and any other flammable surface must be at least 13 cm. In any other case: at least 25 cm.
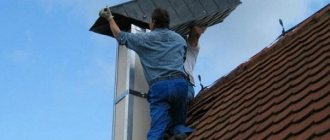
Experienced roofers advise that when making a passage through the roof on the inner surface of the roofing pie, make an apron made of rectangular metal with indentations from the end of the passage opening of approximately 30 cm.
How to install?
For constructing a chimney with your own hands, the ideal material option is metal pipes. They reduce construction costs as well as labor costs. Installation of the chimney begins with the stove already installed in the bathhouse. An ordinary iron pipe is installed up to the first elbow. Proper fastening will be ensured by special structures with fire-resistant characteristics.
The initial part is connected to the stove pipe. Immediately install a gate valve, which will allow you to increase or decrease the traction force. Then a hole is made in the roof, which can be square. Next, a metal box with a through hole corresponding to the size of the structure is assembled. Through it the chimney will be led to the attic. The height of the box should be greater than the ceiling finishing materials.
The box is securely fixed in the ceiling. The free space of the box is filled with mineral wool or expanded clay. In the attic, the structure is covered with a lid with a hole for the pipe. A sheet of heat-resistant material is fixed at the chimney passage point. The top pipe is protected with sheets of mineral wool or asbestos. A special waterproof cuff is used as thermal insulation. The gaps can be treated with sealant.
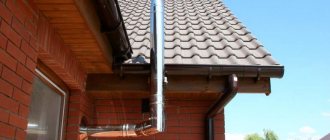
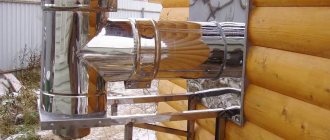
Installation of an external metal chimney will require even less labor costs. The device requires the presence of a suitable hole in the wall (not in the roof). To turn the pipe from the furnace, a special elbow is purchased. There are different types of bends, choose the option that suits you.
The outlet is installed on the stove pipe. Then a tee is installed on the outside. From it, the chimney is routed up along the wall, and down if necessary. To insulate the wall, it is correct to use a similar metal box filled with non-flammable bulk material.
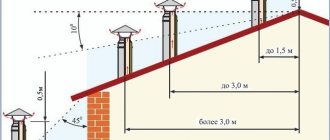
When arranging an external structure, it is important that it rises 50-60 cm above the ridge: such an installation will guarantee good traction. To protect the chimney from small debris and rain, put a special umbrella on top
Brick chimneys can be root or mounted. The best option for sauna stoves is the root one. If the stove is made of brick, then a structure made of the same material is attached. If the stove is made of metal, the brick chimney is connected to the pipe with a special pipe.
A brick chimney is arranged in the form of a square pillar, which is equipped with a well-shaped section. The cross-sectional size is related to the power of the sauna stove; it can be half a brick, a brick or two bricks. The basis for a brick structure is a foundation of the same thickness as the sauna stove, forming a single whole with it. The pipe is raised to the required height, where a valve is installed.
Immediately mark the location for the structure on the ceiling and roof. To maintain strict verticals, use a level. Start the work by laying the top part, for which there is already a point on the stove. Carry out the passages of brick rows evenly: any unevenness will impair the quality of the traction force. Control the placement of each row. For control, a tensioned thread between the corner of the starting row and the corner of the hole in the roof is suitable.
To protect the ceiling from fire, fluff is laid. Fluffing is an expansion of the outer walls of the pipe, which also ensures the stability of the structure. The widest point of the fluff should be located at the level of the ceiling material. After the installation of the fluff is completed, the chimney is secured with edged boards. Then the fluff narrows, the pipe is aligned to the initial value.
The outer perimeter of the chimney is laid out until the roofing material appears. A structure is being built at the top that will serve to drain rainwater. It has increased dimensions by about a quarter of a brick. Lay out the structure according to a similar principle with fluff. Its height is related to the angle of the roof.
Next, lay out the neck of the chimney. It is allowed to install a metal cap on top of the structure
It is important to carefully seal the joints between the brick chimney and the roof structure. Choose methods of work and additional elements depending on the type of roofing material
The methods of this work are different; decisions on the use of one method or another are made at the site of pipe installation.
It is difficult to install a brick chimney correctly with your own hands. In addition, the design is expensive. Therefore, you should not start bricklaying if you have only seen a brick and a trowel in a video. Modern materials make it possible to construct simpler and more efficient pipe designs for bathhouses.
What thermal insulator should I use?
Having finished installing the passage unit on the ceiling with your own hands, work continues in the attic or second floor, where it is necessary to seal the space between the outer wall of the pipe and the beams with insulation.
Basalt wool
Basalt wool can serve as a heat insulator. Before purchasing, be sure to check that it can withstand temperatures over 600°C.
There is an opinion that this is not the optimal option for such work. This is explained as follows. This insulation is made using resins as a binder, which, when exposed to high temperatures, begin to release formaldehyde . In addition, condensation sometimes begins to flow through the pipe. As a result of the interaction of mineral wool with moisture, the former loses its heat-shielding properties. As the moisture evaporates, the properties are only partially restored. Therefore, basalt wool cannot be considered an ideal option.
Expanded clay
In addition to the insulation, it is necessary to lay expanded clay of medium and fine grain into the passage space in the bathhouse. Builders know it as a natural material that is quite lightweight. Its main advantage is that even after getting wet it restores its properties . But after contact with moisture, its thermal conductivity characteristics increase slightly, although they are already very low even in comparison with mineral wool.
At one time, instead of expanded clay, sand was used as a sealant. In principle, it suited everyone, except for one thing: due to its fine grain, it constantly spills through the cracks. As a result, the owner has to monitor the amount of sand and replenish it if necessary. However, it is unlikely that anyone will enjoy collecting sand from the stove.
Among natural insulation materials, you can choose clay. Before use, it is mixed with water to a paste-like state, and then the entire gap is sealed with the mixture. Sometimes expanded clay is used as a filler.
According to some owners, using a pass-through heat insulator in a bathhouse is not very correct. It is believed that nothing will happen if the space is left unfilled. This will help prevent this part of the chimney structure from overheating and burning, and thanks to the ventilation created in this place, the pipe section will cool faster. This may be true, but you need to take into account that the hot pipe radiates heat, which will cause the nearby tree to dry out. And then fire can occur at a lower temperature of + 50°C.
How to choose the right location for a chimney on the roof ↑
The best option, according to boilermakers and roofers, would be to install a smoke exhaust on the roof near the ridge.
- This makes it possible to ensure minimal accumulation of snow around the chimney pipe in winter and the absence of snow pockets near the ridge, that is, leakage in the junction area is eliminated.
- The height of the chimney above the roof
is small, which reduces the impact of external unfavorable external factors on its design. - The low height of the chimney relative to the ridge creates favorable conditions for the formation of the smallest amount of condensation.
It should be taken into account that the lower the chimney pipe is located along the roof slope, the greater, according to building regulations, the height of the chimney above the roof should be.
If there is a common wall with a multi-story building, then the pipe is installed above the roof of the multi-story building.
Where it is not recommended to install a chimney ↑
It is better not to install passage units in the following places:
- next to the attic windows, since any gust of wind will bring carbon monoxide and smoke into the attic;
- valleys, the junction of two slopes that form an internal corner, where it will be difficult to ensure a high-quality connection to the pipe, in addition, a huge snow pocket will form there.
The chimney cannot be rigidly fixed to the roof, since if the integrity of the roof is damaged, there is a danger of destruction of the chimney, and therefore a fire.
Safety regulations
To ensure that the bathhouse is comfortable and safe, and that the heating device operates without interruption and does not cause a fire or injury, the following safety rules should be followed when installing and operating the chimney:
- Sagging and warping of the elements of the smoke exhaust system are not allowed.
- Turning the pipe is allowed, but not more than three.
- The distance from the chimney to the walls must be at least 50 cm.
- All connections must be made in such a way that none of them end up inside the wall, ceiling or where the roof passes.
- The margin for thermal insulation in the ceiling and roof made of combustible materials is made at least 100 cm when installing a single-wall pipe, at least 20 cm when installing sandwich sections and 6 cm for a smoke shaft or combined chimney. To pass a non-combustible roof, a margin of 13 cm is sufficient.
- If the chimney rises above the roof by more than 1.2 m, it must be additionally secured with braces.
- All connections must be reliable and tight. If a unit is found to be depressurized, it should be repaired immediately. If smoke appears at the junction of pipes or shaft elements, the operation of the heating device is stopped and the joint is repaired.
- During operation, it is necessary to carry out preventive maintenance: cleaning the pipe from soot deposits, discharging condensate from the drip line. This will extend the life of the chimney and heating device.
- When the draft decreases or reverses, as evidenced by smoke in the steam room or boiler room, as well as sparks and hum in the firebox, it is necessary to clean the chimney.
- After a long break in using the sauna, the chimney and heating device may become clogged or airy. In this case, it will not be possible to light the bathhouse. It is better to carry out inspection, repair and cleaning of the chimney before starting up the heat generator.
We recommend that you read: Features of using a single-pipe heating system with forced circulation of coolant
Installation of passages for two-story buildings
If the building is two-story, then in this case, after installation on the first floor, it is necessary to work on the second. How to install a sandwich pipe through the second floor? Let's consider the main points of wiring a sandwich chimney through the second floor:
- As a rule, the second floor of the baths is equipped as a rest room. Also, laying a sandwich chimney can take place in a private house. In such cases, a transition is made from a sandwich pipe to a single-wall pipe. This is done so that the heat from the chimney spreads and warms the rooms. The transition to a single-wall pipe should be carried out at a height of 1 m from the floor of the second floor.
- In front of the attic passage unit, a transition is made back to the sandwich pipe.
- The attic passage unit is installed in the same way as the previous one.
Note! It is strictly forbidden to seal the joints of the chimney waterproofing apron using ordinary construction silicone. For these purposes you need to use a special sealant.
- It is necessary to route the chimney through the waterproofing coating and the roof. It is imperative to carry out thermal insulation and install a protective apron, which will serve as waterproofing for the chimney sandwich. Homemade aprons and heat-resistant sealant may be suitable for these purposes.
Waterproofing after running the pipe through the roof is necessary to ensure that moisture does not penetrate into the attic and does not flow down the structure. When passing a sandwich pipe through the roof, it is also necessary to comply with the standards described in SNiP.
Safety regulations
The passage of a pipe through the ceiling of a bathhouse is regulated by SNiP 41-01-2003. This document states that:
- the passage of the bath pipe in the ceiling should be located at a minimum distance of 350 mm from flammable structures and 250 mm from difficult to flammable elements;
- It is considered ideal to leave this distance not closed (air). However, such a design will lose a large amount of heat;
- the specified distance is filled with non-combustible materials;
- the hole must be covered with metal sheets (stainless steel is more often used, which does not spoil the appearance of the room);
- the pipe in the bathhouse through the ceiling and roof should not have joints. This factor must be taken into account when designing a chimney;
- the maximum length of the pipeline passing through the ceiling or roof should not exceed 1 m;
- The chimney should not be attached rigidly to the ceiling or roof.
As the temperature rises and falls, the pipe may expand and contract slightly, respectively. A strong fastening will lead to deformation of the pipe or passable ceiling.
Selection of thermal insulation material
The following materials can be a heat insulator:
basalt or mineral wool. The insulation can withstand heating up to 600ºС. The main disadvantages are: the release of formaldehyde, since the material contains resins and the instability of protective qualities when wet, which is possible in the event of condensation formation;
Basalt wool
expanded clay The material has excellent properties. When wet, expanded clay quickly restores its functions. However, to arrange the ceiling, you will have to additionally install containers in which the material will be located;
Middle fraction expanded clay
mineralite The material consists of cement, cellulose and mineral fillers. Minerite tiles can withstand temperatures up to 600ºC. When heated, it does not emit harmful substances, and when exposed to water, it does not lose its properties;
Minerite insulation
- asbestos. It is a good insulating material, but when heated strongly it releases substances harmful to humans;
- sand or clay. The materials were used as heat insulators earlier, before the advent of modern insulation materials. However, some experts prefer to use natural materials rather than artificial ones.
Minerite is considered the most optimal insulation.
Pipe joint insulation
To make the joints airtight, use:
- high-strength sealants that can withstand large temperature changes;
- special clamps made of the same material as the chimney.
To ensure draft, there should be no more than 3 to 4 pipe connections in the chimney duct. A chimney consisting of 3 elbows is considered optimal.
Useful tips for stove makers: pay attention...
- Be sure to use a ceiling passage box, even if you are using a sandwich. Fill it with expanded clay, foam glass or mineral wool. Do not fill the space around the pipe with earth, especially sand. Sand tends to get very hot and retain heat for a long time.
- The most optimal chimney height is 4.5-5 meters. Try to stick to these parameters.
- The upper edge of the pipe should rise above the ridge by at least 50 centimeters. But, if the roof is flat, then the height here should be at least a meter. For large chimney heights, special guy wires are installed.
- In a steam room, if the pipe passes near a wall or partition, then a protective screen must be installed on the wall. It can be in the form of stainless steel or basalt cardboard.
- When installing a flash drive, it is recommended to use a special thermal and weather-resistant sealant. He copes well with the task assigned to him. By the way, during the assembly of a chimney sandwich, the same thermal sealant, and sometimes crimp clamps, are often used.
- If flammable roofing material is used, a spark arrestor is required. You can do it yourself by using a used KAMAZ air filter.
- Try to avoid sandwich pipe joints in the ceiling passage. At this point the smoke channel must be solid.