An important stage in the construction of a private bathhouse is the construction of a roof structure that can provide reliable protection from the negative effects of precipitation and perform an aesthetic function.
In order for a roof for a bathhouse to serve for many years, you will need the correct choice of design configuration, calculation of the angle of inclination and length of the overhang. Of course, you can turn to professionals to carry out the work, but constructing the roof yourself will significantly save money.
Types of bath roof designs
The modern bathhouse roof is a functional and reliable structure, which comes in two types.
Shed roof
This type of roofing is the most accessible and cost-effective for installation. The design involves installing rafters with emphasis on opposite walls. In this case, it is important to correctly calculate the appropriate slope angle to protect the roof from possible damage and deformation.
A lean-to type of structure should be erected in an area with high wind loads to prevent stagnation of rainwater and snow cover on the surface.
Gable roof
Such a roof has a number of advantages: reliability, durability, heat capacity, and the possibility of arranging an attic space. In addition, precipitation does not linger on it, but its cost is much higher than that of its lean-to counterpart.
The gable roof option is made in one of two ways:
- Sloping rafters.
- Hanging rafters.
The angle between the installed rafters determines the slope of the slopes: the smaller it is, the steeper the slopes.
Most often, gable roofs are:
- Attic. Roof structures that provide for the presence of free space between two slopes and load-bearing beams for arranging a utility room. A prerequisite is the presence of a ceiling separating the lower floors from the roof.
- Heartless. Structures in which the space under the roof is not separated from the main functional rooms of the bathhouse by a ceiling. The difference lies in the height of the ridge, which is much smaller than that of attic structures.
Step-by-step instruction
The entire process of creating a 4-pitch roof can be divided into a number of stages in the following sequence of installation of rafter frame elements.
Mauerlat
Leveling the horizontal surface of both external and internal walls of the house with cement mortar. A laser level is used for control .
Double boards 120x50 mm, timber 100x50 mm or 100x100 mm are laid on the finished surfaces. The beams are secured with anchor bolts, driving them into pre-drilled holes in the masonry.
Attention ! Armored belts are not used in wooden buildings. In timber frames, the upper frame can serve as a mauerlat.
Lezhny
This is the base for various parts of the roof. The beams are laid on the surface of the internal walls. The horizon of the walls is also leveled and lumber of the same section is used. In some cases, beds are used as lintels for doorways. They are attached in the same way as the Mauerlat.
Skate and racks
In the case of a reinforced concrete floor, the racks are installed directly on it .
They are fastened with corners, which in turn are connected to the concrete with dowels, and to the wood of the racks with self-tapping screws. If the upper floor of the house is a system of horizontal beams with transverse braces, then the racks supporting the ridge of the roof rest on the central purlin or on the support of the axial internal wall. A ridge with posts is a frame structure on which both diagonal and row rafter legs rest.
Rafters and sprigs
The tent version lacks ordinary rafters and a ridge . The frame is assembled from four hips. They are isosceles triangles, the sides of which are diagonal (sloping) rafters, the base is the mauerlat.
The internal space of the hips is filled with sprigs - inclined beams of different lengths. They are installed in increments of 0.5 - 1 m. As they approach the central axis of the hip, the length of the flaps increases.
For hip and half-hip roofs, the frame is formed from two end hips and side trapezoidal slopes. The sides of the roof are frames, where the ordinary rafters rest on the ridge girder at the top, and on the mauerlat at the bottom.
Reference . When making cuts on rafters and frames, templates are used. All wood must be treated with antibacterial impregnations and fire retardants.
Lathing
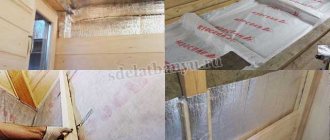
Prepare the base of the frame for the roofing by installing sheathing on top of the rafters. To do this, 50 x 50 mm slats or 120 x 50 mm boards are placed on the rafters in horizontally parallel rows with a pitch of 400 - 500 mm. It should be noted that before installing the sheathing, the frame is covered with waterproofing. Rolls of PVC film are rolled out across the rafters, secured with a stapler and secured on top with counter slats.
Due to savings, developers often neglect the installation of counter-lattice . These are the same slats that are laid on the waterproofing perpendicular to the subsequent sheathing. Thanks to this, a ventilated space under the roof is created. It prevents moisture from penetrating into the attic or attic from the outside and eliminates the accumulation of condensation.
Installation of waterproofing, counter battens and sheathing:
Insulation
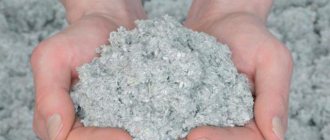
The roof of a hipped roof must be insulated, regardless of whether it is a cold attic or a warm attic floor. Mineral wool or special heat-insulating mats are used as insulation.
In order not to bother with adjusting the dimensions, they try to design the pitch between the rafter legs equal to 600 mm or 1200 mm - this is the standard width of the insulation boards. Thermal insulation is attached to the sheathing and rafters using a stapler and mushroom dowels.
Roof covering
The specificity of hipped roofs lies in the large angle of inclination of the roof from 350 and above. Therefore, roofing material with a high specific gravity is not recommended for use. At the same time, popular types of roofing materials for hip and hip roofs are:
Overhangs
The lower ends of the slopes, ordinary rafter legs and spigots are extended with pieces of boards to form a kind of canopy. Overhangs are made from 200 mm to 400 mm long. A canopy around the perimeter of the roof protects the blind area around the house from rain. Also, overhangs covered with roofing cake prevent excessive flooding of the walls with rainwater.
How the roof structure works
In order to competently build a roof on a bathhouse with your own hands, you need to study its structure in detail, which includes the following functional elements:
- Rafters and purlins.
- Lathing.
- Steam and waterproofing.
- Roofing covering.
Rafter structure
It is designed to properly distribute loads over the entire roof surface. The rafters on the bathhouse are mounted using crossbars, ties and spacers to ensure the strength of the finished structure.
The rafter system can be assembled on a finished building or on the ground with subsequent installation on the bathhouse. Rafter supports must be securely fixed to load-bearing walls and supports to prevent deformation or collapse of the roof when exposed to strong air masses.
Wooden sheathing
The sheathing can be assembled with a solid panel or a cellular base of wooden beams. The choice of the appropriate lathing option depends on the type of roofing material. Rolled roofing felt requires a continuous sheathing, while corrugated sheeting requires a cellular sheathing.
Vapor barrier and waterproofing protection
An obligatory stage of arranging the roof of a bathhouse is to provide protection against the penetration of moisture and steam. To create a waterproofing layer, tiles or slate sheets are used, for a vapor barrier layer - roofing material or parchment paper.
Roof coating
Practical and safe materials are used as roofing: rolled roofing felt, metal tiles, ondulin, asbestos-cement or bitumen slate, roofing steel.
How to properly build a hipped roof with your own hands, drawings and photos
One of the most popular roofs is the hipped roof. It covers buildings that have a rectangular or square shape in plan.
The absence of gables and the slope of all 4 roof planes give the roof special strength and the ability to withstand significant snow and wind loads.
Such structures include hip, half-hip and hip roofs.
If you have experience in working with wooden structures, it is quite possible to build a four-pitched roof with your own hands.
Construction standards for pitched roofs
The roof for a bathhouse is an enclosing structure that is designed to protect the building from negative atmospheric influences, as well as to maintain comfortable living conditions in the premises. Therefore, modern roofs must meet a number of requirements:
- High weather resistance.
- Waterproof.
- Thermal efficiency.
- Wear resistance and increased strength.
- Fire safety.
- Resistance to biological effects.
- Environmentally friendly.
- Durability.
When constructing pitched roofs, it is important to comply with certain standards and regulations. If the bathhouse building is adjacent to a residential building, then it is rational to install a pitched roof - a more accessible and cheaper option. In this case, the height of the roof can be arbitrary, but taking into account the height of the residential building.
For full-fledged bath complexes or private baths equipped with an attic space, the best option is gable roofs. With the right approach to heat and waterproofing, such a structure can be used for living. When organizing a gable structure, it is important to choose the correct location for the ridge and calculate its height.
Average prices for turnkey work
Typically, specialized companies offer their services for the construction of 4-pitch roofs based on the installation cost of 1 sq.m. roof area. By analyzing advertisements of this nature on the Internet, you can present the average price with an element-by-element installation layout in the following table.
| Type of work | Price, rub./sq.m. |
| Rafter system | 350 |
| Insulation | 150 |
| Waterproofing | 100 |
| Countergrid | 100 |
| Lathing | 150 |
| Seam roofing | 300 |
| Additional elements | 350 |
| Total | 1500 |
Selection of roofing material
The modern construction market offers a wide range of reliable and durable roofing materials. The following materials are suitable for covering a sauna roof.
Corrugated sheet
For the production of corrugated sheets, non-ferrous metals (zinc, aluminum, titanium alloy) or galvanized steel are used. The main difference between the material is the thickness of the metal base. Corrugated sheeting is characterized by high strength, wear resistance, low weight and affordable cost.
Metal tiles
Suitable for organizing a gable roof, subject to an inclination angle of 35 degrees. Metal tiles are resistant to corrosion, provide good sound absorption, have a long service life (over 45 years) and an attractive appearance.
Soft tiles
Roofing material based on ceramic and bitumen is suitable for creating single- and double-slope structures, easy to use, practical and durable. Roofs made of soft tiles look aesthetically pleasing and attractive.
Ruberoid
The available roofing material is inexpensive, easy to install and has a short service life (no more than 15 years). Roofing felt is laid while maintaining an inclination angle of 5 degrees. This is the most budget option for roofing material.
Slate and Euroslate
Regular slate sheets are an affordable and cheap material used for roofing. It has a long service life (up to 40 years) and does not require special care. Laying sheets is easy and quick. The disadvantages of the material include high moisture absorption and fragility.
Euroslate is a more expensive and practical roofing material, which has an attractive appearance, good performance characteristics and high cost.
Ondulin
A popular material with high ductility, strength, wear resistance and durability. It is ideal for covering curved roofs. In addition, ondulin is easy to install and affordable.
Flaws
- Technical difficulty. Without practical skills, it is difficult to cope with work. It is better to entrust the construction to specialists.
- A roof will require more materials than a gable roof. Since four slopes imply the same number of connections, and they will have to be trimmed. Roofing material will cost more according to the estimate.
- The attic is small, since rafters, supports, and braces take up a lot of space. Hip structures are not used for attic construction.
Technology for constructing a roof with one slope
The most popular is the bathhouse with a pitched roof. A roof structure with one slope can be easily erected with your own hands from available materials. One of the load-bearing walls should be several rows higher than the others to create the desired slope of the slope - from 20 to 45 degrees.
For construction work you will need tools and materials:
- Beam with a section of 6×8 cm.
- Support beams for the floor.
- Boards 25x3 cm.
- Membrane for waterproofing.
- Thermal insulation material.
- Roof covering.
- Fasteners (screws, nails).
- Hammer.
- Primer with antiseptic properties.
- Level.
- Hacksaw.
According to the working instructions, a pitched roof for a bathhouse is built in stages:
Stage 1. Installation of the load-bearing beam (mauerlat)
The supporting beam is laid along the perimeter of the external walls and is intended for installation of the rafter system. In log houses, the mauerlat is the top row; in brick and block buildings it is equipped additionally. The beams are fixed with wire, anchor bolts or studs.
Studs are inserted into the upper wall rows to a depth of 40 cm in increments of 65 cm between each other so that the upper part of the thread rises 3.5 cm above the load-bearing beams.
Rolled roofing felt is laid on top and pinned onto the studs at the places where they are installed. Next, the beam is laid on the tip and hammered in to make small notches. Holes are made along the notches, after which the beam is installed on studs, on top of which the nuts are screwed.
Stage 2. Installation of beams for the ceiling
Grooves are made in the load-bearing beams for the ceiling in increments of 65 cm. After installing the ceiling beams at the ends, they should have a space of 32 cm beyond the load-bearing walls. Ceilings serve as rafters, so they are fixed to the Mauerlat using nails or wire. After installation is completed, all elements are treated with an antiseptic primer.
Stage 3. Hydro- and thermal insulation
The lower part of the ceiling structure is hemmed with boards. An overlapping film is laid over the installed rafters, and the joints are taped. Next, the thermal insulation material is installed - roll or slab. The gaps are filled with polyurethane foam, an overlapping membrane is installed on top and the joints are secured with construction tape.
Stage 4. Roof installation
The beams are placed on the rafters through a film for waterproofing, after which the finished frame is sheathed with boards. The width between the beams can be from 1.5 to 14 cm, depending on the type of roofing material. A finishing coating is installed on the finished sheathing - slate, metal tiles, ondulin or corrugated sheets. Sheet roofing is fixed with self-tapping screws and gaskets to prevent moisture from penetrating through the inlet holes.
Preparation for construction
Preparatory activities before starting roof construction are carried out in the following order:
Calculation of parameters and creation of a drawing
All calculations are based on several factors - the material of the walls, the shape of their perimeter, the design of the floor, the average snow and wind load according to SNiP 2.01.07-85.
Hip roof frame drawing:
Based on the optimal angle of inclination of the roof slopes (SNiP tables), the maximum height of the ridge girder (hip or half-hip roof) or the convergence point of the slanted rafters (hip roof) is taken. Options for forming a rafter system may differ in the presence or absence of various reinforcing elements.
Construction of a hip roof rafter system:
Not every independent developer can make an accurate calculation and . In this case, the best option would be to contact specialists.
Materials and fasteners
Particular attention should be paid to the selection of lumber and the choice of fasteners.
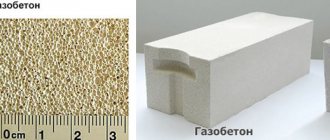
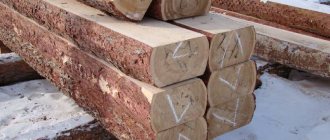
In the choice of lumber, their profile plays a big role. The use of boards will cost the construction site owner less than the use of timber, although the latter has higher load-bearing capacity characteristics. In some cases, builders use double boards instead of timber. As a result of established practice, builders choose larch and pine lumber.
For the same reason, for different types of structural elements of 4-pitch roofs, boards and beams of the following section are most often used:
| Name | Section |
| Mauerlat beams | Beam 100x100 mm, 100 x 50 mm or 150 x 150 mm |
| Ridge, central purlin and beds | Same |
| Diagonal rafter legs | Double boards 120 x 50 mm or timber 100 x 150 mm. There may be other options |
| Ordinary rafters | Board 120 x 50 mm or timber 50 x 50 mm |
| Racks, struts | Same |
| Lathing | Same |
| Filing and finishing | Board 120 x 20 mm or plywood, OSB, chipboard, fiberboard |
To assemble the wooden support frame of a 4-pitch roof, a standard set of fasteners is used. These are studs, nails, screws, self-tapping screws, staples, paper clips and anchor bolts. For joints, perforated metal elements such as corners and plates of various shapes are used. An approximate range of fastening accessories is shown in the figure below.
Tools
To manufacture finished structural elements from blanks and install them, you will need to organize a small indoor workshop at the construction site. To do this, you can use a light homestead building with an electrical connection.
Attention . When working at height, you must always use a hammer to drive nails. To significantly increase the productivity of this process, experts recommend purchasing or renting a nail gun.
Technology for constructing a roof with two slopes
For a large bathhouse, it is better to equip a gable roof with an attic space for storing bath accessories and equipment. The assembly of the rafter system is carried out in stages.
To assemble the roof structure you will need:
- Beams with a section of 10×8 cm.
- Beam with a section of 5×5 and 5×10 cm.
- Board.
- Level and plumb.
- Iron nails and screws.
- Hammer.
- Electric drill.
- Primer composition.
A step-by-step guide to constructing a gable roof includes the following steps:
Stage 1. Installation of beams for the ceiling
Grooves are made in the supporting beams of the building for the installation of beams for the ceiling. The pitch between the grooves is 100 cm, the depth is up to 8 cm. The beams are pre-treated with an antiseptic compound, dried and mounted edgewise into the grooves. Additional fixation with nails.
Stage 2. Assembling the truss structure
A gable roof consists of triangular rafter structures - trusses, each of which is made of identical bars - legs, bases and lintels. The elements are fixed to each other using screws.
For the legs, 5x10 cm boards are used, the length of which is 2.8 m. The edges of the boards are cut at an angle of 45 degrees, holes are made for screws, after which the elements are securely connected to each other. A 50 cm indentation is made from the joint of the rafter structure for a groove for the lintel. Rectangular sections are cut at the ends of the lintel, thanks to which it is mounted in the rafters. Screws are screwed in at the junction of the lintel and rafters. Other trusses are assembled in a similar way.
Two trusses located on top of the side walls are sheathed. For this, 5x5 bars are used, installed in a horizontal position in increments of 35 cm. To strengthen the structure, additional bars are installed in the diagonal direction.
Next, the sheathing is sheathed in a vertical direction with a small allowance along the edges of 3 cm. A door is installed on the surface of the second structure.
Stage 3. Installation of rafters
Finished structures must be placed on ceiling beams. Fixation with spacers in compliance with the geometry of the structure. The edge trusses are installed first. To further strengthen the installed structure, jibs are used - beams placed between the load-bearing beam of the wall and the rafters at the level of the lintels.
Next, the remaining rafters are installed while maintaining the vertical level. The technological distance between individual rafters should be 100 cm. All elements of the rafter system are connected by a canopy of two boards nailed to the upper beams on both sides of the roof.
Stage 4. Installation of sheathing
For the sheathing, a board is used that is long enough to cover the roof and extend beyond the rafter system by 25 cm. Technological gaps between individual boards can range from 2 to 48 cm, depending on the type of roofing material.
At the exit point of the chimney pipe, a hole of the required size is made and a continuous sheathing is installed around the perimeter.
Next, the waterproofing material (film or membrane) is laid and fixed to the sheathing using metal brackets. The waterproofing is overlapped by 10 cm.
Stage 5. Installation of the finishing coating
A counter-lattice made of 5x5 cm bars with pre-treatment with an antiseptic composition is installed on the waterproofing. The selected finishing coating is installed on the counter-lattice from the edge of the cornice. A hole is made under the chimney, and after installing the pipe, the joints are carefully sealed with bitumen impregnation or an adhesive mixture and covered with a protective apron.
What is the difference between layered and hanging rafter systems?
Before assembling a gable roof, you need to know some features of its structure. A hanging rafter system is installed when the house is small in size and there is no internal load-bearing wall. In this case, the rafters are connected at a certain angle, making appropriate cuts at their ends; nails are used for connection.
When installing such a rafter system, the posts and ridge are not made, and the support of the lower ends of the rafters falls on the external load-bearing walls. To make the structure more durable, the top tightening should be located no further than 0.5 meters from the top. Sometimes floor beams are used as tie-downs. The absence of racks frees up the attic space, which allows it to be used for arranging the attic floor.
If the house has an internal load-bearing wall, then it is more effective to use a layered rafter system. In this case, the bed is laid, support posts are fixed on it, onto which the ridge is nailed. This method is considered simpler and more financially profitable. When designing ceilings at different levels, the studs can be replaced with a brick wall, which will divide the attic space into two parts. A gable roof can also be made with different slopes along the length, which is also very beautiful and practical.
Advantages
- Natural material and environmentally friendly. Due to its natural origin, wood has a beneficial effect on the human body, giving it the opportunity to inhale beneficial substances.
- Saving money on the purchase of building materials.
- Low thermal conductivity of wood. In winter, a 6 by 6 bathhouse with a veranda retains heat well, even with thin walls. Heating costs are minimal.
- The log house of the bathhouse has an aesthetic appearance. Even log buildings of simple shapes and without additional finishing look stylish and beautiful.
- Ease of assembly is one of the most important components of a log sauna. Due to this, construction time is significantly reduced. If necessary, the building can be easily disassembled, transported and reassembled in a new location.
Bathhouse with veranda 6 by 4 made of logs
One-story baths
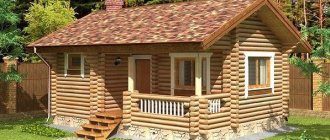
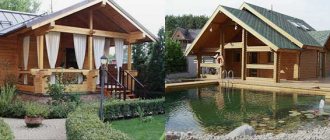
A one-story building with an open gazebo under one roof is a good option for planning a bathhouse for a leisurely relaxation. You can build such a bathhouse not only from traditional timber or logs. The brick bathhouse is also very easy to use, and its facades, combined with dark wooden parts and a green roof, look quite impressive.
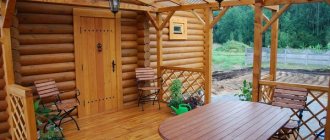
In the gazebo attached to the bathhouse, you can place a relaxation area with a rattan sofa and armchairs or a dining table with chairs, and if space allows, an outdoor fireplace and a summer kitchen.
An alternative to a gazebo as an extension is a canopy over the dining area located near the bathhouse. Notice how unique the bathhouse looks, not with a standard, square or rectangular layout, but with a building with rounded ends under a thatched roof.
About the general principles of color selection
House designs presented on numerous construction sites are in most cases made in neutral shades. This is done so that the colors do not distract from the details of the project, allowing you to more fully appreciate the design. The choice of colors for the facade and roof goes to the owner; it will be successful if you follow the simple rules that guide professional designers.
Before settling on a particular color scheme, you should decide whether you want to highlight your home, emphasizing its advantages, or, conversely, make it invisible, built into the environment. The solution to this question will tell you which direction to move in. The first option will require rich colors and bold combinations, while the second will require a harmony of natural shades.
For fans of extravagant solutions
When choosing colors for a country house, it is important to remember some features that are inherent in all colors, albeit to varying degrees. All of them have the following properties:
- Burnout
. The more saturated and bright the color, the more noticeable it is. The champion in terms of burnout speed is black; brown, red and lilac roofing will be exposed to the sun to a lesser extent. The best durability is demonstrated by the gray color, which only slightly changes the shade. A white roof is also not ideal; elegant at first, over time it will inevitably turn yellow, and not evenly, but in spots. - Heat absorption
. We remember from a school physics course: the lighter the surface, the more it reflects light, and the darker the coating, the more it absorbs solar energy. Therefore, the further north the house is located, the more practical the choice of dark materials and colors for its facade and roof becomes.
Bright colors become lighter over time
Accentuation. Paints can change the external impression of a building. Light shades visually enlarge an object, dark shades make an object smaller, but also give clarity to details.
Caution is needed when using several bright colors - this is usually a good solution for a house of a simple shape with a minimum of architectural details.
To simplify the task, it is convenient to approach the selection of a suitable color scheme in one of the following ways:
Choice of shades of the same color. A common and almost win-win option. One color is divided into successive shades: for the roof, facade walls and smaller details. Buildings made in green, sand or brown tones look harmonious; more boldly - in red or blue.
Selecting shades of the same color
Choice of contrasting colors. The appearance of such a building will be bright and memorable. The color scheme is based on two maximum contrasting colors, for example, chocolate brown for the roof material and pale yellow or beige for the facade. Sometimes, to enhance the effect, facade details (doors, trim, plinth) are also painted to match the roof.
Choice of contrasting shades
Combination with white color. A universal option, given that white harmonizes perfectly with both pale and rich shades.
The combination with white is also contrasting
Combinations of several colors. A three-color combination is specified: brown – beige – olive or gray – pink – white. They are complemented by a suitable secondary tone, which is supposed to be used for finishing. With the right selection, even a black facade of a house, complemented by a light roof, will look harmonious and stylish.
Combination of several colors
What is important to note right away
The final stage of construction is the construction of the roof.
However, even at the design stage, it was preceded by many calculations designed to guarantee in the future the ability of this roof to withstand wind, snow, condensation and other inevitable misfortunes. We remind you of this so that the reader who intends to do the roofing with his own hands soberly evaluates his skills and gives the calculations to professionals, if he is not an architect or civil engineer. It’s easier to collect according to calculations. Perhaps this is the best option for those who are determined to build themselves.
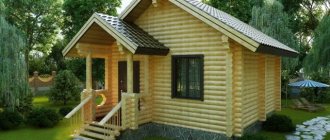
Log baths
Log baths have an expressive Russian flavor, which can be emphasized even more if you cover the roof with reeds and add a small gazebo for spending time outdoors after the steam room.
An excellent addition to the exterior of a bathhouse with a multifaceted gazebo made of logs will be a fence made of carved balusters in the Russian style. A brown metal roof will add an interesting touch to the design of the building.
The log bathhouse and the extension to it in the form of a gazebo under multi-level gable roofs offset relative to each other look impressive. Such an asymmetrical pediment will give the building an unusual flavor, despite the usual rustic style of architecture.
To set off the light facades of a bathhouse made of pine logs, lay the roof with brown, red or green Ondulin - this solution will be both budget-friendly and beautiful.
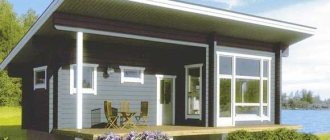
If you are a lover of modern style, build a log bathhouse with a spacious terrace under a curved pitched roof. Log facades in combination with inclined supports, metal roofing and stone plinth will look very non-standard.
Recommendations from the pros!
Accessories for a bath Do-it-yourself gazebo Concrete fence Do-it-yourself potbelly stove Do-it-yourself veranda Screw foundation Do-it-yourself country toilet Decorative brick Stone fence Pouring a foundation How to make a fence Wicket from corrugated sheets Do-it-yourself fireplace Brick fence Do-it-yourself flower beds Forged gates Do-it-yourself porch Pool for a bathhouse Chicken coop do it yourself DIY staircase Metal gates Installation of lining Installation of polycarbonate Pump for a summer house Arrangement of a garage Fences for flower beds Do-it-yourself blind area Steam room in a bathhouse Railings for stairs Do-it-yourself cellar Painting walls Press with your own hands Grilles on windows Rolling gates Do-it-yourself barn Alarm system for a summer residence Benches for a summer residence Fence posts Floor screed Solid fuel boilers DIY greenhouse Fence installation House insulation Attic insulation Foundation insulation
Essential elements
It is important to know the basic elements of a hipped roof. The frame or frame structure is designed to support roofing materials, therefore keeping the building watertight
Rafters are the structural members of the roof that support the sheathing. Usually they are perpendicular to the wall and never touch it.
Roof pitch refers to the amount of rise of the roof compared to the horizontal dimension of the roof, called run. As a rule, it consists of 12 units. If the roof rises 4 units in the length of twelve, the height is 4:12. In degrees, this figure is 18.43. Sheets are small overlapping roofing blocks with stepped vertical joints. They are made from wood, asphalt, slate, clay, concrete, metal or other materials.
A few words about fire safety
The main fire safety requirements for a roof are a free attic space. No flammable material should be placed near the pipe.
When using building materials, pay attention to their fire resistance index. The best materials for roofing are basalt and mineral wool. They insulate the chimney and protect all heating surfaces.
When installing ceiling finishing materials, use fireproof and moisture-resistant panels impregnated with special compounds. Processing of wooden structures is carried out 2 times a year.
When installing the chimney, follow the fire safety rules:
- The chimney should not come into contact with electrical wiring and pipelines;
- The joints are connected with clamps;
- To seal the seams, a sealant is used that does not lose its properties at high temperatures.
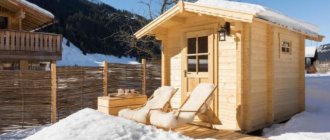
Baths made of timber
You can build your own bathhouse from timber, and make the main building with a steam room and washing room small, and attach an open gazebo with a summer kitchen to it. When the recreation area is moved outside, the heated area of the bathhouse will be significantly reduced, and accordingly, the costs of its operation will not be so high.
The most budget-friendly option for a bathhouse is a prefabricated structure made of timber under a pitched roof made of Ondulin. A bathhouse like the one in the photo is a building with a small steam room and a fairly spacious outdoor seating area.
The one-story timber baths with a veranda or gazebo under a gable roof made of flexible tiles are beautiful in architecture. Facades made of timber, painted in light colors and combined with a dark roofing, look especially colorful.
A spectacular option is a bathhouse with a gazebo under one hip-type roof. Relaxation after the bathhouse will be especially pleasant if you equip an outdoor fireplace or barbecue area in the gazebo.
Peculiarities
For residents of private houses, life often revolves around housework and gardening, but sooner or later they get tired of this cycle and want something different.
The simplest and at the same time useful option would be to build a bathhouse. This place will help you relax after a hard day, take a break from everyday worries and be alone with yourself, if there is such a need. To build such a building you only need to know how to do it, otherwise the project may be unsuccessful, and the construction is not only not functional, but also life-threatening.
In order to be able to steam and wash in the bathhouse, it is necessary to provide at least two rooms, but it is best to supplement them with a bathroom for complete comfort.
When building a bathhouse, special attention is paid to the wiring, which must be completely protected from moisture and grounded. It is best to hire professionals for such important work to be completely confident in the quality of the work.
When thinking about a bathhouse, the first thing you need to think about is its future project. In addition to the fact that in the steam room you can give the body the opportunity to spend some time under the influence of high temperatures, and then take a contrast shower, friendly gatherings in good company can be very pleasant.
In order not to break away from the process and one stage smoothly flows into the next, it is best to provide a relaxation room either in the bathhouse itself or near it.
The most convenient and useful option is to build a bathhouse with a gazebo under one roof. This not only simplifies construction, but also makes it possible to easily move from one area to another.
By properly planning the gazebo and placing a grill and barbecue in it, you can enjoy delicious dishes after the bath and truly relax. If you spend a lot of time in the gazebo, it is worth equipping it with lighting and placing comfortable and upholstered furniture for the most cozy atmosphere.
Layout
The 4x6 sauna layout is not only a steam room and a washing room. It can be equipped with a closed veranda for comfortable spending time in the cold season, and an open terrace for relaxing in the summer.
If the bathhouse has a second floor with a bedroom where guests can spend the night, it turns into a real bathhouse complex. In addition to the bedroom, a swimming pool, billiards, and a recreation room can be located on the second floor. The first one is then allocated for the steam room and washing department.
When drawing up a drawing of the future building, it is necessary to think in advance about the location and size of the rooms. For example, the area of the dressing room, which prevents cold air from penetrating into the room, is measured at 1.3 m² per person plus the space where things and bath accessories will be stored.
Brick facade - clinker tile cladding
Our customer's preferred color scheme was dark tones. Therefore, the main elements of the building are made in a classic dark brown color.
To imitate Bavarian masonry, thermal panels based on clinker from a German manufacturer were used. As you know, ceramics on the facade are a very resistant and durable material. An additional layer of insulation will reduce heat loss. Installation of factory-made panels occurs in a matter of days.
Attention! When ordering a preliminary design for a cottage of 400-500 sq.m.
Project of a bathhouse or guest house up to 100 sq. m. - Free!
Since the thickness of the clinker tiles is about 10 mm, the façade is light, relative to natural brickwork. Accordingly, we save on the foundation.
During the design process, we considered the option of a wooden facade:
As a result, they decided in favor of a clinker facade. The main argument was a similar technique for cladding the facade of the house.