A chimney is an element with an increased fire hazard , so it is important to responsibly approach the processes of bringing it onto the roof made of corrugated sheets and isolating it from the contents of the roofing pie.
It is also important to protect the pipe from moisture penetration , which can significantly reduce the life of the roof.
In this article we will take a detailed look at how to wrap a pipe on the roof with corrugated sheeting and look at waterproofing issues.
How to route a pipe through a roof from corrugated sheets - avoid mistakes
The smoke exhaust structure is an element that is characterized by an increased fire hazard, so solving the problem of how to make a hole in the roof for a pipe should be approached responsibly. It is also important to protect the roof from moisture penetration, otherwise its service life will be significantly reduced.
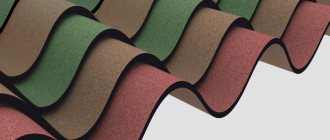
Roofs made of corrugated sheets deservedly enjoy the trust of owners of private houses, since they have:
- a light weight;
- long operational period;
- appearance reminiscent of the relief of ceramic tiles.
Corrugated sheets are thin, durable and corrosion-resistant sheets of metal that are coated with paint and pressed into the required shape. After installing stoves or heating boilers, it is necessary to make a passage for the chimney through the roof structure.
Every homeowner should understand how to route a pipe through a corrugated roof. Even if this work is done by professionals, it won’t hurt to check the result.
Video instruction
A chimney is an element with an increased fire hazard , so it is important to responsibly approach the processes of bringing it onto the roof made of corrugated sheets and isolating it from the contents of the roofing pie.
It is also important to protect the pipe from moisture penetration , which can significantly reduce the life of the roof.
In this article we will take a detailed look at how to wrap a pipe on the roof with corrugated sheeting and look at waterproofing issues.
Types of chimney structures
The chimney pipe serves to remove smoke and combustion products into the atmosphere. It is a hollow cylinder.
To organize this process, stove makers build:
- Brick chimneys . The smoke exhaust system is created from heat-resistant bricks, which are produced using a special technology specifically for the installation of stoves. The pipe has a rectangular or square cross-section. This method of getting rid of smoke is expensive, but it is more durable and safe. Its main disadvantage is the porous inner surface - for this reason, large amounts of soot and dust settle on it. If the pipe is not regularly cleaned, layers of soot can completely or partially clog it, reducing draft force and increasing the risk of fire. The process of how to remove a chimney through a roof from corrugated sheets is complex and therefore it is better not to do this work with your own hands - it should be done by experienced stove-makers.
- Metal chimney systems . To assemble a structure of the required configuration, you need to purchase stainless steel pipes with the addition of zinc or molybdenum. Then insert the segments one into the other - you will need straight pipe products, clamps and bends. Thanks to the presence of a slippery inner surface, soot cannot accumulate, which means that smoke can freely move upward, outside the house. The disadvantage of this method is that metal does not retain heat well enough compared to brick, as a result of which condensation collects on it, since there is a temperature difference between the pipe and the air outside. The metal chimney structure can be easily brought to the roof, because it consists of separate elements.
Answer
To design the junction of the chimney (and other, by the way, communications extending beyond the roof plane, the same ventilation ducts, sewer “firecrackers” - fan pipes), there is a decent number of different nodes. For pitched roofs, a so-called “collar” made of roofing steel is usually installed. The rabbit is placed on top of the collar, and in turn, the rabbit itself must rest with its lower part on the roof to ensure normal drainage of rainwater. In turn, during the laying process, a so-called “otter” is installed on brick pipes, i.e. a certain type of brick laying that forms an overhang above the roof plane. The bent edges of the collar are inserted into this otter.
This is all to say that simply cutting a hole and removing the pipe will not work. The collar has a rather complex shape, made of at least two parts in which the metal is bent in a certain way, and then, during the installation of the roof covering itself, it is mounted on the roof, ensuring normal water drainage. There are many photographs, drawings and diagrams of this unit on the Internet; I think there will be no problems finding it for various types of roofing.
Leave your tips and comments below. Subscribe to our newsletter. Good luck to you and good luck to your family!
Chimney outlet location - how to cut a hole
Before cutting a hole for a pipe in a profiled sheet, you should choose a convenient place for this. The decisive factor in this case is the location of the furnace unit.
According to professionals, the chimney should be placed strictly vertically, taking into account some nuances:
- It is advisable to make a hole for the exit of the chimney pipe at the highest point of the roof, and therefore closer to the ridge. The optimal distance from it to the chimney is considered to be 50–80 centimeters.
- Before you make a hole for the pipe in the corrugated sheet, you should make sure that it does not fall on the elements of the rafter system. To bypass them, bends are used, with the help of which a rotation of 45 or 90 degrees is set.
- The length of the chimney segments is selected so that the joints between them are below or above the intersection of the roof and ceilings, otherwise a high-quality connection will not work.
- It will be possible to achieve the required level of draft if the height of the chimney structure exceeds this parameter at the ridge by 1–1.5 meters.
- To ensure that the hatch location is correct, mark it on the roof with a marker and check the temperature at the end of the day. The pipe must remain in the cold zone at all times.
Metal scissors for corrugated sheets
Corrugated sheeting can be easily processed using ordinary metal cutting scissors. Use hand tools or modifications with mechanical and electrical drives.
Cutting with scissors has the following positive aspects:
- allows you to cut the material into strips;
- cross cuts are performed without edge deformation;
- adjustment work is carried out directly at the installation site;
- allow you to cut geometric shapes of different shapes from corrugated sheets.
- it is inconvenient to use if the cutting site (line) is located near the base of the wave;
- long sections do not turn out smooth;
- When cutting a sheet with the edge of the blades, a burr is formed.
We use scissors only to fit the sheets in place. Cutting a large amount of material takes considerable time.
Preparatory measures for venting the chimney through the roof
There is the following technology for making a hole in a profiled sheet for a pipe:
- First, use a permanent marker to mark the location where it will be placed on the roof.
- The cross-sectional size of the chimney elements is selected taking into account the recommendations of the heating unit manufacturer. The thicker and higher the pipe, the easier the smoke comes out of the stove. The main thing is that there is no gap between the elements when connecting.
- Cut a hole with a grinder with a thin blade for metal work, stepping back a few centimeters inward from the drawn line. The corrugated sheeting must be cut carefully and slowly so that the edge of the cut is without jagged edges.
- Short cuts are made in the corners of the hole so that the edges of the corrugated sheet are bent upward.
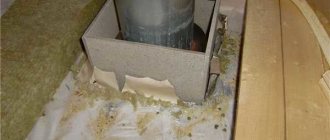
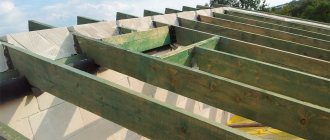
- A similar passage is made in the ceiling. Then a metal box is installed to connect the pipe to the rafters. The chimney is laid through a hole inside the box.
- Hydro- and vapor barrier material, as well as insulation, are removed from the exit cut out in the roof.
For cold areas, where the thickness of the thermal insulation material is more than 15 centimeters, you need to use sandwich pipes that have two layers of metal and a layer of insulation between them.
Jigsaw for cutting metal sheets
The tool is used for cutting straight and curved sections. For work, we select a special metal blade with a minimum pitch and tooth height. In addition, the saw width should not exceed 4 mm if it is necessary to cut small radius curves.
We use an electric jigsaw:
- for profiled sheets with a height of no more than 40 mm;
- for longitudinal and transverse cutting of small pieces;
- When cutting long sections along the wave, we use a manual clamp to eliminate vibration of the sheet.
The disadvantages of the method include:
- limitation of the processed sheet thickness due to the length of the saw blade;
- low cutting speed and high noise level;
- vibrations of the material due to the stroke of the saw, which affects the accuracy of the cut.
It is recommended to use a jigsaw for cutting holes, grooves and other complex geometric elements.
How to remove a pipe on a roof from corrugated sheets
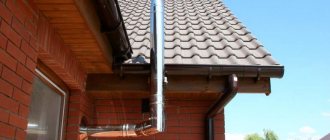
When preparation for how to remove the chimney pipe through the corrugated sheeting has been completed, it should be correctly connected and the chimney put into operation, for which:
- You need to insert a pipe through the hole in the box and direct it towards the roof, and secure the edges of the waterproofing material with adhesive tape to the surface of the chimney.
- Expanded clay is densely poured into the box or mineral wool is used.
- A rubber or silicone seal is placed on the pipe to protect the outlet from water seepage. To improve waterproofing, glue the seal to the corrugated sheet using a fire-resistant sealant.
- The smoke exhaust structure is raised in segments to the required height, while the joints are tightened with galvanized steel clamps.
- Install an outer apron, the color of the roofing, which will cover the box and rubber seal.
When installing a chimney pipe onto the roof, you must remember that negligence in such work can result in a fire and material losses.
Causes of leaks
On the roof, many holes are made from corrugated sheeting, through which the chimney and ventilation ducts exit; they violate the integrity of the waterproofing layer, leading to leaks. The most difficult thing to do is to waterproof the joint between the pipe and the roofing pie, if the installation is carried out after the roofing work has been completed, in which case it is extremely problematic to ensure a tight fit of the corrugated sheeting to the chimney wall. If the finishing of the pipe passage on the roof is done poorly, the following problems arise in the design:
- Leaks. If the chimney is installed on the roof and the joint between it and the corrugated sheeting is not properly sealed, leaks will occur in the structure.
- Rotting of the rafter frame. The flow of water through the joint between the corrugated sheet and the chimney leads to dampness of the wooden structural elements, and then to rotting and deformation of the rafters.
- Roofing corrosion. When moisture appears under the corrugated sheet, it begins to corrode, since the protection on the inside of the material is not as reliable as on the outside, since the outside of the profiled sheet is covered with a polymer protective film, and the bottom only with varnish.
- Damp insulation. If you do not seal the joint on the roof where the chimney exits, moisture penetrates into the thermal insulation material, reducing the effectiveness of insulation by half.
Installation of pipe passage through the roof
Note! High-quality finishing of the joint between the corrugated sheet and the stove or ventilation pipe is considered the key to long-term operation and reliability of the roofing. To seal this seam, use silicone sealant, a galvanized steel apron, self-adhesive waterproofing tapes, silicone or rubber elastic penetrations
Pipe passage through a roof made of corrugated sheets and metal tiles
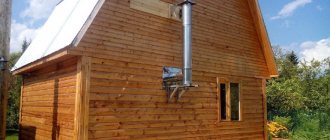
Roofs made of corrugated sheets have earned the trust of private developers due to their light weight, long service life and appearance that imitates the relief of traditional ceramic tiles. Corrugated sheets are a thin, durable, corrosion-resistant metal that is coated with a layer of paint and pressed to give the surface the desired shape. To heat the house, wood stoves, gas boilers and solid fuel stoves are installed in it. Since the installation of such equipment is technically complex, it is trusted to professionals. However, ensuring the pipe passes through metal tiles and corrugated sheets is the homeowner’s task.
Edge protection against corrosion
Regardless of which tool you select, the cut site will be damaged. Additional protection of the edges of corrugated sheets from corrosion will extend their service life.
In general, the drilling and cutting areas are resistant to corrosion, even if the protective coating is completely absent. Zinc molecules near the cut create a barrier that prevents oxidation of the sheet.
But this does not apply to cutting metal with a grinder or a manual circular saw.
Open metal is most susceptible to the influence of harmful external and chemical factors, and therefore quickly succumbs to destruction (rusts). To extend the service life, anti-corrosion and moisture-resistant preparations are manually applied to the edges of the cut, and then covered with factory paint, which should be included, or with a can of paint selected by color.
Taking into account the information provided, everyone will be able to decide for themselves what is the best way to cut the profile flooring
It is important to remember that the speed of work, the durability of the material and its aesthetic appearance depend on the choice of the right tool.
Types of chimneys
The chimney pipe is a hollow cylinder through which smoke and combustion products are discharged into the atmosphere. Stove makers use the following options for organizing this process:
- Using a brick chimney. The chimney system is made of heat-resistant bricks, designed specifically for laying stoves, and has a square or rectangular cross-section. This is an expensive way to get rid of smoke, however, it is safer and more durable. The only disadvantage of a brick chimney is the porous, textured surface on which soot and dust settle. If you do not regularly clean the pipe, soot deposits will completely clog it, reduce draft and increase the risk of fire. Bring a brick chimney through the roof, so it’s better not to do this yourself.
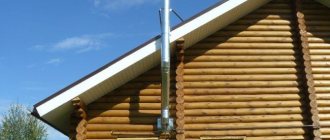
- Using a metal chimney. Metal pipes made of stainless steel with the addition of molybdenum or zinc are sold in hardware stores. Having purchased straight sections, bends and clamps, you can assemble a chimney of the required configuration by inserting pipe segments into one another. The slippery inner surface of the chimney prevents soot from accumulating, allowing air to move freely to the roof. The disadvantage of this method is that metal does not retain heat as well as brick, so due to the difference in temperatures outside and inside the pipe, condensation settles on it. The metal chimney is made of a round cross-section, and due to the fact that it consists of individual parts, it is quite easy to remove it through the roof.
Varieties
The elements differ from each other according to the material of manufacture:
- Brick chimneys. This is a classic option, which is distinguished by its reliability and undemanding finishing . Red brick is used for the production of products. To lay bricks, you must use a special fire-resistant mortar. Lime mortar works well.
- Steel chimneys. This is a budget option, characterized by ease of installation, light weight and a large selection of section sizes. But steel pipes burn out quickly, and their safe service life is relatively short.
- Sandwiches. These chimneys consist of several metal pipes of different sizes placed inside each other. Between them there are layers of thermal insulation. Sandwiches retain the advantages of simple steel chimneys without their disadvantages. The main disadvantages of such structures are the high price and the possibility of depressurization during sudden temperature changes , which can render the pipe completely unusable.
- Modular chimneys. Like sandwiches, these chimneys are multi-layered. They consist of layers of metal and fireclay (fireclay). Between them there is a layer of basalt insulation. The pipe body is made of lightweight concrete . If there is a layer of clay inside, then the chimneys are called fireclay; if there is a metal pipe inside, then the design is called modular.
Steel chimney
Sandwich
Brick chimney
Modular chimney
There are complex pipe designs that cost a lot of money to produce and install. They are rarely used in construction. This includes glass structures.
CAREFULLY!
It is strictly not recommended to use asbestos cement pipes. Their fire resistance is low, and when heated they release carcinogens that poison the surrounding air.
Selecting an output location
Choosing a convenient place to make a hole in the roof from corrugated sheets for the chimney pipe is half the success. Naturally, the decisive factor in this matter is the location of the stove. Professional stove makers recommend positioning the chimney strictly vertically, but there are more subtle nuances:
- It is best to place the hole for the chimney outlet at the highest point of the roof, that is, closer to the ridge. The optimal distance from the ridge to the pipe is 50-80 cm.
- It is advisable that the hole in the corrugated roof for the pipe does not fall on the elements of the rafter system. To bypass them, use bends and corner sections of the chimney. Using them, you can set the rotation to 90 or 45 degrees.
- The length of the chimney pipe segments is calculated so that the joints are located above or below the places where the ceilings and corrugated roofing pass. Otherwise, making a quality connection will be problematic.
- To ensure good draft, the height of the chimney system should be 1-1.5 more than the roof ridge. If the pipe is too high, the flow of smoke will have time to cool while passing through it, which leads to the appearance of condensation.
To check whether you have correctly identified the exit location of the future chimney, draw a mark on the corrugated roof with a marker and check its temperature at the end of the day - the pipe should be located in the “cold zone”, that is, remain in the shade for almost the entire day.
Preparatory stage of work
To avoid any difficulties during the pipe installation process, you need to prepare the work site and tools in advance. A hole from corrugated sheeting is cut according to the following technology:
- After determining the configuration of the chimney, they plan where the exit to the roof will be located. Let us remind you that it is better to place the pipe vertically.
- The cross-sectional size of the chimney pipes is selected based on the recommendations of the heating device manufacturer. The thicker and higher the pipe, the better the smoke is removed from the stove. It is important that all segments are of the same cross-section and fit each other, and are inserted without creating a gap.
- On a corrugated roof, mark the outline of the pipe using a permanent marker.
- Using a grinder with a thin metal cutter, cut out a hole, moving a couple of centimeters inward from the intended line. You should work with corrugated sheeting carefully and slowly so that the edge of the cut is smooth, without jagged edges that could cause injury during the pipe removal process.
- You need to make short cuts in the corners of the hole to bend the edges of the corrugated board upward.
- They cut out the same weight in the ceiling. A metal box is installed that will connect the pipe to the rafters. The chimney will pass through the hole inside the box; the distance between their walls should be at least 15 cm.
For northern regions, where the insulation layer exceeds 150 mm, sandwich pipes are recommended, which consist of two layers of metal and a heat-insulating material between them.
Exiting the chimney pipe to the roof
All the preparatory work has been done, all that remains is to correctly connect the pipe and put the chimney into operation. To bring the chimney to the roof you need to:
- Insert a chimney pipe through the hole in the box and direct it to the roof. Using adhesive tape, the edges of the waterproofing film and vapor barrier membrane are securely fixed to the surface of the chimney.
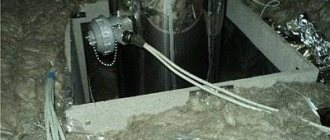
- Fill the box tightly with expanded clay or lay mineral wool. These types of insulation are not subject to fire, so they thermally insulate the pipe and protect against sudden ignition of the wooden elements of the rafter system and sheathing.
- Place a rubber or silicone seal on the pipe, which protects against moisture seepage at the outlet. To ensure better waterproofing, the seal is glued to the corrugated sheet with a fire-resistant sealant.
Do not be afraid of overheating of the waterproofing film from the surface of the chimney; it is reliably protected from fire by mineral wool or expanded clay placed in the box.
Even a novice craftsman can carry out the installation of a chimney pipe on the roof; the main thing is not to forget that a negligent attitude to this issue can lead to a fire and loss of your property.
Electric scissors
This is the most convenient tool for cutting sheet metal . It combines the cutting precision of a hand saw, the speed of a grinder or jigsaw and the quality of a circular saw. Electric scissors can be used to cut almost any broken or smooth curves, holes, grooves and other geometric shapes. The battery-powered modification allows installation and adjustment of corrugated sheets without power supply directly on site. The disadvantage is the high cost of the device.
Where is the best place to take it out?
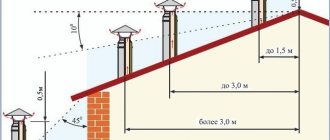
The rules for the installation of chimneys are indicated in SNiP 41-01-2003 “Heating, ventilation and air conditioning”. So in SNiP there are clear recommendations regarding the height of the pipe, which depends on its location:
- If the chimney is located within 1.5 meters of the ridge, it should be 30 cm higher than the roof.
- If the chimney is located within 1.5-3 meters from the ridge, its height should correspond to the height of the roof.
- If the chimney is located within 3-10 meters from the ridge, the height of the pipe should be 12 degrees below the ridge.
It is very important to follow these recommendations.
If the height of the chimney is underestimated, the draft may be insufficient; if it is too high, the risk of condensation will increase, and it is very harmful, as it contains acids that destroy stove bricks.
But SNiP does not indicate where it is preferable to locate the pipe passage through a corrugated roof. At the same time, experts advise placing it on the ridge, or as close to it as possible.
- First, it will prevent smoke from entering the attic.
- Secondly, the smallest part of the chimney will remain in the cold zone, which will prevent the formation of condensation.
Circular saw for cutting corrugated sheets
A circular saw resembles a turbine in its operating principle, but in comparison with an angle grinder it has a number of advantages:
- the cutting speed is 2 times lower, which eliminates melting of the polymer soya and burnout of zinc;
- under the influence of the saw teeth, small chips are formed, which are easily removed;
- accurately carries out straight cuts at high speed;
- circles for cutting thin sheet metal are comparable in cost to abrasive material for a grinding machine;
- no spark;
- the cut is smooth without burr.
Using the tool requires operating skills. Maximum efficiency is achieved when cutting corrugated sheets on a workbench or in special clamps. Not used for cutting complex geometric shapes and holes.
Installation of an abutment to a rectangular chimney
To ensure that no leakage occurs at the chimney outlet, the connection must be made correctly. For this purpose, a so-called apron is made. Its main task is to collect and drain water that can get into the gap between the pipe and the corrugated sheet. As a rule, lower (main) and upper (decorative) connections are made.
For the bottom connection you will need a sheet of galvanized steel, and standard strips of the same steel 150 by 230 mm. These strips have a 20 mm bend at the top and a 16 mm bend at the bottom to protect against leakage. The installation procedure is as follows:
- Installing a sheet of galvanized steel from the bottom edge of the chimney to the eaves. A tie may be used instead.
- Chimney gating. To do this, the junction strips are tightly attached to the pipe, and a line along the edge of the bend for the groove is marked with a construction pencil or marker. The groove itself is convenient to do with a grinder using a stone circle.
- It is very important to correctly bend the sheets one under the other. Therefore, the first abutment strip is installed from below.
- Next, the side strips are installed.
- The top bar is installed last.
Before installing the corrugated sheet, it is necessary to resolve the issue of waterproofing the pipes on the roof made of corrugated sheets. There are two popular ways:
- Use only standard waterproofing film. To do this, when installing it, a cut is made with an envelope at the place where the chimney passes. After installation, the excess part must be removed, leaving a margin of 5-10 cm, after which you can glue the waterproofing to the pipe. But there is a risk of moisture getting directly onto the membrane.
- Additional waterproofing. It is best to use self-adhesive waterproofing tape. It is installed under the decorative junction. The installation sequence is the same as for the bottom connection: starting from the bottom, move to the sides, and then to the top.
The next stage of work is the installation of corrugated sheets, after which decorative abutment strips are installed. The procedure here is the same as described above, with the exception of the need for gating.
Repairing leaks
The main cause of leakage at the joints of the pipe and roof is a violation of the tightness of the apron structures.
Before installing it, the roof should be cleaned of dust with a wire brush.
The tape is laid in several layers along the bottom of the pipe and along the adjacent corrugated sheet (or along the apron). Then it must be heated with a burner and pressed down with a wooden plank.
This type of gasket can last for several years.
Serious leaks can only be repaired by replacing the flashing.
Moisture can also get under the roof due to excessive condensate production by the pipe. To reduce its amount, you can build an umbrella on the chimney. Umbrellas are made from metals such as copper, galvanized steel and stainless steel. The cap not only reduces the volume of condensation, but also extinguishes sparks coming out of the chimney, increasing the fire safety of the structure.
If the chimney is located close to the edges of the slopes, then leaks may occur due to the accumulation of large amounts of snow masses. To eliminate this problem, the apron is supplemented with a triangular convex structure (with mandatory sealing), which will separate the snow and simplify its removal.
Features of installation of the connection when the chimney is discharged through the ridge
The chimney outlet through the ridge is the most convenient option for subsequent installation of the junction.
This also minimizes the risk of leakage and eliminates the possibility of snow and debris being trapped on the roof.
At the same time, to implement this idea it will be necessary to violate the integrity of the ridge beam. This problem can be solved by installing additional supports.
If the chimney exits exactly in the center, an apron made of smooth metal of the same color as the entire roof is used to remove precipitation. The base of the apron must be sealed.
The most suitable material would be butyl rubber self-adhesive tape. The upper part must be protected from leakage with a decorative joint.
Repairing leaks
The main cause of leakage at the joints of the pipe and roof is a violation of the tightness of the apron structures. To solve this problem, it is necessary to build an additional external apron from bitumen tape.
Before installing it, the roof should be cleaned of dust with a wire brush.
The tape is laid in several layers along the bottom of the pipe and along the adjacent corrugated sheet (or along the apron). Then it must be heated with a burner and pressed down with a wooden plank.
This type of gasket can last for several years.
Serious leaks can only be repaired by replacing the flashing.
Related article: Do-it-yourself gable roof
Moisture can also get under the roof due to excessive condensate production by the pipe. To reduce its amount, you can build an umbrella on the chimney. Umbrellas are made from metals such as copper, galvanized steel and stainless steel. The cap not only reduces the volume of condensation, but also extinguishes sparks coming out of the chimney, increasing the fire safety of the structure.
If the chimney is located close to the edges of the slopes, then leaks may occur due to the accumulation of large amounts of snow masses. To eliminate this problem, the apron is supplemented with a triangular convex structure (with mandatory sealing), which will separate the snow and simplify its removal.
Installation of an abutment to a round pipe
Often, instead of a rectangular brick chimney, a round pipe is used. To waterproof such a pipe, roll waterproofing based on bitumen or foil tape made from modified bitumen is used. Moreover, the foil will protect the tape itself from overheating, which will significantly extend its service life.
To protect the chimney outlet, there is no need to install two stages of connection.
Instead, an apron-cap, or, as it is also called, a roof passage, is put on the round pipe.
Attach it directly to the sheathing and seal it with sealant.
When using a roof passage, it is important to consider one nuance.
Rubber heated by the pipe will melt.
To prevent this from happening, a clamp with a heat-resistant gasket is attached to the chimney at the junction between the pipe and the apron.
Hacksaw blade
An even simpler solution would be to use a hacksaw blade for metal. Here we will repeat approximately the same actions as when working with a jigsaw. In terms of its availability, this option can be considered the most acceptable in most cases.
It is important to note that you should be careful when working with the blade, because it is quite possible to get injured when sawing. To avoid this, you can take simple precautions, for example, wrap one side of the fabric in several layers with electrical tape or put heat-shrink tubing over it. If not needed, such an improvised handle can be removed
If not needed, such an improvised handle can be removed.
How to vent a chimney through an existing roof
We have already answered the question of how to bypass a pipe on the roof with corrugated sheeting. Now let's consider a situation where it is necessary to remove the chimney through an existing roof.
First, the following preliminary work is carried out:
- Determining the diameter of the future chimney.
- The cutting line is indicated on the corrugated sheet with a construction marker. It is worth leaving a few centimeters of margin on the smaller side. For example, if you need a hole of 40 by 80 cm, then you need to mark 38 by 78 cm.
- It is best to cut out the hole using a grinder with a thin metal circle. To avoid the formation of burrs, work is carried out as carefully as possible.
- Make small cuts at the corners of the hole and bend outward those few centimeters of corrugated sheet that we left in reserve.
- In the place where the pipe passes, it is necessary to make a continuous sheathing so that it is possible to secure the lower junction strip and the corrugated sheet.
- Cuts are made in the insulation and waterproofing. In order not to throw away excess, the waterproofing can be cut with an envelope and temporarily secure the edges with staples. This cannot be done with insulation.
- A box is constructed between the chimney and the two rafters located on either side of it. The gap between it and the chimney itself is around 150 mm.
- The edges of the waterproofing film are glued to it.
- Before running the pipe through the roof, it is necessary to resolve the issue of thermal insulation to avoid a fire. Stone wool is best suited for these purposes. This is exactly why we left a gap in the box.
After the pipe has been thermally insulated, you can begin its direct installation.
- We install the chimney in the box. It is important that there is at least 5 centimeters of clearance between the open parts of the pipe and the tree.
- To prevent the pipe from collapsing, steel clamps are used that are attached to the rafter system and sheathing boards.
The next stage is external work. Now we will look at how to seal a pipe on a roof made of corrugated sheets.
- If there is just a round pipe leading outside, without a duct, it is necessary to waterproof it using foil tape or roll waterproofing, and install a roof passage, attaching it to the sheathing we created and treating the contact areas with sealant.
- If a rectangular box is installed outside, you will have to install a lower junction bar to prevent leakage.
Preliminary work
The process of removing the chimney through a sheet of profiled flooring is preceded by a number of preliminary works, the competent implementation of which will be the key to the quality of the work performed.
- The diameter and length of the pipe are determined.
- On the corrugated sheeting, use a marker to mark the dimensions of the hole for the chimney.
- The sheet is cut according to the drawing. It is good to carry out the operation by using a grinder with a thin circle for working with metal. It is fundamentally important to carry out the work very carefully. This will help avoid the formation of burrs.
- When cutting out a hole, be sure to deviate a couple of centimeters from the drawn contour.
- The cuts at the corners of the perimeter will allow you to bend the edge of the sheet. The direction of the bend is the plane of the roof.
- A box is arranged between the chimney pipe and the sling system, the dimensions of which suggest the presence of a gap of 14-15 cm. As a rule, the location of the box is in the attic room.
- A hole of a similar size is arranged in the ceiling.
- The layer of waterproofing and insulation must be removed. There is no need to cut a hole in them, just make a slot like an envelope and bend the edges, which can be secured with nails, staples, and self-tapping screws. The result should be the presence of a through hole.
- When the design of roof insulation layers is complex, it is more advisable to give preference to a pipe that allows for self-assembly, for example, a sandwich.
The need for insulation
Before removing the chimney through the corrugated sheeting, it is necessary to provide for its insulation and thermal insulation. This measure will protect the house from the possibility of a sudden fire due to overheating. To carry out the work, it is better to use a non-flammable material such as stone wool, since it copes well with the function of insulation and is absolutely hygroscopic.
Design principles
The chimney in bathhouses is installed to remove harmful products remaining after fuel burnout and provide draft in the stove. The method of leading the pipe through the roofing sheet is chosen during design. The main condition is that the roof must be protected from possible fire, especially in places of contact with the pipe. No moisture should seep through the hole. The height of the chimney is selected depending on the location of the roof ridge and the requirements of SNiP:
- At a distance of 150 cm from the highest point of the roof, the pipe should exceed the height of the ridge by 50 cm.
- At 150–300 cm, the pipe can be located at the same level as the ridge.
- At 300 cm from the ridge, a straight line is drawn at an angle of ten degrees. Below this limit, installation of a chimney is prohibited.
The smoke exhaust passage unit is installed anywhere on the roof. Often a chimney is made at the highest point of a horizontal rib. This installation method is considered simpler, but the rafter system becomes less durable, since the ridge beam is sawed. To strengthen it, you need to install additional supports on the sides of the structure.
It is better to place the pipe close to the ridge element. This ensures the chimney is protected from cold and condensation accumulation.
The opening for the smoke exhaust system can be square, round, oval or rectangular. To protect the roof from sudden heating, a box is installed.
Measurements and calculations
On a roof with a ridge, the height is calculated depending on the interval between the pipe and the ridge:
- With an interval of 1.5 meters, the height of the pipe should be 0.5 meters higher than the roof ridge.
- With an interval of 1.5 to 3 meters, the ridge and pipe should be at the same level.
- If the interval between the pipe and the ridge is more than 3 meters, then the length of the pipe above the roof can be determined based on a line that runs at an angle of 10 degrees from the ridge run to the horizon.
Thermal insulation materials, waterproofing and vapor barrier should be at a distance of 15 cm from the brick or concrete chimney; if the pipe is a ceramic product, then the permissible distance is 25 cm.
Non-standard equipment
Sheet material is cut in a factory using plasma or laser cutting. Such equipment is stationary and allows you to perform precise work on a large scale. The laser allows you to cut holes from 1 mm in diameter and cut lines of any configuration. The work is carried out automatically. Cutting drawings are entered into a computer system that controls the process at all stages.
How to make a smooth hole in the roof?
How to make a smooth hole in the roof?
Post by Vadim Semin » March 19, 2010, 11:32 am
Re: How to make a smooth hole in the roof?
Post by vladimir123 » Mar 19, 2010, 11:58 am
Re: How to make a smooth hole in the roof?
Posted by jetcool » Mar 19, 2010, 12:08 pm
To pass through such roofs, it is wise to use a special passage unit - a piece of pipe with a riveted/welded platform installed on this piece of pipe at an angle corresponding to the slope of the roof. The ventilation shaft is usually installed at the horizontal junction of two sheets of metal tiles; The top sheet of metal tile covers the plate of the passage assembly, and the bottom sheet of metal tile passes under the plate.
As for cutting, you can’t cut anything better than with scissors. It is clear that you need to have the skills to work with them on the roof or air ducts. You need current shears that are good according to the manufacturer and have “curves” according to the cutting profile.
Re: How to make a smooth hole in the roof?
Post by vladimir123 » Mar 19, 2010, 12:12 pm
Re: How to make a smooth hole in the roof?
Post by Vadim Semin » March 19, 2010, 12:30
Re: How to make a smooth hole in the roof?
Post by Vadim Semin » March 19, 2010, 12:34 pm
jetcool wrote: To pass through such roofs, according to the mind, you need to use a special passage unit - a piece of pipe with a riveted/welded platform installed on this piece of pipe at an angle corresponding to the slope of the roof. The ventilation shaft is usually installed at the horizontal junction of two sheets of metal tiles; The top sheet of metal tile covers the plate of the passage assembly, and the bottom sheet of metal tile passes under the plate.
As for cutting, you can’t cut anything better than with scissors. It is clear that you need to have the skills to work with them on the roof or air ducts. You need current shears that are good according to the manufacturer and have “curves” according to the cutting profile.
Re: How to make a smooth hole in the roof?
Post by baron » Mar 19, 2010, 8:04 pm
Re: How to make a smooth hole in the roof?
Post by WhiteEagle » Mar 19, 2010, 8:11 pm
Re: How to make a smooth hole in the roof?
Post by vladimir123 » Mar 19, 2010, 8:13 pm
Re: How to make a smooth hole in the roof?
Post by WhiteEagle » Mar 19, 2010, 8:14 pm
Re: How to make a smooth hole in the roof?
Post by vladimir123 » Mar 19, 2010, 8:17 pm
Re: How to make a smooth hole in the roof?
Post by vladimir123 » Mar 19, 2010, 8:28 pm
Re: How to make a smooth hole in the roof?
Post by VVVlad » March 19, 2010, 8:33 pm
Re: How to make a smooth hole in the roof?
Post by vladimir123 » Mar 19, 2010, 8:35 pm
Source: www.promalp.ru
Workflow - step-by-step technology
Surely you are wondering whether it is possible to install high-quality and reliable ventilation (chimney) yourself and at the same time save not only money, but also time - our answer is positive. The sections below will describe detailed instructions to confirm that this process is possible for independent mastery.
Stage one - preparatory
Initially, you should prepare everything necessary for subsequent work:
- Purchase a pipe, if not available, and fire retardant material.
- Fastening materials.
- Tool: Building level.
- Welding machine - in case the pipe has to be joined.
- Screwdriver.
- Hammer.
- Jigsaw and grinder.
- Wooden beam.
- Finishing material.
For your information! The drawing does not have to be professional, the main thing is to indicate in it all the main points: the diameter and height of the chimney, communications that will need to be bypassed, etc.
Stage two - roof preparation
Now let's move on to the process where you already need to work with your own hands:
- To begin with, on the roof we measure the distance from any rafter beam, which is half a meter plus the diameter of the ventilation pipe.
- We build another beam in the indicated place to increase the stability of the roof.
- Using a regular plumb line from the center of the measured distance, we measure a point on the floor of the attic or attic.
- Around this point we attach a vertical and horizontal beam so that there is an equal distance from each edge to the pipe (its center is the measured point).
Instead of timber, you can use a metal profile
- We drill a hole through in the indicated place so that a hole is formed on the ceiling of the first floor. According to the plan, this should be exactly above the stove or half a meter from this place.
Note! It is better to route the ventilation pipe to the roof strictly vertically, this allows for efficient pumping of carbon monoxide from the room.
As a result, we should get a reinforced box inside which a chimney will be laid. At the same time, it should be installed only in the attic or attic space; in the living room, it is enough to decorate the pipe with finishing materials.
You can avoid the box if you purchase a galvanized pipe casing
The box is necessary for the safe operation of the ventilation system, which often heats up to critical temperatures - protection for both those living in the house and for flammable materials.
Stage three - through hole
Now let's move on to preparing a specific place for the passage of the ventilation pipe in the ceiling of the first floor/floor of the attic:
- If the ceiling is made of wood, you can cut a circle of the required diameter using a chainsaw. We remind you that you need to add 15-20 sms on each side to the diameter of the pipe itself.
- If you have to work with a concrete slab, then a long drill and a hammer drill will help you with this - the tool drills many holes in a circle. A very weakened piece of the slab is knocked out with a sledgehammer.