Proper installation of the chimney pipe through the attic floor, rafter system and roof is no less important than compliance with all other requirements when building the stove itself. The fire safety of the house, and therefore of everyone living in it, as well as the efficiency of the heating device, will depend on how reliably these components are equipped.
Chimney passage through a wooden ceiling
The passage of the chimney through a wooden ceiling must be especially reliable, since in this area the heated walls of the pipe are in close proximity to flammable materials. In order to protect the floor elements, various thermal insulation materials and special devices can be used - there is no shortage of them on the market today.
Such work must be carried out with the utmost responsibility. Therefore, in order to understand these issues, you should familiarize yourself with the current requirements of regulatory documents, consider the process of installing a chimney through the ceiling in order to carry out everything strictly according to the rules established by regulatory organizations.
General rules and location selection
How to route a stove pipe through a wooden ceiling - this must be done so that there are no problems, as in the photo. The main task of the preparatory stage is to determine the location of the stove installation and the installation of the chimney to the street. Depending on the materials of the floor slabs and chimney pipes, work will need to be done taking into account several sizes:
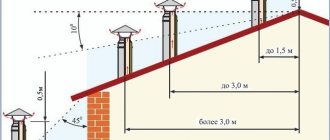
- the maximum distance from the ridge to the pipe canopy is 1000 mm, and the minimum protrusion is 350 mm;
- distance to wooden wall surfaces – at least 250 mm;
- length of the horizontal section of the chimney up to 1000 mm;
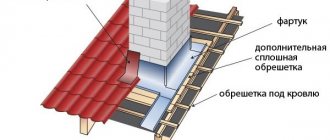
- When choosing a passage location, take into account the passage of the pipe through the roof structure. This place should be located between the rafters;
- When passing steel pipelines through wooden slabs, finishing elements and roof structures, we must use homemade, industrial boxes or couplings with an internal layer of thermal insulation.
What is it used for?
PPU is designed for pipe passage through wall and ceiling ceilings; it is a round or square box with a hole. The main task is to ensure the protection of wooden floors from overheating, since during operation the temperature of the external contour of the chimney increases and heats objects in the immediate vicinity.
Such a device can be purchased in specialized stores or assembled with your own hands. When choosing a finished product, it is necessary to take into account the diameter of the chimney, as well as the location of the stove and ceilings.
For thermal insulation of the unit, basalt cotton wool rolls with a foil screen, which can be used at high temperatures, are perfect.
Do-it-yourself installation of polyurethane foam
The hole should be approximately 0.5 mm larger than the thickness of the channel diameter. This will ensure ease of insertion. Thermal insulation is packed along the outer and inner walls. The distance between them is 1-2 cm.
If you do not have a ready-made kit, you can perform high-quality stove heating in your home without it. To do this, the free space in the ceiling is sealed with fire-resistant thermal insulation, on top of which steel strips are installed. A plate made of heat-resistant metals is installed on it, in which a suitable hole is cut. This plate is secured with a bolted connection. It is most convenient to make it from metal.
When installing it, we comply with all requirements and maintain the established distances to fire hazardous objects. The resulting voids on the side of the second floor or attic should be filled with expanded clay or other non-flammable insulation.
Passage of a brick chimney through a wooden ceiling
Laying out a stove chimney is a complex process where many nuances must be observed. Therefore, it is better to entrust this matter to specialists. In addition, errors during construction can lead to poor draft and fire.
An important point: simple building bricks are not suitable for laying individual parts and the entire chimney. A prerequisite for long-lasting and trouble-free operation of a brick pipe is the use of a ceramic heat-resistant type of brick.
When building structures, it is necessary to lay them out in a special way in the places where the floors pass. The ideal option would be to cut the chimney on the ceiling. The height of this section of the masonry must be at least three rows of bricks. The thickness of the chimney walls when passing through the roof or wall (partition) should be greater than along the main height. The distance to flammable materials must be at least 25 cm.
Two passages of a brick chimney are possible. In the first option, the passage unit is mounted by increasing the thickness of the masonry, the so-called “fluff”. The second option for passing a brick pipe through the attic floor without laying out the “fluff” is carried out in almost the same way as for a metal pipe. In this case, the chimney along its entire height has the same cross-sectional size, without increasing the thickness of the walls.
The hole in the ceiling is secured with a stainless steel sheet or mineralite slab. A window is cut out in the center of the sheet through which the chimney will pass. The length and width of this opening should exceed the similar parameters of the pipe by literally 3–5 mm. When laying a chimney, approximately three or four rows up to the ceiling, a sheet with a prepared opening is placed on it, and then the laying is carried out further up to the height of the finished attic floor. Wooden floors are laid with mineral wool to reduce heat transfer from the pipe. But a more reliable way would be a stainless steel box into which a brick chimney will pass; the distance from the pipe to the walls is also laid with mineral or kaolin wool at 5-7 cm.
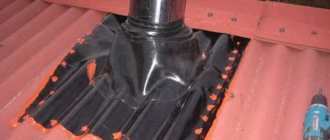
Sealing joints
This stage is considered the most difficult when removing through the roof. To do this, install a lower apron made of tin.
A “tie” made of metal is placed under it, the purpose of which is to drain liquid into the drain. Outside, you can install a decorative apron, the purpose of which is to create an aesthetic appearance.
When using a flexible coating, the task of waterproofing is greatly simplified. It is quite easy to bend such material onto a pipe that has been pre-coated with impregnation to create a better fit. It is also recommended to treat the joints of the wall and roof with sealant.
Video tip - assembly of a chimney pipe passing through a wooden ceiling
From the following video you can learn how to properly lay the structure without spending extra effort.
Penetration for a metal chimney pipe
Special devices and materials for sinking a metal chimney
Box-shaped ceiling-passage structures
Arrangement of the passage of a metal chimney through a wooden floor structure can be done using a ready-made ceiling-passage assembly, or one made independently, but in compliance with the standard dimensions.
If a ready-made version of such penetration is purchased, then its size is selected according to the diameter of the chimney pipe. The convenience of using a factory box is that its design already includes all the dimensions established by SNiP, so you don’t have to rack your brains about it. All that remains is to open an opening in the ceiling for penetration, and then strengthen its thermal protection of the surfaces.
Such pass-through units are sold in specialized stores. Sometimes they are immediately supplied with sets of pipes for installing a chimney
You can make a box penetration yourself. It is made from different materials - it can be a steel sheet with a thickness of at least 0.5 mm, alone or in combination with mineralite, asbestos sheet, with mineral basalt wool foiled on one or both sides. If the box is purchased or made of metal, then it will need to be thermally insulated with regular or foil-coated mineral wool, vermiculite, or expanded clay.
If you decide to make such a penetration yourself, then the diameter of the hole in its central part should be approximately 0.5 mm larger than the outer diameter of the pipe. This is done so that the metal pipe passes freely through the box, but at the same time, the gap between them is not too large.
To make a penetration, you can use the dimensions shown in the illustrations and presented in the table:
The main dimensions of the passage box for a metal chimney
Recommended dimensions of the passage box
| Letter designation of structural elements and size in mm | |||
| d - hole diameter | L - length of the side of the decorative panel of the box | G - width of the sides of the box | H - box height |
| 205 | 580 | 370 | 310 |
| 215 | 580 | 370 | 310 |
| 255 | 580 | 450 | 310 |
| 285 | 580 | 450 | 310 |
- If the passage box is made only from foil-coated mineral wool 50 mm thick, then cutting the elements for it is best done according to pre-made templates. The parts are assembled into a single structure using heat-resistant foil tape. Having chosen this option for cutting, you must not forget that you will also need to purchase or manufacture one or two metal panels for it. One of them is fixed to the ceiling surface, flush with it, and the second (optional) covers the thermal insulation material from the attic side.
This box penetration is made of dense foil-lined mineral wool
- Another option for penetration could be a box made of metal sheet, insulated with the same foiled mineral wool. This insulation is cut into strips with a width equal to the height of the resulting box and laid along the walls at the end, with the foil side facing the pipe. The space of the box free from the pipe must be tightly filled with thermal insulator.
- The box can also be made of mineralite (fiber-reinforced concrete slabs) 10 mm thick. Structural elements are also cut out using prepared templates and then fastened together using metal corners. A smaller box made of a metal sheet 0.5 mm thick is installed and secured into a casing made of this material.
Minerite box penetration with metal liner
There should be a gap of 10÷15 mm wide between the walls of the outer and inner boxes, which is filled with basalt insulation, and the space around the pipe can be filled with vermiculite, expanded clay of fine or medium fraction, or the same mineral wool. The holes through which the pipe will pass must have the same diameter in both boxes. To aesthetically design the penetration from the side of the living room, you can also use a metal plate, or leave the fiber cement board open. After completing the installation work, it will be easy to paint the slab facing the living space to match the color of the ceiling.
Video - Manufacturing and installation of a homemade box-shaped penetration for the chimney of a sauna stove
Heat-resistant materials for making penetrations
The characteristics of heat-resistant materials that are used to insulate the ceiling penetration deserve a few minutes of attention. They differ in some qualities from conventional insulation made on the same basis.
Strong, durable, environmentally friendly material - mineralite
- Minerite is an absolutely non-flammable material, which is also called fiber cement boards. It is often used for wall cladding in areas where stoves are installed and where chimneys pass through.
Minerite prices
mineralite
This material is not only resistant to extremely high temperatures, but also moisture-resistant, has good mechanical strength, and does not contribute to the formation of mold and mildew colonies. Minerite is an environmentally friendly material, therefore at elevated temperatures it does not emit fumes harmful to human health.
Minerit LV panels are used to make screens installed in the grooves and on the walls around stoves and chimneys. In addition, such panels are also suitable for the construction of fire-resistant partitions.
- Non-combustible slabs made of basalt wool and covered with aluminum foil are used for fire protection of walls and passages around chimneys.
High-density basalt mineral wool slabs with foil coating can also be used as a material for the manufacture of ceiling penetrations
This material is made from environmentally friendly components and is highly resistant to aggressive biological and chemical influences. In terms of its thermal insulation properties, mineral wool is certainly many times superior to mineralite, but is inferior to it in mechanical strength and durability.
High-quality basalt slabs do not accumulate moisture, and they do not create a favorable environment for the settlement of rodents and insects, or the appearance of microflora colonies. This type of insulation belongs to the flammability group G1. (And this is only due to the adhesive layer that holds the foil covering, since in its “pure form” basalt insulation can be classified as a completely non-combustible material). Basalt slabs from different manufacturers may differ slightly in the upper limit of the operating temperature range. But in any case, it ranges from +750 to 1100 degrees, which should be more than enough for the chimney duct.
Prices for basalt slabs
basalt slabs
Installation of penetration for a metal pipe
Before installing the penetration into the window cut out for it in the attic floor, it must be prepared, additionally strengthened, if necessary, and insulated from high temperatures.
The installation of a box penetration is always preceded by checking and preparing the ceiling structure for this operation
- The first step is to additionally monitor the condition of the opening and the surrounding parts of the ceiling structure. This is done to make sure that the box will be securely fastened in it.
The box penetration must be firmly fixed to the ceiling structure. It is, of course, positioned so that it is between the floor beams (it is clear that these issues regarding the placement of the stove in the room are always thought out in advance). Beams can become a reliable basis for fastening the penetration, located on the sides of it.
However, it often happens that the floor beams are located too far from each other and therefore the floor “pie” in the area where the pipe passes does not have the necessary rigidity and will need to be strengthened. Another option, exactly the opposite, is that the spacing of the installed beams is too frequent and does not leave enough free space to accommodate the box penetration.
In any of these cases, after removing the desired section of the coating, you can mount the frame in accordance with the dimensions of the box using a wooden beam. The cross members of this frame are rigidly cut into the floor beams. If necessary, if the beams are too widely spaced, additional longitudinal support beams can be used in the frame. An example of creating such a frame is shown in the illustration.
An example of preparing an attic floor frame for installing a box penetration for a chimney.
Similar checks and strengthening (revision) of the frame will be necessary if the chimney is installed in an already built house. However, as a rule, the installation of stoves and, therefore, the installation of chimneys are planned in advance. And during the installation of floor beams during the construction of a building, such a frame is provided in advance for the subsequent installation of a box penetration.
- Further, all wooden parts of the ceiling structure located around the perimeter of the cut window for penetration must be additionally treated with a special impregnation. The fire retardants included in the composition will increase the fire-fighting characteristics of the created unit. Further operations are carried out only after the treated surfaces have completely dried.
Installation of the penetration must be carried out with high precision so that the verticality of the chimney pipe is not disturbed
- The next step is to install a penetration box into the cut opening from the side of the room. The edges of its bottom part are securely screwed onto the ceiling surface with self-tapping screws.
But this operation should be performed only after carefully monitoring the location of the round opening for the chimney relative to the heating device. It is unacceptable for even a slight deviation to cause unevenness or a “kink” in the installed pipe. This will create unnecessary stress in its walls and may well lead to insufficient sealing at the joints.
It is best to accurately adjust the position of the box passage using a plumb line to ensure that the axis of the pipe being installed is vertical.
- Next, the lower part of the chimney pipe is assembled, starting from the outlet pipe of the stove (boiler).
It is very important - whatever the distance from the stove to the ceiling, and whatever components are used, never, under any circumstances, the connection of two elements (pipes) of the chimney should fall on the ceiling. Moreover, the minimum distance from such a connecting unit to the surface of the ceiling (no matter from below, indoors, or from above, from the attic) must be at least 300 mm.
The requirements for the correct location of the interfaces of individual pipes are important, of course, from the standpoint of ensuring visual inspection. But the main predetermining factor of such a considerable (300 mm) distance from the ceiling is the continuing likelihood of a breakthrough of hot gases in these, let’s be honest, the remaining most vulnerable places of the prefabricated metal chimney.
- The next stage of work can be carried out from the attic or living space, depending on how it is more convenient to install the next section of the pipe. If the work is carried out from the attic side, then the next part of the chimney pipe is passed through the hole and fixed to the lower, already mounted section.
An approximate diagram of the relative arrangement of parts of the ceiling penetration assembly.
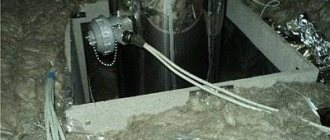
- When the pipe is brought into the attic, you can proceed to filling the penetration box with heat-insulating material. If one of the bulk thermal insulation materials is selected, and there are small gaps between the pipe and the border of the round hole, they can be sealed with basalt wool or plastic clay, and then the insulation can be poured on top.
The ceiling penetration box is filled to capacity with expanded clay
It is best to choose expanded clay or vermiculite from bulk heat-insulating materials. Ordinary sand is used for backfilling only as a last resort, since it has too fine a fraction, is heavy and has excessively high thermal conductivity for such a function. Expanded perlite sand is not particularly convenient to use in such conditions due to its excessively high “volatility”.
The easiest way is to fill the box with heat-resistant basalt wool, since it has the lowest thermal conductivity. When using mineral wool mats, the box from the attic side should not be completely sealed in order to have free access to the pipe along its entire length. If the pipe goes to the second floor, then the hole in its floor with insulating material around the chimney can be closed with a metal sheet, screwing it to the floor.
The selection of photographs below demonstrates the installation of a homemade box-shaped penetration made from dense slabs of foil-coated basalt insulation.
Installation sequence for a homemade box penetration for a chimney pipe
— The first two fragments: this is a finished homemade tunnel from different angles.
— Third fragment: a window was cut out in the ceiling to install the penetration. Please note: to ensure maximum safety, the master also filled the resulting gap between the ceiling covering and the attic floor with mineral wool.
— Fourth photo: The penetration box is inserted into the prepared opening and fixed from below.
— Fifth fragment: After installing the section of pipe leading into the attic, the penetration is closed from below with a metal panel. It is securely fixed to the ceiling with self-tapping screws, completely covers the edges of the window of the passage unit, holds the heat-insulating box well in the ceiling and provides mechanical protection for the mineral wool panel, which is not particularly durable.
— Sixth photo: Continued installation of the chimney pipe. The gap between the pipe and the box will be tightly filled with mineral wool. Since the attic in this case is “inhabited”, the passage unit will be covered with a decorative metal plate.
And in the video below, the master did without creating a box-shaped structure at all.
Video: fireproofing of a chimney pipe in a passage through a wooden ceiling
Chimney pipe lining and special caps
One of the finishing methods is cladding. For this, natural or artificial stone is used, but this option is not practical. This is explained by the fact that often the cladding is torn off from low-quality bricks, along with the top layer of ceramics, which spoils the roof. If the brick is of high quality and beautiful, there is no point in covering it.
When the sheathing is heavy, it should be fixed not only with adhesive, but also with hardware. For this purpose, metal brackets or dowels are used - nails directly through the stone tiles.
To protect ventilation ducts from atmospheric hazards, protective caps are installed on the pipe heads. They reduce traction force, so their size should not be too large. In this case, the distance from the top of the pipe to the bottom point of the cap must be at least 15 centimeters. The shape of this product and the material it is made from can be very different.
How to make a chimney: choosing insulation
Fireproof plate
We believe that special attention should be paid to the choice of insulation. We repeat: most will put expanded clay or mineral wool inside the box, and cover it on the outside with mineralite (its analogue is Flamma sheets) or basalt cardboard. This is a valid solution. It is doubtful to use asbestos instead of mineralite.
asbestos cardboard (asbestos cardboard)
ADVICE! Do not make an internal backfill of sand, because it transfers heat perfectly, and when the chimney heats up to 400 degrees, even this is a guaranteed fire. Because wood lights up at 330 degrees, but if you heat it for a long time, it will light up at 150-170 degrees. Sand will do a very bad job.
However, in our time, other refractories have appeared - the same calcium silicate, known commercially as superisol or Silca slabs. But it is a slab material.
The chimney in the ceiling of the bathhouse in the area of the polyurethane foam can be lined with other materials, such as cotton wool or felt. If we talk about stone derivatives, these are basaltine and Basfiber, which are technologically more advanced modifications of mineral wool.
But now you can buy not only them, but also ceramic fibers, in particular, Supersilica, which is a silica fiber from which either cotton wool or mats are made. It has no binding substances at all, which in mineral wool burn out over time, causing it to crumble. The manufacturer's website directly states that this fiber is suitable for insulating the ceiling passage in a bathhouse.
Below is a video that shows a funny stress test of everything that can be stuffed into a PU foam assembly:
There is also mullite-silica wool, but this is a real refractory that can withstand temperatures twice as high as the maximum for a chimney.
Passage through a wooden floor
As a rule, the most common material when building a bathhouse is wood. Therefore, when passing a chimney through a ceiling, it is necessary to use a passage unit.
Below we will look at the main options for the passage duct, based on the material of the chimney itself.
Use of brick structures
If you have a brick chimney in your bathhouse, then the cutting of the chimney on the ceiling is made of brick by thickening it at the passage points. The height of this section of the masonry must be at least three rows of bricks.
Laying out a stove chimney is a complex process, since errors during construction can lead to poor draft and a fire. Therefore, it is better to entrust this matter to specialists.
Plasterboard box
The passage box can be made from heat-resistant plasterboard. To do this, you will need to prepare insulation from mineral wool or asbestos. This option is made in the same way as in the case of a metal box. The first step is to install plasterboard walls, and fill the space between them with insulation.
Expanded clay can be poured on top of the cotton wool or even instead of it, which gets clogged into all pores and provides additional insulation.
Metal box
A more popular alternative to passing through wooden floors has become the use of a stainless steel ceiling-pass assembly. It is a box made of several steel plates; a hole is made in one of the walls based on the diameter of the outer contour of the sandwich. The void between the pipe and the box is filled with heat-insulating material.
Ceiling cutting for sandwich pipes is found in GOST and conventional. They differ in the size of the hole. According to GOST, it is necessary to cut a square measuring 1.0 by 1.0 m in the ceiling or wall, into which the polyurethane foam will be directly inserted. However, this size is not particularly popular, since then it is necessary that the distance between the logs in the bathhouse be 1.0 x 1.0 m, otherwise it is very difficult to insert such a unit.
A regular knot is a square measuring 48-50cm. To determine the size of the cut, you need to start from the diameter of the sandwich:
- if more than 200mm, then the correct size is 1.0x1.0m;
- if 200 mm – 48-50cm.
Important information: if the chimney is for a fireplace, then the size of the cut must be 1.0 x 1.0 m.
When installing the box, foil insulation is glued to all points of contact with wooden surfaces.
Pass-through unit: structure and dimensions of the box
There are several names for a box that is installed in the gap of a hole cut in the ceiling: these are “pass-through unit”, and “cutting box” and “ceiling cutting”, and PPU (ceiling pass-through unit).
What is he? Quite simply, it is a box with insulating material that should fit into the hole you cut, and also keep the chimney pipe exactly in the center.
Box for the passage of the chimney through the ceiling for installing a stove in a steam room
In addition to this, there is also the finishing of the hole itself, which is very desirable to be reinforced with a material that can withstand high temperatures, is non-flammable and has low heat transfer. Below we will talk about specific materials, but the problems that should be solved by them are exactly the same.
The pass-through unit is made of metal. In particular, it can be stainless steel. In any case, the part that is visible from the steam room is usually made of stainless steel. On sale you can find boxes made entirely of stainless steel, and entirely of galvanized steel, and combinations thereof.
The boxes vary in size. And not only the box itself, but also the internal hole through which the chimney must pass. Diameter varies from 115 to 300 mm.
As for external dimensions, everyone interprets GOST in their own way. We already understand why this happens - some believe that a box with a side of 1 meter corresponds to GOST, others that 26 cm + pipe diameter is quite enough. And all this is based on technical standards.
IMPORTANT! If there is any discrepancy, one has to rely on common sense. What is the main limitation when passing through the ceiling? Ceiling beams, if the ceiling is suspended
If the dimensions of the box are greater than the distance between the beams, you will have to cut the beam and insert the cross member in another place. This will affect the load-bearing capacity of this beam. That is why they try to fit the box between the existing beams without additional waste of effort and time
What is the main limitation when passing through the ceiling? Ceiling beams if the ceiling is false. If the dimensions of the box are greater than the distance between the beams, you will have to cut the beam and insert the cross member in another place. This will affect the load-bearing capacity of this beam. That is why they try to fit the box between the existing beams without additional waste of effort and time.
The ceiling in the bathhouse and the chimney. Photo StroyDom
Of course, if the position of the furnace had been thought out at the design stage, then the beams could have been positioned so that the foam would pass between them. Consequently, the size of the PPU would need to be thought out in advance.
On the other hand, there are now materials with low heat transfer that can withstand heating up to 1000-1100 degrees. If you use them, there is no need to cut out a large piece of the ceiling. For example, watch a video showing a test test of a calcium silicate slab. We then looked at the technical characteristics of this refractory - they are simply excellent! Find out for yourself (we do not advertise or sell).
For now, let’s summarize the data. It turned out that, according to SNiP and other standards, there are the following options:
- radius of ceramic pipe + insulation + 13 cm;
- ceramic pipe radius + 25 cm;
- pipe radius + 38 cm;
- pipe radius + 50 cm.
ATTENTION! There are no data for steel pipes in the first two cases. As for the device, everything is simple: the metal box has the height of the ceiling, and is closed at the top and bottom with lids with holes for the diameter of the pipe
Lids are larger than the box size
As for the device, everything is simple: the metal box has the height of the ceiling, and is closed at the top and bottom with lids with holes for the diameter of the pipe. The lids are larger than the size of the box.
The box itself is lined on all external surfaces with a heat insulator - mineralite or basalt cardboard. Expanded clay is poured inside the box or basalt wool is laid. This is the standard option and is done most often. But in the video you saw that you can get by with a calcium silicate slab and use it to insulate the pipe in the bathhouse from the ceiling.
Ceramic chimneys
When manufacturing an internal chimney, the following requirements are imposed on it:
Ceramic pipe installation
- the minimum distance from the chimney to the load-bearing beams, if laying asbestos sheets in two layers between the pipe and the ceiling is provided - 250 mm, without laying asbestos - 380 mm.
- if there is asbestos insulation, the distance from the pipe to the wooden wall is taken to be 250 mm or more; if insulation is not provided, the distance is taken to be at least 380 mm.
- when using mineral wool for insulation, the distance from the pipe to the rafters is taken to be at least 130 mm;
- when using flammable materials - 260 mm;
- for roofing in places of contact with the pipe, materials resistant to high temperatures (steel, ceramic tiles, slate) should be used. If materials such as flexible bitumen shingles are used, it is necessary to prevent their contact with the pipe. The distance from the bitumen coating to the chimney in plan should be at least 50 cm.
All the requirements described above are relevant for the manufacture of an internal chimney, but sometimes it is better to choose an external outlet. It avoids complications and increases the safety of the structure, since combustion products cannot enter the room.
This installation is only suitable if the boiler is located directly on an external wall. The design will not allow for an extended horizontal section. The advantages of use include the attractive appearance of the building. This option is best suited for boilers running on liquid and gaseous fuels. The disadvantage of the design will be the increased formation of condensation, which leads to the deposition of substances on the walls that destroy the pipe.
The external chimney is made in the same way as the internal one, but insulation of its walls in contact with cold air should be provided. The thickness of the thermal insulation is up to 10 cm and is assigned depending on the climatic characteristics of the area
It is important that in most cases the pipe will still pass through the roofing, so it is worth following the recommendations for internal connections. A hole is provided in the lower part for inspection and cleaning, and a drip line is installed.
Under the brick pipe you will have to make a separate foundation or a support ledge for the house.
It is worth considering the following masonry requirements:
- providing dressing;
- production of ceramic solid bricks using lime (cement-lime) mortar inside the house;
- after exiting through the roof, the masonry is carried out using cement mortar;
- the thickness of the seams should not exceed 10 mm;
- Plastering the inner surface of the pipe is prohibited.
Installation of a chimney through the wall
- Mark where exactly the chimney will go, this place will have to be dismantled, do everything carefully and slowly so that the wall does not collapse. If the building is old and is literally falling apart before our eyes, with cracks creeping across it, the structure must first be strengthened, otherwise it will not withstand the load of the chimney.
- If the wall is monolithic and strong, the area near the transition still needs to be strengthened so that nothing crumbles around the edges. Negligent attitude towards this stage of installation in the future will lead to the gradual destruction of the wall. Most often, at the strengthening stage, bars or special components are used, which are sold in stores that sell building materials.
- Next, attach a bracket to the hole on which the runners are fixed, allowing the parts to easily pass through the wall.
- The wall near the chimney passage area should be covered with a plywood sheet. A sheet of asbestos is laid on top, one more layer remains to be laid - galvanized metal, at which point the wall treatment can be considered complete.
- You can protect fastening components from corrosive processes with a varnish; its label should indicate that the varnish is intended for use with metal.
Installation technology
Increased requirements are imposed on buildings made of combustible materials. When venting a chimney through a wall in a wooden house, you must take into account all fire safety standards.
Step-by-step instructions on how to make a chimney correctly:
- For the pipe, a passage is made through the wall in accordance with SNIP standards. The distance from the pipe to a wall built from fire-resistant building materials is at least 25 cm. To a surface made from materials susceptible to combustion - 45 cm. In the second case, it turns out that you need to punch a fairly large hole. To make the hole for the chimney through a wooden wall smaller, the surface is sheathed with metal or other fire-resistant material. Make a hole of 25 cm, since the surface is insulated from fire.
- A metal box is mounted into a hole in the wall.
- The pipe is passed through a metal box, secured in the middle, and taken out. The pipe must be solid; elements cannot be joined inside the wall, as they will be problematic to maintain.
- All free space in the wall is filled with non-flammable thermal insulation material.
- The hole on both sides is covered with metal or other heat-resistant raw materials.
- A support platform for external pipes is mounted outside, which is held by metal brackets attached to the wall.
- An adapter in the form of a tee is installed on the outgoing segment.
- The lower part is removable. It functions as a glass to collect condensate. Some models are equipped with a fitting with a tap to which a hose is connected, through which the water accumulated inside is poured out.
- A chimney is connected to the upper part, which is brought to the desired height. To prevent debris from getting inside the pipe, a cap is installed on it.
The pipe brought out is secured to the wall using stainless steel clamps.
In a frame house, it is recommended that instead of a support platform, build a small foundation that will hold the outer pipe in order to relieve the load from the wall.
For more details on how to install a chimney through a wall, watch the video:
Installation of a sandwich system for smoke removal
Before installing the structure, you must carefully read the technical documentation and safety regulations.
It is imperative to take all measures to prevent fire during operation of the chimney.
Before purchasing, it is necessary to calculate all materials, taking into account the specific layout of the house
Sandwich chimney installation diagram
To make it easier to imagine how to carry out the installation correctly, here is a diagram.
Figure - Installation diagram
Thus, if you take into account all the requirements and rules when calculating the location of the sandwich chimney, its height and length, then the installation will be carried out correctly.
Step 1 - assembly of chimney pipe elements
Installation of the structure always starts from the bottom up. Sandwich chimneys must not be connected directly to a heating device.
A sandwich chimney element is never connected to the heating device - a single-wall pipe or adapter is installed first
First, install a special adapter or a single-wall steel pipe half a meter long.
If it is planned to lead the pipe directly into the wall, then install a horizontal outlet with a slight slope of 2°.
The adapter is designed to connect different sections of the chimney system - single-wall and sandwich pipes
The section of uninsulated pipe can be short or long if greater heat transfer is expected. Walls and structures located near it must be protected with a screen or casing.
They install it “smoke-wise”, that is, they put it on top of the heating device pipe and additionally protect the joint with a heat-resistant sealant.
Assembly “by condensation” prevents drops of moisture from penetrating into the insulation system, which significantly reduces its insulating properties
The chimney sandwich element can be connected to the heating device through an adapter - a double-circuit pipe, the lower part of which is installed “for smoke”, and the upper part “for condensate”.
All subsequent pipes will be installed “on condensate”, which will prevent its seepage and protect against damage to the thermal insulation layer.
All joints are secured with couplings. A clamp is installed near each joint to secure the system to the wall.
To prevent lateral movement of the structure, wall brackets are used every two meters, and support brackets are used for tees. The system is attached to the wall using consoles or support platforms every five meters.
Step 2 - passing ceilings and walls
Even the fact that sandwich chimneys have an insulating layer does not mean that their surface cannot heat up quite strongly. Therefore, it is prohibited to place them without additional insulation near flammable materials (wood, plastic, etc.).
The joints of sandwich pipes for chimneys during their installation and operation should not coincide with the passage in the ceiling or wall.
The free space between the ceiling and the pipe is filled with non-flammable and non-flammable basalt wool
The diameter of the hole in the wall or ceiling is cut 250 mm larger than the diameter of the outer pipe.
Make it round or rectangular. Heat-resistant material is placed in the free space, which is hidden with decorative plates.
The passage unit is heat-resistant, it prevents deformation of the chimney when the building structure moves - shrinkage, moisture and temperature deformation
To pass through the ceiling and, especially, through flammable materials, a special passage unit is also used. An air gap is left between the outer contour and the inner surface of the assembly.
When passing through a ceiling or wall made of a slightly flammable material, you can use an unloading platform instead of a passage unit. It will act as an additional support.
Step 3 - passing the system through the roof
When the chimney pipe is brought out through the roof, its tightness is broken. To strengthen the pipe, isolate it from flammable elements of the roof and eliminate the possibility of leaks in the roofing, special devices are used: conical roofs, silicone seals.
These parts have standardized slope angles; they are selected taking into account the roof parameters.
Silicone sealant - master flash greatly simplifies the work and helps create reliable protection against leaks
Postulates of chimneys in a private house.
Fire safety requirements form the basis of any chimney in a private home. According to SNiP 41-01-2003, channels are designed vertical, bends up to 30° are allowed (attitude from the vertical to a meter). The chimney is created with an equal cross-section along its entire length, with a smooth inner surface. Pipe height - from 5m.
Chimney in a private house
Gases are easily removed through round pipes, but more difficult through square or rectangular shapes. The cross-section of the chimney is selected according to the power of the heating boiler and is prescribed in the instructions. It corresponds to the size of the outlet pipe. If the cross-section of the channel is made smaller, the waste is poorly removed, the fuel burns poorly, and gases enter the room. If it is more, the heat “flies into the chimney”, due to which the automation is disrupted. Plus, more condensation forms (the smoke cools). The minimum cross-section of the chimney for a stove is 140*140mm and increases with increasing its power. For fireplaces, the ratio is 1/15 of the firebox parameters.
The interfloor cutting for the chimney duct has its own standards, where an increase in fire safety will not be superfluous.
Chimney in a private house
Basic Rules
When wiring a chimney through the ceiling and roof structure, it is necessary to take into account fire safety rules and regulations, in accordance with SNiP 2.04.05–91. The pipe in a private house and bathhouse must be equipped with a special passage unit.
The rules have the following main provisions:
- The distance between rafters made of flammable material and a pipe made of brick or concrete is set at a level of 13 centimeters or more.
- The distance between an uninsulated ceramic pipe and combustible rafters must be at least 25 cm. If there is thermal insulation, this figure is reduced to 13 cm.
These rules are mandatory when installing beams, the pitch of which is usually 60 cm. To obtain the required distance between the chimney structure and the ceiling with such a pitch, the use of exclusively insulated pipes will be required. An excellent option in this case is a special sandwich pipe, the design of which includes several layers, including insulation. Typically, furnace outlet pipes have a cross-section of 115-120 cm. If the thickness of the insulating layer of the sandwich pipe is 10 cm, the total diameter reaches 315-320 mm, and the distance reaches 130 mm.
In bathhouses, pipes are usually used, where the thickness of the insulating layer usually reaches 10 cm. In some cases, this figure can be reduced to 5 cm, although experts do not recommend this. The most common type of sandwich pipes are products with a thickness of insulation layer of 35-50 mm: options with 100 mm thermal insulation are usually available at specialized points of sale focused on bathhouse equipment. For chimney pipes without insulation, the minimum distance to combustible material is set at 250 mm.
Modern chimneys
However, thanks to the achievements of modern technological progress, it was possible to solve this rather difficult problem by using such an acid-resistant material as stainless steel.
Due to the low fire resistance of wood, it is considered optimal for wooden houses to install chimneys made of sandwich pipes, since such elements have low thermal conductivity, which completely eliminates the possibility of fires.
Let's face it, the use of sandwich pipes for arranging outlet channels is the best material option for forming such structures.
Sandwich pipes are elements consisting of two pipes inserted into one another and an insulating layer located between them, which is most often basalt fiber, which has low thermal conductivity and high resistance to temperature influences.
If the chimney is formed from several elements, then the joints of the pipes are fastened with a special locking connection and additionally treated with a heat-resistant sealant.
The thermal insulation layer can have a thickness from 2.5 to 6 cm. The outer pipe can be made of steel or galvanized iron, a more expensive option is brass or copper.
The installation of a chimney in wooden houses is carried out in strict accordance with the design documentation. The chimney pipe is installed strictly vertically, but its deviation from the axis by no more than 30° is permissible. The minimum height of the chimney above the ridge should not be less than 50 cm, and the element should be located at some distance from the ridge purlin.
When installing a coaxial chimney, it is recommended to replace the part of the wall where the hole will be formed with any fire-resistant material, for example, foam concrete
Particular attention should be paid to the wooden wall next to which the pipe will be installed
If the distance between it and the pipe is less than 60 cm, it is enough to treat its surface with fire retardants.
If this distance is less than 60 cm, then it is recommended to plaster the wall surface or line it with metal sheets or ceramic tiles to reduce the possibility of its ignition.
Organization of passage
In most cases, a special sandwich pipe is used to construct chimneys. It is a structure of two pipes of different diameters, nested one inside the other. Between them, non-flammable heat-insulating material is laid. The outer shell is made of thin metal, and the inner part is made of thicker steel.
The passage through the ceiling of such a sandwich chimney is carried out in the same way as a regular pipe. Perhaps there will be a little less work on arranging the passageway. You can use either a ready-made solution already made at the factory or assemble the required unit yourself.
In any case, it is necessary to first prepare the place where the entire device will be installed. A square hole is cut in the ceiling, with a side of about 45 centimeters. This size is large enough to fit a standard chimney through.
The ceiling assembly itself for the passage must be lined outside and inside with a heat insulator capable of withstanding high temperatures. The most popular for such purposes is special basalt wool.
According to the size of the square part of the assembly, approximate lines are drawn on the ceiling. The opening should be located strictly above the stove pipe. The hole itself is cut out slightly smaller than the connecting square plate. It is necessary to leave such a gap so that it is possible to attach it to the ceiling with self-tapping screws. The finished opening is lined with the same heat-insulating material as the passage unit.
The finished assembly must be inserted into this hole to check all connections. Before bringing the chimney through the ceiling and finally securing it, you need to make sure that the pipe is vertical and that it is located exactly in the center of the opening.
If you look from the top floor or attic, you can see that there are voids in the passageway. They are filled with non-flammable heat insulator. You can use expanded clay, clay or leftover basalt wool. The main thing is to fill the void very tightly.
To have a more complete idea of what the entire assembly looks like in section and what the passage for the chimney through the ceiling looks like, you can look at the drawing below.
The diagram shows the main elements of the chimney and passage unit, as well as parts of the ceiling through which the passage was made. The pipe is passed through the roof in a similar way. The only difference will be the hole in the square metal plate - it will not be round, but oval, since it will be located at an angle.
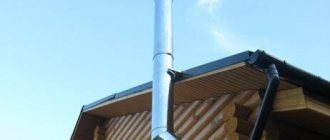
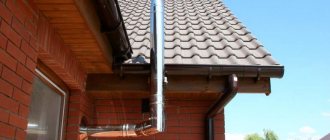
Waterproofing a chimney on the roof
When making a passage through the roof, it is important to comply with SNiP standards. A gap should be left between the roof elements and the chimney, the size of which is regulated by documents. At the point of passage through the roof, a box (wooden or galvanized metal) is usually installed, in which all the free space around the pipe is filled with non-combustible material - stone or glass wool
At the point of passage through the roof, a box (wooden or galvanized metal) is usually installed, in which all the free space around the pipe is filled with non-combustible material - stone or glass wool.
Sealing a chimney on the roof can be done using improvised means or using standardized elements. Around the chimney you should make a so-called collar, or flashing - a trim made of strips of metal, about 40 cm wide, in accordance with the dimensions of the pipe. The bend angle of the steel strips must correspond to the angle of passage of the chimney pipe through the roof. To calculate the length of the section, you need to take into account
:
- slope angle;
- chimney dimensions;
- chimney finishing type.
If the flashings are made of galvanized sheets, then they are interconnected with an overlay and soldered. Elements made of sheet steel are connected by a double standing seam. The rebated seam connection is used to seal the passageway on roofs made of corrugated slabs and tiles. If the roof slope angle is more than 30 degrees, a special beam should be installed behind the chimney - a “bumper”, which will protect the pipe from rainwater flows and excessive snow pressure in winter
.
A protective elastic apron for a chimney can be made
:
- from flexible metal tape (lead or aluminum);
- made of galvanized metal with polymer coating.
The apron is installed around the pipe in two layers around the entire perimeter. The bottom layer of the apron is placed under the roofing, and the top layer is mounted on top of the roofing material. To cover the top layer of the apron, a waterproofing film and metal profiles are used.
The top curved edge of each apron should fit into a groove cut around the perimeter of the chimney. After installing the edge into the groove, the joint is filled with polymer sealant or silicone for roofing.
Ready solutions
Sealing a chimney on the roof is a rather complex task, the quality of the solution of which determines the reliability of the thermal and waterproofing of the roof. You can make the passage assembly yourself, using various materials and special strips, or mount a ready-made structure, which includes a wide protective apron.
Ready-made roof cutting on the construction market is presented in many versions - models differ in material and manufacturing method, as well as the angle of inclination of the element that protects the place where the pipe passes through the roofing pie from water. The angle of inclination can be from 15 to 55 degrees, therefore, the cutting of the chimney on the roof is designed for the most common slope options.
To install such a structure, a hole of appropriate dimensions is made in the roofing pie. A seal made of rubber is attached to the outside of the structure using silicone. The distance between the pipe and the collection passage is filled with non-combustible insulation. The roofing penetration covers the passage unit, after which the penetration can be attached to the roof with self-tapping screws. To ensure a tight connection, it is recommended to use a sealant.
When choosing the option of how to seal a chimney on the roof, you can use other ready-made solutions, for example, Master flash roofing penetrations.
https://youtube.com/watch?v=rL-_Irakk4s
Stages of installing a ceiling cut for a bath
The main two tasks that a builder must perform when laying a sandwich pipe through the floors and roof are protecting the floor from fire (insulation) and ensuring the normal structure of the pipe. Let's consider the three main stages of arranging the ceiling trim for a bath structure:
- First of all, it is necessary to determine and prepare the place where the hole for wiring the sandwich chimney will be made.
- installation of a protective unit.
- At the end we install thermal insulation material.
Calculations and installation rules
Installation rules imply careful consideration of all stages of future work:
- You should make sure that the pipe itself will not come into contact with any flammable materials, which, under the influence of high temperatures, may begin to smolder and release toxic fumes.
- When installing the system directly externally, it is necessary to remember the deflection angles, which will act as active guides for smoke removal. The chimney pipe should not be located parallel to the wall of the house, since in this case smoke stasis will occur - it simply will not be removed from the system.
- Special tees must be installed in the lower and side parts of the pipe, which will be used as a place to install mechanisms for condensate drainage. If this step is not completed, then moisture when lighting a fireplace or stove will simply enter the firebox and extinguish the flame. All this will significantly complicate the kindling process!
- The upper part of the pipe should rise above the edge of the roof to ensure that smoke and soot are blown away in an area of more rarefied air. Typically, such zones are formed at a distance of 15-25 cm from the roof sheet.
Technical prerequisites for selection
If you plan to install a chimney in a wooden house, then before you start installation, you need to find out what is the temperature of the exhaust gases in the heating device in your house? Table 1 shows the flue gas temperature depending on the type of heating device and the fuel used.
Table 1.
People have been living in wooden houses for thousands of years and using stoves, hearths and fireplaces, and have developed considerable experience during this time. This experience is collected in regulations on construction, installation and fire safety. A chimney is being installed in a wooden house in accordance with regulatory documents adopted by government agencies.
There is a guideline document SNiP 41-01-2003 “Heating, ventilation and air conditioning”. It is this document that governs state regulatory authorities.
SNiP states that it is prohibited to place flammable elements closer than 130 mm in the clear distance from concrete and brick pipes or ceramic pipes in thermal insulation. For ceramic chimney pipes without thermal insulation, this distance should be even greater - 250 mm.
Wood is a flammable material; most modern insulation materials are also flammable, and polymer vapor and waterproofing films are even more so. Therefore, we must ensure that these materials do not touch our chimney.
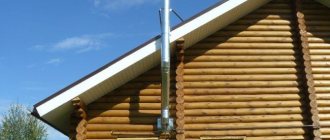
Options and features of exterior finishing
The chimney trim on the roof plays a decorative role. To avoid maximum smoke removal and prevent the formation of condensation, the outer part of the pipe must be insulated, and insulating materials require mandatory external protection. The finishing of the chimney pipe should be in harmony with the design of the roof, and it will make the smoke exhaust structure a full-fledged decorative element.
There are a lot of finishing options, the most current ones can be named:
Plaster. This is a simple solution that allows you to protect the pipe from the cold and provide it with a pleasant appearance. At the request of the house owner, mineral chips are added to the plaster mortar, which allows the finished cladding to be given a beautiful relief structure.
Decorative brick. This is another common solution that is widely used in finishing brick buildings. This finishing of the fireplace chimney allows you to maintain the temperature in the chimney; it lasts for a very long time and does not collapse even from very strong heat. Artificial or natural stone
A stone chimney looks very solid and stylish; it attracts attention to the roof and performs its functions perfectly. This is an almost eternal facing material that will make the smoke removal system more reliable.
Finishing the chimney with corrugated sheeting. An interesting option is one in which the smoke exhaust duct is designed in the same way as the roof itself. Finishing a chimney with a metal profile is a fairly strong and durable option; such lining is installed on a metal frame and reliably covers the insulating material.
These are just some of the external cladding options that will help make the chimney beautiful and very noticeable. An ordinary pipe can be turned into a real home decoration.
Finishing the chimney with a metal profile on the outside
Finishing a chimney on the roof with corrugated sheeting is one of the simplest options; even a novice home craftsman can handle such work. A galvanized sheet equipped with an anti-corrosion coating will be a strong and durable solution: it does not burn, does not collapse under the influence of high temperature or strong vibrations, and installation of such cladding does not take much time. However, this is a cold material, so the chimney will have to be insulated.
Finishing the chimney with a metal profile is carried out after the construction of the metal frame. Metal sheets are installed overlapping on it to ensure the strongest possible connection. To ensure that the sheets are positioned evenly, a building level is used when attaching them.
The metal profile is attached with self-tapping screws; this work is more convenient to carry out using a screwdriver. Between the metal sheet and the smoke exhaust pipe there is a layer of non-combustible insulation.
Finishing the chimney inside the building
A fireplace or stove is usually installed in a living room or study, so it becomes necessary to conduct smoke exhaust ducts through the second floor and the attic or attic room. The decoration of the chimney inside the house can be very diverse in appearance, but in any case it is installed on a common basis. The interior finishing of the chimney is carried out as follows:
- To line the chimney, a metal profile frame is built around it, which is sheathed with special plasterboard sheets. They must be fire-resistant, this will ensure the fire safety of the house. Such sheets are designated by the special abbreviation GKLO.
- The frame is insulated: a layer of mineral wool or other non-combustible insulating materials is laid around the chimney.
- Smooth plasterboard sheets are finished with any selected materials: it can be ordinary wallpaper, ceramic tiles, plaster and much more. This decoration of the fireplace chimney allows it to be harmoniously integrated into the space of the room, and the choice of material depends on the style of interior design.
The interior decoration of chimney ducts can have a wide variety of colors, so it can be chosen to suit every taste. However, in any case, it is recommended to choose non-combustible materials so as not to increase the risk of fire
This is especially important in a wooden house: walls located near the chimney, and especially all bending areas, must be treated with fire retardants
External and internal finishing of the chimney will allow you to turn it into a full-fledged decorative element: the choice of materials depends on the design features of the building and the financial capabilities of the owner. Self-installation of the cladding will allow you to save a lot, but it must be carried out in strict compliance with all technological requirements.
You need to enable JavaScript or update your player!
Installation of passages for two-story buildings
If the building is two-story, then in this case, after installation on the first floor, it is necessary to work on the second. How to install a sandwich pipe through the second floor? Let's consider the main points of wiring a sandwich chimney through the second floor:
- As a rule, the second floor of the baths is equipped as a rest room. Also, laying a sandwich chimney can take place in a private house. In such cases, a transition is made from a sandwich pipe to a single-wall pipe. This is done so that the heat from the chimney spreads and warms the rooms. The transition to a single-wall pipe should be carried out at a height of 1 m from the floor of the second floor.
- In front of the attic passage unit, a transition is made back to the sandwich pipe.
- The attic passage unit is installed in the same way as the previous one.
Note! It is strictly forbidden to seal the joints of the chimney waterproofing apron using ordinary construction silicone. For these purposes you need to use a special sealant.
- It is necessary to route the chimney through the waterproofing coating and the roof. It is imperative to carry out thermal insulation and install a protective apron, which will serve as waterproofing for the chimney sandwich. Homemade aprons and heat-resistant sealant may be suitable for these purposes.
Waterproofing after running the pipe through the roof is necessary to ensure that moisture does not penetrate into the attic and does not flow down the structure. When passing a sandwich pipe through the roof, it is also necessary to comply with the standards described in SNiP.
Chimney on a metal roof
Bypassing a chimney with metal tiles is a complex process. It does not bend like ondulin and is difficult to install hermetically.
Sealing includes the following steps:
- Roof waterproofing is installed on the side walls of the pipe
- Behind the pipe, at a distance of 80 cm, a gutter is built into the waterproofing material to drain moisture
- A box is installed in the roof and the chimney is removed
- A groove is made for the wall profile
- Set up a profile. The process is described above
- Set language
- The roof is covered with metal tiles. Around the pipe it should overlap the profile and the tiles that flow around the pipe
- Install the apron. For metal tiles they are made smooth. It should be secured to the protrusions of the coating with self-tapping screws.
How not to do it.
1. Previously, ready-made polyurethane foam made of steel and basalt wool was actively used in our country. Such devices are now considered obsolete and not considered safe!
Firstly, they transfer the thermal load from the pipe to the flange and then to the wooden structures. Secondly, the distances from the inner pipe required by fire safety rules are not observed. All this leads to the risk of fire. Especially over time. When the insulation inside the sandwich bakes, it decreases in volume and sags. Such a passage turns into a time bomb.
Second: you definitely can’t do it like in the photo below. Small drink with poor quality and thin insulation. This is another common mistake.
And in the next photo are the consequences of low-quality polyurethane foam. In this case, the fire was tracked almost immediately and quickly extinguished. Unfortunately, you are not always so lucky.
Finishing a pipe with slate stages of work
Lining the chimney on the roof is necessary not only for better preservation of the chimney structure, but also as a decorative finish, so it is usually made from materials that are most suitable for roofing. One of the most durable, durable, and also very aesthetically pleasing is the stanza.
- Purple
- Green
- Graphite
It can be in the form of tiles or panels. Fastening the slate is possible using copper nails with a wide head with a diameter of 2.5 mm and a length of 40 mm.
When performing work, it should be taken into account that due to temperature changes, deformation of materials is possible. Therefore, the nails are not nailed down completely; a small gap must be left between the head and the tile.
The tiles are installed on the sheathing, the beams are attached to the corners of the chimney, and if its width is more than 60 cm, another additional beam will be required.
- The outer guides are set according to their level, the rope is pulled (above, below and in the middle - at a height of more than 2 m), and then the intermediate bars are set
- If necessary, the smoke duct is insulated
- Plywood sheets are laid on the guides
- The tiles are being laid (their installation is carried out in such a way that one overlaps the other within 1.2, and the angle is not less than 22°
There are several ways to lay slate - from the standard rectangular one, to one reminiscent of fish scales. They are selected taking into account the pattern of the roofing.
The first is performed on a previously primed surface. To do this, the dry mixture is diluted with water in a bucket in the proportions indicated on the packaging. Please note that it is usually sold in white, and to obtain a colored coating, color is added.
aab06e3d460b8aa8c97245c54ec5d49a.jpe
The diluted composition is applied in a thin layer and left to dry, and then cleaned with a steel brush. Next, a second layer is applied - if necessary, but experts still recommend limiting yourself to one. The final touch is to treat the surface with a grinding machine and grout with an iron spatula.
Venetian plaster, unlike marble, is considered an expensive pleasure, but it looks amazing. Moreover, if you do everything yourself, you can save a certain amount of money.
It is also sold in bags, has a white color and is diluted with water with the addition of color for application. Apply with a spatula or trowel. But to obtain a high-quality coating from Venetian plaster, the use of forced drying technology with a construction hairdryer is required. Any cracks that appear are treated with paint or varnish and, after drying, polished with a grinding machine.
What is a sandwich chimney?
In another way, designs of this type are also called modular chimneys. Such pipes can be used when installing boilers and stoves for heating residential buildings and baths. Chimneys of this type are assembled by inserting individual parts into each other using the “condensate” or “smoke” methods.
Sandwich pipe elements can be made from stainless or galvanized steel. The first type of structure is used most often by owners of country houses. Galvanized chimneys, since zinc can burn out at high temperatures, are mainly used only when installing gas boilers or boilers.
Pipes of this type received their original name for their multi-layer nature. When assembling such structures at the factory, another one is put on the main smoke exhaust pipe, which acts as a protective casing. Mineral wool is also installed between the pipes inserted into each other.
The main advantage of sandwich chimneys, in comparison with conventional single-wall structures, is that condensation does not form inside them during operation. Acid never accumulates in such chimneys and soot is not deposited. Accordingly, the service life of exhaust gas exhaust structures of this type is quite long.
Self-production of the adapter assembly
It is not necessary to buy a finished product if you want to do everything yourself. The design will remain virtually unchanged. It is also necessary to cut a square hole in the ceiling.
The next stage is the preparation of a plate of non-combustible material, which will be attached from the inside of the room. A round hole is cut in it, equal to the outer diameter of the sandwich pipe.
The inner surface of the cut opening is lined with heat insulation and sewn up with metal strips. A sandwich pipe is passed through it, with a prepared mounting plate put on it. It must be securely fixed in the opening with spacers made of a material that can withstand high temperatures and does not burn.
Between the mounting plate and the ceiling plane, a sheet heat insulator is often laid to prevent heating. This is not the most mandatory measure, but such a precaution certainly won’t make things worse.
From the side of the upper room, the void in the ceiling is filled with a heat insulator. As in the previous case, it can be expanded clay, clay or special basalt wool. Some people use sand, but it’s better not to do this - its thermal conductivity is higher than even expanded clay, and its loose structure will lead to the fact that sooner or later it will start to fall out.
You can also read about how to close the chimney passage on the ceiling in this article.
This material provides only general information on how to install a sandwich chimney through the ceiling. There are also more technically complex designs. However, the general principles of ensuring fire safety and efficient operation of the chimney will not change.
Making an opening in the ceiling
In addition to the difficulties associated with different types of chimneys, there is a certain amount of uncertainty due to the variety of ceilings. The easiest way is with concrete monolithic floors: an opening is cut out in them using an angle grinder with a disc for cutting concrete, adhering to the minimum allowable distances from the chimney pipe. Since the ceiling material is non-flammable, minimal thermal insulation is required.
It is more difficult with structural strength, especially when passing through prefabricated floors or if the width of the chimney is 2-3 times greater than the slab reinforcement pitch. It is advisable to foresee the need for an opening at the stage of installation of the floor by constructing a reinforced steel hoop or filling the end of the opening with the inclusion of additional reinforcement.
It is more difficult to arrange an opening in a frame ceiling. First you need to determine the location of the load-bearing beams. Approximately in the center of the opening, you need to make a hole with a wide crown, and by touch determine the removal of the beams and their direction. We mark the outside within the free space, then use a jigsaw or hand-held circular saw to cut out a section of the floor and rough ceiling. Most likely, the beams will not allow you to cut out the full profile right away, but now they will become available for further manipulation.
You can cut out the beam fragments with a regular hand saw and then finish cutting off the floor and ceiling parts. To restore the strength of the supporting ceiling system, it is enough to add a pair of crossbars, which are equivalent in power to the total cross-section of the removed parts. Allowance for the thickness of the inserts must be made in advance. In the cavity at the open ends, you need to lay insulation and cover the opening with a thin board or sheet materials. For greater reliability, you can repeat the cladding with materials with low thermal conductivity - heat-resistant gypsum plasterboard or MGL.
We will describe filling the passage opening with a heat insulator and restoring the casing a little later. Now it’s only worth noting that due to thermal linear expansion, the chimney and its lining must be located independently of each other with a small gap, otherwise the formation of cracks can spread far beyond the adjacent area. The internal surfaces of openings in ceilings made of conditionally combustible materials should be treated with fire retardants, as well as the area of the ceiling and floor 50–60 cm from the passage point.
What do building codes and regulations (SNiP) say about this?
SNiP 41-01-2003 Ventilation, air conditioning and heating regulates the main aspects associated with the arrangement of various autonomous heating systems. Since this publication is devoted to an analysis of the design features of the passage of a chimney through the attic floor, it is necessary to pay special attention to section 6.6 - this is Stove heating, and its subsections.
In some cases, these existing rules become a real problem for owners of private houses when arranging their home heating system. Such difficulties arise due to the fact that some of the requirements for modern heating systems and materials used for thermal insulation are clearly outdated. However, despite possible obvious contradictions, regulatory organizations rely on this guidance and demand compliance with established standards.
It must be remembered that if a stove is installed in a newly built house, then it will be necessary to legalize its presence with the fire services, otherwise it will simply not be possible to register the property. Such a permit is issued on the basis of a document drawn up by an employee of the controlling organization who accepts the building. If during the inspection serious violations of current standards are discovered, then there is no escape - the mistakes will have to be corrected. Therefore, it is best not to immediately deviate from the established standards.
The design and location of both the stove itself and its chimney are strictly regulated by current building codes and regulations
Not everyone likes the dry language of regulatory documents, and that is why they are simply afraid to look into them. Let's try to outline these rules for them in a few paragraphs:
- The thickness of the walls of a brick chimney in the area of its passage through the floors, roofing or walls (partitions) must be greater than along the main height. This thickening is called cutting.
According to existing standards, the cutting thickness is calculated taking into account the thickness of the pipe itself. Craftsmen often use the colloquial term for smoke in this regard. So, the standard cutting size is:
- 500 mm if the pipe borders a building structure made of flammable material (which, of course, includes a wooden floor).
- 380 mm - for those cases when the materials of the building structure are protected from fire by a layer of plaster of at least 25 mm reinforced with steel mesh, or a metal sheet with an asbestos lining underneath with a thickness of at least 8 mm.
- The height of the chimney cut must be at least 70 mm greater than the thickness of the ceiling. By the way, SNiP does not stipulate from which side these millimeters should look out - from below, on the ceiling, or in the attic. Judging by the forums, there is also no unanimity among the masters. But, as a rule, customers ask for a flat ceiling in the room, so a 70-mm step can be located in the attic. However, if you again read the forums, you can come across cases where fire inspectors demanded a 70-mm side at both the top and bottom. And it was not possible to convince them otherwise.
- It is not advisable to attach the chimney section rigidly to the floor materials or to rest it on any building structures. True, there is no categorical prohibition in this regard, but one should still adhere to such a recommendation so that the deformation of one element that occurs for some reason does not entail the destruction of another.
- The space between the cutting and the building structure is filled with non-combustible materials. The list of materials is not specified, but in practice those that can be classified as thermal insulators are usually used - expanded clay, vermiculite, mineral wool.
- If the pipe is cut through the opening of a wall or partition and flammable materials, then its thickness cannot be less than the thickness of the partition itself. In this case, the cutting must be done along the entire height of the wall.
- When the pipe passes through the roofing, cutting is also often performed, which in this place is called otter. In any case, the distance from the outer walls to any elements of the roof structure made of combustible materials must be at least 130 mm for a brick pipe, and 250 mm for a ceramic pipe without thermal insulation (when using insulation with a heat transfer resistance of at least 0.3 m²×ºС/ W – 130 mm). The roof section at the passage point should only be made of non-combustible material.
- When constructing a stove and its chimney, it is important to maintain the distance to walls and partitions. This gap has its own name - retreat. The amount of derogation is also regulated by the requirements of SNiP:
Rules for bringing the heating element out
According to section SNiP 6.6 on “Stove heating”, the developer must adhere to the following general rules:
- If the rules for the location of a brick chimney are observed, contact of the chimney with any flammable surfaces and materials is excluded. To implement them, as a rule, a passage unit is installed in the ceiling made of non-combustible materials. Here, the strictest compliance with fire safety standards is necessary, in particular - an indentation of 130 mm when passing through difficult-to-combustible surfaces and up to 500 mm for a wooden floor (or anything else consisting of flammable substances).
- It is important to maintain a distance between walls, partitions and the heating element. Depending on the type of brick, the thickness of the chimney walls, and the fastening mortar, the distance varies from 20 to 50 centimeters.
- The clearance between the top surface of the stove and the ceiling must be at least 350 millimeters if there is thermal protection and 1000 mm if there is no thermal protection. The numbers vary depending on the material of the heating element, frequency of use of the stove, and roof.
Manufacturers of chimneys and stoves, builders usually provide documentation and materials that describe in detail the dimensions of the indentations and installation rules.
Through the roof
It is recommended to locate the chimney closer to the highest point of the house and build it 0.5 meters above it. The size of the seams, filling of cracks, insulation of the pipe itself completely depends on the selected material. The heating element is usually installed through a professional coating. However, most cases of leaks through the roof, despite its reliability, occur precisely in the places where the heating pipe passes through the corrugated sheeting. To avoid this, you can resort to methods from the times when most homes used stove heating. The method involves thickening a unique shape at the base of the chimney, preventing drainage along the walls. However, nowadays this technique is not popular, and most often attention is paid to the correct insulation of the roof around the base of the pipe.
Connection to pipes with rectangular cross-section
To insulate a brick chimney, a special metal belt called an apron is installed at the junction of the corrugated sheet. The individual components of the heat-insulating element are inserted under the corrugated sheet by 1.5-2 centimeters. Where the pipe passes through the ceiling, a special hermetic substance is poured. This prevents the formation of excessive moisture.