Date of publication: February 12, 2020
The chimney is the most important part of the heating system in a country house, cottage or country house, as well as in bathhouses. A lot depends on the quality of both the chimney itself and its installation: the fire safety of the entire building, the draft and supply of oxygen required for the operation of the heater, the removal of combustion products and smoke from the room. At the same time, the optimal operation of the heating device itself also depends on the quality of the smoke channel.
Chimney on the roof - installation rules and nuances
The chimney on the roof is a critical and rather complex element of the smoke exhaust system of heating devices. Therefore, its design raises a number of questions for beginners, in particular, many people are interested in how to make the structure fireproof, efficient, and at the same time tightly adjacent to the roof. Next, I will try to answer these and other popular questions, and also share with you the important nuances of chimney installation.
The chimney must be reliable and fireproof
What you need to know when installing a chimney
Before installing a chimney above the roof, you need to understand the following design nuances:
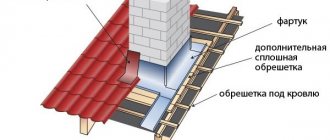
Important nuances of installing a chimney on the roof
Pipe material
First of all, before installing a chimney, you need to decide on the material from which it will be made. To help in this matter, I will give a few of the most popular options and briefly talk about their features:
- Red solid brick (grade M150 and higher) . This is a traditional material that allows you to create strong and durable chimneys. The disadvantages include the complexity of installation. In addition, a brick chimney has a lot of weight, as well as a high cost, especially if you take into account the costs of specialist services for its installation;
- Galvanized pipe. This is a cheap and fairly durable material, but it can only be used for gas equipment where the temperature of the gases is low. Otherwise, the structure begins to evaporate toxic zinc oxide;
- Stainless steel pipe . It costs more than galvanizing, but it is more environmentally friendly and durable. Therefore, stainless steel can be used for any chimney. The only thing, keep in mind that this material can heat up to high temperatures, which can cause a fire;
Sandwich pipe - an inexpensive and reliable solution for a chimney
- Pipe sandwich . This name is due to the fact that the pipe consists of three layers - an outer pipe made of stainless steel or galvanized, then a layer of thermal insulation made of mineral wool, and a thinner stainless pipe. Thanks to this structure, less condensation forms in the chimney. In addition, the design is more fireproof. Therefore, I recommend sandwich chimneys to those who are interested in a relatively inexpensive, durable and safe smoke removal system;
- Ceramic pipes . Ceramics can be recommended to people for whom the durability of the product, rather than the cost, plays a decisive role in their choice. Ceramic chimneys are not afraid of either high temperatures or chemical influences, therefore they are practically eternal. At the same time, installation of a ceramic chimney is quite simple.
Coaxial chimney - a compact and efficient design for a gas boiler
For gas boilers, an excellent solution is a metal coaxial chimney, which is a pipe in a pipe. As a result of this structure, gases are removed through one compartment, and air is supplied through the other for the combustion chamber.
Rules for the location of the chimney on the roof
In order for the chimney to be effective, and therefore safe for the heating device itself, it must be correctly positioned relative to the roof ridge. To do this, you must follow the following rules:
- If the pipe is located in the center of the ridge or is located at a distance of no more than one and a half meters from it, its height should be 0.5 m;
- If the chimney is 1.5-3 m away from the ridge, the pipe should be located flush with it;
- If the chimney is more than three meters away from the ridge, the angle of the imaginary line connecting the pipe and the ridge should not exceed 10 degrees.
Diagram of the dependence of the height of the chimney on its location relative to the ridge
Keep in mind that you cannot make the pipe too high, otherwise the temperature of the combustion products will not be enough to warm it up. As a result, draft will deteriorate and condensation will appear.
Do not forget that the efficiency of the chimney is affected not only by its height, but also by its diameter. This parameter must correspond to the requirements of the heating device. The higher its power, i.e. The larger the combustion chamber volume, the larger the pipe diameter should be.
The nuances of bringing the pipe out
An equally important point is the passage of the pipe through the roof. The main requirement for this unit is, of course, fire safety.
The fact is that even on the roof the chimney heats up to a very high temperature, which can cause a fire of flammable materials located nearby. This is especially true for metal pipes, including sandwich chimneys, despite the presence of a layer of stone wool.
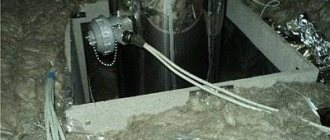
To ensure fire safety, the pipe must run in an insulated box
To make the outlet fireproof, you first need to position the pipe correctly. It is necessary to ensure a distance of at least 25 cm from it to flammable materials.
In addition, the passage unit must be thermally insulated. To do this, a box made of non-flammable material is installed around the pipe and filled with basalt wool.
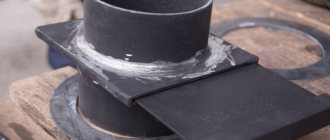
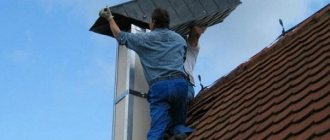
But ensuring fire safety is only half the battle, so the passage unit must be airtight. For sealing, a special element, the so-called passage, is used.
The joint between the roof and the chimney is sealed using a special casing - passage
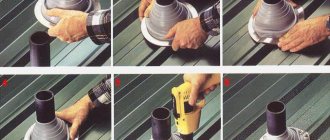
The passage is selected individually, taking into account the type of pipe and roofing material. If the pipe is rectangular, made of brick, the passage is assembled from separate profiles - aprons. Installation is carried out as follows:
| Illustrations | Actions |
Installation of the lower apron. This operation is carried out before covering the roof. It is performed as follows:
| |
Installing the top apron:
|
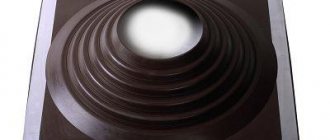
Sealing a round pipe is easier - after covering the roof, a casing is put on the chimney, which presses it tightly. The apron of the passage is made of soft material, thanks to which it follows the contours of the roofing, even if the roof, for example, is made of metal tiles or corrugated sheets.
The soft apron of the passage follows the contours of the roof made of corrugated sheets or any other material
The joints, as in the previous case, should be treated with sealant. As a result, the waterproofing will be reliable and durable.
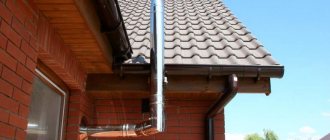
Metal chimneys often need to be mounted on the roof
Fastening
If the chimney is brick or ceramic, then it does not need fastening. If metal pipes are being installed, most often they need to be additionally fixed to the roof. For these purposes, we will need a special set of stretch marks, which includes:
- Ring - is a clamp with ears for cables;
- Set of cables;
- Roofing fasteners.
Do-it-yourself pipe fastening is carried out as follows:
Related article: How to paint a metal roof on a house
| Illustrations | Actions |
Ring mount:
| |
Pipe fastening:
|
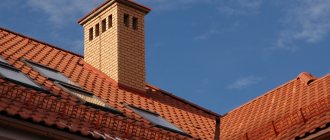
Cladding allows you to increase the durability of a brick chimney
Finishing the pipe
Sandwich pipes do not need lining, but finishing a brick pipe will extend its service life. For these purposes, you can use the same materials as for the walls. The only thing is that they must be non-flammable. Such materials include:
- Profiled sheeting;
- Facing brick;
- Plaster;
- Natural stone, etc.
Finishing the chimney is carried out in the same way as finishing the walls.
Cladding a brick pipe is done in exactly the same way as cladding walls. For example, to cover it with metal siding, you need to attach a sheathing made of profile or timber to the pipe. That's all the main nuances of installing a chimney on the roof that I wanted to share.
How to protect a tall chimney from the wind?
According to SNiP 41_01_2003 “Heating, ventilation and air conditioning”, the height of chimneys passing through a pitched roof should increase relative to the slope as the chimney moves away from the ridge. However, the higher the pipe, the more intense the wind load on it, which means that the high chimney must be further strengthened
The height from which reinforcement is required depends on the type, model, and design features of the chimney and is usually 1.2–2 m. How is the pipe structure reinforced?
For example, in the case of stainless steel chimneys that are popular today, steel guy wires directed in different directions are provided for this purpose (most often three flexible cables or two rigid rods). At one end they are attached to a clamp placed on the pipe, and at the other - to a solid base (usually to the rafter legs).
This solution is associated with a number of problems.
Firstly, it is not always possible to find a suitable point for securing the cable in the direction from the pipe to the eaves of the roof. It is even more difficult to select the third point of fixation of the cable when the chimney is routed through the facade of the building, and then through the gable or eaves overhang of the roof. Obviously, in this case, the place for securing the guy rope should be on the site next to the house, but the cable is rarely fixed in this way for various reasons. We have to look for a point for its support in the plane of the roof, but then the static stability of the chimney remains in question.
The second problem is how to achieve a sealed passage of the guy wire or its fastening through the roof, when the cable or rod is fixed to the wooden base of the roof.
Widely practiced today by non-specialized teams, the option of drilling a hole in the roof for tensioning and then filling it with an elastic sealant (or even foam) causes rejection among professional roofers. Gradually, due to shrinkage of the rafter system, vibrations of the chimney under the influence of the wind, or due to the flow of water flowing down the stretch during rain, cracks will appear where the cable or rod passes through the coating, and, as a result, leaks will begin. How to be? For example, in the case of metal tiles, the cable can be attached to a wooden base with a bracket that has an elastic washer that will cover the place where the bracket passes through the sheet of metal tiles. Moreover, to increase the tightness of this unit, it is advisable to coat the washer around the perimeter with roofing sealant.
To fix guy wires on a roof made of ceramic or cement-sand tiles, it is recommended to use special walk-through tiles for connecting antennas to the roof, presented in the lines of all leading manufacturers of these roofing materials
Option to strengthen the design of a ceramic chimney
To strengthen another popular type of chimney - ceramic with a shell (casing) of lightweight concrete - there are several solutions.
The simplest thing is to install reinforcing bars (followed by pouring cement mortar) into vertical channels in the concrete shell. These channels, provided by most ceramic chimney manufacturers, are located along each of the four corners of the shell. It is recommended to reinforce only two channels (diagonally) with a pipe height of 1.5 to 2 m, and with a height of 2 to 3 m - all four. The length of the reinforcing bar is determined by the distance from the mouth of the pipe to the point where it passes through the roof, which is multiplied by two, since the rod must go the same distance under the roof. If the chimney rises significantly above the roof, then other methods can be used to strengthen it. For example, install a pipe, in the concrete shell of which, in addition to the smoke channel, there is also a second large-section channel (for ventilation of the room or wiring of utilities inside the house). This channel is filled to the very base with reinforcing bars and poured with concrete. Another option is to “dress” the concrete casing in a corset made of steel corners with a bandage of the required length.
Note that in the case of chimneys with a large overhang above the roof, it is necessary to make a static calculation of the reinforcing structure (certainly taking into account the snow load characteristic of the region in which construction is taking place).
The higher the chimney ends above the ridge, the better the flue gases are removed from the firebox or boiler. In addition, the chimney, which rises greatly above the ridge, prevents flue gases from entering the zone of wind turbulence in the area of the ridge, that is, the occurrence of reverse draft (smoke blowing into the chimney) is impossible. Despite all the apparent advantages of a high chimney, it is hardly recommended. Indeed, as the height increases, the wind load on it increases, thereby reducing its static stability. This means that the structure will need to be further strengthened. For example, in the case of steel chimneys - with special braces. But they also do not eliminate problems: sometimes it is difficult to find points for correct fastening, and over time, under the influence of wind load, the fasteners weaken and the stability of the structure decreases.
Ceramic chimneys with a shell of lightweight concrete are easier to reinforce, but the pipe will still experience strong wind exposure throughout the entire period of operation. So it is preferable to build a chimney that does not rise too much above the roof
Subscribe to our Yandex Zen channel so you don't miss anything!
Types of clamps
The chimney clamp differs in purpose.
For wall mounting
It differs in that in the tail part it has a flange with two holes for screwing to the wall.
This clamp is used when the pipe runs close to the wall. And if a large number of pipes are installed outside, a gust of wind will not be able to knock them down.
It is recommended to place one of these wall clamps every two meters to secure the pipe to the wall and maintain stability.
The crimp clamp consists of two parts:
- bolts the pipe
- tighten until the two parts fit tightly around the structure.
Built into the wall
Another type of product for attaching a chimney is one that is mounted deep into the wall. Instead of a flat flange with a threaded hole, it has a long flange.
To place the clamp, you will need a guide on the wall so that the tail is held in place using building materials, plaster or cement.
This type of fastener is used when the pipe is separated away from the sunny side of the wall and a long tail will save the necessary distance.
A wall clamp for a chimney has two parts that wrap around the pipe and are secured with threaded screws to prevent the wind from knocking down the structure outside the house.
For gripping between pipes
There are other types of clamps that perform different functions.
For gripping between pipes, holds and secures connection together.
This type of fastening is used in stainless steel pipes of sandwich systems.
Many brands have edges for using these clamps which, combined with the silicone compound inside, maintain a seal.
The party to such a connection is considered to be:
- odor prevention
- smoke leak
- outlet pressure
Because the stove has a smoke output pressure sensor. Pipes that do not have a clamp may be deformed by an impact during transportation, and will not be ideal for the system, and then the oven will signal a pressure failure on the stove.
Connection to furnace outlet
Failure to use a clamp when the pipe exits the furnace is considered the main failure of many chimneys.
The outlet inlet has a diameter thicker than the pipe itself and therefore does not fit together perfectly.
Typically, this is where you notice the smell of smoke when you turn on the stove.
And due to the fact that the pipes are not yet heated, the smoke comes out through the holes due to incorrect adjustment, between the outlet and the installed pipe.
To avoid these odors, it is recommended to use aluminum tape to surround the junction of these two elements, which have different thicknesses.
Then use a clamp to tighten this connection and avoid the inherent losses that occur when installation is not done properly.
This is a malfunction that causes people to complain about the smell of smoke but not be able to determine where the loss is occurring.
Independent design and assembly of chimneys
The chimney provides an influx of fresh air and removes combustion products from the room, and is responsible for the natural draft of a stove or gas boiler. Installation of a chimney is a prerequisite for the operation of heating equipment.
DIY chimney
Correct installation of a chimney is the key to a comfortable microclimate and safety inside a house, cottage or bathhouse. To save money, you can assemble the chimney yourself. It is important to correctly calculate and comply with all existing standards for the design and installation of chimneys.
Related article: How to make a pitched roof at home with your own hands
Rules for placing a chimney on the roof
The chimney must be installed in accordance with fire safety requirements. The main provisions are as follows:
- On a flat roof, the height of the pipe should not exceed the height of the roof by more than 1 m;
- On a pitched roof, provided the device is located less than 1.5 m from the ridge, the pipe must rise above the ridge by at least 0.5 m;
- If the distance from the ridge is 1.5-3 m, the pipe should be installed flush with the ridge;
- A pipe located at a distance of 3 meters or more from the ridge must be at a distance of at least 10° from the horizon of the ridge part. Options for placing an internal chimney on a pitched roof are shown in the figure:
Placing a chimney on a pitched roof
- When installing the device, it is recommended to install inspection elements for draining condensate and cleaning the structure, as well as plugs with a stainless steel condensate drain;
- Installation of a chimney at a height of at least 1.5 m from the roof of neighboring buildings;
- A chimney pipe with a height of more than 1.5 m must be additionally secured with guy wires. An example is shown in the figure:
Securing the chimney with guy wires
- If the roof is made of flammable materials, installation of a spark arrester on the structure is recommended;
- The chimney joints should not coincide with passages through the ceiling, roof or wall;
- The installation of elbows and tees must be done in such a way that they do not bear the load from the chimney pipe located above;
- Horizontal areas should be avoided. Their maximum length can be 1 m.
Fastening the chimney with guy wires. 4 General requirements
4.1 The design of industrial chimneys (hereinafter referred to as pipes) should be carried out taking into account the requirements of SP 43.13330.2012 (clauses 9.3 and 9.4), while evacuation into the atmosphere and effective dispersion of exhaust gases to the concentration limits of harmful substances and solid particles must be ensured at ground level in the area where the pipe is located. When designing pipes, their level of responsibility should be taken into account.
4.2 Pipes according to their design features are divided into: - free-standing (self-supporting) - brick, reinforced brick, monolithic reinforced concrete, prefabricated reinforced concrete, steel, polymer composites; — pipes with guys — steel, made of polymer composites; — pipes in the supporting frame (tower) — steel, made of polymer composites. Several pipes may be combined by connecting structures that do not interfere with the independent movements of each pipe relative to the others combined into one structure. Pipes are usually installed on their own foundations. In addition, pipes can be installed on the supporting structures of technological equipment (boilers, boiler plants, etc.), as well as on the structures of buildings and structures; Moreover, all structures on which pipes are installed must be designed for the full range of loads transmitted to them from the pipes.
4.3 The dimensions of pipes and their design characteristics for design are determined in accordance with SP 43.13330.
4.4 The estimated service life of the pipe is taken depending on the type of pipe and the recommended period in accordance with SP 43.13330. The estimated service life of the pipe must be indicated in the design and working documentation and the pipe passport.
4.5 At the junction of gas ducts with a pipe, compensating devices should be provided in the form of settlement seams or expansion joints, while the design and calculated deformation of the compensating devices should exclude the possibility of transferring any loads and deformations from the gas ducts to the pipe and from the pipe to the gas ducts.
4.6 When introducing several gas ducts from different sides in the base part of the pipe, it is necessary to provide a dividing wall and comply with the requirements for the placement of gas ducts and restrictions on the size of openings in the pipe for connected gas ducts in accordance with SP 43.13330.
The height of the dividing wall must be taken to be at least one and a half times the height of the supply gas ducts in internal dimensions up to the zone where the gas ducts are inserted into the pipe and be at least 1.5 m above the openings for supplying the gas ducts. The dividing wall must exclude the possibility of collision of gas flows when they enter the pipe, and also exclude the throw of fly ash from an operating flue into an inactive one when burning solid fuel when one of the gas flues is temporarily disconnected.
4.7 Separating walls should be designed from brick, metal or reinforced concrete. It is necessary to provide a gap between the dividing wall and the lining to compensate for thermal expansion of the wall.
4.8 In accordance with, for pipes with a height of 45 m or more, as well as for pipes of a lower height, for which these requirements are specified in the design assignment, the design and working documentation must provide for marking paint and light fencing of the pipe, ensuring the safety of aircraft flights.
4.9 To avoid resonance when the frequency of flue gas turbulence coincides with the natural frequency of vibration of a shell made of metal or polymer composites, a minimum frequency of 2 Hz should be taken as an ovalization criterion.
4.10 Pipes that produce condensate must have a system for collecting condensate and discharging it into the sewer system or special containers. For this purpose, wedge belts are installed inside the gas outlet shafts or in the design of the protective system, from which condensate flows onto the ceiling of the pipe and then into condensate receivers along the condensate drain outside the chimney. It is allowed to use (mainly in metal pipes and pipes made of polymer composites) condensate collection gutters arranged along the entire circumference of the inner wall of the gas outlet shaft, as a rule, above the entrance of the gas ducts. For chimneys operating with the formation of condensate, the speed of the flue gases at the mouth of the pipe should be no more than 18 m/sec to prevent significant release of condensate into the atmosphere.
4.11 To measure the parameters of temperature-humidity, gas and aerodynamic operating conditions in the pipe, as a rule, the installation of instrumentation is provided. Depending on the operating conditions, it is recommended to monitor the following parameters of exhaust gases:
— temperature; - humidity; — dustiness; - pressure (vacuum); — chemical composition of exhaust gases. For pipes with a passage or ventilated gap, it is additionally recommended to monitor the following: - air temperature in the gap; — the pressure difference between the exhaust gases and the air in the gap. The need to install control and measuring equipment, monitored parameters and locations of primary devices must be indicated in the design assignment.
Features of installing a brick chimney
It is recommended to use clay bricks for the chimney and lay out each wall at least 12 cm wide. Brick laying for low-power stoves is done in four rows, for medium-power stoves - in five rows and for high-power stoves - in six rows. However, any brick is destroyed under the influence of soot, soot and condensation; to avoid this, the brick box should be strengthened by adding a metal pipe. The space that is formed between the pipe and the brick walls must be filled with non-combustible insulating material, thus providing additional insulation of the chimney.
Brick chimney for home
Stages of chimney construction:
- They begin to install a brick chimney with their own hands from the neck. This is the part of the chimney that immediately follows the stove top pipe. In this place it is necessary to make a smoke valve, or, as it is also called, a view, which blocks the pipe after fuel processing.
- Next, the outer diameter of the masonry expands, the so-called fluffing is performed, while the internal smoke channel does not change in size.
Brick laying must be done in such a way that the internal size of the smoke channel is the same in any place.
- After the chimney passes through the ceiling, a pipe riser is laid, which has the same dimensions as the neck.
- The next time the outer size of the masonry increases during the passage of the chimney through the roof rafters. This extension is called otter. It is necessary to install each otter wall at least 0.1 m wide to successfully prevent moisture from entering the attic space through existing gaps between the chimney and the roof.
- After cutting the otter, the outer diameter is narrowed again - the pipe neck is laid.
- After the neck of the chimney, the masonry expands again - this is the head of the pipe.
- A special metal cap is installed on the head - an umbrella, which protects the chimney from rain and other precipitation. In addition to its main function, the umbrella also restrains strong gusts of wind that can disrupt the draft in the smoke channel and serves as a decoration for the chimney and the entire building, giving it a finished look.
- Insulation of the visible part of the chimney can be done using a duct.
Sometimes, with a lack of experience, the chimney is laid out the same size from the neck to the head, and then the wall is expanded from the outside, adding fluff and concrete otter. Laying a brick chimney is not an easy task and requires certain skills. However, you can do it yourself if you study the diagrams and drawings in detail.
We build a brick chimney according to the diagram shown in the figure:
Brick chimney diagram
Exiting the chimney through the ceiling
The choice of design and materials depends on the type of chimney. Let us analyze the rules for organizing work for the main materials of pipelines in detail.
Round metal
The whole process is divided into several stages:
- The most popular today for the manufacture of steel chimneys are double-sided metal sandwich pipes with an internal layer of thermal insulation. For such chimneys, you can easily make a homemade box from tin or buy a ready-made one in a store.
- According to the dimensions of the box, we cut out a cavity in the ceiling, insert the box so that it is securely fixed with its curved edges on the floor of the attic or 2nd floor.
- We insert the pipe into the prepared hole and secure it to the wall with self-tapping screws. Fill the remaining gaps with heat-resistant sealant.
- We fill the entire remaining cavity of the box with insulation. You can use mineral wool, penoizol, polystyrene foam and any other material. The use of asbestos is prohibited in residential premises.
- The thermal insulation layer should protrude slightly beyond the metal sides. All that remains is to cover the surface of the box with decorative wood trim. You can buy a polished stainless steel plate that will decorate your ceiling.
Stages of work on removing a steel chimney through the ceiling
Brick chimney
Here everything is much more complicated:
- Before the floor slab, the mason must fluff the pipe and gradually expand the outer size of the chimney. If you have skills in laying bricks, you can do the job yourself. If not, you will have to hire an experienced stove maker.
- An opening is cut in the slab (ceiling) according to the dimensions of the pipe, even with a small margin. After laying the bricks and the chimney exiting the surface of the ceiling, we cut the slab insulation material to the size of the pipe.
- You can use mineral wool or prepare foam blanks. The main thing is that the thickness of the layer compensates for the high temperature of the exhaust gases and does not allow them to affect the surface of the walls and ceilings.
- Then we lay the blanks around the pipe and secure them with special screws or simply wrap them with tape. The main thing is not to leave large gaps, but to fill small gaps with fire-resistant sealant. Having filled the entire cavity with insulation, we cover it with a layer of decorative finishing.
Scheme of the outlet of a brick chimney through the ceiling and roof of the house
Installation of a metal chimney
There are various options for installing a metal chimney both inside and outside the building. To properly make a chimney from a metal pipe, you must follow some rules:
Metal chimney installation diagram
- To collect condensate, it is necessary to install special tees with plugs;
- Where the structure passes through the ceiling, it is necessary to use the “Passage through the ceiling” element and insulate the free space;
- If the smoke duct passes through a wall, the pipe exits at an angle of 45°. You will also need additional insulation and insulation of the space between the wall and the pipe;
- In places where the chimney passes through the roof, the “Passage through the roof” element is used;
- The structure is completed using the protective element “Umbrella” or “Insulated Umbrella”;
- It is necessary to insulate all pipe joints using heat-resistant sealant and clamps;
- Installation should be done from bottom to top;
- You can optionally install a box on the main chimney pipe.
The box or casing covers the part of the chimney that rises above the roof and performs a number of important technical tasks:
- Insulation of the main pipe, which in turn improves traction;
- Strengthening the chimney, if the duct is installed on a wall of the chimney duct subject to permits;
- Decorative design. If there are several gas ducts on the roof, the box is installed on each of them.
Chimney casing
The chimney duct can be made of various materials, be solid metal or consist of corrugated sheet elements. If a box is installed on the roof, the umbrella is mounted directly on it.
How to install an outlet passage through the roof
The roofing pie consists of various materials, each of them has its own degree of fire resistance. However, the rafter system in most cases is made of wood, which does not have this property.
Safe exit of the pipe through the roof is ensured by a passage box, the installation of which is carried out according to the following scheme:
- To begin with, buy or make your own metal or asbestos box, the size of which is slightly larger than the chimney. The optimal distance between the walls of the pipe and the box is at least 15 cm.
- The box is inserted into the prepared hole so that the top edge is flush with the roof slope.
- The chimney is brought out inside the box and the insulation and vapor barrier are sealed with sealant.
- The space between the pipe and the box is filled with expanded clay or stone wool.
- From the outside, an elastic penetration, a decorative apron or a metal pipe is put on the pipe.
A high-quality chimney fully complies with fire safety standards, retains moisture well and does not spoil the appearance of the roof. Compliance with all the rules when deciding how to remove the pipe from the stove through the roof helps protect the residents of the house and all property.
Parameters for proper operation of the device
A properly installed chimney creates natural draft and removes combustion products through a channel, preventing them from entering the room. Sometimes you can even evaluate the operation of a chimney visually - by the presence of smoke in the room or the color of the flame. Excessive draft is determined by a white flame and a characteristic hum, while a bright orange flame indicates insufficient draft. A special device, an anemometer, will help you take more accurate measurements.
Related article: Construction of a hipped roof
If traction needs to be strengthened, you can use one of the following methods:
- Install the deflector. However, it must be taken into account that deflectors improve traction only in the presence of strong wind.
- Install a special umbrella on the chimney. Using a sensor located under the hood, the umbrella regulates the combustion temperature.
- Increase the height of the pipe.
- Use a turbine nozzle.
Maintenance of the assembled system
During operation, soot growths may appear on the walls of the sandwich chimney, reducing its cross-sectional area, which can lead to smoke in the room and a fire. Therefore, it is necessary to clean the duct at least twice during the heating season. It is convenient to carry out cleaning through the inspection hatch in the plug; if there is none, you can open the plug completely for these purposes by unfastening the clamp.
The condensate collector also requires regular inspection to ensure timely discharge of accumulated liquid. If the condensate drain is connected to the sewer system, then the condition of the connecting tube must also be examined: clean it if it is clogged and replace it if it fails. To clear a clogged drip line, you can use a thin, strong wire.