The bathhouse is an integral part of the Russian tradition of healing the body and spirit, an unchangeable building on a country site that many people want to own.
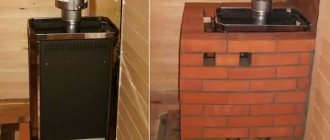
The issue of decorating the main structural element is discussed at the design stage. The lining of a sauna stove plays not only an aesthetic role, but also a protective one. Often, bathhouse owners don’t bother and use simple plaster, which cracks over time, and the cracks are covered up from time to time.
The modern market is pleased with the abundance of various materials for lining a bathhouse stove, which are endowed with excellent performance characteristics. The most popular among them are: metal, wood, brick, tile, stone.
Why cover with brick material?
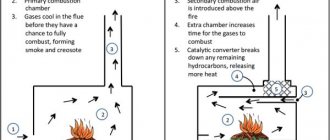
Any work must be done thoughtfully, and before execution it is necessary to understand the reasons. The designs are easy to install, heat up quickly and are accessible to everyone due to their low price, but they have a lot of disadvantages.
In addition to the high heating rate, the surface is a source of infrared radiation, which is unpleasant for humans and burns the skin at a considerable distance.
Steel heaters dry out the air, which prevents the creation of the correct conditions in the bathhouse necessary for a comfortable procedure. When heating quickly, such a stove instantly gives off heat and has to be heated regularly, which increases the consumption of firewood and creates a lot of inconvenience.
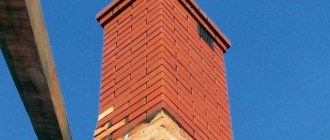
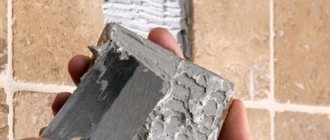
Brickwork acts as a protective screen, allowing you to retain heat for a long time and rid you of infrared rays. Covering a sauna stove with bricks is inexpensive.
Types of partitions
Depending on the functional purpose and configuration, screens are conventionally divided into the following types:
Brick protective screen for the furnace.
- Protective partitions. Protect people from direct exposure to radiant heat.
- Fire screens. They are built between a wooden wall and a stove in accordance with the requirements of regulatory documents.
- Decorative. They are made in the shape of a semicircle or in the form of arched vaults over steel stoves made of pipe.
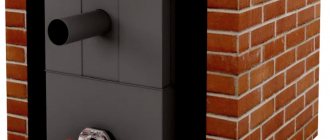
A fire screen is in any case necessary for fencing wooden structures, even when the sauna stove is equipped with a metal casing. The rules allow the use of ordinary sheet metal for this purpose, but a brick partition will look much more aesthetically pleasing.
Covering homemade heaters of various designs with bricks is a way to successfully cover them, since such products do not shine with beauty. If the heat source is welded from a vertical pipe, a circular screen can be built around it. A brick arch is built above the horizontal pipe.
Calculations for choosing a base
For the correct distribution of parameters, knowledge of the basic parameters is necessary:
- dimensions of the furnace and its weight;
- weight of stones in the heater;
- the mass of the container for heating the liquid and the volume of water (further calculations are based on the condition that a liter weighs 1 kilogram);
- the weight of the brick wall (depends on the type of stone, but standard fire brick = 4 kg).
When all the information is received, the specialist can easily carry out the necessary calculations. He will need to add up the weight of the stove, stones, brickwork, container and liquid. 20% is added to this amount to create an additional safety margin. It should be remembered that pressure is applied constantly, and if the boards do not meet the required characteristics, then sooner or later they will be pressed through.
If the resulting number does not exceed 600 kilograms, you can line a metal stove in a bathhouse with bricks without manipulating the foundation. For detailed calculations, you can use the information below.
Possible difficulties
Fitting and cutting - in practice, these operations take too much time. Therefore, it is easier to calculate the length and height of the “front entrance” in order to use only whole bars, boards and other piece products.
The presence of a door at the firebox can make access difficult. If it is removable, it is better to dismantle it, carry out all the work calmly, and then install it again.
Vertical and horizontal deviations arise not only due to lack of experience, but also due to uneven floors or walls. So it is imperative to carry out constant level checks - it will help to avoid mistakes.
Calculation of dangerous load on floors (kg/m2)
To assess how much load your floor can support, the technician needs to know what kind of joists are used. In the table below you can see the capabilities of different types of joists to support weight in kilograms per square meter.
| Section (cm) | Beam length between supports | ||||||
| 2 m | 2.5 m | 3m | 3.5 m | 4 m | 5 m | 6 m | |
| 10×5 | 734 | 585 | 490 | 420 | 367 | 325 | 293 |
| 15×5 | 1650 | 1321 | 1101 | 942 | 827 | 733 | 665 |
| 20×5 | 2930 | 2347 | 1955 | 1675 | 1464 | 1303 | 1172 |
| 20×10 | 4867 | 4690 | 3910 | 3353 | 2933 | 2733 | 2607 |
| 20×20 | 11730 | 3987 | 7821 | 6705 | 5866 | 6215 | 4691 |
| Cylindrical shape 20 | 6912 | 5528 | 4608 | 3950 | 3456 | 3070 | 2765 |
| Cylinder. f. 22 | 9200 | 7360 | 6132 | 5256 | 4600 | 4090 | 3682 |
Construction on foundation
If a metal sauna stove lined with brick is not suitable for installation according to the table, then in this case it is necessary to make a foundation. This task is simplified if you have just started building a building with your own hands and you do not need to dismantle the stove and floors.
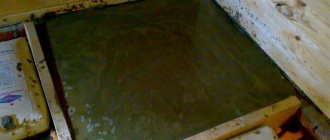
To build a foundation, a hole about half a meter deep is dug around the perimeter of the masonry and filled 3/5 with crushed stone or a mixture of gravel and sand. It must be taken into account that contact with the bathhouse foundation is unacceptable.
After laying the cushion, a cement screed and a layer of waterproofing are made, after which formwork is made, which is filled with concrete mortar. For such a product to harden properly, it must be regularly moistened with water to avoid cracks.
The next stage is the construction of brick pillars that serve as support. It is recommended to do the masonry using clay mortar. All work must be carried out taking into account the level, avoiding distortions.
When everything is ready, the metal product is installed and covered with brick.
Using plaster
Plastering is the most budget-friendly option for finishing a stove yourself. The product takes on a finished look and looks good in the interior. After plastering, you can whitewash it with a special heat-resistant compound.
This type of finishing is quite often used for brick ovens. The technology is as follows:
- It is necessary to properly prepare the surface. All traces of old finishing, incl. plaster and tiles must be removed. Each seam should be selected at 10-15 mm.
- We dilute the deep penetration primer according to the instructions. Carefully prime the surface. Do not forget that the primer must dry (at least 24 hours).
- We stretch and fix the metal mesh using dowels. Such reinforcement will significantly increase the strength of the tile fastening.
- Apply plaster to the stove. We recommend using a ready-made mixture specifically for ovens. The plaster must be allowed to dry for 48 hours.
- Now the stove needs to be whitewashed.
Floor base
If the weight of your structure does not exceed the established standards, you can place the stand directly on the surface. If the bathhouse is many years old, the technician will still have to open the floor and inspect the joists and boards for damage. You also need to remember that the brick base also has its own weight and will put pressure on the floorboards.
If the wood is not suitable for the job or is not in perfect condition, it is not necessary to replace it. It is possible to reinforce them with a metal channel or additional wooden beam. It is worth considering the distance between the beams. If they are located more than a meter apart, the specialist will need to install additional ones so that the clearance between them is about 600 mm.
To lay the base, floorboards are placed ten centimeters larger than the size of the structure with the lining. On the firebox side, it is necessary to increase this distance to avoid burning elements from hitting the wood. Then a sheet of refractory material is placed on the marked area, on which brickwork is made about 200 mm high.
It is recommended to use refractory bricks without hollow sections for these purposes. You need to use a clay mortar, to which you can add a little cement mixture. All actions must be performed using a level. After preparing the base, you can think about how to properly brick a stove in a bathhouse.
Tiles
A stove with tiles is a rather labor-intensive process. Technology has simplified things a bit. But until now, the construction of such a furnace takes 4-5 months, if you use the classic version. The laying and lining of the furnace occurs simultaneously. Although, in a simplified version, you can line a finished stove.
Expert opinion
Nikolay Davydov
Stove maker with 15 years of experience
The drawing can be anything. Usually Russian folk motifs are used. The sizes of tiles are regulated by GOST 3742-47. Permissible deviations should not exceed 1 mm in all directions. Thanks to standardization, the cladding process has been significantly simplified. The most important thing is to choose the right material.
Instructions
You should be guided by the following rules:
- Material of manufacture. Impurities in colored clay will not allow the production of high-quality tiles, so it is not used. In contrast, white clay is an ideal raw material.
- The quality of a product is determined by its ability to absorb water. The more pores in a tile and the larger they are, the less quality the product will be.
- Choose tiles made by pressing.
- The surface of the product should not have a dull appearance and there should be no cracks on it. This happens when a product undergoes only one firing.
For cladding, tiles must be sorted by shade. They will need to be laid in such a way that the transition is not noticeable. The size is adjusted using a rasp and an angle grinder on all sides. Defective tiles should not be thrown away immediately. They can be used later.
The next step is to mark. The thickness of the horizontal seam should not exceed 3 mm, vertical - 1 mm. Now let's move on to installation.
Lay out the first row.
The process is very labor-intensive, but the result is worth it. The first thing to do is to properly prepare the tiles for installation. This will ensure the best result.
The installation order is as follows:
- immerse the tiles in water, waiting until the clay absorbs water;
- the clay in the tiller will increase the heat capacity, so you need to fill it halfway;
- steel brackets allow you to correctly connect the tiles to each other;
- We connect a row of tiles to a row of the stove using wire.
Scheme for fastening the tiles: 1 – lump, 2 – pin, 3 – wire, 4 – staples.
Subsequent rows.
- drill holes in the masonry;
- We use screws and wire as a connecting element;
- We fasten the steel pins using wire;
- we place the tile on the pin and bend the last one;
- the dry solution will fill all the voids between the tiles.
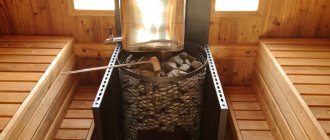
Sauna stove in tiles
Construction process
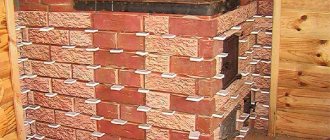
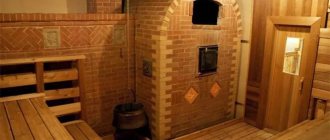
If you plan to cover it with bricks on all sides, then it will be a full covering, if only some sides are partial. When completely surrounded, it is possible to control the movement of warm air masses. To do this, doors are made at the top and bottom of the screen to stop the movement of air when closed.
The model, completely covered with masonry, creates an ideal microclimate typical for a Russian bath. If at least one open wall remains, it will be more like a sauna, and the stone will protect you from burns and accumulate heat.
Types of masonry
The “quarter brick” technology, which involves laying blocks on a side edge, is suitable for those who have already encountered similar work. There are two main masonry:
- Solid. Does not imply the presence of air circulation holes. Suitable for subsequent decorative lining of the stove with facing materials.
- "Into detente." Provides ventilation holes.
The presence of holes leads to faster heating of the bath when lighting an iron stove, but it threatens increased heat and burns from the escaping air. An alternative is to install metal or cast iron doors (hatches) in the second or third row. The measure will allow you to control and manage the heating.
Screen construction options
To determine the answer to how to line a metal sauna stove correctly and with what kind of brick, it is necessary to consider all existing classifications.
By distance:
- solid - interferes with circulation, which reduces the heating rate;
- randomly - the brick is placed with holes, this type reduces the quality of shielding;
- a screen with doors at the top and bottom is an ideal option with the ability to adjust convection.
By arrangement of bricks:
- in size - increases the heating time of stones and consumes a lot of raw materials during construction;
- half a brick - the most suitable option with a durable wall and rapid warm-up;
- in a quarter of a stone - has good heating characteristics, but the strength of the masonry is reduced.
It is worth noting that an overly unstable option can be corrected using reinforcement with a special network, but still, a thin-walled lining should not be erected without good preparation.
Steel case
Steel is also a fire-resistant material. It cannot be left untreated, as it will instantly rust in a bathhouse. When finishing the space around the stove with steel, you need to keep in mind that unlike brick, tiles and stone, steel does not insulate heat at all.
A protective portal around the stove made only of steel will be completely pointless, since it will not be able to fulfill its main task - to protect wooden walls from overheating. In order for this function to be fulfilled, it is necessary to provide a good heat-insulating layer of another material, and then cover it with a facing steel sheet.
This heat-insulating separation layer is created from mineralite. Other fire retardant insulation materials can also be used. Simple mineral wool is not suitable, since after getting wet once it shrinks in volume, and this defect cannot be corrected by anything.
The insulation near the stove should not get wet. You need to take care of its waterproofing. Moreover, this waterproofing should only be on the side of the cold wall, but not on the side of the stove.
Steel has a metallic luster. This effect can be used to greatly increase the efficiency of the portal.
If made from uncoated polished stainless steel, it will act as an infrared reflector.
A similar element can very often be seen in electric fireplaces, heating stoves and any other heating devices.
The main difficulty of this solution is the need to use only stainless steel. Compared to ordinary steel, it costs 10 times more, but the total thickness of the sheets for the reflective screen can be small.
Stainless steel perfectly withstands any humidity. It can even be placed in rooms such as a steam room in a bathhouse; the decoration around the stove will be compact and with a modern design. In a steam room, all interior elements are usually made only from wood. Stainless steel would be appropriate next to a metal stove-stove.
What kind of brick to cover a stove in a bathhouse
Before the main procedure, you must first prepare all the materials. On the modern market you will find a huge variety of bricks, varying in size, aesthetic qualities and properties.
The choice of brick must be made based on the distance from the metal to the screen being built. If it is less than 250 mm, then this will lead to strong heating of the masonry and therefore it is better to use fireclay.
The optimal is 500 mm. For such buildings, an ordinary fire-resistant red stone is perfect. If you plan to install vents from below, then this material can be used closer.
Sheathing followed by cladding
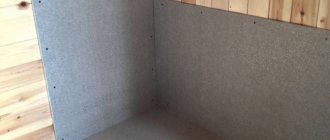
You can ensure an aesthetically presentable appearance of the bathhouse by decorating the heat-insulating layer with fire-resistant tiles, the installation of which must be done with heat-resistant glue. To ensure high thermal insulation protection of the wooden surface from the heat of the stove, fire-resistant materials are mounted on it, which can be used as:
- glass magnetic sheets, resistant to high temperatures and high humidity. They are characterized by high elasticity and mechanical strength. When heated, they do not emit toxic substances;
- expanded vermiculite sheets;
- mineralite slabs.
Characteristics of building materials
You can calculate the main indicators that a brick has for lining a metal or iron stove in a bathhouse using the following table:
| Options | Facing | Textured | Raised | Ceramic |
| Strength | M-250 | M-250 | M-250 | M-200 |
| Size, cm | 25×12×6,5 | 25×12×6,5 | 25×12×6,5 | 25×12×6,5 |
| Frost resistance | F35 | F35 | F35 | F75 |
| Moisture absorption,% | 8,5 | 8,5 | 8,5 | 6 |
| Weight, kg | 4 | 4 | 3,8÷4 | 4,1 |
| Thermal conductivity, W/(m×°C) | 0,61 | 0,61 | 0,61 | 0,72 |
Choice of solution
The most common option for carrying out such work is clay. It is mixed with sand, adding a little cement. A cement mixture with the same clay ratio is also used. For the cementless option, make a clay mixture with twice the amount of sand, which is diluted with water to the desired consistency.
Fireclay powder is best used for refining seams, because it binds bricks less firmly.
A simpler option is to purchase a special mixture. It is inexpensive and easier to use. Thanks to a wide selection of similar products, you can easily select the optimal solution. It is worth noting that the diluted mixture must stand for some time before use so that the substances contained in it dissolve better and the solution takes on the necessary properties.
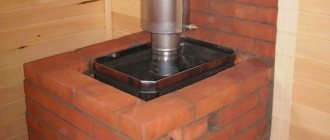
Fencing an iron stove in a bathhouse
Before starting construction, it is recommended to thoroughly wet the bricks with water for 12-13 hours. This will allow them to achieve the desired level of humidity. Otherwise, they will dehydrate the solution.
The quality of the mixture is checked as follows: it is applied to a new brick, and if it does not spill or crack, then the specialist has created the correct consistency.
Now you can begin the laying process itself. It is important to check each row for evenness using a level.
If you are interested in what to line a stove in a bathhouse with (except for brick), you can always find a replacement. There are special casings that are cut to suitable dimensions. They are made from different rocks, are easy to install, and you will definitely find the right option for yourself.
Step-by-step installation instructions
After calculations and design on paper, the specialized specialist begins the actual work:
- Mix the solution using cement and sand of medium or fine fraction.
- Lays bricks - sequentially, from the base, one level after another.
- Takes into account the ligation of seams when creating rows - they should go like a “ladder”, and not an even vertical line.
- Use jointing when the masonry of the portal for the sauna stove is completed to prevent surface roughness.
Afterwards, you can additionally decorate the “front entrance”, for example, with tiles, but this is not necessary, since if the work is done correctly, it already looks quite aesthetically pleasing.
Finishing
After setting, you need to make a lining so that the sauna stove, lined with brick, becomes a real decoration.
It is most convenient to remove excess solution using a drill with a special attachment. It is important to use personal protective equipment during the process. If after this procedure there are stains left on the brick, they can be removed with a brush dipped in a solution of laundry soap.
In order for the stone to retain its appearance for a long time, it is better to melt it slowly for the first time after lining, allowing the material to gradually warm up. Otherwise, the mortar may crack and the brick may lose its aesthetic qualities and properties.
Brickwork looks very beautiful regardless of the interior style. It does not require decorative finishing, and a huge selection of facing building materials will satisfy the most sophisticated tastes. All you need to do is keep it clean and protect it from damage.
Now you know how to cover an iron stove and boiler in a bathhouse with bricks. Regardless of the masonry method you choose and the materials used, you will immediately feel the pleasant comfort of the updated stove.
More about firebox rules
For your own safety, as well as for long-term, normal and problem-free operation of the heating unit and “gate”, adhere to the following recommendations:
- Splash water onto the stones carefully, without flooding them, in small portions - 50-100 ml, gradually reducing this volume.
- Use a fan to wet as much of the area as possible.
- Try to direct the liquid between the stones to obtain the hottest and dryest steam possible.
- Follow the sounds - when you hear the water hissing, you will understand that the temperature in the room is dropping.
- Pay attention to the color of the soaked stones - if they acquire a crimson glow, it means you are steaming correctly.