In any project, let it be a sauna or a Russian steam room, sooner or later the construction will reach the stage when it will be necessary to install and first select a suitable drain for the bath. As a rule, there are no problems with the purchase, fortunately, on the market you can find quite a lot of ready-made kits for arranging a ladder or drain floor in a bathhouse. But there can be problems with the choice, especially if you rush into the purchase.
The drain is a special device for draining water in a bathhouse.
How to choose a bath drain
In modern technology for the construction of washing and steam rooms, the traditional U-shaped elbow has long ceased to be used as a drain and water seal. At least for modern projects of a free-standing bathhouse for a summer residence.
Old U-shaped sauna drains are practically not used, as they require a large space under the floor
This option is not very convenient for unheated buildings, it requires a large space under the floor in the bathhouse, and most importantly, the water from the drain does not drain well and often freezes in winter, so you have to blow out the remaining liquid in the drain under the floor.
There are two options left:
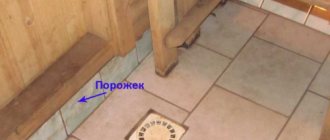
- Use a classic drain ladder, dry or with a water seal, built into the floor inside the bathhouse, with a sewer outlet without additional passages;
- Build a wooden ladder with a false floor and a drainage channel underneath.
The choice of a specific scheme for the drainage system is determined by the design features of the floor. In small steam rooms and washing areas of the bathhouse, a drain channel is usually used, laid along the entire length of the room. The surface can be tiled with a slope towards the drain gutter. In this case, the sauna drain is led into a pipe that carries water outside the room.
Organization of drainage with a wooden ladder
Classic ladders are used in small steam rooms and wash rooms. The floor area in the room is small, so the presence of a slope on the surface of the ceramic tiles does not cause such pronounced discomfort as in the case of large spaces.
Important! Because of the slopes, a ceramic floor in a bathhouse, even one equipped with a drain, must be covered with tiles with a corrugated surface, and in some cases even equipped with heating.
In addition to good thermal conductivity, ceramics have high heat capacity. An ordinary floor under tiles in a country bathhouse always seems cold, even if the room was faithfully heated and heated the day before. In winter, the feeling of cold in the feet increases many times over. In this case, the problem is solved by laying wooden gratings or ladders on the floor. True, you will need to think in advance about how to properly make the bathhouse drains, choose the size and direction of installation. It seems like a trifle, but the orientation of the grates can cause improper operation of the drainage system and the accumulation of foam and detergent residues on the floor in the bathhouse.
Well with a filter at the bottom
The design of a drain pit with a filter bottom is used primarily to purify wastewater from dirt and chemical elements, as well as to retain bacteria. Subsequent filtration of water is carried out directly by the soil layer. But at the bottom of the well, crushed stone, crushed brick or sand are used as a filter.
To ensure the outflow of water from a bathhouse designed for 3-4 people, a well with a diameter of 1.5 m and a depth of 2 m is sufficient. It can be either rectangular or round in shape - the latter option is preferable due to the uniform distribution of pressure on all walls. The cylindrical design will need correction much less often.
Since it is necessary to drain the bathhouse at the dacha without damaging the building itself, it is advisable to retreat from it at a distance of about 3-5 meters. Such a gap will ensure, first of all, the safety of the bathhouse foundation from being washed away, and will also prevent the penetration of unpleasant odors from the well into the bathhouse. But if you locate the drainage hole further, you will inevitably have to purchase additional pipes for water drainage. In addition, it is difficult to ensure the correct angle of inclination over a long distance.
If the soil on your site is dense enough, then simply dig a hole for drainage and lay filter materials at the bottom - sand, crushed stone and broken brick. Additional strengthening of the walls is not required.
According to the drainage diagram in the bathhouse, a trench can be dug from it to the pit, through which water will randomly flow by gravity into the well. However, it is best to equip the drain with pipes made of asbestos, metal, plastic or ceramic, with a diameter of 50-100 mm. In this case, a trench is also necessary, but its depth will depend on the depth of soil freezing, but not less than 50 cm. The pipes are laid at a slope of 20 mm at every meter of distance.
At the design stage, the future design of the drain and the features of the floor organization are thought out in detail. An economical option for draining a bathhouse in a country house is to make the floor sloping towards the drain hole. With this design, wastewater enters the pipes and is discharged directly into the drainage pit.
An alternative to a drainage pit is to use a sealed septic tank, such as one made of plastic. Such a device will be especially relevant in cases where the bathhouse is equipped with a toilet, that is, the nature of the wastewater will require more thorough cleaning.
Modern bath drain
The use of polyester and PVC materials, equally resistant to low and high temperatures, heavy contamination with sand and detergents, has led to the emergence of compact and reliable drainage systems. A modern sauna drain is a fairly reliable device, with a body height from the inlet flange to the bottom of no more than 100 mm.
The box, just over 100 mm high, can easily be placed on any bathhouse floor, be it wooden or concrete.
Inside the round or square box there is a system of movable petal valves or a water seal with a level height of 20-25 mm. In petal models, the drainage path is blocked from the sewer automatically due to a built-in spring or using floats. In water drains, the shutter only cuts off odors from the drainage hole, but the hole can be completely closed by pressing the central insert.
What does it give:
- A small resistance force of a float, spring or water seal ensures normal operation of the drain system with simultaneous high-quality shutoff of the sewer system, even with a small amount of water on the floor in the steam room or washing compartment of the bathhouse;
- The drain ladder is easily drained and blocked by a valve from the internal space of the sewer system or drain pit;
- Installation of the ladder does not require special preparation or adjustment of the product.
Both ladder options are considered convenient for bathhouse buildings installed on a foundation with a low floor height.
True, mechanical and hydraulic locking systems also have a number of disadvantages. For example, petal models turn out to be quite sensitive to sand and scree. Therefore, you should not use the washing compartment of the bathhouse at the dacha as a shower after working in the beds. The hydraulic ladder is more durable, but requires increased care and periodic flushing of the drain system with clean water. Otherwise, an unpleasant swampy smell may appear inside the bathhouse.
Which material should be preferred?
Today, on sale you can find drains made of the following materials:
- cast iron;
- of stainless steel;
- plastic.
Cast iron sewer drains are characterized by high throughput, corrosion resistance, affordable cost, and long service life. The disadvantage of cast iron ladders is their heavy weight, which increases the complexity of installation work.
Stainless steel equipment is highly decorative and durable. Stainless steel elements perfectly withstand the aggressive effects of detergents, which makes them indispensable for use in hospitals and children's institutions. The main disadvantage is the high cost.
Water drainage ladders, made from modern polymers, have high strength, durability, resistance to aggressive influences, are lightweight and affordable. All this allows the use of plastic products for organizing drainage in premises for various purposes.
Wooden gangway
Oddly enough, old drainage schemes compete on equal terms with modern systems and ladder mechanisms. The reason for this is the high reliability and simple design of the drain structure.
Most often, wooden ladders are used in small baths, where the steam room and washing department are often combined in one room. Among the most successful schemes are the following options:
- Wooden ladder with gutter. The floor is laid out without cracks, water is discharged into an open drain channel;
- The floor in the bathhouse can be made in the form of a wooden ladder without sewerage. Its functions are performed by a layer of sand and gravel that absorbs excess water;
- Tiled floor with wooden gratings - ladders. The drainage system is made in the form of a hidden gutter with a water seal.
The last option can be considered the most successful for a bathhouse built on a concrete strip foundation using frame technology. The same scheme can be used for a bathhouse box attached to a summer kitchen or a country house.
Under the wooden ladder there is a concrete screed with drainage slopes
The presence of rather large gaps between the slats makes wooden sauna ladders not always convenient, especially if it is customary to walk barefoot inside the steam room or washing compartment. In this case, a more rational solution would be a regular wooden floor with a built-in drain gutter.
Option with tiled floor and wooden ladders
For small spaces, you can get by with a modernly designed drain, no matter whether it is a model with a water seal or a more complex model with a swing valve.
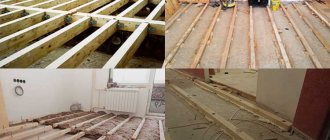
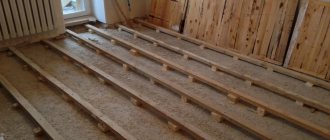
pouring floor
Bathhouses on screw piles are in most cases equipped with a pouring floor. This is a traditional solution for Russian baths. The main difference between a floor of this design is that water flows out over the entire floor area through the existing cracks. The further path of water depends on design solutions in the field of sewerage, which will be discussed below.
This type of floor for a bathhouse is considered traditional, because previously wood was not a scarce material. Thick pine boards that can last for decades were used for installation. Modern technologies make it possible to build baths, in particular to install floors, with much less lumber. There are a lot of products that protect wood from rotting or at least significantly slow down this process.
Bathhouses on stilts, including screw ones, and poured wood floors are made for each other. Due to the presence of natural ventilation, the likelihood of fungus developing on wood is significantly reduced.
If you decide to make a pouring floor for a bathhouse on a pile foundation, then its installation should be carried out in the following order:
- The first step is to prepare the necessary material. To do this, you need to measure the length and width of the room to find out its area. An edged board 3.5–5 centimeters thick is ideal as a material for flooring. Boards should be purchased with a small margin. In addition to them, you will need nails 100 millimeters long and a plinth.
- All lumber must be thoroughly treated with an antiseptic, after drying it. Impregnation must be carried out at least twice, otherwise the poured floor will not last long.
- You need to start installing a floor with a drain by cutting the boards according to the existing dimensions. It is worth understanding that, despite the treatment, the wood is still exposed to water, especially in the washing room, so the boards may swell. To avoid deformation, you need to cut the boards 1–1.5 centimeters shorter than the width of the bath.
- The floors of the washing room and other rooms of the bathhouse in which water drainage is needed must be laid, leaving small gaps. As a rule, the distance between the boards is 1–1.5 millimeters. This is enough for the water to flow freely, while eliminating the possibility of drafts. It is important that the gaps are the same size. Therefore, it is best to use templates, such as an ordinary wooden ruler.
- An equally important point is nailing. Regardless of the width of the boards, installing floors involves using two nails for each joist. Otherwise, the boards will begin to deform over time. After the installation of the floors is completed, you need to go down under the bathhouse and bend the nails that went through.
- Pre-prepared skirting boards should be installed on top of the boards along the walls. At this point, the installation of pouring floors in the steam room or washroom is complete.
When making a poured floor with your own hands, you should cover the flooring with paints and varnishes. This will not only increase its service life, but also eliminate the possibility of injury in the form of splinters.
How to choose a place to install a ladder
When planning drainage systems inside a bathhouse, first of all, pay attention to the design of the ventilation system of the room. The connection between the location for installing a gutter or a modern drain and ventilation is obvious:
- The air supply and removal system ensures high-quality drying of all drain routes;
- An exhaust ventilation window effectively removes any odors that escape from the sewer in the bathhouse.
In the simplest case, the drainage chute is located in the center of the steam room, from the front door to the window. If the bathhouse does not have a special hood, then it is best to place the drain in the warmest place on the floor.
Modern models of drainage ladders are installed in the most moisture-saturated area of the steam room or washing compartment. The shorter the path from spilled water on the floor to the receiving hole of the drainage system, the better.
Advice! You should not choose the location of the drain on the floor to suit the design or interior of the bathhouse. If the appearance of the receiving flange of the drain system causes unpleasant associations, then you can purchase a more modern model with a gutter and a decorative grille.
When choosing a location, you have to repeatedly check for drainage slopes
If the drain is already installed in the bathhouse, it can always be covered with wooden flooring or a special collapsible floor made from drains.
Conclusion
We hope that our brief instructions will help you choose high-quality drains for your bathhouse without extra costs or outside help. These simple designs have both a practical meaning, preventing accidents and allowing water to flow freely into the sauna drain, and an aesthetic one - the wood fits perfectly into the interior.
You can also make furniture for a bathhouse that matches the style of the ladders on the floor
In addition, wood is an environmentally friendly material that does not contain chemical compounds harmful to the human body. And some types of wood, when exposed to temperature, release beneficial substances into the air, making the atmosphere in the bathhouse even more favorable. The video in this article will help you understand this topic more clearly.
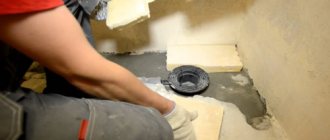
Installing a drain ladder in a bathhouse
Modern models do not require special preparation or major alteration of the floor in the steam room. But there is one peculiarity in installing a drain; the drain system can be installed only after the installation and arrangement of the floor has been completed. It happens that the pre-selected location for installing the drain does not correspond to the actual slopes on the floor.
Therefore, before cutting holes for drain communications, a small amount of colored water is poured onto the floor. In this case, it is desirable that in the steam room of the bath there is a weight or ballast that simulates the weight of people. The wooden floor in a bathhouse is most often placed on joists, so the weight of visitors can affect the direction of water flow. Simply put, when the steam room is fully loaded with visitors, the floor may “sag” and moisture will move away from the location of the ladder. A water test makes it possible to clarify the location for installing a drainage system in the bathhouse.
Basic moments
The owner of a bathhouse must remember that each stage of sewerage installation requires careful compliance with the requirements for it.
The failure-free operation of the system is ensured by a properly designed scheme and exact compliance of the pipe slope with SNiP standards. A comfortable stay in the bathhouse is guaranteed by the presence of a hydro- or dry seal. You should not neglect the design of the ventilation system, as it forms optimal air exchange and promotes the removal of moisture after bath procedures. This will help prevent the formation of fungus and mold. For regions with cold climates, it is extremely important to carry out high-quality work on insulating the sewer system
Installation of a dry ladder
Any model of automatic or semi-automatic drainage system is suitable for a bathhouse in the country. Most often, float or pendulum ladders are installed; they are easy to maintain and do not require special operating conditions. Almost all models are designed to drain water at temperatures up to 85°C. The only important condition is to ensure the slope of the outlet pipe; to prevent reverse flow, a slope angle of at least 3-5o will be required.
Float and pendulum options
Membrane drains for bathhouses are less practical, since normal operation requires constant moistening of the flexible element, otherwise the sealing tightness of the hatch is lost.
If the floor in the bathhouse is tiled, covered with wooden ladders, then to install the housing you will need to cut out a cylindrical cavity with a diameter of 100-120 mm. The flange is glued into the cavity using mastic so that after assembly the protective grille is 1-2 mm below the surface of the tile covering.
The flange must be welded or glued to the waterproofing of the drain surface
Often a dry drain is installed complete with drainage gutters and a leak-proof wooden floor. In this case, the device body is embedded directly into a concrete screed covered with waterproofing. Gutters are connected to the receiving window of the ladder, and the drainage functions are provided by thin slots made in the wooden floor of the bathhouse.
Floor with drain: work order
Although the designs of drains are different, all floor-mounted models are installed according to the same principle - the sequence of work is the same.
It is much more pleasant to stand on a warm floor in the shower, which is why a floor with a drain is most often made with a layer of thermal insulation. The best thermal insulation material for this is high-density extruded polystyrene foam. It does not absorb water, does not rot, has excellent thermal insulation characteristics, and can withstand loads normally (it will withstand the weight of the screed and tiles without problems).
You can make a floor with a drain in the shower with your own hands
It is more convenient to work with a level (laser level) that has a plane builder function. It will make the work much easier.
Preparatory work
The first step is to remove a branch from the sewer riser where the water will flow. The sewer pipe is laid with the required slope (2 cm by 1 meter), the socket is placed at the intended location of the drain connection. After the sewer outlet is installed, take a drain and make preliminary markings - you need to mark the height of the screed on the walls of the shower stall:
- We install the level so that it marks the axis of the drained sewer pipe.
- We position the drain so that its axis is approximately 1.5 cm higher than the axis of the sewer pipe (see photo).
The axis of the drain should be slightly higher than the axis of the sewer pipe
- After this, we raise the leveling beam to the installation height of the ladder grating (taking into account the fact that another grate will be installed - add its thickness).
- Since normal water flow requires a slope. It is made 1-2 cm per meter long. From the existing ladder grating line upward, set aside the required distance.
Mark the line for laying the screed on the walls
- Based on the mark found, we set the leveling beam. This will be the level of screed that must be maintained along the walls. You can draw this line with a pencil or marker.
Now you can measure the height to which you will need to raise the floor in the shower stall. It largely depends on the parameters of the ladder (its height). Based on the obtained figure, it will be necessary to plan the layers of screed and their thickness.
Determining the thickness of screed layers
Usually it is assumed that polystyrene foam 5 cm thick is placed in the screed. The minimum thickness of the screed is 3 cm (more is possible, less is not). This is in the center near the drain; towards the edges it becomes thicker (the required slope is created). From the existing screed height line, we put the resulting figure down (add the thickness of the polystyrene foam and the screed). It will be necessary to bring the rough screed to this level.
From the existing height of the screed we set down the thickness of the insulation and DSP
To reduce the load, the rough screed is made of lightweight concrete. It can be foam concrete or expanded clay concrete. Wet work can be minimized. To do this, you can lay foam blocks at the missing height and fasten them with reinforcing mesh. You can pour a 3 cm layer of DSP on top.
When installing such a base, a damper tape is needed along the walls. Since in the presence of polystyrene foam or any other insulation, the floor may sag a little, it must be made incoherent with the walls. This is why you need a damper tape. It is placed around the perimeter of the base. In height it should be 1-2 cm above all layers.
You can use a special damper tape, or thin foam plastic (1 cm thick or less). Even corrugated cardboard will do. The remaining tape is then cut flush with the screed. She did her job - we got a floating slab.
The poured screed must stand for at least a week - the concrete must gain at least 50% strength. After this, you can continue working.
Waterproofing
To prevent the drain floor from leaking, the shower stall needs good waterproofing. It is better to make it multi-layered. One of the layers can be done at this stage.
Coating waterproofing is usually used. This could be bitumen mastic or special waterproofing for swimming pools. It is applied with a brush in several layers, extending onto the walls at least 30 cm. These mastics form an elastic, waterproof film on the surface without seams or joints. This type of waterproofing is highly reliable.
Particular attention should be paid to the processing of corners. They can even be glued with a strip of rolled waterproofing (such as Gidroizol, etc.). Apply the first layer of coating waterproofing to the walls, then glue the joint between the wall and the floor with roll waterproofing (set on the same compound), and apply another layer on top.
Multi-layer waterproofing is more reliable
For those who like to do everything with a margin of safety, the first layer of waterproofing can be laid even under the first corrective screed. All rules remain the same as described above.
Instead of coating waterproofing, you can use roll waterproofing. But you will still have to lay it on bitumen mastic, lubricating it well and pressing the seams. The approach to the walls is approximately the same - about 30 cm. If the width of one roll is not enough, the panels are laid with an overlap of 15 cm, they are well coated with mastic.
Choosing a place to install a drain ladder
To ensure that the tiles on the floor of the shower stall look at least normal, it is better to position the drain grate symmetrically relative to the tiles. Therefore, first, dry, lay out the tiles on the floor (taking into account the seams). When laying out, remember to step back a little from the walls - by the thickness of the tiles and glue.
It is not at all necessary to make the drain in the center - it can easily be moved to any wall. In this case, the far wall from the entrance was chosen to reduce the possibility of water spilling out of the booth
Next, we choose the position of the ladder so that everything looks good and, at the same time, it is necessary to make a minimum of trimmings. Not only do they take up time, they also spoil the view.
Installation of drain and insulation
The next stage is installing the drain and laying thermal insulation. A drain is placed at the selected location, it is connected by a pipe to the sewer outlet (during installation, do not forget about the slope). After this, insulation boards are laid. It is cut so that the installed ladder can be covered. A damper tape is also required around the perimeter. This time it is better to make it also from polystyrene foam, but taking a thickness less than -2-3 cm is enough. At this level, polystyrene foam will still prevent heat loss into the walls.
The joints of polystyrene foam are glued with tape (so that moisture does not leak out of the concrete). If there are large gaps, they can be tightly packed with scraps and then sealed.
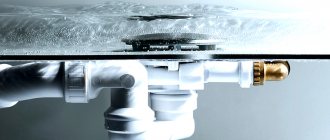
Installation of a water drain
The design of “wet” drain models is different in that the water flow in the drainage system is controlled using a water seal and special partitions. The principle of operation is in many ways similar to the U-bend circuit, with the only difference being that the height of the locking liquid column in the water drain is only 50 mm.
What does this give? There are more than enough advantages to equipping the bathhouse drainage system with a water drain:
- Simple design, no moving parts or membranes. Accordingly, the drain will withstand the most barbaric treatment; for a country bath this is especially valuable if you have to wash off dust and dirt after working in the beds;
- A simple device means a long service life of the drain ladder in the bathhouse. It is enough to install it once, connect the output to the drain pipe, and you can forget about its existence;
- The water ladder is insensitive to installation errors; a small error or deviation from the horizontal plane will not lead to malfunction.
There are two types of water drains, with straight and angled outlet. The first option is perfect for a wooden bathhouse floor with a small drainage hole under the building. The second option is used for lateral water drainage. In water drains with a side outlet of the drain pipe, there is a special partition that blocks the backlash or backflow of sewer contents.
The only significant disadvantage of such devices is the lack of protection against drying out of the water, so the drain is often simply piped beyond the foundation of the bathhouse, discharging the liquid onto the ground or sand bedding. For the winter, the outlet hole is simply closed with a stopper.
To install a water drain, a cavity is cut out in the floor and mounted directly on the waterproofing of the ceiling. The housing can be laid under a cement screed or embedded directly into the floorboards.
Ventilation of bath sewerage
1. Leaking floor.
The boards are laid with a gap of five millimeters, without attaching them to the joists. This floor can be removed and dried at any time.
2. Solid floor.
It is laid tightly at an angle towards the floor drains. A tray is placed under them that collects water and drains it into a pit. To protect the environment, filters are installed at the exit from the bathhouse and covered with a rubber casing.
A mandatory element of the sauna sewer system is a ventilation riser. To make it, take an asbestos or metal pipe with a diameter of no more than ten centimeters. The riser is mounted directly at the drainage site and raised above the roof of the bathhouse. The upper end is equipped with a deflector or cap.
Part 3: waterproofing, polystyrene foam, polyurethane foam
After applying the primer, the next step was to apply Mastergood Liquid Waterproofing. I made a separate video about this material, dryly and purely technically about its properties, uploaded it to my additional channel, if you are interested in this waterproofing, see below.
In general, a professional plumber friend advised me on Knauf waterproofing and waterproofing tape, but it wasn’t on sale in my city, but later, in the next series, Knauf will also be available, I had to order it, subscribe if interested. In the meantime, MasterGood waterproofing, I coat the surface with it for the first time, I try to apply it thicker in the corners, whether it helped me, look further, you will see for yourself. Then I missed it a second time, with a second layer. In the meantime, I bought extruded polystyrene foam, more precisely polystyrene foam produced by TechnoNIKOL. I start cutting out the required pieces of EPS according to the pattern. The blade of the knife turned out to be a little short, I had to take a longer one. Still, 100 mm, 10 centimeters thick pieces. I had to cut out a piano lid like this, it was also a creative job. Now the remaining sealant came in handy; I used it to glue the polystyrene foam to the floor. I filled all the voids with polystyrene foam with gaps for foaming. I bought this foam called Profile. I also made a separate video about it, dryly and purely technically about its properties, see below.
According to what is said on the bottle, there should be enough foam for 40 liters of space. I doubt I have 40 liters in my cracks. What do you think, write in the comments, is there 40 liters in the cracks? Now you will see for yourself whether the cylinder is enough. Using a laser level, I mark the line of the future edge of the concrete slab. In order to save money, I buy a small can of foam; I also made a separate video about it, dryly and purely technically about its properties, see below. Here I will only give brief conclusions, which I think will be useful to many.
What is a water seal
They come in two types:
U-shaped (knee) water seal
From the figure it is absolutely clear that this simple device, similar to a hookah, unlike it, does not allow air to pass through, creating a water plug .
And what happens in a hookah is called a breakdown of the water seal. The diameter of the pipe and the method of connection can only affect the performance of such a device; the main thing that is required of it is tightness , and its lowest point must be at least 50 mm below the drain pipe.
Any materials at hand will be suitable for the water seal, but we must not forget that in the case where access to it is closed, reliability and the ability to clean it are of decisive importance.
The second picture shows how water, having evaporated from the plug (and this will definitely happen in 40-50 days), opens up the possibility for air to penetrate from the sewer.
So you need to either periodically fill it with water, or use a different type of water seal, or seal it hermetically during a long absence.
Bottle water seal
From this figure it is clear that another design solution did not change the function of this device - to create a water plug. Another name for this thing is siphon.
Natural filtration
Technologically, the system is quite complex. It is used when the volume of wastewater is large enough, but not more than 250 liters, or when it contains solid elements. The drainage system consists of a container of any shape and a system of pipes extending from it over the entire area.
Requirements for the container: waterproof; the volume should be three times the water consumption per day. Periodically, the septic tank must be cleared of sediment. A sewer truck is used for this, so there must be access to the tank.