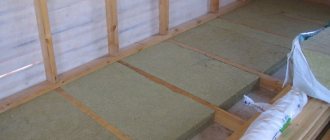
Regardless of whether there is a screed under the floor or just a filling of expanded clay, or maybe there is even damp earth under the floor, in order for the floorboards of a wooden floor to be warm, the space under the top flooring will need to be insulated.
For this, the well-known and most common method is used: insulating the floor along the joists. What logs are and what insulation is best suited for thermal insulation of wooden floors, as well as what schemes are best to implement this will be discussed in our material.
Types of floor insulation
The logs are wide bars installed on an edge and running from wall to wall parallel to each other. Plastic or metal beams can also play their role. Next, the finished floor boards are attached to them, so it is very important to lay them correctly so that over time the floor does not begin to creak or deform.
The selected insulation option is placed between and sometimes under the joists. Let's try to figure out which material for floor insulation is better to give preference to, and which should be completely abandoned.
It is not necessary for the logs to be exactly boards. Often this is an ordinary beam, adjusted to the level in one plane. The main thing is to secure them well and level them so that subsequent laying of the floor does not bring problems to the homeowner.
We will consider the most popular types of insulation materials, which are distinguished by fairly high heat saving rates.
These included:
- sawdust or sawdust mixture;
- expanded clay;
- glass wool;
- mineral wool;
- ecowool;
- penoplex;
- expanded polystyrene.
All of the listed insulation materials are quite airy, which means they will let the cold through with great reluctance. In addition, a high-quality layer of insulation can prevent the appearance of high humidity in the house, which is also important.
Option number 1 - budget sawdust
This material has the most unstable characteristics. Often, it becomes saturated with moisture, which significantly worsens its heat-protective properties.
In this case, the owner better take care of the bottom layer of waterproofing, since wet wood will begin to rot, and this can cause not only damage to the coating, but also a number of serious diseases.
Often, as a relatively inexpensive option, pellets or sawdust granules similar to pellets are used to insulate the floor. In them, sawdust is compressed and held in place by an adhesive base.
Such insulation will have slightly better thermal conductivity, but experts do not recommend insulating the floors of your home with such material. Its moisture resistance leaves much to be desired.
Of course, if you plan to insulate the floor in a country house or in an outbuilding, you can use sawdust, but they are completely unsuitable for insulating floors in a house. It is better not to save money, but to purchase more expensive and high-quality insulation.
According to experts, sawdust is one of the most undesirable materials for floor insulation. But the budgetary nature of the material often takes its toll. Experienced builders recommend using sawdust only when insulating the floor of outbuildings
Option No. 2 - environmentally friendly expanded clay
This material is quite in demand, due to its affordable cost, as insulation. Therefore, it is no wonder that he has the most mediocre performance.
With relative and comparatively low thermal conductivity for thermal insulation materials (within 0.1 W/m*K), it also has a number of unconditional advantages:
- this is the most environmentally friendly material of all presented in our list of insulation materials;
- it is free-flowing and therefore easy to install;
- completely fireproof, as it does not burn at all;
- does not rot;
- its granules have a high degree of strength.
But residents of the northern regions, who have expanded clay as insulation under their floorboards, often complain that it feels cold from below. And this is no wonder. Even though expanded clay is a porous material, its very base is solid, and therefore is just as prone to absorb cold as it is to give it away.
And, of course, its thermal conductivity varies greatly depending on the size of the granules. The larger the granules, the higher the level of thermal protection, and vice versa.
After insulating the floor with expanded clay, the result will not be the warmest floor. But owners often use this material, especially in southern latitudes or when constructing floors for utility rooms
Option No. 3 - affordable glass wool
Despite the fact that glass wool is a subtype of mineral wool, it is considered an unsafe material, so we will consider it separately. Its fibers are nothing more than real glass fibers. They can not only irritate the skin and damage the eyes, but also cause serious lung problems. That is why they everywhere prefer to replace it with mineral and ecowool.
The main advantages of glass wool are:
- chemical inertness, the material is dangerous only due to its physical characteristics;
- high vapor permeability;
- ease of installation. This material cuts well with scissors.
But some still haven’t given up using it. After all, its thermal conductivity parameters are more than two times lower than those of the same expanded clay (within 0.04 W/m*K).
And if a protective layer of vapor barrier is laid on top of it and the threat of damage from glass wool fibers is thereby reduced to 100% zero, why not use this material?
Glass wool is not the safest material. Some people have a severe allergic reaction to it. Therefore, nowadays they prefer to replace it with other types of cotton wool.
Option No. 4 - popular mineral wool
This is a more expensive analogue of glass wool. It has all its advantages, but at the same time, it is completely safe for health.
This is due to the fact that mineral wool fibers are smaller, softer and made not from frozen glass fibers, but from natural minerals - carbonates, that is, rocks, which are mixed with various additives.
This type of cotton wool is even more convenient, since you can take it even with your bare hands without fear. For convenience, it is available both in rolls and cut to specific sizes.
On sale you can find mineral wool of several varieties - stone, basalt and slag. But it is not 100% composed of rocks. Some part of it is occupied by processed products of the metallurgical industry
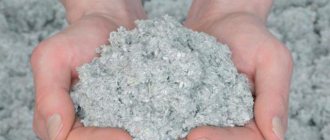
Option No. 5 - high-quality ecowool
Ecowool is an even more expensive analogue of glass and mineral wool. Its advantages mainly lie in its 100% environmental friendliness, as in the case of expanded clay and sawdust. It, like previous materials, has a low degree of thermal conductivity, but at the same time remains the only material of all that is not affected by rodents.
Its important advantage is that if mice and rats make not only burrows, but also entire nests in glass wool, mineral wool and polystyrene foam, then they do not touch ecowool, since it causes a severe allergic reaction and dehydration in them.
Oddly enough, more than 80% of ecowool consists of recycled waste paper, that is, it is a product of recycled cellulose. In addition, it contains harmless antiseptics - boric acid and fire-resistant impregnation based on borax
Option No. 6 - high-strength penoplex
Penoplex is foamed polystyrene foam. In other words, it is a frozen foam mass made from molten polyethylene granules. In some ways it vaguely resembles foam rubber, only frozen and hardened.
In terms of its thermal conductivity qualities, it is ahead of all the above types of cotton wool. The thermal conductivity coefficient of penoplex varies within 0.03 W/m*K.
He has:
- low water absorption rates;
- high strength indicators;
- low density.
Its only disadvantage, and not in all cases, is poor vapor permeability. But if the room is equipped with good ventilation, this is not critical.
You can read more about thermal insulation with penoplex here.
Penoplex is in no way inferior to foam plastic in its energy-saving qualities. But at the same time it is much easier to work with it. And that’s why it costs significantly more
Option No. 7 - popular polystyrene foam
Its performance is no worse than that of penoplex. The only difference between it and the previous material is that it is not a foamed layer of frozen plastic, but a layer made from compressed granules of airborne polystyrene.
If you look closely, you will see that the material consists of small balls. In a piece of regular polystyrene foam they will be larger in size - up to 5 mm in diameter; in extruded polystyrene foam, on the contrary, they will be smaller - up to 0.1 mm.
But this does not in any way affect the advantages of the material, which are one-to-one similar to those described for penoplex. The only difference is that the foam will be more difficult to cut, and after the work done to lay it, there will always be mountains of debris between the lags that become electrified, which is why it is not so easy to remove them.
It is also worth noting that polystyrene foam will have to be cut strictly to size between the logs with a small overlap of 1-2 mm, otherwise the gaps remaining between the board and the insulation will negate all thermal insulation. That is why cotton wool is most often used to insulate floors.
The balls that make up polystyrene foam boards are literally filled with air. It’s enough to take a slab of insulation in your hands to feel that this material is capable of warming like a dry and airy layer of down.
Optimal thermal insulators
What material is best to use for finishing the rough coating with your own hands? To insulate wooden floors, both natural and synthetic thermal insulators are used. The most popular of them include:
- Wood sawdust;
- Expanded clay;
- Minvatu;
- Izolon;
- Styrofoam;
- Penofol.
Each material has its own technological features and thermal insulation parameters. To understand their disadvantages and advantages, let’s consider all of the above heat insulators in more detail.
Popular floor insulation schemes
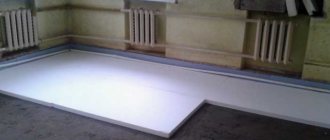
In practice, most often, two schemes for insulating the floor of the basement/lower floor are used. The first is the most reinforced, when the insulation is present both under the joists and between them. Such thermal insulation, as described in the first case, is used only in northern latitudes, where the ground freezes quite noticeably in winter.
But most often, on the first floor of a building, logs are mounted on top of the screed, and in some cases, on top of well-planned soil.
Let's look at both examples suitable for the basement floor, and then we'll talk about insulating the floors of the upper rooms.
The diagram provides options for floor insulation for the lower floors. The DSP layer can be simplified, which is what most owners prefer to do
Reinforced thermal insulation option
According to this scheme, first, even before installing the logs, it is necessary to level the soil and insulate it with the bottom layer.
As insulation for the first layer, builders can choose:
- expanded clay concrete;
- planned layer of expanded clay;
- extruded polystyrene foam;
- a hard and denser type of penoplex.
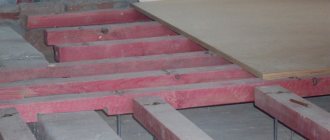
Logs are already installed on top of it, after which the space between them is also carefully filled with insulation. This time it can be the same penoplex or one of the varieties of cotton wool.
In this case, people often resort to double waterproofing - one is laid between the upper and lower layers of insulation, the other is placed on top of the upper one, on which the counter-battens for ventilation and, directly, the floorboards will be attached.
In this option, penoplex was chosen as the bottom layer of insulation. The material of the top layer does not have to be identical to the bottom
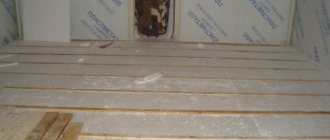
Conventional insulation scheme
Everything is clear here. The logs are mounted directly on top of the leveled ground surface or, in the case of a screed, on it.
Next, a layer of insulation is laid on them. On top of the insulation is a layer of vapor barrier, which, as a rule, is an ordinary thick polyethylene film. Then thin counter-battens are nailed on top of the joists (some may neglect them), after which the final flooring is laid.
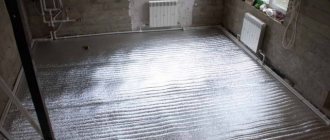
If you need to insulate the floor on the upper floors, then you will have to act a little differently. Here, a layer of vapor barrier is first laid on the ceiling material - the same film, then only the logs are installed.
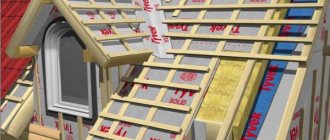
Often in this case, builders lay a kind of subfloor on top of the ground - the basis for the insulation. This is what it will look like on the diagram
When insulating the floor with mineral wool or ecowool, a lower layer of vapor barrier must be present. This is especially true for the second and all subsequent floors.
The space between the joists is sealed with insulation, after which everything is covered again with film. Counter battens are screwed onto the joists with a screwdriver, onto which the finished floor is laid.
We also recommend reading the article where we described in detail how to put wood floor insulation into practice.
Features of thermal insulation
How to insulate a floor in a wooden house? The process of installing thermal insulation is relatively simple. However, the quality of work is largely determined by the technical features of the coatings used for insulation. Before purchasing material for covering the rough foundation, you need to take into account several important nuances:
- expected load on the coating;
- humidity level;
- temperature loads;
- height of thermal insulation coatings.
The base insulation technology itself is simple and consists of several stages:
- installation of logs;
- fixation from below on wooden sheets on joists;
- installation of insulation on joists;
- covering the base with vapor barrier material;
- finishing of the rough base.
When planning work, it is very important to take into account the microclimate in the room. To insulate the first and second floors, various heat insulators are used, correctly. Moreover, technologically the insulation process also has some differences, which we will talk about a little later.
Conclusions and useful video on the topic
You can visually familiarize yourself with the process of floor insulation using joists from this video:
It can be seen that the process of floor insulation using joists is not as costly and labor-intensive as it seems at first glance. The choice of insulation is always at the discretion of the owner. In addition to sawdust and expanded clay, any of the listed materials will be optimal. With the exception, perhaps, of polystyrene foam, the cutting of which will require a lot of tinkering.
Do you have a different opinion about floor insulation? Please share it with people who are encountering this issue for the first time. Leave your comments in the communication block located below the article.
Underfloor ventilation
In the space under the floor, air exchange occurs due to the natural movement of air masses. This can be done by installing vents - holes located diagonally from each other in the floor through which ventilation will take place. But the required level of air exchange still cannot be achieved with the help of holes alone. Vents will need to be made along the entire perimeter of the base, one or two in each of the walls. If there are solid partitions inside the basement, they will also be equipped with holes. Each of them should be slightly offset relative to the one opposite. The recommended vent diameter is ten centimeters.
It is better to insulate the underground space located under the building. Modern types of heat insulators make it possible to minimize the level of heat loss in a building associated with heat leakage in the basement. In winter, it is better to leave the vents open, and only cover some of them in severe frosts.
Thermal insulation with expanded clay
Expanded clay is a granular insulation material with good sound and heat insulation properties. Why is it worth insulating foundations with expanded clay? The heat insulator has considerable advantages, which include:
- environmental friendliness;
- frost resistance;
- strength;
- low thermal conductivity;
- non-flammability.
When finishing the coating with expanded clay with your own hands, you need to take into account the low level of hydrophobicity. The material quickly absorbs moisture, although it does not deform. However, insulation with expanded clay is fraught with the formation of mold under the floor. Therefore, during the installation process it is necessary to think about additional waterproofing.
How to properly make thermal insulation with expanded clay?
Types and installation of floors in a wooden house
- Before expanding expanded clay, lay a layer of waterproofing on the base. It can be plastic film or roofing felt;
- The layer thickness should vary from 10 to 50 mm, no more;
- As you can see in the photo, a vapor barrier is placed on top of the insulation;
- Coatings with a foil layer can be used as a vapor barrier. The best option would be Penofol.
If you want to insulate a plank floor with expanded clay with your own hands, under which there is a basement, it is advisable to pour a layer of sand underneath. Thanks to it, condensation will not accumulate under the floor, which will significantly reduce the risk of mold or mildew.
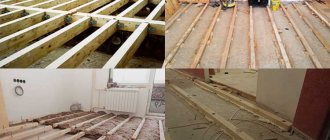
Features of thermal insulation of the first floor
Since wood tends to deform, over time, cracks may form in the floor, through which heat gradually begins to escape from the room. How to make high-quality insulation of the first floor in an old house?
- The first step is to remove the old flooring;
- Then the lag is inspected for deformation or rotting;
- If necessary, rotten beams are replaced;
- Then they treat the wood with an antiseptic with their own hands;
- From below, blocks for laying wooden boards are nailed to the joists;
- Insulation is poured onto the boards;
- Next, lay a layer of vapor barrier;
- The work is completed by installing the finishing coating.
The insulation technology is shown in detail in the video.
Obviously, a layered cake of additional heat and vapor barrier layers provides the floor with reliable protection from basement drafts and condensation.
How to arrange floors with joists
In beam floors, the beam spacing can be up to 3 meters. When installing floor boards directly on beams, to prevent their instability, their thickness will need to be increased to 10 centimeters or more. Or significantly reduce the distance between the beams and increase their cross-sectional dimensions. This will lead to a significant waste of materials and their weight. Therefore, on top of the load-bearing beams in a direction perpendicular to them, additional rectangular beams, called logs, are laid in increments of 40...60 cm, on which the floor in the form of boards, thick plywood, or chipboard is supported during installation.
Overlap with joists
*
Summing up
When choosing a suitable insulation for the floor, it is necessary to take into account not only the technical characteristics, but also the conditions of its future operation. This is the only way you can choose the best option.
Therefore, thermal insulation material is always selected individually. But if you have 2 insulation materials with similar characteristics, then always choose the one produced by a well-known manufacturer. Then the likelihood that the material will serve without problems for many years will increase significantly!
Main stages of work
Insulation of a wooden floor in a private house is carried out in stages. You need to do the following:
- carry out an inspection of the condition of the subfloor and supporting structures (lag);
- choose a method of insulation, decide which insulation is best to use;
- purchase the necessary materials and equipment;
- carry out preparatory work;
- install waterproofing, insulation and related materials on the subfloor;
- lay a layer of sheathing and a finished floor covering on the floor.
The main task is the correct choice of installation method and insulation. If the house uses an old floor, you need to decide whether it can be continued to be used, or whether a complete replacement of the floor is needed. In addition, you need to determine the direction of installation - from below or from above. All subsequent actions depend on what decisions are made.
Note to builders
- Penoplex and teplex are products of progressive techniques created on the basis of extruded polystyrene. The base for the teplex was a foamy “cocktail” of ozone and freons. Innovative materials are highly effective as a heat insulator and have no disadvantages.
- Isoven and isolight confirm the best quality properties of rocks.
- Ursa is a type of mineral wool.
- Insulation - this option is similar in properties to the previous type. The basis is staple fabric, and the cost is half the price of the above-mentioned heat insulators.
- Thermolife is a processed stone wool based on basalt rocks.
The incoming cold air from the underground affects the blackness of the walls and the dampness of the air. There are two ways to get rid of such problems: carry out work on insulating the subfloor directly on the ground or install logs. But the problem should be solved, starting with the first action, which requires making the necessary thermal calculations.
Ecowool thermal insulation
Why is it better to make thermal insulation with ecowool? 100% natural coating has good technical parameters and a relatively low cost. It is made from cellulose and mineral additives, so even when heated, the ecowool coating does not emit caustic chemicals. A product impregnated with boric acid is practically invulnerable to fungus and mold.
What advantages does this type of insulation have?
- Good heat and sound insulation;
- Fire safety;
- Environmentally friendly;
- Low thermal conductivity.
As you can see in the photo, finishing the rough base using ecowool joists can be done in two ways:
- Manual. In this case, finishing with ecowool involves installing insulation along the joists on boards attached below. To prevent heat loss, the joints are treated with polyurethane foam;
- Mechanical. To finish the base of ecowool, blowing machines are used: through a special hose, crumbly insulation is evenly distributed over the coating. In this case, the layer thickness should be at least 3-4 mm.
The process of thermal insulation of ecowool floors is shown in more detail in the video clip.
Thanks to the glue that is included in the thermal insulator, it can be used to insulate not only the floor base, but also walls. It is also worth noting that ecowool is convenient for insulating not only the first floor of a house, but also interfloor ceilings. The vapor-permeable coating does not contribute to the accumulation of condensation and the development of mold.
Features of thermal insulation of the second floor
If you want to insulate the floors between floors in an old house, it is better to use roll coverings for these purposes. Why? They are quite light and therefore do not create a static load on the load-bearing parts of the structure. To organize a heat-insulating “pie” on the second floor, you need to do the following:
- Place roll insulation on the prepared base;
- Adjacent sheets of material are overlapped with a margin of 10-15 mm;
- To fix the thermal insulator to a wooden base, you can use a stapler;
- When using foil insulation, it is advisable to fasten the seams with masking tape;
- Now all that remains is to install the finishing coating.
The process of insulating interfloor ceilings is shown in detail in the video below.
As it turned out, there are a lot of different thermal insulators that can be used to insulate floors in a wooden house. Each of the considered heat insulators has its own disadvantages and advantages. Taking into account the basic parameters of the materials, you can choose the appropriate insulation to create an optimal microclimate in the room.
Possible mistakes
Often, insulating the floor in a private house with your own hands does not give the expected effect. The reason for this is errors made by the owner during the preparation or installation of the cutoff. Among them are:
- misunderstanding of the meaning of the entire procedure. Most users are sure that floor insulation is done in order to increase the air temperature. People do not know that the main task is to prevent condensation;
- installation of hygroscopic materials without a waterproofing cocoon. In a fairly short time, instead of insulation, you get mold, mildew and bad odors from under the floor;
- Insulation of a wooden floor in a private house must be combined with the organization of high-quality air exchange. Otherwise, water vapor, which is in excess in the atmosphere of residential premises, will be absorbed into other surfaces;
- It is important to choose the right way to insulate the floor, take into account the design features of the basement or plinth, and other factors. Mistakes at the preparation stage are extremely difficult to correct later.
It is not difficult to insulate a wooden floor in a private house with your own hands. The main thing is to understand the physical meaning of this event and follow the rules for using the selected heat insulator. Then the result will be a long service life of the ceiling and a reduction in the cost of heating the home.