A self-built and equipped sauna is a real pride for any owner. If you have the proper theoretical basis, you can handle all the activities on your own.
How to build a sauna with your own hands
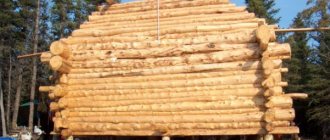
It is better that the sauna is built of wood. Beginners are recommended to give preference to frame buildings made of timber - they are the easiest to set up compared to existing analogues.
How to build a sauna with your own hands
Varieties
There are two completely different types of saunas - wet and dry. The first option combines a very high percentage of humidity (from 95 to 100%) and a relatively low temperature (60-75°C).
This option is very good when it comes to ordinary get-togethers; these parameters create a very comfortable atmosphere that allows you to warm up, but without the extremes of enormous temperatures.
A dry sauna, also known as traditional or Finnish, has completely opposite characteristics - low humidity (5-20 percent) and high temperature (from 90 to 120°C)
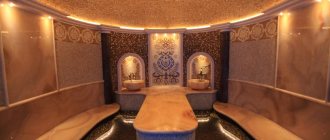
Main types of saunas
All saunas differ from a traditional bath in the level of humidity and the absence of water vapor (for the model with infrared radiation). The following types of steam rooms are distinguished:
- With electric oven. In the center of the room is a homemade or factory-made stove, inside of which there are specialized stones.
- Sauna with infrared emitter. Only production lamps from trusted supplier companies are used. Installations are located around the perimeter of the room in the recommended order. An infrared sauna can be done very successfully with your own hands.
There are many advantages of each of the presented models. Infrared radiation has a number of pronounced medical and biological effects that are successfully used in medicine and rehabilitation.
Small nuances that are very important during construction
- The material of doors, their handles and other fittings is wood or tempered glass. The fact is that otherwise these objects will become very hot due to the high temperature. A burn is clearly not what you want to get in a steam room.
- For the floor you should use ceramic tiles. This option is the optimal one; it can withstand elevated temperatures well and does not form a damp layer over time, as happens with wood. The latter material is also good, but because of this property, one day it will smell damp.
- Lighting devices are installed in the corners of the room.
- Usually, for convenience and compactness, benches are installed on several floors. The distance between them should not be less than forty centimeters.
Installation of central equipment
The final and most important stage of the work.
Infrared emitters are located around the perimeter (two on the back wall, two on the front corners, one along the bottom contour of the shelves). The electric oven is placed in the center of the steam room, enclosing the installation with a protective casing.
There are special requirements for the installation of a wood-burning boiler. An old metal container (for example, a frame from an old washing machine) is used as a boiler. The opening for storing firewood can be located either in the steam room itself or brought outside (to the next room).
Now let's move on to the construction algorithm itself.
As you know, the very first stage of any construction is the project. However, it is not required in all cases.
- You cannot do without it if the sauna is planned as a separate building. This is a separate building and requires detailed documentation and design.
- But if you decide to make a sauna in your house with your own hands, by attaching it to the house or remodeling one of the rooms, this is absolutely not necessary. The drawing is quite enough to understand your wishes regarding the appearance of the sauna.
Recommendations for sauna design
A sauna project can be ordered, found in the public domain, or made independently.
First of all, determine how many people will be using the sauna at the same time. The calculation is extremely simple: per person there must be at least 5 m2 of the total area of the sauna. That is, if you are building a building for 6 visitors, its total area must be at least 30 m2.
Determine the optimal stove power for the sauna of the selected area.
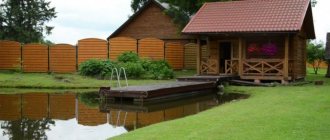
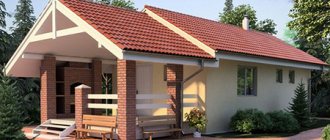
Sauna project with terrace
Plan the order of placement of the bath shelves - they should be located at a distance of at least 100 cm from the stove. The optimal distance between shelf installation levels is 450-500 mm.
Consider the procedure for organizing water supply and drainage, lighting and arrangement of additional premises (shower room, rest room, etc.).
Make sketches and drawings according to the plan.
Project of a sauna in a finished log house with a relaxation room, a billiard room and a guest bedroom
Sauna project with swimming pool
Prerequisites
- First, consider the height of your original room. It should exceed 210 centimeters, but be below 230. Indicators higher than this will make heating the building much more difficult; you will have to spend several hours to achieve a comfortable temperature.
- The shelf on top should have a distance from the floor of about 1.2 meters.
- The distance between shelves should be forty centimeters
- To calculate the room size you need, take 3 square meters for each user.
Installation of benches and other sauna equipment
A proper sauna should have a room height of 1.9 to 2.1 meters. When installing benches, it is necessary to take into account that the person sitting on the upper tier should feel comfortable without resting the top of their head on the ceiling (for more details: “How to make benches in a bathhouse with your own hands - from drawings to ready-made benches”). Then the bottom strip of benches will have a height of 65 centimeters. If such a design creates discomfort for visitors, then under the bench you can make a step 20-25 centimeters high.
Other conditions for arranging a steam compartment:
- To eliminate the effect of a closed space, you can install combined doors with glass or tinting. It is very important that the door is without any locks and opens to the side from the steam compartment;
- It is worth considering that a wood-burning heater is very difficult to install, and therefore it is best to opt for electric stoves, which can be purchased in many stores. Such a stove is placed with a gap of 20 centimeters from the floor and secured to the wall with screws;
- To increase safety, the stove must be fenced with a wooden fence at a distance of 5 centimeters. Stones are placed in the voids between tubular electric heaters at a minimum distance;
- Lastly, lighting fixtures and switches are installed, after installation of which the sauna can be put into operation.
Construction site
Owners of small plots, for whom the law imposes rather strict restrictions, are not very lucky in this matter.
- Firstly, if this is a separate building, you need to mark it at a fairly large distance from the house - eight meters.
- The second nuance is completely justified and the obligation to comply with it is clear - fifteen meters from the toilet. In principle, these two premises should not intersect, therefore it is in your interests to comply with all conditions prescribed by law.
- If you have a well, you should stay away from that too. Minimum eight meters.
Advantages of mini structures
The beneficial effects of bath sessions on the human body can hardly be overestimated. But to rejuvenate, there is no need to visit public saunas or erect a huge building on your site. Of course, it’s very nice to take a dip in the pool after a steam room. And after completing the procedures, play a game of billiards.
But in order for the body to receive maximum benefit, it is quite enough to make it sweat several times. And this can be done both in a spacious steam room and in a small cabin. The effect will be the same. Only the costs of the process in the latter case will be much less.
In addition to significant financial savings, it is also appreciated that small bathhouse projects do not require the allocation of a large area on the site for construction. This is especially important if the suburban area is small or has already been completely planned out. In the latter case, there is always the opportunity to take a few meters from the garden. Or tuck a small structure into the far corner of the site.
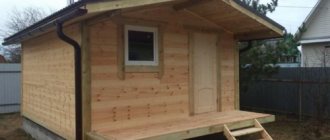
Small steam room on the site Source renovaci.ru
There are plenty of advantages to a small bathhouse:
- The compactness of the structure does not require significant space.
- A small house requires very few materials.
- The building can be erected in a very short time.
- All designs are not seriously complicated, so for most people it is possible to build them yourself.
- It is much easier to operate and maintain a small building.
- A small steam room requires very little fuel or electricity to heat up.
- The low weight of the structure allows you to use a light foundation or abandon it altogether.
- You can purchase a ready-made operating structure, which will be quickly delivered to your address and installed on the site.
- There are mobile versions that are easy to move around.
In the last two cases, the cost of a bathhouse for a summer residence increases. But it will still be several times smaller than that of a built full-fledged house with a spacious steam room and a relaxation room. And mobile options have a number of additional advantages. For example, they can be attached to a car and taken with you on trips.
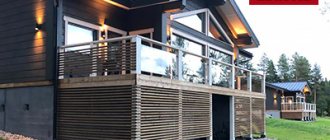
Bathhouse on wheels Source tvoya-banya.ru
But, when planning to build a mini steam room on your summer cottage, you should remember that the area of the building is designed on average for two people. And even members of a large family will have to take paired procedures in turns. And it is practically no longer possible to receive guests. And this is the only drawback.
See also: Catalog of companies that specialize in the design and construction of baths of any complexity
Walls
Although traditionally only natural materials were used for them - wood of different varieties and types, now the choice is simply huge. All possible varieties of bricks and other blocks are at your disposal.
But still, the frame method is recognized as the best because of its low cost, ease of construction and, most importantly, convenience. You won't have to wait long for the room to warm up to a comfortable temperature. Owners of other species will need a lot of patience.
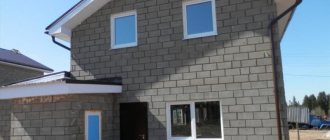
Construction of a sauna at the dacha
The sauna building can be erected using various materials: wood, brick, cinder block, etc. Today, the choice of material is the prerogative of the owner. When choosing a material, you can only rely on how the structure will look in the photo and during visual inspection, as well as on the final estimate for the construction work. There will not be a detailed discussion of the construction process, but the main stages will be touched upon. To begin with, each owner will have to decide what linear dimensions their small sauna at the dacha will have, unless of course they want to make the building larger.
Many difficulties arise during the interior decoration and equipment of the sauna. For example, when finishing floors, it is best not to resort to the use of wooden facing materials. When using plank flooring, there are many nuances to consider. First of all, it is necessary to abandon the use of protective paints and varnishes within the booth where the procedures will be performed. It is best to use heated tiles, since it is this coating that creates comfortable conditions for visitors in the steam compartment. Work begins with finishing the floors and only after that can you begin to cover the walls with facing material.
Dimensions
In general, in any case, it is recommended to stick to the minimum, because... Each square meter very significantly increases the heating time of the room.
But if you have many friends who are close to you in their love for the sauna, calculate the required size, allocating five square meters of the total area for each person.
Therapeutic effect
- There is such a thing as ''artificial heat'', which refers to the accelerated production of white blood cells in response to the high temperature in the sauna. This helps to significantly strengthen the immune system and destroy harmful microorganisms.
- It has been scientifically proven that people who regularly visit the sauna produce much more interferon than other people. This protein reduces the chances of cancer several times.
- Thanks to the abundant secretion of sweat glands (on average, from 0.5 to 1.5 liters at a time), waste and toxins are released along with them.
- The condition of the skin improves, it becomes more elastic and smooth
- The condition of the kidneys improves significantly
- Recognized as an excellent prevention of arthritis, myositis and radiculitis. It is very helpful for chronic forms of runny nose, bronchitis and other nasal or throat diseases.
- After all, this is a great rest for the body. Frequent sauna visitors experience an increase in the quality of sleep, appetite, and overall stamina. In the steam room you can perfectly relieve stress and tension accumulated throughout the working day.
Foundation
This is the support without which your building cannot exist, and if you make a mistake at the initial stages, the entire construction will go downhill.
Useful tips for finishing
The final stage of construction is interior and exterior finishing. It is best to cover a sauna with clapboard. Each type of wood has its own advantages:
- Linden has an excellent appearance and smells good.
- Alder is able to retain heat well, while it practically does not heat up. It has a varied palette of colors and beautiful designs.
- Pine is used most often. Releases healthy elements when heated.
The disadvantage of alder is that it is soft. Consequently, impacts may cause dents.
The finishing instructions are as follows:
- The first step is to cut the material to the height of the room.
- Next, do the sheathing. You need to start from the corner, and then move smoothly around the perimeter.
- It is recommended to cover them with wax or natural oils intended for saunas.
Treating the lining with wax will extend the life of the sauna
There is no need to treat the lining inside the sauna.
Typically, the required foundation is determined by the type of soil.
- When building on a slope with loose soil, pile foundations made of asbestos-cement pipes are used.
- The other option with piles is much better technically, very reliable, aesthetically good, but suitable only for those with large financial resources.
- Concrete blocks are a good option when you are sure that the construction is not heavy. He can easily withstand it. The advantage is the ease of construction and the relative cheapness of all work and materials.
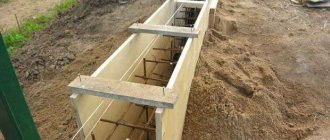
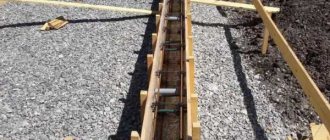
- Reinforced strip foundation is an option that has been proven over the years. The most familiar and simple. It lies shallow and is distinguished by its low cost and ease of construction. In most cases, this is what is recommended; it is suitable for almost all cases, except for loose soils. There are many contraindications for them.
Calculation of materials for construction
First of all, you need to calculate how many floor boards you will need. For example, we will consider a sauna measuring 3.7x3.7 m. To make a floor in it, you need to prepare 25 edged boards.
Edged floor board
Standard board dimensions: thickness - 0.5 cm, width - 15 cm, length - 4 m.
Accordingly, 4 x 0.15 x 0.5 = 0.03 m3 is the area of one board.
The width and length of the sauna is 3.7 m, so to install the floor base you need to prepare 25 boards 15 cm wide and 4 m long.
To arrange the ceiling in a bathhouse, you need 38 boards of lining. The calculation of the material is carried out according to the same scheme. The thickness of one board is 22 mm, width is 100 mm.
In order to complete the interior decoration of the sauna and install partitions, you need 22 mm thick lining.
Linden lining is suitable for a sauna
If you plan to place the boards vertically, you will need approximately 153 boards.
Standard dimensions: board length - 3 m, width - 10 cm, thickness - 2.2 cm.
3 x 0.01 x 0.22 = 0.01 m3 - the area of one board.
Next, you need to calculate the area of the sauna walls: the height is 2.1 m, and the length, taking into account the partitions, is 24 m.
2.1 x 24 = 51 m2
There are 3 boards in 1 m2, respectively 51 x 3 = 153 lining boards for the entire steam room.
To perform a vapor barrier on the internal walls and ceiling structure, you can use various materials, among which vapor barrier film and breathable membrane are especially popular.
Vapor barrier of sauna walls is required
For a sauna 3.7x3.7 m, 44 m2 of material will be required.
To perform the calculation, you need to find out the total area of the ceiling structure and walls, while partitions do not need to be taken into account.
Length excluding partitions - 14.1 m.
2.1x14.1=29.61 m2.
The width and length of the ceiling structure is 3.7 m. The area is 3.7x3.7 = 13.69 m2.
Next you need to add up the area of the walls and ceiling: 29.61 + 13.69 = 43.3 m2.
At the next stage, the materials for the foundation are calculated. The need for cement, crushed stone, sand and other elements will depend on what type of base is planned to be made.
If it is a columnar foundation, then you will need asbestos-cement pipes with a diameter of 20 cm and a length of 150 cm. In the center of each of them, 2 reinforcement rods with a diameter of 5 mm must be mounted.
Legislative permission
Every nuance in construction is very important, but it can go down the drain, all your efforts and invested funds will disappear the first time your neighbors contact you. The bottom line is that by law you are required to register every building.
For this you will need:
- Plan
- Estimate for materials
- Type of future foundation and its drawing
- Confirmation of no complaints from neighbors
Step 10: Feeder and Photography
After seeing my sauna, my old friend James suggested adding a bird feeder to it so he could photograph them for an internet project. I agreed and started posting photos on social networks, and in return received a ton of complimentary comments.
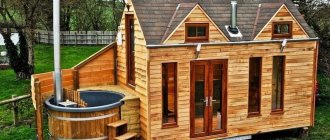
Photo of a homemade sauna
Place on the site for a bathhouse (where best to place it)
This issue should not be neglected. The place for the bath should facilitate comfortable use and comply with all legal norms.
Selection rules:
- If there is a reservoir, there is no need to strive for the location of the bathhouse as close as possible. The problem is the risk of flooding;
- It is important to understand how to profitably install a bathhouse: next to the house, thanks to one or two of its walls, which is considered an economical option, and allows you to create an entrance through the living space or as a separate building;
- Experts believe that it is most profitable to build a bathhouse at the back of the yard. This will help ensure peace of mind when visiting the structure for the purpose of ablution and rest;
- There is no need to neglect the presence of high-quality ventilation;
- It is important to ensure reliable drainage of water so that it flows on your own property and not to your neighbors;
- A bathhouse cannot be built next to a cellar, as it may flood;
- It is worth studying the direction of the wind at the dacha. It is advantageous to use a place protected from powerful gusts of wind;
- During the construction process, it is necessary to focus on fire safety rules;
- You can build a bathhouse only after communicating with your neighbors. They must give the go-ahead for the new building so that it does not create a shadow on the garden. And there was no discomfort in any other way: the noise of flowing water, the communication of vacationers;
You cannot place the bathhouse closer than 20 meters to a well or well, since shampoo, gel, and soap may penetrate into the drinking water.
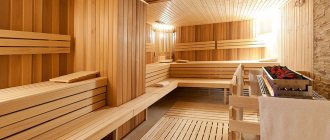
Interior decoration of the bath
Inside, special attention is paid to communications: water supply, electricity and sewerage. Although it is more profitable to do the latter before laying the foundation.
- Sewerage is usually represented by a drainage well. A sewer pipe is drawn from it based on the slope to remove the drain from the washing department.
- The floor is made of wood or poured concrete. Then you can cover it with tiles. All that remains is to install windows, doors and decorate with clapboard.
Now electrical wiring is created to power the corresponding devices.
We will install the stove and shelves
Any shelf configuration can be used. To do this, we rely on the beam. First, the frame is formed. Then boards are added on top.
The stove is installed in compliance with fire safety. It is important to ensure that wooden structures are insulated from the effects of increased temperature.
The selected stove model can be installed on a foundation or without its support. It is allowed to operate a heater with wood, a metal, electric or gas stove. Much depends on the type of bathhouse and the preferences of the owners.
Now we understand what a bathhouse is used for, how to create a project, what materials to use for construction, and have learned to carry out all stages of construction with our own hands. But don't miss an important point.
A modern mini bath also deserves attention, since it is designed for 1 - 2 people and takes up less space. Its installation requires less money and personal effort. It is characterized by economical content.
Stages of constructing a roof for a bathhouse
The roof is erected after the walls of the bathhouse are completely built. The principles of constructing a bathhouse roof are the same as for conventional buildings: first the mauerlat is laid, then the rafter system is installed, then the sheathing is attached, and at the final stage of the work the structure is covered with roofing material.
Mauerlat and rafter system
At the first stage of work, the protruding ends of the mauerlat should be leveled, because it is these logs that will serve as support for the rafter legs. The more carefully the measurements are taken and the smoother the logs are cut, the faster and easier the rafter system will be erected.
It is necessary to measure all the protruding parts of the Mauerlat and determine the smallest value. On the logs located along the edges of the structure, make a mark of the lowest value and drive nails there. Stretch the cord between two logs at opposite ends, make marks on all other parts and saw off the excess logs. After which you can safely begin installing the rafter system.
Before installing the rafter system on the mauerlat, you should lay a rough flooring on which you can walk. Flooring can be made from any boards.
The rafter system is made according to the roof parameters indicated in the bathhouse design. Those parts of the rafters that rest on the Mauerlat beams are impregnated with a special waterproofing agent, then wrapped in roofing felt, inserted into pre-prepared grooves and securely attached to the walls using metal brackets or studs.
Roof structure
An under-roof structure is mounted on the finished rafter system - it helps to securely attach the roof directly, transfers external load to the rafters and ensures good ventilation in the space under the roof.
The roof structure consists of the following elements:
— rough flooring;
— waterproofing;
- counter battens;
- laths.
The rough flooring carries a huge functional load. Waterproofing material is applied to the flooring and a counter-lattice is attached. In addition, together with the sheathing, the flooring forms gable overhangs with a length of 60 cm.
The rough flooring is made from plywood, boards, OSB or unedged boards. The gaps between the boards should not exceed 2 cm, so when laying the flooring it is necessary to adjust the protruding areas and minimize the possibility of gaps.
Waterproofing is laid on the rough flooring. Any rolled waterproofing material that is sufficiently resistant to moisture is suitable for an attic roof. Strips of waterproofing material are laid horizontally on the flooring with an overlap of 15-20 cm. For insulated attics, it is recommended to choose a material that allows steam to pass through.
A counter-lattice is placed on the waterproofing layer. For this, bars with a length of 70 cm and a cross section of about 30 mm by 70 mm are used. Starting from the very bottom, the counter-lattice is filled with lathing - bars with a cross-section of 50x50 mm or 40x60 mm. The sheathing pattern for all types of roofing material is the same, the main difference between the structures is the distance between the individual bars. So, for example, under slate the bars are placed at a distance of 50 cm from each other, under ondulin - up to 60 cm, under corrugated sheets or metal tiles - 35 cm.
The final stage of installing a bathhouse roof is the installation of roofing material. When choosing a roofing covering, you should consider the following factors:
— strength and reliability: the material must have sufficient resistance to wind and precipitation;
— functionality and durability: a good coating protects the structure from snow and rain, extends the life of the building walls; the longer the service life of the material, the longer the roof will last, requiring only ongoing maintenance and intermediate repairs;
— basic roofing tool;
— good thermal insulation: well-chosen hydro- and thermal insulation materials, as well as their correct installation, retain heat inside the building in winter and prevent walls from getting wet and rotting.
Competent roofing work means a reliable roof for a bathhouse for many years. If all important points were taken into account during construction, then further operation will not require significant material costs; it is enough to periodically clean the roof of overgrown plants and small debris.