It is no secret that successful construction requires a plan, in accordance with which an estimate of building materials will be drawn up and certain work will be carried out. For example, a professionally developed project for a house with a bathhouse made of foam blocks allows you to build a full-fledged house with a steam room and a washing room. As a result, you will not have to move from a separate house to a bathhouse, since everything will be built under one roof.
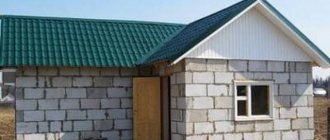
The photo shows construction using foam blocks
How to build with your own hands?
You can build a bathhouse from blocks yourself, without involving specialists, whose servants are often very expensive.
The main thing is to adhere to the step-by-step algorithm for constructing the structure:
First you need to draw up a project for the future bathhouse.
Then you should proceed to laying the foundation. To do this, you need to mark the area, dig a trench and make a 15 cm sand cushion at its bottom. The sand needs to be watered and compacted.
Now you need to make wooden formwork over the trench. Using a level, it is necessary to mark off the upper (horizontal) surface of the foundation.
A frame of reinforcement should be made in the inner part of the formwork.
Next, pour concrete into the formwork.
Now you can build walls. Laying the starting row of blocks is especially important. Using a cement-sand mortar, you need to lay the blocks on the prepared waterproofing.
The following rows must be placed on special glue.
At the end of the installation, reinforcement is laid on top of the walls and a mauerlat is made.
After this, you need to move on to building the roof structure. To do this, it is permissible to use rafters and lay waterproofing on them.
They should also be finished with a counter-batten, on which the main batten should then be laid.
After this, you should proceed to the installation of roofing materials.
After completing all of the above work, you need to finish the resulting bathhouse.
Features of masonry walls made of aerated concrete
In the case when you build a bathhouse from aerated concrete yourself, you should keep in mind some of the nuances of laying walls from it. They must be reflected in the construction design of your building. For example, laying aerated concrete blocks can be carried out at temperatures from +5 ºС to +25 ºС. In this case, when the temperature reaches the upper level, the surface of the aerated concrete blocks will need to be moistened with water. If you are building your bathhouse in winter, you will have to add a special anti-frost additive to the solution for better adhesion.
When constructing premises from aerated concrete, it is mandatory to carry out horizontal waterproofing between the foundation and the masonry, the main purpose of which is to ensure its protection from moisture. For this purpose, you can use any materials made on the basis of bitumen, for example, roofing felt. In addition, it will be possible to use special waterproofing polymer-cement solutions prepared from dry mixturesIn addition, before starting masonry, it will be necessary to level the foundation. Then you can begin the first row of masonry. To do this, a flat horizontal surface is specified, which can make laying subsequent rows as easy as possible. During laying, they constantly monitor its horizontal evenness and the correctness of the angles. In this case, small irregularities can be straightened using an ordinary plane.
When laying aerated concrete walls, you can use both ready-made mixtures and those prepared independently. The block must be installed on the applied mixture within 15 minutes; if it is installed later, it will not adhere to it. Sometimes the blocks are tongue-and-groove. This should also be reflected in the bathhouse construction project. In this case, the solution will need to be applied to the ridge of the block and its grooves. In this case, the blocks are usually carried out with a dressing of half a block.
Reinforcement is used to strengthen the masonry. These are brief explanations about laying aerated concrete blocks. More detailed information can be obtained not only from the construction project, but also from technological maps for carrying out a particular operation during the construction process.
Features of foam concrete
Foam concrete is a cellular material that appeared on the construction market several decades ago, but continues to be in great demand and is widely used in the construction of premises. For its production, simple technology is used, which reduces the cost of the final product and allows you to produce building materials at home.
Pros and cons of the material
The popularity of foam block is due to its performance properties and advantages. First of all, it is increased thermal insulation and resistance to temperature fluctuations. Experts say that even with constant exposure to high temperatures, the material does not begin to deform and retains its initial strength. It also meets all environmental safety requirements, is not afraid of corrosive or putrefactive processes, and also does not become an object of attack by rodents.
The foam block is lightweight, which reduces the complexity of construction work and simplifies installation. Baths based on this material are characterized by resistance to fire, and this is an important point in compliance with safety standards.
But, in addition to a lot of advantages, the foam block also has disadvantages. Before use, they must be treated with special compounds that provide the required degree of moisture resistance. If you miss this moment, the material will be deformed and quickly lose its presentability.
Despite the affordable cost of raw materials, the installation process can be accompanied by high costs. They are associated with the acquisition of a special adhesive composition, as well as the carrying out of insulation work.
The nuances of building an aerated concrete bath
So, we build a bathhouse with our own hands from aerated concrete
Let us pay attention to the most important points that affect the performance of the finished building
Foundation design
Before building a bathhouse from aerated concrete, it is necessary to prepare a reliable foundation. What does reliable mean?
It should be a structure that, due to its rigidity, maximally compensates for the effects of soil settlement. Only reinforced concrete can be considered as such - no wooden or metal piles.
More precisely, metal piles can be used, but they must be tied on top with a monolithic grillage. This is the same tape, only “suspended” above ground level.
4 types of foundations for aerated concrete walls
Floor construction
Depending on which foundation option is taken as a basis, the floor structure is also selected.
Let's present the 3 most commonly used ways of structuring it:
| Floor design | A comment |
| Expanded clay screed | This version of the floor design is called frame, as it is arranged on beams. It is provided in bathhouses, at the base of which there is a strip foundation (or a point foundation with a grillage). The subfloor in the form of boards or sheets of plywood is mounted here between the side edges of the beams, to which the skull blocks are first nailed. The flooring is completely covered with waterproofing material (for example, two layers of polyethylene), after which the remaining space between the joists is filled with fine-grained expanded clay. The minimum backfill thickness is 10 cm, which may exceed the cross-sectional height of the beams. A sand-concrete screed is made on top of the expanded clay; if necessary, heated floor pipes are laid in it. A drain hole must be provided in the center of the washing room, towards which the screed must have a slope. For the convenience of walking on such a floor, a ladder is installed on it in the form of a lattice made of 30*50 mm bars - or the surface is lined with porcelain stoneware. |
| Option with polystyrene foam insulation and dry screed | The second floor option has the following structure:
|
| Floor with a container for collecting water, arranged on the ground | If the bathhouse is built according to a project in which a slab foundation is laid, a floor configuration in the washing compartment such as in the photo will already be provided. When building on strip or column foundations, such a floor is laid on the ground. In the center it has a U-shaped recess for collecting water, from which it goes through a drain pipe into a cesspool or drainage well. The slope here is greater, so support pillars made of brick are provided for installing the ladder. |
As you can see, bath floors have a rather complex design, and for comfortable operation of the bath it is very important to structure them correctly. Floors in the washing area lined with porcelain stoneware
Floors in the washing area lined with porcelain stoneware
Furnace installation
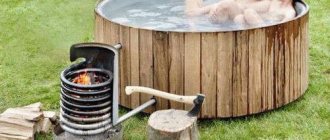
For a bathhouse with a 4x5 attic, you can choose a metal or brick stove.
Metal stove
A metal stove heats up faster and provides quick heating of the room. However, it also cools down within a short time. Installation of a metal furnace does not take much time and is carried out as follows:
- The selected oven is installed on the prepared surface. Its power must correspond to the volume of rooms that are planned to be heated.
- a tank is connected to the stove, then a damper, then there is an adapter for a sandwich and an insulated sandwich pipe, which will go to the second floor;
- a ceiling groove is installed in the interfloor ceiling, through which a sandwich pipe passes;
- the pipes are routed through the roof through a special master flash, which will ensure sealing of the passage opening;
- in total, the chimney is mounted at least 4 meters in height.
Furnace installation
The wall near the stove should be lined with bricks or sheathed with asbestos and thick sheets of iron. If you plan to install a firebox inside the partition between the steam room and the dressing room, then it should be lined with refractory bricks. All pipe connections between each other should be sealed.
Brick oven
Brick sauna stove
A brick stove takes longer to heat up than an iron stove, but it retains heat for a long time. You can fold it yourself or seek help from specialists.
For independent masonry you will need:
- fire bricks;
- mortar for laying stoves;
- cast iron grates, valves, doors;
- row masonry diagram;
- metal sheets;
- trowel;
- wire.
Project
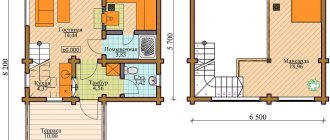
As with the construction of any other building, the design of a bathhouse must be approached scrupulously and responsibly. The first step is to draw up a plan for your project. The convenience of the block design is that they are suitable even for the smallest - two- or three-room bathhouse.
So, before we start construction, let’s look at the most common and successful drawings of standard sizes.
- To place a small structure with maximum convenience, you need to do everything right. In this case, both external and internal layout are very important. The minimum area of a steam room is considered to be a house measuring 4x3 m. Here you can make a project for a small two-room house, where a steam room complete with a washing room is quite conveniently located, and the relaxation room can also be used as a small corner for storing bath accessories. This project is highly functional despite its small dimensions. A 3x4 m bathhouse can be built even on a small plot of land or attached to a summer house.
- The next popular size of block baths is slightly larger - 3 by 5 meters. There are also only two rooms here. As in the first option, the steam room is adjacent to the sink without a partition and occupies an area of 9 m². The hallway is only 6 square meters. At the same time, the bathhouse is equipped with everything necessary: a shower with a drain, a stove with a tank for hot water and shelves, usually two-tiered.
- Another project for a bathhouse with an area of 3x5 m. Here you can already make three rooms, despite the small space. Let's look at how this was achieved. There is a comfortable dressing room - a relaxation room. Now 9 m² are allocated for it. The steam room and sink have dimensions of 4 and 2 square meters, respectively.
- An example of a square bathhouse 4 by 4 meters allows you to place everything in its place and absolutely geometrically evenly. The same three rooms as in the third option. Only the steam room and sink this time have the same area of 4 m², and the dressing room with the guest area is located on 8 squares. Modern craftsmen manage to make a 4x4 m block bathhouse even with an attic. But this should be taken care of at the stage of laying the foundation for the appropriate height of the building.
- Large baths are a pleasure to create. For example, a comfortable size is 5x4 m. Here you can already walk up to an open or closed terrace, and also more calmly plan an attic floor with a sleeping area placed on it.
- 6x4 m is the best option for a bathhouse on a large area. This design looks great as a separate room. The main thing is that all the main communications are connected to it and work as smoothly as possible. Let's consider a project that can easily accommodate a company of 6 people at the same time. The bathhouse is also equipped with an outdoor terrace. All rooms are isolated. Washing room and steam room - 4 square meters each. Guest area + dressing room – 8 m², and terrace – 8 square meters. In the warm season, you can sit almost in the lap of nature after active steaming.
For bathhouses made from large-area blocks, original and spacious designs are provided. For example, a square building with an area of 6 by 6 meters can be considered a full-fledged house for active recreation. A 10x4 m bathhouse can be easily arranged in such a way as to accommodate more tiers of shelves.
Few disadvantages
Of course, it is fair to say that this product is not perfect and has some shortcomings. However, given the number of advantages, the negative features have virtually no effect on the opinion of users. We are talking about the following:
- When building structures from this product, you will have to spend some time leveling the masonry, that is, apply 3 centimeters of cement on top of the material;
- You will still have to carry out additional thermal insulation work;
- No matter how good the blocks are, it is still not recommended to erect high-rise buildings using them.
In addition, before you start purchasing the material directly, it is worth studying the descriptions offered by the manufacturers. From them you can easily understand that this product is somewhat more fragile than its counterpart - traditional concrete. In this regard, you may need more extensive preparatory work before construction, which includes detailed instructions to workers.
Approximate layout of the bathhouse
Plan diagram of the simplest structure, area 12m2
Scheme of a bathhouse with an entrance hall and a terrace
Project selection criteria
When comparing aerated concrete baths, their designs and prices in order to choose one of the options for future construction, it is necessary to take into account several points. So, initially you must decide exactly what size your bathhouse will have, how many rooms it will have, and what its appearance will be from an architectural point of view. For example, a Russian bathhouse is usually small in size, since it traditionally contains only 2 rooms: a dressing room and a steam room. And the same bathhouse, combined with a guest house, can have several rooms and a large area.
In addition, designs for bathhouses made of aerated concrete with an attic are very common, and this is practically the second floor, where you can place guest rooms or a billiard room. Naturally, the area of the first floor will increase. All this will directly affect the cost of the entire construction, but in this case the level of comfort of your bathing holiday will increase significantly.
It is worth noting the fact that a bathhouse built from aerated blocks will have little weight. As a result, it can be placed on soft soils, where the construction of a heavier structure is simply prohibited. This opens up wide opportunities for you to place it on the site, but at the same time, when selecting options for such construction, you need to consult with an experienced architect who will take into account all the nuances of such a project and its subsequent implementation.
In addition, the design of a bathhouse made of aerated concrete allows the use of the lightest and cheapest strip-type foundation during construction. As a result, you can save up to 20% of the cost of the entire construction.
When choosing a design for a bathhouse made of foam blocks, you should immediately decide how the stove will be placed in it. The fact is that this structure can be installed both on a common foundation and on a separate one. Typically, brick stoves are placed on a separate foundation due to their heavy weight, while metal stoves can be installed on the structure of the floor and foundation of the bathhouse itself.
In any case, the heating method for this building must be reflected in your design and construction documentation. This is required by SNIPs and fire safety standards.
Foundation: step-by-step instructions
A cushion of sand mixed with gravel is poured onto a previously prepared plot of land, which is compacted with water. The thickness of the foundation should be about 30-40 cm.
Note! You need to equip the formwork; it can be removable or monolithic.
It is necessary to reinforce the area with metal rods and fill it with concrete mortar. The mixture needs to be perforated with a knitting needle in several places. This is necessary to release the air, otherwise it will turn out porous.
The foundation for a bathhouse made of foam blocks requires:
- cover with waterproofing material;
- leave for a while (at least 3 weeks) so that the mixture can harden and dry.
They cover it with roofing felt and another stage of construction follows. It can be ordered turnkey.
Construction technology
Bathhouse foundation
As mentioned earlier, these designs belong to the lightweight category. Therefore, they do not require a capital, powerful foundation. Depending on the location of the building, you can use a shallow strip foundation, a strip-column foundation, or in swampy areas a columnar foundation for a bathhouse.
We will consider the most common type of foundation, strip.
- Naturally, we start by marking the territory; to do this, we need to take measurements, drive in wooden or metal pegs and stretch a fishing line between them, marking the outline of the future foundation. The width of the foundation is made wider than the wall by 150 - 200 mm.
- According to the rules, a strip foundation is laid at a depth slightly below the freezing point in a given area.
- Next, a trench is dug and a layer of sand of at least 100 mm is poured onto the bottom with the first ball and compacted. A layer of gravel is poured onto the sand in approximately the same layer and compacted.
- After this, one layer of roofing material is laid for waterproofing and formwork can be installed on this layer.
- Next, the reinforcing structure is installed. The thickness of the reinforcing rod must be at least 12 mm. The rod can be welded by electric welding or simply tied with pre-burnt steel wire.
Classic strip foundation.
We build walls
Setting the angle.
- A bathhouse made of aerated concrete blocks, when the foundation is ready, is erected quite quickly. Initially, you need to lay a layer of waterproofing on the foundation in the form of 2 - 3 layers of roofing material.
- Next, the first row is laid. You need to start laying the first row by installing corner blocks. The first row is fastened to the foundation using ordinary cement-sand mortar, the thickness of the seam is about 12 - 15 mm.
- The blocks are fastened together with a special glue, which initially comes in dry form and is diluted in a special container with water only before use. A special attachment for an electric drill is used for stirring.
Applying glue to blocks.
Block cutting.
- The solution is applied to the blocks with special trowels for laying aerated concrete blocks. It rarely happens that the distance between two corner blocks is a clear multiple of the length of the block. When it is necessary to cut a block, a special limiter is installed on the edge of the product and cut using a regular hacksaw. Glue is applied to aerated concrete both horizontally and from the ends.
- After laying each subsequent row of aerated concrete, it should be sanded well with sandpaper, and the dust should be thoroughly swept away.
- Tray blocks are used to lay the top layer of windows and doors. Initially, a wooden support is made under the upper level of a window or door, U-shaped tray blocks are laid on it, a reinforcement frame is laid in them and concrete is poured.
Reinforcement of tray blocks.
For partitions, special configurations of products in the form of large bricks are also used, which are connected, like the main walls, with an adhesive mortar.
Wall decoration
Aerated concrete itself is a good heat insulator, but it absorbs moisture. Proper interior finishing of aerated concrete baths can solve this problem.
First of all, it is important to understand that the walls should not be rigidly waterproofed
Because after several freezing they can burst, the walls must breathe.
The plaster should act as a vapor barrier, that is, allow evaporation to pass only in one direction, to the outside.
Applying plaster to the reinforcing mesh.
- Initially, the walls are well rubbed with sandpaper in order to level out all the unevenness, after which all chips and potholes can be repaired with the same adhesive solution on which the blocks were attached.
- All plaster mixtures should be purchased specialized specifically for aerated concrete. Their price is relatively small, but in this case the quality of the finish will be guaranteed.
- Next, 2–3 layers of soil are applied to the wall, beacons and reinforcing mesh are attached. An initial, thick layer of rough plaster is laid on the reinforcing mesh. And the finishing plaster is already applied to it, along the beacons.
- After completing the internal plastering work, a reflective layer of foil is installed in the steam room and linden lining is filled. In all other rooms of the bathhouse, you can simply lay tiles or cover them with clapboard.
Installed beacons.
Phased construction: walls and roof
The first row is fastened with cement mortar; it must be laid out evenly, so it is worth using a softened rubber hammer (since an iron hammer can destroy fragile blocks) and a building level to measure deviations.
Might be interesting Rolled lawn: what is it, types, how to choose, lay and care Do-it-yourself verandas and terraces in the country: types, design, arrangement with photos Assembling a garden shredder with your own hands
Foam blocks are laid not like ordinary bricks, but on edges. The second row is fixed using a thin layer of specialized construction adhesive. Every three to four rows you need to lay a rigid reinforcing mesh, which will contribute to the strength of the walls.
A standard roof with two slopes and a central ridge is suitable for a steam room.
Before deciding on the length of the rafter legs, you need to pay special attention to:
- width of the building;
- at what angle should the slopes be?
- climate features.
To connect the rafters together, staples are used. The bars are installed at a distance of about 1 m.
The material for the rafters must be of high quality, without any defects. After installing the rafters, it is necessary to create a sheathing. It is made from smooth boards. Lathing happens:
- solid;
- discharged.
The final option is chosen taking into account the characteristics of the roof covering, for:
- roofing felt – double;
- slate – single;
- tiles - from beams.
The roof, like everything else, is insulated and protected from moisture, steam, and insulated. The final stage is laying the roofing. It is chosen based on personal tastes and available budget.
Selection of materials
The question of choosing materials for a bathhouse is raised at the design stage. The location on the site, the type of foundation, and the appearance of the structure itself depend on this. The main materials for construction are wood, brick and foam concrete.
As for wood, bathhouses made from rounded or chopped logs, regular timber and profiled timber are considered optimal. Such projects are quite cheap. Brick baths are quickly and easily installed. One of the advantages is that they have better fire protection and a long service life, but the disadvantage is that the structure takes longer to warm up.
The blocks are easy to process, so their individual parts can be used as decorative elements.
Bath buildings made from three-layer SIP panels have excellent noise and heat insulation, relatively light weight and no temperature restrictions during construction. However, the material is far from environmentally friendly, easily ignites and serves little purpose to its owners.
Aerated concrete baths are no worse than wooden ones, and their cost is much lower. Aerated concrete retains heat well, is an environmentally friendly material and is easy to process.
Stone baths have low shrinkage and high resistance to fire. However, the construction is quite expensive and technologically complex.
The best material for bath walls
Let's list the options again. The bathhouse can be built from wood, brick, concrete and on a frame.
Wooden baths are log houses made of timber and round timber.
Concrete - those in which block material was used such as gas blocks, foam blocks, cinder blocks, etc.
A board bath is a type of frame bath consisting of frame boards, between which insulation is inserted and lined with finishing material on both sides.
The heaviest walls are made of brick. Also, a wall made of large diameter logs can have a lot of weight. The lightest walls are framed and made of cellular concrete. Yes, cinder blocks are also heavy. As mentioned above, the weight of the walls will affect the choice of foundation material.
Walls also differ in thermal conductivity. The warmest ones are frame ones, but they consist almost entirely of insulation. Wood also holds heat well if the thickness of the log is suitable. For concrete walls, thermal conductivity depends on the amount of air in the cells.
This is what happens to the foam block from humidity and frost
IMPORTANT! Warm at the beginning, block concrete loses this property over time, because it easily absorbs moisture, and in the cold it tears the concrete, so the number of frost resistance cycles is small.
Well, the coldest ones are the brick walls. This material requires a lot of heat to warm up, but in return, it holds it for a long time due to its high heat capacity. Therefore, brick walls must be insulated (in the bathhouse). Also, for insulation, voids are created inside the walls and/or part of the wall is built from brick with voids inside each block.
The next factor is fire safety. Brick walls have the greatest fire safety, followed by concrete walls. The wood and frame cannot boast of this; they are made of flammable materials.
Susceptibility to rotting is characteristic only of organic matter, so it is clear that wood has no competition here - everything else simply cannot rot. True, mold also settles on damp stone (brick and concrete are stones), but destructive fungi only threaten wood. The problem is solved by using antiseptics.
Again, in our opinion, the worst option for building a bathhouse is concrete blocks. It is problematic to install window and door frames in them, and you have to do the casing yourself - they do not hold the fasteners well. They need to be protected from moisture even more than wood; they are often of poor quality due to the machinations of the manufacturer. The garage is the best one.
What material is better for a bath? We would say that it is still a tree. Especially a tree like cedar - but this is an unattainable dream for many.
Bathhouse made of cedar logs. Photo: Cedar Master
Of course, there is a lot of hassle with a log house - wood is a material that, even after 20 years, continues to change dimensions depending on humidity. You will have to take care of it, constantly caulk the cracks, and inspect it for rotting. But there is also a return from it, and a considerable one. Russia doesn't have the right latitude to build from stone.
For those who have a limited budget, we can recommend the frame - this is a good option for your money.
Brick will be expensive, but if this is not a problem and it is properly insulated, then there should be no problems with heating such a bathhouse.
Well, we have expressed our opinion, now it’s your turn - vote for the material that is closest to your heart.
Loading …
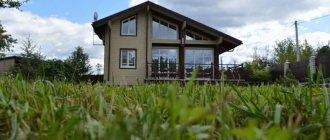
Beautiful examples
Many consumers are skeptical about block baths, explaining this by their unsightly design. In fact, such buildings can be made very stylish and attractive not only inside, but also outside.
For example, a small building with a triangular roof and steps leading to a dressing room can be finished with light-colored siding panels. The lower part of the building should be lined with decorative brown bricks around the perimeter. In such a bathhouse, blue or purple tiles will stand out effectively.
At the entrance to the building, place brick columns and install a red tile roof on top, which would cover the entire structure as a whole (along with the terrace). Green plants and flowers should be planted around. As a result, you will get a very impressive bathhouse.
A bathhouse made of blocks can be made laconic, but no less attractive, by playing on the contrast of the walls and roof. For example, the external finishing of block ceilings should be done with snow-white or beige plaster/paint, and brown coverings should be chosen for the roof. Install high plastic windows and doors in such a structure. This will make the bathhouse more stylish and modern.
Tips and tricks
Reviews from owners of block baths are usually positive. Especially those who did the construction themselves. Most often, among the wide variety of blocks, buyers highlight aerated concrete and foam concrete. Indicating that these materials fit better, have blocks that are the same in shape and size, do not shrink at all and delight with their simplicity when working with them.
As for building a bathhouse from blocks, experts willingly share their tips and recommendations, paying attention to the most basic of them:
The location for the block steam room must be chosen after weighing all the important nuances. The building should be well removed from the well so as not to pollute drinking water. And also in order to avoid even the slightest possibility of fire, the bathhouse should be located away from the residential building. And it is equidistant from each tree on the site (the approximate sufficient distance is 10-15 meters).
- When arranging drains, you should definitely dig a separate drainage hole for the bathhouse. Experts do not recommend connecting it to a common drain, since bath emissions are quite large and powerful, which can negatively affect the condition of your common drain “well.”
- All sewer and water pipes for the bathhouse are placed on a sand bed in the same way as a strip foundation.
- Each porous material for bath walls has its own base size. For example, cinder blocks and expanded clay concrete are best and most stable on a foundation 50 cm high from ground level.
- For all types of foamed concrete blocks, a hinged ventilated façade is best suited. It has a beautiful appearance. It will also eliminate the problem of condensation between the wall and the cladding.
Design
The aesthetic component in the interior decoration of a bathhouse is certainly important. A design made in strict accordance with the owner’s wishes is not only a source of pride for the homeowner, but also a condition for comfort during operation. However, when planning a specific internal content, general recommendations must be taken into account.
The most common finishing material for any bathhouse is wood. For the interior decoration of the steam room, it is customary to use types of lining, the most preferred are linden and larch boards.
The sink and dressing room can be made from any raw material.
When arranging the interior space, it is recommended to start from the floor. The first step is to process and lay the boards. Consider the properties of this material, since oak on the floor in a steam room, for example, will promote slipping. And this is very dangerous, especially if the steam room is small. The floor itself must be raised from the concrete screed by 10 centimeters. This will keep the heat in the steam room.
Next, tiers of shelves are installed. In this case, the lower one should be 10-15 cm above the stove. Depending on the area and height of the room, from two to four tiers are installed.
The next stage is the walls, which are covered with wooden boards or clapboard. When facing, do not forget about the intermediate layer - vapor barrier. And only after this is work done on the ceiling.
The issue of external finishing can be approached less critically, but it is still worth remembering the need for additional thermal insulation. Of course, blocks usually have a high index of this indicator.
Do-it-yourself bathhouse made of aerated block
Before the start of construction, it is imperative to prepare all the necessary documentation. In order to find out the necessary documents, contact the registration chamber, where you will be given a detailed list of documents. Remember that if the bathhouse is built next to the house, then a new registration certificate for the house will be needed.
After collecting the necessary documents, determine the place where you will build your bathhouse.
Where is it advisable to build a bathhouse:
- At any elevation, this will help organize a simplified sewage system.
- So that the paths that lead to and from the bathhouse are surrounded by vegetation: bushes, trees with a dense crown.
- So that the building is no further than 20-30 m from the nearest body of water.
- It is advisable that the doors face the south side and the windows face the west.
Where is it undesirable to build a bathhouse:
Further than 8 m from your home. You should not build too far from the residential building itself; it will be better if the bathhouse is visible from the windows. You cannot build in such a way that sewerage flows into the reservoir, because the sewerage system must be carefully worked out
The bathhouse should not be built close to neighbors’ fences; it is important that it be built at least 300 m from the fence
Basic options for combining a steam room and housing
There are 2 options for constructing such buildings:
- initial construction of the complex;
- extension of a steam room to an already built dwelling.
Bathhouse on the attic floor
When choosing option 2, you need to pay special attention to:
- ventilation;
- waterproofing (the home must be well dried and ventilated);
- construction of an extension (for this purpose it is recommended to use a kitchen wall).
Note! If a single complex is being built, then the communications should also be uniform.
Why do you need insulation?
In principle, aerated concrete walls are quite warm and do not need additional insulation.
However, it is still better to provide thermal insulation, and there are two reasons for this:
- A layer of insulating material will make it possible to make the walls thinner, which will save not only on masonry material, but also on concrete for the foundation - its width can also be reduced.
- External thermal insulation (together with external finishing) is provided in order to protect the porous stone, which absorbs moisture well, from moisture and freezing, which can cause cracks to appear in the masonry.
How to choose the right thermal insulation option
Since the bathhouse is operated at elevated temperatures and humidity, its premises - especially the steam room - must be lined with a material with low thermal conductivity. But at the same time, the insulation must be resistant to steam penetration, or it must be covered with a vapor barrier film.
In this regard, the construction of baths from aerated concrete is not too different from options using other materials.
Aerated blocks have characteristics close to wood, which also does not like moisture. But if the outside of a wooden frame can be left unfinished (from an aesthetic point of view, it already looks great), and the steam trapped in the wood will simply escape, then such conditions still need to be created for aerated concrete. It is also impossible to leave the masonry without external finishing due to the unpresentable appearance of the block walls
And since it is planned to cladding the facade, and also thermal insulation underneath, it is very important that these materials do not interfere with the free escape of steam. For this reason, the vapor permeability coefficient of insulation should always be higher than that of the wall material. If for aerated concrete it is 0.2 mg/m*h*Pa, then polystyrene foam with its 0.013 mg/m*h*Pa will practically not allow steam to pass through the masonry. Consequently, moisture will condense under the insulation, which cannot be allowed.
But mineral wool with a vapor permeability index of 0.5-0.6 mg/m*h*Pa for a material such as porous concrete is an ideal option. No other insulation can compare with it in terms of vapor permeability.
We install mineral wool outside
Features of the construction of a bathhouse made of aerated concrete: two finishing schemes - 1) with brick lining, 2) with plastering over mineral wool
From the inside, everything is done exactly the opposite: the insulation should have the lowest vapor permeability, since steam gets into it even when an insulating film is mounted on top. You can combine two in one by using polyethylene foam roll materials with a foil surface.
Insulation and vapor barrier with Penofol
Using plastic to decorate a bath
The interior decoration of a foam block bath can be made of various materials
Not so long ago, finishing with plastic was not common - except perhaps the ceilings of kitchen areas were sheathed with such material, or something in the bathroom. That is, plastic was chosen for those rooms where the air humidity level is very high.
Today, this finishing material is very popular. In general, finishing a foam block bathhouse with plastic is a durable, practical solution. However, you can only use such material in the dressing room, which is usually located in front of the washing room.
What are the advantages of plastic?
Why is it worth using plastic, what are its advantages?
Let's consider in detail:
Nowadays, plastic can be of several types.
It is known that plastic is a very moisture-resistant material, but it is very durable. However, it is not difficult to damage it - any sharp object will cope with this task; Installation of this finishing material is not so difficult - you will definitely cope with the job, even if you get to work with your own hands without special training; Another important factor: the cost of plastic is affordable for almost any family - this also affected its popularity in modern use
The material is used today not only for performing various finishing works indoors - it is also often chosen for external cladding; Climatic phenomena, various weather vagaries - all this does not pose a threat to plastic products; Experts recommend paying attention only to the fact that there are certain types of plastic (we are talking about cheap products) that can fade due to exposure to direct sunlight. However, there is no need to worry about this if the material is used only indoors.
Plastic may be used inside some bathhouses
How to install plastic
It is not difficult to attach plastic - this can be said about both wall material and plastic lining. For this purpose, a lathing should be made on the surface of the wall.
To make the interior decoration of the foam block with plastic in the bath ideal, you need the following elements:
- Construction level;
- Self-tapping screws for wood;
- Wooden bars, planks;
- Electric jigsaw;
- Sealant;
- Plastic;
- A construction stapler wouldn't hurt.
In general, it is not recommended to do this, since the work will take much more time. It is much easier to create a sheathing directly where you are going to attach the plastic.
And the installation is done in this way:
- The sheathing (frame) structure has auxiliary and load-bearing guides. All elements are fastened together with self-tapping screws - to make work easier, also use a screwdriver;
- The supporting guides are mounted to the surface using dowels. They will significantly strengthen your entire structure, making it as durable as possible - finishing a bathhouse made of foam block will only benefit from this;
- This type of sheathing should be done around the entire perimeter of your finish. Using a construction stapler, it will be necessary to attach sheets or strips of plastic to it;
- To connect the elements of the plastic lining with each other, special locks are used - they are at the end of the material. And if we talk about sheet plastic, then its installation is carried out on the frame using a construction stapler, and here you can also use self-tapping screws, the diameter of which is not too large.
But, if possible, wood remains the preferred material for cladding.
This work should involve:
- Styrofoam;
- Polyurethane foam;
- Mineral solid insulation;
- Mineral wool.
Insulation can be inserted into the sheathing cells immediately. That is, you will save not only the insulating material itself, but also the time that you will have to spend on insulation, because there is practically no need to take time off from the finishing work inside the bathhouse.
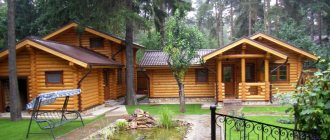
Modern designs of aerated concrete baths
Technological capabilities and modern design work do not limit the bathhouse to one function. This room can serve as a guest house and be equipped with additional rooms for recreation.
Modern design includes not only the building of a bathhouse, but also the improvement of the territory adjacent to this facility. These can be various elements of landscape design, decorative barriers, a gazebo or a fountain.
Currently, construction from aerated concrete is a modern, progressive solution that saves money and allows you to equip a bathhouse to the highest quality standards.
Advantages of ready-made projects for aerated concrete baths
First of all, I would like to note that there are quite a lot of projects of such structures. You will be able to choose exactly the room that will meet your requirements. This may be a building of considerable size. A 6x6 or 5x4 bathhouse can comfortably accommodate a large company. And if you make a two-story structure, this will allow you to create several additional rooms for universal purposes.
When choosing a project, pay primary attention to the functionality of the room. No matter how beautiful and attractive the facade is, if the bathhouse is inconvenient to use, it will not bring you much joy
Interior of a 3x4 bathhouse: layout, photos, ideas
The shelves should be of such length that you can lie on them at full height.
The shelves should be of such length that you can lie on them at full height.
It is also important to maintain a distance from the shelves to the ceiling: it is unacceptable that when you get up, you touch the ceiling. It is recommended to make two-tier shelves or compartments in the steam room, in which case its capacity will increase
The shelves should be of such length that you can lie on them at full height.
It is recommended to make two-tier shelves or compartments in the steam room, in which case its capacity will increase. The shelves should be of such length that you can lie on them at full height.
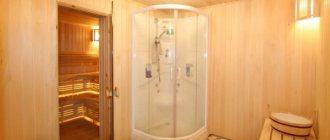
In the washing room you can put a shower stall or a tray with a tub. Create small shelves to store shower accessories.
The rest room must have places to sit and a table. It is better to place benches rather than chairs as they take up less space but have more capacity.
A folding table can help save space. If necessary, you can always fold it, thereby freeing up precious meters in the room.
If the project provides for a dressing room, then you need to hang clothes hooks in it; if there are none, then they need to be installed in the rest room.
Be sure to add small little things for decoration: paintings, bath caps (they are used not only for decoration, but also protect the head from overheating), various figurines and other details. Little things like this help create an atmospheric and cozy environment that sets you up for relaxation.