Sometimes you want to take a break from all the hustle and bustle and go to the countryside to relax. Do things you love that you enjoy. One of the most favorite things to do at the dacha is, of course, a bathhouse.
View this publication on Instagram
Publication from Wooden Houses from SBK (@dom_iz_brusa_sbk)
You can entrust the construction of a bathhouse to professionals. But you can build on your summer cottage and landscape it on your own. You are freed from unnecessary costs and the money you save you spend on landscaping and finishing your desires and preferences. A self-built sauna will be more enjoyable.
How to choose the right place for a bath
The most important point is to choose where your future bathhouse will be located. The chosen location must comply with both existing legislation and your convenience in using it. The following recommendations will help you when choosing:
- We decide where the bathhouse will be located relative to the house: separately from it or as an extension to it, each of these options has its own pros and cons.
- It is believed that it is better to build a bathhouse in the backyard in silence.
- During construction, be sure to provide ventilation and wastewater disposal.
- When positioning the building, take into account the location of the light and the direction of the wind: the best is the southern part, protected from the wind; I recommend placing the windows to the west.
- The best option for a bathhouse will be located at a distance from other structures; if you decide to add one to the house, be sure to follow fire safety rules.
- When you have decided on the size and its placement, follow the rules of distance from the boundaries of the site (2.5 m) so that neighbors do not have discomfort and complaints in the future.
- Maintain a distance to the water intake - no more than 20m.
Bathhouse made of timber 100x150 step by step guide
1. We draw up a project and calculate the necessary materials
Whatever we build, the first thing we do is draw a detailed plan. Without it, you will not be able to start construction and calculate the amount of material needed. Therefore, use a special program or use the old method: a piece of paper and a pencil. The project needs to indicate:
- Distance of load-bearing walls;
- number of premises and their size;
- where the windows and doors will be located, and most importantly the heating unit.
As soon as a clear plan is drawn up, you can immediately begin to calculate the necessary material. You can calculate the amount of timber either yourself or use the services of the companies where you will purchase building materials.
A bathhouse made of 100x150 timber is the best option, which is suitable for both the southern and northern regions of the country. Of course, if in your region the temperature drops below 40 degrees, then it is better to use 180x180 timber.
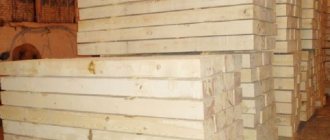
2. We purchase timber, what you should pay attention to
The choice of timber must be approached with special responsibility. After all, the quality of the bath will directly depend on this. Therefore, inspect the wood carefully and take into account the following nuances:
- There should be no wide longitudinal cracks. After all, this is an excellent place for moisture to accumulate;
- the appearance of blue spots or blackening indicates the beginning of the wood rotting process;
- the presence of insect holes indicates that the wood is of low quality.
The ideal option is timber that has a smooth surface with a natural color and smell.
If we talk about the type of wood, it is better to use a combined option. This is when the lower ones (from 1 to 3 rows) are made of larch, and the rest are made of softer types of wood.
Why is this the best option?
Larch has a dense structure that, under the influence of moisture, only becomes stronger and more stable. Therefore, it is usually placed on the lower rows, where there is a large amount of moisture. The cost of larch is several times higher than that of ordinary conifers, which makes complete construction difficult financially.
Fir or pine is a cheap option; in addition, they have good moisture resistance. This makes it possible to use it in the construction of the middle and upper rows of bathhouse walls. Also, when heated, coniferous wood releases resin, which gives a pleasant and healthy smell.
Timber with natural humidity and forced drying. Main differences.
The first option is not expensive, since shrinkage is required after construction of the structure. Having chosen this type, you need to immediately begin construction without allowing the timber to dry. Otherwise, during the natural drying process, moisture will evaporate only from the top layer, while the core will remain damp, and this will lead to deformation of the material.
Timber after forced drying costs an order of magnitude more, but after its use the structure does not require shrinkage.
3.Construction of the foundation
In order for the bathhouse to serve for many years, it is necessary to prepare a reliable foundation. Here you can consider several types of suitable foundations.
Columnar, made from pillars made of brick and installed along the entire perimeter of the future building. The supports are placed strictly at the corners of the structure in places where partition elements pass, as well as at points where heavy loads are present. The pillars are erected no more than two meters from each other. The weight of the structure also affects the number of supports; the larger it is, the more often they will have to be installed.
The only significant drawback of this option is the inability to use it on moving soils.
Tape is considered the most commonly used base in construction. This is due to its high reliability and ease of construction. If calculated correctly, it can support a two-story building.
But in order to fill such a foundation, you will need to spend a lot of time and perform the following actions:
- First of all, it is necessary to fill the cushion with a sand-gravel mixture. This is necessary if the soil where the bathhouse will be built has weak bearing capacity;
- Carefully compact the prepared area and install the formwork. The box must rise above the ground at least 50 cm;
- prepare and pour cement mortar into the installed frame. It should take about two weeks for the structure to dry completely.
Also, when building a foundation, it is necessary to perform reinforcement using reinforcement. This necessary element will give it additional strength and stability. Reinforcement with reinforcement must be performed for all types of foundations.
4.Laying waterproofing between the foundation beams
A concrete product and wood material have different properties. Therefore, their direct contact leads to further destruction of the tree in the form of rot. The beauty of the lower rows of the log house arises for the following reason: moisture from the ground will be actively absorbed into the timber through the concrete.
This undesirable process can be prevented by installing a layer of waterproofing between the foundation and the lower crown in a timber wall. To do this, it will be enough to apply a layer of bitumen to the surface of the foundation and lay roofing felt on it. Such a waterproofing barrier will protect the tree from rotting.
Construction of a log bathhouse from timber
In order for the structure to be even and strictly level, it is necessary to take a responsible approach to laying the initial row. To do this, it is important to use only perfectly flat material and a building level.
Bathroom layout: recommendations
At the very beginning, make drawings of the bathhouse in which the ideal bathhouse area will be located.
View this post on Instagram
Publication from Sergey Bogachev (@serj_bogachev)
The ideal area per person is approximately 5 sq.m. Approximately 4 people will visit the bathhouse, then the total area should be at least 20 sq.m.
The minimum number of rooms for a bath is recommended: steam room, washing room, relaxation room and dressing room. Determine for yourself the location of all the rooms and how convenient they will be.
View this post on Instagram
Publication from ► DACHA, HOUSE, BATH in MOSCOW ↗ (@zakazdom)
Make some diagrams and drawings:
- General plan of the building.
- Foundation diagram.
- Drawing of each room.
- Roofing diagram.
- Plan of the floor and ceiling of the bathhouse.
- Fastening plan and timber laying.
- Installation diagram of the furnace, taking into account its structural features.
View this post on Instagram
Publication from HOUSE BANYA BRUS LOG OTSB (@domavashi)
You can create all the drawings that you may need yourself, but you can also find ready-made drawings that are provided below or find them in the public domain, choose the one that suits your needs. You can also pay an architect or builder and commission a unique design from them.
View this post on Instagram
Publication from ► DACHA, HOUSE, BATH in MOSCOW ↗ (@zakazdom)
What material to use to build a sauna at home yourself
Nowadays, the choice of materials for building a bathhouse is very large, so everyone can choose the bathhouse that they like. Often a bathhouse is built from wood, brick and aerated concrete.
Bathhouse made of Wood.
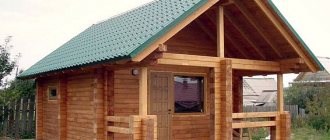
The wooden bathhouse is an old classic; this is what our ancestors built. Wood is environmentally friendly, has a low level of thermal conductivity, has a magnificent appearance, smells like wood, and does not require interior finishing.
The construction of a wooden bathhouse is divided into several types due to the type of material.
A sauna made of timber is a common option. It has low thermal conductivity, it has little shrinkage, it is quite simple to build, and due to its low weight, there is no need to make a complex foundation.
A bathhouse made of logs is also in demand, it is more difficult to build than from timber, you must carefully choose the material, it must be straight, without any bends.
When examining the material, you will see signs of wood rotting; blue spots are a signal to you to abandon this material.
The appearance of a rounded bathhouse is generally better than one made from timber. But timber construction is cheaper, the level of thermal insulation is higher, and there is no need to caulk the cracks.
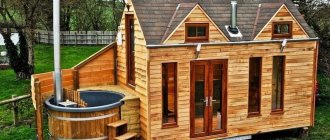
If you have a strong desire to build a reliable wooden bathhouse and are afraid of deformation that may appear when drying the wood, then I advise you to consider the Carriage material.
It has all the advantages of construction:
- Environmental friendliness
- Aesthetics
- savings on interior decoration and exterior decoration
Its main disadvantage is the locking connection, which increases the strength of the bathhouse.
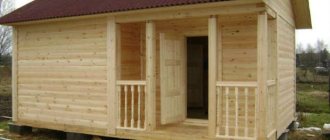
The simplest and cheapest option is a frame bath. Anyone can build it, even without experience in construction. It will be cheaper to build, and you can do the interior decoration right away. The frame has a very poor level of vapor barrier, so do all the work to protect the walls from moisture.
View this post on Instagram
Publication from Wooden houses and baths from KELO (@artkelo)
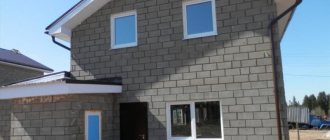
Bathhouse made of aerated concrete
Aerated concrete is very strong and reliable.
Pros:
- Fire resistance.
- Moisture resistance.
- Low thermal conductivity.
- Cheaper than wood.
The downside is, of course, the appearance of the building, which forces you to spend money on cladding, which entails additional costs.
Foam block bath
The structure of a foam block is similar to a gas block, but the advantage of a foam block is that it is less hygroscopic, which makes building a bathhouse even easier. It is about 20% cheaper, but inferior in strength. During construction, two materials are combined: load-bearing walls are made of aerated concrete blocks and ordinary partitions are made of foam blocks.
Cinder block bathhouse
The most important advantage of cinder block is its price compared to other materials. This material is made from waste, you must understand that this material is not environmentally friendly.
A cinder block bathhouse is cheap, but there is a loss of sound insulation and thermal conductivity. Its strength indicators are closer to brick.
The main disadvantage of a cinder block is its appearance. And you will have to spend money on additional materials to finish the appearance. Basically, those who choose to build a bathhouse from blocks already know what and how they will improve the appearance; they will cover it with siding or other materials.
Brick bathhouse
The brick structure itself is considered reliable and strong, and the most important factor is that brick construction is not flammable. The process of building a bathhouse from brick is more difficult than from other materials. If you do not have experience with this material, I recommend considering other materials that are easy to build: timber, gas blocks.
Why is a log sauna so popular?
First of all this:
- Environmentally friendly material that has a positive effect on human health. After all, it contains no harmful components, and the natural aroma of wood will delight you for a long time;
- simple construction technology. A person with basic knowledge in the field of construction can cope with this task;
- saving time. After all, building a bathhouse from timber is a rather short process, unlike other types of material;
- high level of thermal insulation. The timber retains heat well inside the room, so you don’t have to spend money on additional wall insulation;
- affordable price for the material. Compared to other materials, a bathhouse made of timber will cost much less than one made of brick or gun carriage;
- there is no need to build a complex reinforced foundation. An ordinary strip foundation on solid ground will be sufficient.
Having become familiar with the advantages of this structure, we smoothly move on to the actual construction.
Do-it-yourself bath step-by-step instructions
Step I - preparing the place you have chosen
You will need to remove all debris, bushes, stumps and anything else that will get in the way when working on the foundation.
Step II - building the foundation
If you have a bathhouse made of timber, then a columnar foundation is suitable for it; it is not expensive and is excellent for the construction of small wooden and frame structures.
To create it, you need to dig a certain number of holes for installing supports. We will now calculate how many holes we will need as follows - supports are placed in the corners and at the intersections of the walls of the structure and with a certain step along the perimeter.
View this post on Instagram
Publication from HOUSE.BATH.STAIRS.SYNDICAT (@syndicat_individual)
To choose the right step, you need to take into account the type of soil and the total load of your structure. The depth of the hole should be 1-1.5 m; the depth of freezing in your area also depends and it can affect the depth of the funnel. The material you need is asbestos-cement pipes and fittings.
Fill the bottom of the funnel with a mixture of sand and gravel about 10-15 cm. Then install an asbestos-cement pipe of the required length into the hole vertically and secure it. Place the reinforcement rods inside the pipe and secure them.
Then prepare a cement mortar and pour it into the hole and into the pipe itself. After you have poured the concrete solution, wait about a couple of days for the concrete to completely harden. Then lay out a wall about half a brick thick between your pillars.
View this post on Instagram
Publication from Vladimir STROY/Building houses. (@vladimir.stroy)
Step III - Construction of walls and roofing
The standard material for the construction of walls is timber measuring 150x150 mm. Before installation, you must install waterproofing. You need to treat the lower part of the beam with an antiseptic. Often laying timber is the “Into the paw” method
You need to make the first installation even to the geometric parameters - all your angles must be strictly 90 degrees. When you lay out a wall, do not forget about the future of windows and doors, do not forget to insulate each row of timber with heat-insulating material. Use metal or wooden pins to connect the beams to each other.
After the walls have been erected, proceed to the roof. You need to fix the rafters, which are attached to the upper crown with brackets.
If you are installing a single-pitched roof, then the supports are secured either with two external ones, or with one external and one internal support. When choosing a gable roof, you need to fasten the rafters so that all support is on the wall, and connect them together from above.
You mount boards across the fixed supports (lathing), then lay insulation, waterproofing, and vapor barrier. The final stage of our roof is that all that remains is to lay the roofing material you have chosen.
Step IV - Interior work
The first step in interior decoration is to start with communications - water, sewerage, electricity.
It is necessary to lay the sewer system at the stage of drawings or construction of the foundation. Next to your future bathhouse, you need to dig a drainage well into which a sewer pipe will be laid at an angle from the bathhouse to remove wastewater from the washing compartment.
After completing installation work with the sewerage system, we make a finishing floor; it is usually made of wood or concrete. A concrete floor will last longer and is most often covered with tiles or porcelain tiles.
If you choose a wooden floor, then such a floor must be made to leak, the boards must be made with a small gap so that the water can drain, or a small drain must be made in the floor. Make the floor with a slight slope towards the drain.
Then you need to insulate and vapor barrier the walls and ceiling using the materials you have chosen. Make high-quality wiring and plumbing.
Next, we install windows and doors, and perform final finishing using lining or other materials. After completing the interior decoration, install the necessary electrical appliances that you have chosen.
Step V - Installation of the Oven and Shelves
There are many ways to place shelves, keep the correct dimensions, they need to be made from hardwood. Installation is easy - create a frame from timber and attach boards to it.
The installation of the stove must comply with all fire safety regulations. Wooden devices should not be exposed to the high temperature of the stove and chimney. If the stove is heavy, it needs a foundation.
You choose the oven according to your preferences. This is a standard stove on stones and wood, an electric or even a gas stove for a bath.
Bathhouse 4 x 2
The layout of a 4x2 meter bath assumes the presence of two rooms: a steam room and a washing room. Also, when drawing the plan of the bathhouse, pay attention to the fact that the log frame is 4 meters long, and the space inside the room will seem smaller. From the internal size you will have to subtract:
- if you cut logs in a cup, then a section of 250 mm will be added to the thickness of the log;
- only the thickness of the log, if the logs are cut in the paw.
So, for example, a log house in a bowl made of 4-meter logs with a thickness of 240 mm will have an internal size of 3 meters. This makes the interior space of the bathhouse much smaller, so this must be taken into account in advance. The layout of the bathhouse may vary depending on a variety of initial data.
The entrance to the bathhouse from the street can be on two different sides . The choice of location of the door directly depends on the order of the bathhouse in relation to the boundaries of neighboring buildings and the entire site.
Depending on where the main entrance to the bathhouse is located and where the furnace firebox will be installed, the remaining rooms will be located accordingly: the entrance to the steam room should go from the washing room. On the one hand, the doors should have the shortest distance between them, on the other hand, the room should have blank walls to which you can place all the necessary bath equipment.
View information on the interior decoration of the bathhouse
The washing room and steam room can be swapped, but you should take into account the flow of water from the bathhouse itself towards the location of the sewer well or ditch. It is best to remove the sewer pipe from the washing room. Therefore, if there is such a possibility, then the washing room should be adjacent to the side that goes to the well or gutter.
An extremely important factor when planning such a small bath is the correct arrangement of bath equipment and furniture. For example, in a steam room, shelves can be placed in such a way that steam from the oven door does not burn the person lying on the shelf.
DIY bath shelves Wooden bath furniture
The area of the premises should be calculated depending on the number of people and personal preferences. For example, a steam room can be larger than a washing room. If in a washing room it is enough to install a shower stall measuring 1x1 meter to make it convenient to wash, then in a steam room there is not enough space for the relative position of the stove and shelves - this is a matter of personal safety.
Also, when constructing a 4x2 meter bathhouse, additional structures are possible: a terrace or porch.