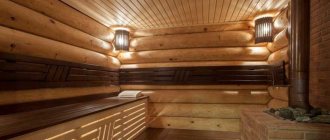
The steam room room should be small; the popularity of projects for small one-story bathhouses is often higher than for full-size buildings 5x7 m or even 8x12 m. According to many experts in bathing, comfort and free space in a small-sized sauna or bathhouse, you get less steam, but the steam produced is significantly greater hotter and richer.
Which bathhouse project to choose
If you do not go into the intricacies of the bathhouse process, but focus only on objective indicators, then the construction of a small one-story bathhouse looks more attractive from all points of view:
- Low costs for drawing up a project and erecting a one-story building;
- Minimum consumption of firewood or electricity;
- Long service life of a one-story bathhouse.
The last point has always remained a mystery for many customers, and for developers of standard projects for one-story baths, although there is nothing unusual about it. A small one-story building, in which a steam room or sauna takes up most of the usable space, warms up and dries many times faster, better and more efficiently than huge bath houses with billiards and a swimming pool.
But comfort remains comfort; even for a summer cottage as a temporary shelter, there is no point in choosing a project with a minimum level of comfort. At a minimum, even in a small bathhouse there are two compartments:
- Steam room, which is allocated at least 3 m2;
- Locker room or rest room for 2-3 m2;
- A small shower behind a partition, which in many small bathhouse designs replaces a suspended wooden bucket or tank of water.
For your information! In the project of a summer one-story bathhouse, instead of a locker room or rest room, a covered terrace or canopy can be used.
This does not mean that all winter bath projects are much more comfortable and convenient than summer ones. Often the sauna box itself is built a short distance from the house next to an artificial pond or swimming pool. According to the design, the one-story winter bathhouse contains nothing but a very hot Russian steam room, a brick heater that occupies half the building, and a small dressing room in which you can leave shoes and outerwear thrown over your shoulders.
According to the owners, all amenities are in the house. The steaming process is as close as possible to a Russian bath with short-term gatherings in a small, very hot steam room, plunging into an ice bath or dousing with water, followed by a long rest in comfortable conditions at home.
Preparation for construction
When building a hammam with your own hands, you will need to thoroughly study all the stages and features of construction, draw up a project and drawings, stock up on building materials and patience, but also purchase tools, building materials and equipment.
To make it easier for you to build your hammam, view our sample designs that will help save you time and money during the design phase.
Also, you can get acquainted with the features of non-standard solutions and the construction of hammams in different types of premises:
- Construction of a hammam in an apartment
- Royal hammam in the bathroom
- How to build a Turkish bath in a country house or a wooden house?
- Hammam in the cottage. How to build a Turkish bath in your home?
- How to build a hammam in a townhouse?
- Turkish bath with swimming pool
- Joint construction of hammam and Finnish sauna
- Combined hammam with Russian bath
- Walls (panels)
- Sunbeds
- Doors (glass)
- Dome
- Cranes
- Qurna (bowl for ablution)
- Nozzle
- Mosaic
- Backlight
- Fiber Optic Lighting
- Lamps
- Ventilation
- Control system
- Steam generator (Hygromatik)
- Dosing stations
Tools
It will not be possible to build a Turkish bath without:
- construction mixer and container for mixing concrete;
- shovel;
- drills with drill bits;
- trowels;
- screwdriver;
- hydraulic level;
- hammer;
- rubber mallet;
- trowels for plaster.
Construction Materials
Once the area and layout of the future hammam has been determined, the need for the amount of building materials can be calculated.
To build a Turkish bath in a private house, you will need the following set of materials:
- Brick. It will be needed to lay out the base of sun loungers or benches.
- Material for the construction of walls and ceilings. It must be resistant to corrosion and moisture. You can use glass-magnesite slabs or sheets of cement and shavings.
- Mortar of cement and sand.
- Finishing materials for floors, walls, sun loungers and ceilings.
- Door made of heat-resistant tempered glass, fully equipped.
- Pipes for a steam generator. Through them, steam will flow from the steam generator into the hammam room.
- Heat-resistant sewer and water pipes.
- Waterproofing materials and mortar for walls and floors.
- Fasteners in the form of self-tapping screws and dowels.
Equipment
A hammam is not just a warm room with running water and a drainage system. There is a certain list of mandatory equipment, without the installation of which the normal and safe functioning of the steam room is simply impossible.
We will help you choose equipment for your hammam:
For proper operation of the Turkish bath you will need to install:
- steam generator;
- system for heating floors, walls and sunbeds;
- bowl for ablution - kurna;
- ventilation system;
- taps for hamam;
- special lamps.
Approximate estimate of the minimum required equipment for a standard mini hammam:
| Name | Quantity, pcs. | Unit price, rub. | Sum |
| Steam generator | 1 | about 40,000 | 40000 |
| Drain valve | 1 | from 10000 | 10000 |
| Qurna | 1 | from 15000 | 15000 |
| Sun lounger | 2 | from 12000 | 24000 |
| Drain ladder | 1 | from 1500 | 1500 |
| Glass door Tylo | 1 | from 20000 | 20000 |
| Taps and shower | 2 | from 3000 | 6000 |
| Lamps | 3 | from 1500 | 4500 |
| Remote Control | 1 (if not included in the steam generator package) | from 15000 | 15000 |
You can do without other devices, such as a watering can with a “tropical shower”, an air aromatization system, and an acoustic system. They are optional and are optional. Also, you will have to separately calculate the plumbing, electrical and ventilation parts.
What material should I use for a bathhouse project?
The construction of even the smallest one-story bathhouse requires a very thoughtful and balanced calculation. If there is no ready-made sample, for example, from friends or neighbors, from which you can copy the solution, then it is best to order a layout or use one of the standard designs for small-sized one-story baths. Anything that is built at random, as a rule, heats poorly and does not last long.
In the vast majority of cases, small baths are built from wood; this can be a building project made of timber, logs, or even a frame version with double insulation and facade finishing with siding.
Ardent fans of Finnish saunas often order projects made from SIP panels or hollow red brick blocks. A small one-story building on stilts, depending on the design, can retain and maintain heat in a steam room for almost two days from the moment the electric heater is turned off or the stove is turned off.
Interior finishing work
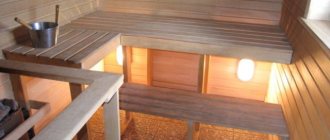
The walls are covered with certain types of wood. Due to high temperature and humidity, chipboard and linoleum cannot be used. Natural wood - alder, larch, cedar, linden - is suitable for cladding. They retain heat indoors.
Wooden lining is considered the best option for finishing the room. It is mounted on the sheathing to prevent contact with the insulation and waterproofing.
Wood paneling is also used for the ceiling
In the steam room it is important to create the effect of a thermos. And this is achievable with proper installation of the insulating layer
It is attached to the underside of the floor beams and secured with a rough layer of filing. The foil insulation is mounted below and pressed with rolling slats - the basis for fixing the lining.
The stove is the basis for the bath. For small rooms, simple devices that you can make with your own hands or replace with an electric furnace will suffice. The second option is preferable due to minimal air pollution and high safety, but it costs additional and considerable costs.
Important! To avoid fire, the place for the heating elements is lined with non-combustible materials. Distance to wooden parts – from 20 cm.
Universal projects and solutions for one-story baths
The most budget-friendly option for a one-story steam room can be called a bath structure assembled in the form of a barrel on a low-power columnar foundation. Despite its apparent simplicity, the room has a small locker room and a dressing room, separated by a partition with a steam room.
In a small bathhouse, up to four people can steam at the same time, but the project is not very convenient for so many people due to the fact that you can only walk through the room along the center line of the room. If a fire or any emergency occurs, it will not be easy to quickly leave a small room. This type of bathhouse is convenient to use as a seasonal steam room in a suburban area.
Some useful tips
Since stones can crack greatly when heated and pieces will begin to fly off, you need to be careful. It is better to water them with hot water and then it will evaporate almost immediately. At the same time, cold water promotes the formation of fragments.
Regarding the tight-fitting material, it is worth noting that preference should be given to a tent - the whole point is that if you use film, you will need a lot of it and it will take up more space in a hiking backpack than a regular Soviet canvas tent
With all this, the tent will also serve as an excellent sleeping place in the future.
Advice. Prepare round, slightly elongated stones for the sauna stove, without any delamination (other stones may simply burst under the influence of high temperature). River/lake boulders with a diameter of about 20 centimeters are ideal (those that are too small in size will “give off” very little heat, those that are too large will simply not have time to heat up). 5. Advice. If you plan to use a tourist scarf as a bath structure, then in no case should it be of a modern type. The fact is that such tents are not designed for high temperatures; moreover, when heated, they can emit toxic
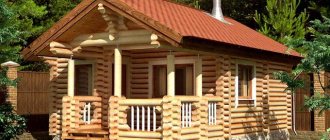
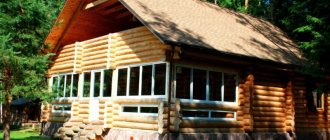
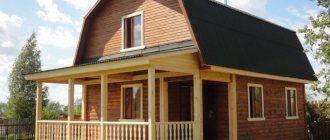
Classic log bathhouse
A real Russian bathhouse should be built from logs. A properly built log house can stand without repair for at least 15 years. Moreover, the walls of a one-story building are often not even insulated according to the design, only the facade is periodically updated, and the joints are minted on the windows and lower crowns of the building.
As an example of a project made from a 3x4 m bathhouse log, you can use the photo below.
This is exactly the case when the developer managed to invest in the project important construction solutions that are usually ignored by non-professionals:
- The entrance to the bathhouse, locker room and steam room are on the same line. There are small windows in each of the steam rooms and locker rooms, as well as in the entrance door. This means that in case of heavy smoke or gas poisoning, you can always leave the room without any problems;
- The roof of a one-story building was built according to all the rules of science. For bathhouses - log houses 3x3 m or more, the roof overhangs are made very long. This allows you to effectively retain heat, get rid of condensation and protect the building from rain and wind;
- At the entrance to the bathhouse there is a covered platform under a canopy. For a small bathhouse there is no point in building a full-fledged terrace, but a canopy over the entrance will help organize summer gatherings in the evening, after the steam room.
In general, the project turned out to be successful, durable and, like all good things, very expensive; on average, the construction of a small one-story log bathhouse will require at least 300 thousand rubles.
A more affordable project for a 3x3 m log bathhouse is shown in the diagram below.
As in the previous case, the box of a one-story building is assembled from 200 mm logs.
The room is divided in a classic way into three sections:
- A dressing room combined with a rest room;
- Small washing room;
- Steam room with an area of 3.5 m2.
The disadvantage of this one-story bathhouse project is the poor roof design. If you build a steam room, as they say, in an open field, then it is best to use a roof, as in the photo.
Advantages of separate rooms
The main advantages of a separate washing room are:
- Freedom of movement. Each visitor to the bathhouse has the opportunity to go to the steam room and washing room whenever he wishes.
- Each room has its own microclimate. The steam room is dry and hot, and the washing room is cool.
- Possibility to install in a washing tub with cold water so that you can shower after the steam room.
- Convenience and comfort of being in the bathhouse for men and women.
It is difficult to find disadvantages in dividing the main rooms of the bathhouse. Perhaps the only thing is that it is necessary to build a partition between them and equip them separately.
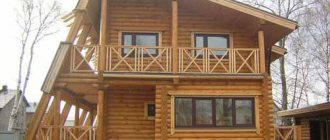
Timber bath projects
The construction of even a small one-story steam room is always associated with the problem of allocating a free local area. Therefore, we have to look for projects for the smallest bathhouse buildings. The timber has a remarkable property - it can be used to build an arbitrarily small bathhouse, down to the size of a doghouse. One of the options for a 2 by 2 m bath is shown below.
The steam room is assembled from logs, all other parts are from timber. The result is an inexpensive one-story sauna, warm and durable. Walls made of timber do not retain heat very well, so the room is traditionally lined with siding or upholstered with a block house.
A more civilized version of the previous project involves the arrangement of a canopy and a small summer terrace. Such designs are very popular for small country houses and dachas, where most of the site is occupied by beds, fruit trees and shrubs.
Any sauna or steam room in the yard is always fraught with problems with melted snow, the appearance of puddles and, as a result, the need to deal with groundwater. This problem cannot be neglected, otherwise the base part of the timber frame will rot in 3-5 years.
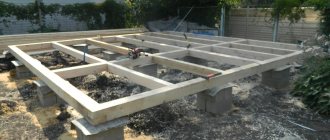
At a minimum, you will need to make a full foundation blind area, lay drainage and cast a concrete walkway. If you have to install a small bathhouse on an unprepared site, then it is best to immediately place the steam room box on a columnar foundation or piles.
Construction order
When deciding how to build a bathhouse, you need to familiarize yourself with the procedure for carrying out all the work.
The first step in constructing a bathhouse, regardless of the design and materials used, will be clearing the site and laying out the foundation.
At the second stage, it is necessary to build walls or assemble a frame. Work must be carried out in accordance with the technology provided for this type of building materials.
Having completed the construction of the walls, they begin to install the roof. First you need to install the frame, attach the sheathing and roof to it.
The last step will be the interior decoration of the building.
The speed and cost of building a bathhouse at the dacha is directly determined by the type of materials used for construction.
Small bathhouse design projects
The most common planning is to divide the premises into three sections. The entrance to the building according to the project can be located from the front of the building or from the side.
In the first case, the convenient location of the entrance door allows you to achieve maximum comfort for summer recreation on the site next to the steam room building.
In this case, the maximum space is allocated directly under the relaxation room and the attached terrace, usually its area is at least 4-7 m2, the rest of the interior space is given over to a steam room and a small sink.
The side entrance to the bathhouse is used mainly for bathhouse projects with a “carriage” layout of the room.
The design turns out to be quite simple to manufacture; you can use a shorter beam or log, which significantly reduces the cost of construction.
In practice, the tandem arrangement of rooms is considered a necessary measure. Such projects are used in cases where it was possible to inexpensively purchase material for construction, or the format of the site does not allow the construction of a more economical and warm bathhouse with a square layout.
The smallest baths 2x3 and 3x4 m can be built according to projects in which the room is divided into only two rooms - a steam room with a sink and a dressing room.
Such simplification in the project is also considered a necessary measure; an increase in the number of rooms has practically no effect on the level of comfort or atmosphere in the steam room, and additional partitions in a small bathhouse only lead to meaningless losses of usable space.
Video
Bath frame
Sizes, of course, are up to everyone’s taste. The whole trick lies in how the bathhouse is designed. It's very easy to do. The main frame was welded from 25 angles. For transitions: floor-wall, wall-roof, the corners were welded with shelves to each other. Don’t forget about the corners for the entrance (steam room) and outer doors.
Lightweight design
To allow water to roll down, I made the roof of the bathhouse sloping and “broke” it into two parts. The first is the dressing room, has a slope in one direction, with a difference of 10 cm. The second part is the bathhouse itself, located at an angle of 90 degrees to the first with a slope height of 20 cm from the highest point of the dressing room.
Strengthening the structure
I also additionally strengthened the floor with one corner in the middle, along the steam room compartment, and to strengthen the structure - another one on top across the steam room. Another corner, for rigidity, in the middle of the partition between the steam room and the dressing room. Horizontally from the wall to the inner door. We drill as many holes for screws in the corners as you think necessary in order to hold the block on them.
Attaching wood to iron
Having cut the 50th beam - dry larch - to the size of the corners, screw the bars to the corners with screws. We nail one-inch dry boards, also made of larch, onto the bars, cover the floor of the bathhouse with them, not forgetting about the hole for the stove (what kind of bathhouse, even a small bathhouse, without it!), the inside walls and the roof. Without relying too much on the dryness of the boards (which I was convinced of myself after a couple of years - gaps appeared between the boards), to improve the insulation we glued cheap ceiling tiles to the walls.
External cladding of a bathhouse with wood
The outside of the bathhouse is lined with one-inch boards located parallel to the ground. We begin sheathing from the bottom up so that the boards lie, slightly overlapping, on top of each other. Your bathhouse at the dacha will greatly benefit from this. Don’t forget to varnish the boards twice later.
Stove, pipe and bath insulation
We install iron (can be made of stainless steel) in the bathhouse: a stove of the size you need, and a pipe, a hole for which we first cut in the roof. Take a pipe of such length as to maintain a distance of 1.5 meters from its end above the roof to the roof itself. And don’t forget about the spark arrestor on top of the pipe.
We install the stove on bricks with a two-centimeter gap from the wall. This gap is quite enough to install insulation between the wooden wall and the stove so that the wall does not burn.
Without further ado, I secured the insulation to the wall. I had it (at first - 25 years ago) in the following order: asbestos fabric, thickness 1 mm, galvanized sheet on it - 1 mm, asbestos sheet - 5 mm and galvanized again. Again - when replacing the stove - I left the first two layers adjacent to the wood, and put fire-resistant polymer fabric on top of them.
Both the initial and subsequent insulation are enough to prevent the boards from burning, even in a hot oven. We line the second, long wall of the stove with bricks the width of the brick so as not to get burned (a small bathhouse in the country is a hot business).
We make a hole in the roof with a diameter larger than the diameter of the pipe in order to lay insulation between the roof and the pipe.
I personally made a hole in the roof 4 centimeters larger, fixed it on the transverse ceiling corner, and so that the boards did not burn, I wrapped the pipe with insulation and lined it with pieces of asbestos board on 4 sides. It rains, of course, but the simple steel stove is like new for 14 years, without rust.
Sewing the internal partition
Having installed the stove, we sew up the frame of the partition between the dressing room and the steam room with a board. We install shelves in two rooms. Don't forget to install the doors. And the final touch. We cover the roof with roofing felt or any material that suits your taste. A small bathhouse in the country with your own hands is another way to get pleasure and cleanliness, naturally. Enjoy Your Bath!
To my shame, I want to admit that this building was the last to be built. There was everything: I made greenhouses with my own hands and such a structure as a pergola for grapes was already standing, but somehow I never got around to doing such a necessary task.
How to design a small bathhouse
Experts consider the most practical and convenient project to be one with a small covered terrace at the entrance to the premises.
A project with a terrace can be developed and combined with a bathhouse with a gazebo under one roof.
The largest number of applications are received by projects of one-story bathhouses with an extension for a barbecue or fireplace.
In essence, this is a new format of a summer kitchen with a built-in small bathhouse for a country plot. The developers tried to create a one-story building made of timber that would best meet the needs of vacationers outside the city.
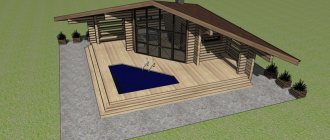
When drawing up a future sauna project, you don’t have to try to copy traditional shapes and designs; you can always find a more original design. For example, a small one-story sauna room with a gazebo can be built in the European style.
The most unusual design of a small bathhouse involves extensive use of brick, metal, timber and glass. The building looks quite unusual and attractive, and will certainly raise a lot of questions from neighbors and friends.
In essence, this is a new idea for drawing up projects, in which the bathhouse space looks less and less like an old wooden “birdhouse”.
Construction of the foundation
After determining all the basic parameters of the bath premises, you can proceed directly to construction work
When choosing the appropriate type of foundation, pay special attention to the type of soil of the area on which the bathhouse will be built. If the soil is hard enough and the groundwater is deep, then a lightweight foundation will be sufficient
We lay flat stones around the markings of the future building, cover them with a small layer of clay and lightly press them. We lay wooden beams on top. We complete the process by covering the beams with waterproofing bitumen.
If there is soft or wet soil on the site, use a strip foundation. Prepare a trench, fill it with a layer of sand, then crushed stone and compact it tightly. Then place the reinforcing mesh on top. All that remains is to prepare a cement solution with which the pit will need to be filled. Don’t forget about waterproofing: roofing felt sheets can be used for this purpose.