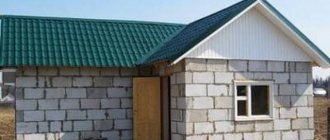
Technologies in construction are developing by leaps and bounds. New materials are emerging that make it possible to build faster, without losing quality. And although aerated concrete is not an innovation - it is already three or four decades old - bathhouses have not been built from it before: this material has a fairly high hygroscopicity. But new impregnations have appeared that can significantly reduce the amount of moisture that the material absorbs. But even without impregnation, using modern vapor and waterproofing, you can achieve good results. The average lifespan of a bathhouse made of foam blocks is about 20-30 years. If you're happy with this, start looking for a project.
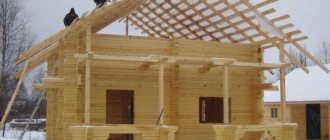
A gas silicate bathhouse can be built “with one hand”, and the process goes quickly: the blocks are large but light
You just have to remember that aerated concrete is produced using two technologies. In the production of some, hardening occurs in an autoclave - these are gas-concrete and gas silicate. When producing others (foam concrete), a foaming agent is simply added, then the foamed solution is poured into molds and hardens in air.
Autoclaved cellular concrete is considered to be of higher quality. An autoclave is not a cheap piece of equipment, so you can’t make the material using a homemade method. This is reflected in the cost - gas silicate is more expensive than foam concrete - but the geometry of the material and its quality are usually much better. Since it is desirable to make the seams between the blocks as thin as possible, the geometry is very important. Therefore, when purchasing, look for gas silicate blocks with the least deviations. Even if they are more expensive, you will save as a result: the glue costs a lot, if you can make a 1-2 mm seam, its consumption will be small. In addition, with such a seam there will be less heat loss, which means that it will be possible to make a smaller layer of insulation (if they are insulated) and less fuel will be consumed to heat the bath.
It is easy to distinguish gas silicate: due to the fact that lime is the binding element in it, it has a white color. The rest of the porous concrete is gray.
The gas silicate block is easy to distinguish: by color
Planning projects
Sometimes when building gas silicate baths, difficulties arise with the layout and location of the premises. The idea can be taken from ready-made projects and, if necessary, modified slightly.
If we are talking about small baths, then they most often have three rooms: a relaxation room, which is combined with a locker room, a washing room and a steam room. Some have a veranda or porch attached.
Layout options for a 6 by 3 bath made of gas silicate blocks
Medium-sized baths may already have a dedicated changing room, as well as a vestibule or hall. A vestibule or hall is desirable, since if the front door leads directly to the rest room, then in winter every opening of the door threatens a sharp drop in temperature. Therefore, at least a small vestibule is needed. If it is not possible to fence it off from the rest room, then you can attach it outside. Let it be small, but closed and insulated.
No one argues about whether a locker room is needed (if space allows). The dispute is about where her door should go. There are actually two options: in the sink and the rest room. Both are imperfect. If the doors of the locker room open into the rest room, after undressing you will have to go through it. If there is no one there, that’s one thing, but if people are resting, that’s another. The second option - the doors open into the washing room - usually does not have this drawback. But in such a room the clothes will be damp. So you have to choose: either a naked fashion show or raw clothes. Although the problem of dampness can be solved by making good forced ventilation in the locker room: the supply hole is at the bottom, the exhaust hole is at the top, and there is an exhaust fan in it.
Bathhouse layout 6*4.45 m
In its entirety, the bathhouse has a large length of 7.4 m since it has a veranda attached to it. It consists of three rooms:
Project of a gas silicate bathhouse 6x4
- rest room 13.66 m2;
- sink area 4 m2;
- steam room 5.8 m2;
- veranda 4 m2.
In this case, a vestibule can be made by moving the steps and installing doors. And the locker room can be fenced off at the end of the rest room opposite the entrance. Then, really, you will have to install a smaller window, or make two small ones: one in the rest room, the second in the locker room.
Bathhouse 5*5 with terrace
In this bathhouse layout, a rather large terrace is made of gas silicate - it has an area of 7.5 square meters. (Projects of bathhouses with terraces are here) Of the interior spaces, the steam room has the largest size - 5.8 m2, all the others are smaller. Non-standard solution. Usually the steam room is made small. But why not? The stove is installed in the wall between the steam room and the washing room.
Projects for a 6x4 gas silicate bath
Premises area:
- rest room/locker room 3.8 m2;
- sink 4.5 m2;
- steam room 5.8 m2;
- veranda 7.5 m2.
There are no options for changes here: the small size of the premises does not allow any liberties. But on the veranda you can have a pleasant time in the warm season.
Project bathhouse 6*6 made of gas silicate blocks with a terrace
In this layout, 6*6 is the size of the bathhouse itself, and the terrace is another two meters. In total, in terms of plan, the entire building will occupy 6*8 meters. The approach is more standard: the largest area is in the rest room. The steam room and the washing room are almost equal in size.
Project of a foam concrete bathhouse with a terrace and a large relaxation room
The stove is positioned so that it is heated from the rest room. The decision is ambiguous. As far as heating is concerned, everything is fine: the rest room will also be warm. But if you need to add firewood, and there are no people outside the steam room in the bathhouse, you will have to go through the shower and go to the rest room. Nothing terrible, but not everyone will like this option. Although installing a stove with a remote firebox is the most popular option recently.
Area of premises in a 6 by 6 bath:
- recreation room 16.2 m2;
- sink 5.5 m2;
- steam room 5.2 m2;
- hall 3.2 m2;
- terrace 12.3 m2
Drawing of a gas silicate bath
Beautiful examples
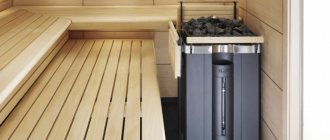
Neat interior decoration of a steam room with a small area. The walls, floor and shelves are made of wooden lining. The height of the ceiling in a block bathhouse is sufficient to make three tiers of shelves. Thus, it can accommodate up to 6 adults sitting down.
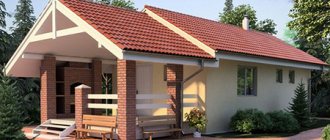
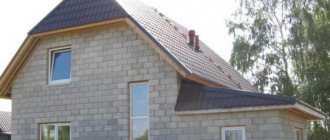
An example of a spacious block bathhouse with a small terrace and PVC siding. It has a gable roof, a low strip foundation, also hidden by plastic that imitates masonry, of a darker color than the main building.
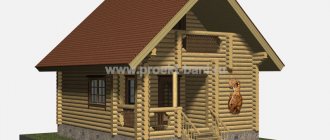
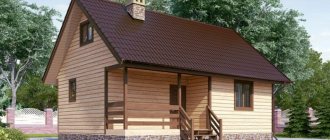
The original design of the external cladding makes us believe that this is a wooden bathhouse. However, this is our familiar block construction. The walls are covered with boards that are impregnated with antiseptic. There is a small terrace for evening or daytime gatherings in nature.
A bold combination of interior decoration for a steam room in a block bathhouse. The walls, floor, shelves and ceiling are made of lining. The oven is designed as a cave in the rock. Three-tier shelves. Moreover, the first of them is located practically on the floor, and not 10-15 cm above the stove, as recommended by professionals.
In this photo, the brickwork looks very nice as the external cladding of the bathhouse. The building itself is very spacious. It can easily accommodate a large steam room, a guest room, a washing room, and you can also install a separate internal bathroom.
Another brick cladding, but the bathhouse is smaller. The roof will have a guest bedroom - an attic floor. The foundation is strip. Aerated concrete blocks were used for construction.
A beautiful and delicate bathhouse decorated with ceramic tiles. Has a small outdoor terrace. The details are painted in the dominant color. There are two windows. The small one goes into the washing room, the big one into the guest room.
When choosing this or that project for building your own bathhouse from blocks, you should focus not only on your taste and your wishes. The ultimate success of an enterprise depends on many constituent factors that we sometimes don’t even look at. Starting from the location of the bathhouse on the site, continuing with the process of laying the foundation and deciding on the issue of internal and external design.
In this video you will find an overview of a small bathhouse made of blocks in the country.
Features of construction from gas silicate
Pouring the foundation and erecting walls during the construction of a bathhouse is no different from similar processes during the construction of a house. The foundation for bathhouses is often made of strip foundations, the depth is below freezing of the soil. The width of the tape depends on the size of the block that will be used during construction.
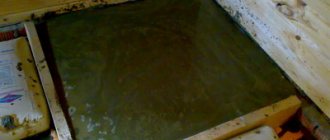
Adhesive for gas silicate - cellular betor. Diluted with water. Dosage and order are indicated on the package
Particular attention must be paid to horizontal waterproofing. Previously, and even today, roofing felt was most often laid in two layers. But roofing felt is bituminous mastic applied to a layer of construction cardboard. At one time it was good material, and there was simply no alternative to it. But it has one very significant drawback: it does not have the longest service life (35 years depending on conditions). Today there are similar rolled materials made using practically the same technology, but based on fiberglass (more durable) or fiberglass. It is better to use them - they are more elastic and do not lose their properties for a long time.
Place the gas silicate on a special glue, which is diluted with water to a semi-liquid state. Only the bottom row is laid on cement-sand mortar. All the rest - on a thin layer of glue (no more than 5 mm, and better - 1 mm). Every 3-4 rows it is recommended to lay two reinforcement bars (ribbed with a diameter of 12-14 mm). The grooves are cut out for them using a circular saw, an angle grinder or a hand-held wall cutter, which is made specifically for foam concrete.
Pay attention to how the reinforcement is laid at the junction of the walls - it is bent and a whole frame is laid
The adhesive composition is applied using a carriage or a special trowel - a scoop with teeth. Clean the block from dust and dirt, apply glue to the end where it will be joined to the next block, and carefully place it. Correct the position with a rubber mallet.
The masonry is carried out similarly to brick - with ligation - covering the seam of the bottom row with the body of the block in the next row. To ensure that the rows of masonry are even, use a building level and pull the cord - the mooring. The verticality of walls and corners is controlled by a plumb line.
When laying blocks, the seams are made very thin - no more than 5 mm. This allows you to save money on glue, but also increases the thermal insulation characteristics of the wall. The glue conducts heat well, so the smaller the cold bridges, the better. The layer is applied using a special trowel or carriage. If necessary, you can level it with a large notched trowel, which is usually used by tilers.
Apply glue to the back of the laid block and to the side of the one standing next to it.
For more information about tools for working with foam blocks, read the article “How to choose trowels and other tools”
Since gas silicate material is soft, they cannot bear any serious loads. Therefore, when installing the floor, the logs rest on the foundation. It is specially made wider than the blocks, and the edge of the wall is aligned with the edge of the tape. In some cases, the blocks are moved 10 centimeters outward. It turns out that the wall seems to hang over the foundation. This simple technique increases the internal dimensions of the premises. And the resulting depression is then covered with insulation (expanded polystyrene boards) and waterproofing. Read about foundation waterproofing here.
The situation with the roof is standard: a thick wooden beam - a mauerlat - is laid on the top row, and the entire system is already attached to it. There is a second option: filling the armored belt. Then formwork is installed or special U-shaped blocks are used, into which four interconnected reinforcement bars are placed (longitudinal thickness 10-12 mm, transverse thickness 6-8 mm).
According to the thickness of the wall. Recommended - 25-35 cm, depending on the region. In terms of density, gas silicates of two grades D400 and D500 are most often used. The first has a lower density, the second has a higher density, and accordingly the D500 is more durable. But in terms of thermal insulation characteristics, D400 is better - walls built using it are warmer.
Table of characteristics of gas silicate of different densities
Generalized instructions for constructing a bathhouse from foam blocks
Step 1. First of all, you need to create a bathhouse project, describing in detail all the dimensions and parameters of the structure. You should also select a suitable site on the site where the bathhouse will be built. Thus, the site, according to SNiP 30-02-97 , must be located at a distance of 1 m from the fence, 8 m from the neighbors’ house and at least 5 m from the border of the site. Also, the bath area itself must be dry.
First, a bathhouse design is drawn up
Step 2. Next, you can decide on the type of foundation and start building it. Foam concrete is lightweight, which means you can make a simple foundation (for example, a strip foundation).
Foundation arrangement
Step 3. After creation, the foundation must be covered with waterproofing, after which you can begin laying the first rows of blocks.
Laying the first rows of blocks
Step 4. The blocks need to be placed on top of each other in a checkerboard pattern, that is, so that the joints between adjacent blocks in one row do not coincide with the joints of blocks in the row below. It is recommended to fasten the blocks with special glue rather than standard cement mortar. It is important to ensure that the masonry is level and even, and do not forget about the presence of doors and windows. Every three rows the walls should be reinforced.
To fix the blocks it is better to use special glue
Step 5. When the frame of the bathhouse is ready, you can begin installing the roof. In this case, a simple gable roof is being built. The rafters rest on tie rods installed and secured to the load-bearing walls.
In this case, a simple gable roof is being erected
Step 6. The roof can be covered with metal tiles or corrugated sheets. The main thing is to install materials according to the rules.
Now you can start laying the roofing material
The roof is covered with corrugated sheets
Step 7. After this, you can move on to the interior decoration of the bathhouse - creating a floor, covering walls, etc. It is important not to forget to carry out waterproofing work!
Interior arrangement of the bathhouse
Ventilation
When building baths from any material, the main task is to ensure good drying of all rooms after the bath. Then there will be no problems with fungi and mold.
When building a bathhouse from gas silicate blocks with your own hands, do not forget to leave ventilation holes at the top and bottom of the wall in each room. They can probably be cut out later, but why complicate your life. To prevent suction from them while vaping, they are closed with doors. And they don’t go into the room - they end up under the insulation. Their task is to remove all steam from under the casing after visiting the steam room.
One of the options for external insulation of walls made of foam blocks with subsequent finishing
Characteristic
Gas silicate block
Manufacturing proceeds as follows:
- Using special equipment, aluminum-based powder and Portland cement are combined.
- Next add water, ordinary cement and quartz sand.
The resulting samples have the following advantages:
Advantages
- Low cost. The absence of expensive components and additional processing processes that require brick and wood makes the cost of this material minimal.
- High thermal insulation. For a bathhouse, this is a very significant indicator, which also allows you to save on insulation for the bathhouse.
- Little weight. This indicator allows one person to carry out all the work.
One product can be easily lifted with one pair of hands
- Big sizes. Thanks to this, construction work goes much faster.
- Ease of processing. Any cutting can be easily done with your own hands using an accessible tool.
Cutting with a regular saw
- Fire safety. Complete non-flammability means there is no risk of fire from accidental exposure to open flame.
Flaw
It would be fair to note the disadvantage of gas silicate - extensive moisture absorption. Taking into account the fact that the bathhouse provides high humidity in the steam rooms, part of the savings must be spent on high-quality waterproofing.
Insulation
The outside of a bathhouse made of gas silicate blocks is insulated depending on the region. In central Russia, 10 cm of basalt wool is enough. In more northern regions, more is needed, in southern regions less. The use of mineral wool is associated with certain difficulties: it is afraid of moisture and loses its properties when wet. And if it freezes wet, it will simply crumble. But that's not all. Since the foam block is quite hygroscopic, it also needs to be protected from moisture. Therefore, before laying the insulation, it is treated with impregnation such as Penetron or Kalmatron. After drying, you can begin thermal insulation.
Based on all this, it makes sense to spend money on the purchase of extruded polystyrene. It itself does not absorb water or conduct it, has low thermal conductivity, and is not damaged by rodents and insects. This one material, laid without cracks, will be both hydro- and thermal insulation.
The sheathing is stuffed on top of the insulation, and then the sheathing is added to it. You can attach a painting mesh to polystyrene foam and plaster over it - if this type of finishing appeals to you more.
Options for finishing and insulating foam concrete walls
The inside of the steam room will be insulated as follows (from the wall to the steam room):
- cement-based impregnation that reduces hygroscopicity;
- block 50*40 m;
- there is a heat insulator between them;
- steam and hydrobarrier - usually foil film (you glue the joints and fasteners with special tape - buy it in the same place where you buy the film);
- counter-lattice at least 2.5 cm thick;
- lining.
In other rooms, including the washing room, insulation may not be installed. If you also cover the washing area with clapboard, then a vapor barrier film should remain. It may no longer be foil-coated (this is mainly only for steam rooms), but both it and the impregnation should be there. In the remaining, “dry” rooms, the impregnation remains (the humidity is still high), the lathing, and the lining is stuffed to it.
The walls are covered with sheathing - preparation for laying insulation
The ceiling insulation in the steam room is standard (from bottom to top, when viewed from the steam room):
- lining;
- vapor barrier film (foil);
- rough ceiling;
- insulation from the attic.
Moreover, a ventilation gap is required between the lining and the vapor barrier. It is organized using a counter-lattice. Read more about insulating the ceiling of a steam room in the article “How to insulate the ceiling in a bathhouse with your own hands”
Advantages of aerated concrete
This material is a type of cellular concrete, which is widely used for the construction of external and internal walls of residential and commercial premises.
It is advantageous to use it for the construction of baths and saunas, since structures made from this material are practically in no way inferior to wooden ones, but are less expensive. Aerated concrete has very good construction properties, which have found excellent application in the construction of saunas and baths.
- Aerated concrete buildings are erected very quickly.
- The design of a bathhouse made of this material has the same properties as traditional structures. This is possible due to the low thermal conductivity and high heat transfer of the material.
- Thanks to the light weight of the blocks, you can carry out independent construction of any level of complexity.
- The cost of construction using foam concrete is significantly lower than similar projects made from wood.
Reference: aerated concrete is a special composite material, which includes a mixture of quartz sand, a gas-forming agent and cement. Sometimes it is practiced to add alabaster, lime and aluminum powder to its composition.
Finishing in the steam room and washing room
No matter how hard you try to do a vapor barrier, water will still seep under all the layers and settle in the wall. To minimize its amount, it is better to tiled the walls in the washing room. If you are afraid that it will be cold, make a warm floor (you can also use the walls).
In the steam room, also lay the floor and part of the wall - to a height of 10 cm or higher - with tiles. And then there’s the whole “pie” in full.
If you take into account all these nuances when building a gas silicate bathhouse with your own hands, it will delight you for many years.
Procedure for cooperation
You choose a project
Choose our solution from the catalog. It can be adapted to suit your task. You can order an individual project.
We determine the cost of the project
Based on the drawn up technical specifications, the company’s specialists make a preliminary calculation. After this, the client receives the price of building the house.
We go to the construction site
Our engineer examines the territory, analyzes the actual situation and takes the necessary measurements, which allows us to avoid any inaccuracies in the future.
Drawing up estimates and other documents
Including a contract, payment schedule and other necessary components.
Final approval of all details
The client approves all documents and signs the contract. After this, specialists go to the construction site and begin work.
Roof
The roof has one peculiarity: the roofing material must be light. It could be:
- soft roofing - made of rolled materials or soft bitumen tiles;
- corrugated sheeting;
- metal tiles;
- wooden roof.
The entire system is attached to the Mauerlat, and it is attached to the upper armored belt with long pins. When attaching the rafter system, everything is attached only to the beam. It is not worth attaching to the walls - there is no sense in it: gas silicate cannot withstand long-term point loads, it crumbles and cracks. That’s why an armored belt is needed.