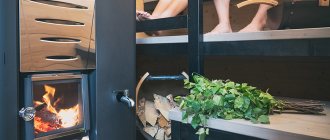
Often a metal stove is installed to heat steam rooms and other bath rooms. The design is compact, but quickly warms up the rooms. Not every owner can buy a good factory unit, so many owners with minimal skills in working with an angle grinder and a welding machine have learned to assemble such a stove themselves.
A furnace made from a large-diameter pipe is characterized by good reliability and a long service life. We’ll look at how to make it at home in our article.
Types of tube furnaces
According to the design and shape of the firebox, they can be horizontal or vertical. We will describe the differences, advantages, and application of each type in more detail.
Horizontal
This is an oblong-shaped sauna stove with a recessed firebox that runs horizontally, which allows you to immediately load a large volume of firewood and quickly warm up the steam room. And provided that part of the firebox is removed to the dressing room, this room will also be removed. It is convenient to use in conjunction with a hanging water tank. A larger firebox length heats a larger number of stones at the same time, due to which the convection of warm air in the steam room improves.
A horizontal stove is perfect for spacious baths. For ease of cleaning, kindling, and loading fuel, it is recommended to move the firebox to the dressing room.
The finished structure has a complex assembly process, but is durable and has high heat transfer rates.
The main advantage of the horizontal type is uniform heating of all corners of the room, which a vertical stove cannot boast of.
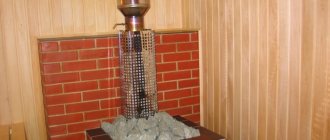
Vertical
This type is an economical option for a small bathhouse. It looks very similar to a standard potbelly stove. Such a stove is installed not only in the bathhouse, but also in the garage and summer kitchen. It doesn't take up much space. Firewood is loaded vertically. The entire structure of the stove is located in the steam room, which causes inconvenience when lighting and cleaning the ash pan.
The diameter of the vertical furnace is equal to the diameter of the pipe used for its manufacture. Immediately under the heater there are grate bars, on top of the heater there is a platform for laying stones, it is possible to attach a tank for heating water. This kind of homemade product is much easier to make than a horizontal one, and it will take less time.
The disadvantage of the vertical type is that the walls of the room are well heated, but the floor and air at the top of the steam room are poorly heated.
But this drawback does not apply to the original “rocket stove”. The design has nothing in common with a combat missile other than appearance. It is characterized by high efficiency, economical consumption of firewood and good heat dissipation. Available with open and closed firebox. For a bathhouse, the second option is preferable.
In the “rocket”, firewood is loaded into the horizontal compartment and set on fire in the vertical section. It is only suitable for a small seasonal bathhouse.
Energy
Basically, in practice, a wood-burning sauna stove is widely used. It is well-dried firewood that helps create a healthy atmosphere in the steam room, for which such a structure is being built.
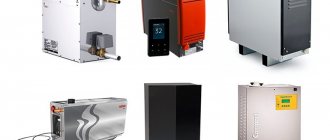
There are other different models. For example, quite often preference is given to an electric sauna stove or its gas analogue.
For some craftsmen, it is more convenient to make a stove that operates using liquid fuel (diesel). In this case, the combustion part that supplies diesel fuel is moved outside the bathhouse to the street.
However, wood-burning sauna stoves are rightfully considered the most popular and convenient.
What metal is suitable
When selecting and inspecting metal pipes for a future furnace, it is important to pay attention to the following details:
- strength of the metal workpiece;
- pipe thickness;
- no defects or severe metal corrosion.
To eliminate defects, you need to weld patches of a suitable size in problem areas with a small margin.
As for the composition of the metal, it is not recommended to use alloy steel or steel with a high carbon content. The permissible carbon content in steel should not exceed 2%.
You can determine whether a metal is high-carbon or not by the appearance of sparks when grinding with sandpaper or an attachment on a grinder or drill. A high carbon content is indicated by white sparks like stars that pour in different directions. Low carbon content is indicated by yellow sparks that fall in a straight line. Alloy steel produces orange, bright red sparks.
The stove can be made either from a round pipe for a bath or from sheet metal. If in the first case the shape will be close to cylindrical, then in the second the furnace unit will be rectangular.
By choosing a round pipe as a blank, bathhouse owners receive a number of advantages:
- The pipe is easier to work with. Essentially, you have a ready-made firebox at your disposal that does not need to be cut.
- Economical material consumption allows you to reduce money expenses.
- In a round oven, the process of heat and air exchange is many times more efficient.
- The service life of a round stove is longer than a rectangular one made of sheet metal.
In addition to selecting the material, it is important to develop a drawing, a diagram of the future product, indicate the location and method of fastening all structural elements. This will simplify the assembly process of the unit.
Choosing a water tank
To make the tank, you can use stainless steel or heavy-duty cast iron. We would advise you to give preference to the first option, since cast iron is more expensive and the water takes longer to heat up.
Note!
Insulate the foundation with your own hands - a step-by-step description of the use of the best materials and technologies (90 photos)
- Do-it-yourself pergola on a summer cottage: step-by-step instructions with photos and descriptions
Laying laminate flooring with your own hands: a detailed description of how to lay laminate flooring. Laminate calculation, step-by-step description and installation secrets (105 photos and videos)
Stainless steel is superior in price in this regard, and the water also heats up quickly. The only drawback is the service life; a cast iron tank in this case will last much longer.
Suitable pipe sizes
Steel pipe as the main raw material for the furnace has a number of advantages. Among them:
- resistance to damage;
- good level of heat transfer;
- rapid heating of the room;
- minimal expansion when heated;
- use of any type of fuel;
- minimum number of welds.
The disadvantages of a metal stove are the same rapid cooling of the room as heating, uneven distribution of heat in the room. To eliminate them, the stove is often lined with bricks.
530 mm
For a steam room of standard sizes, a pipe measuring 530 millimeters is good. A stove made from it will be quite powerful; the wood will burn for a long time, providing good performance. Available in horizontal and vertical versions.
640 mm
A good material option for a large steam room in a bath complex. The large firebox allows you to place a lot of firewood at once, increasing the break between loads to 8 hours.
426 mm
This diameter is enough for a small steam room in a seasonal building, where bathing procedures are combined with washing or dousing with cold water in one room.
It is important to note that cast pipes without seams are an excellent option for small furnace parts; their diameter does not exceed 250 mm. To make the main part of the furnace, it is better to take pieces of spiral pipes - they are reliable and will cost the same as scrap metal. If you can’t find these, you should take straight-seam ones.
Facing a sauna stove: How to choose a facing material? Instructions +Video reviews
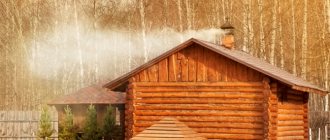
The bathhouse is an integral part of the Russian tradition of healing the body and spirit, an unchangeable building on a country site that many people want to own.
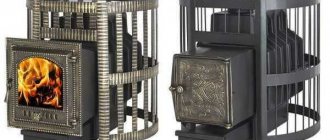
The issue of decorating the main structural element is discussed at the design stage. The lining of a sauna stove plays not only an aesthetic role, but also a protective one. Often, bathhouse owners don’t bother and use simple plaster, which cracks over time, and the cracks are covered up from time to time. The modern market is pleased with the abundance of various materials for lining a bathhouse stove, which are endowed with excellent performance characteristics. The most popular among them are: metal, wood, brick, tile, stone.
Choosing the optimal oven size
The first step is to calculate the volume of the heated room. Therefore, we measure the width, length, height of the steam room and multiply between each other. The result must be divided by two. The resulting figure is the approximate number of kilowatts that will be required to heat the room. But you need to take into account that there will still be stones on top that will have to be heated, and water to wash yourself. That is, we multiply the number of kilowatts by another 3. The resulting figure is suitable for an insulated steam room in which the shower is located separately. For an uninsulated bathhouse, this value is multiplied by another 1.5.
To understand how much furnace volume is needed, the final power is divided by 0.5 – 0.6. The result is obtained in liters. To calculate the linear dimensions, the volume of the firebox is raised to the cube root.
In the dimensions of the sauna stove, it is important to adhere to the following proportions:
- The volume of the firebox to the cross-section of the chimney pipe should be in a ratio of 1 to 10.
- The dimensions of the firebox to the area of the room are 1:50, 1:70.
- The depth of the firebox to the overall dimensions of the furnace is 1:2, 2:3.
The most popular oven sizes are:
- The size of the combustion part is 55*55 cm. The height of the furnace is 90–143 cm. The average power is 16 kW. Can accommodate from 60 to 150 kg of lying stones. Enough to heat a room up to 22 cubic meters. m in volume.
- The dimensions of the firebox are 63*63 cm. The height of the stove is from 98 to 158 cm. It will be possible to load stones of 70–170 kg. To heat a steam room in an hour, a volume of 35 cubic meters is enough. m. Average power 28 kW.
- The large firebox 73*73 cm has a capacity of up to 250 kg of stones. As a rule, when fully loaded, such a stove will provide enough heat for at least 6 hours in a room with a volume of up to 50 cubic meters. m.
If difficulties arise in determining the dimensions of the stove, then it is better to consult an experienced stove maker or find designs for stoves made from pipes of suitable sizes on the Internet.
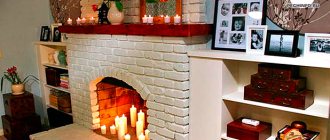
Benefits of brick
This solution can be seen in almost any bathhouse. The brick finish protects the wall from overheating. Very often this protection is made even more powerful and extended to the floor. Finishing the stove in a bathhouse with brick performs both a protective and decorative function. For it, the same type of brick is taken as for the rest of the stove, or another facing brick of the required appearance is additionally purchased.
The rules for brickwork for walls, the stove and the protective portal around the stove are general.
Strict adherence to row levels and neat and thin seams are necessary.
On the walls and in the oven, bricks are laid with overlapping seams. If the portal is laid out in one layer, then it is not at all necessary to comply with this requirement. This is why you can often see protective portals where bricks are stacked on top of each other.
The horizontal row is checked by level. Covering the wall with bricks is plumb. For a corner stove, three planes are laid out with bricks, two on the walls and one on the floor.
For a stove near the wall, there are only two, of which one is located on the floor, and the second is on one wall. Brick, even if it is laid in one layer, has good thermal insulation ability. Its masonry is carried out directly on wooden walls and floors without other fire-retardant insulation.
It is advisable to lay out the horizontal part of the portal in one row between the foundation of the furnace and the subsequent masonry next to it. This advice should only be followed with brick sauna stoves. It is not suitable for metal ones.
In baths, thick fireproof cardboard, mineralite or basalt wool are most often used. There are also basalt cardboard and other materials that are a variation of the previous ones. Minerite is the most preferred. These are ready-made boards specially designed for thermal protection in areas around stoves.
Schemes and drawings of homemade stoves
A correctly drawn up drawing reduces installation time and minimizes errors. On paper it is important to depict not just the detailed design of the stove from different angles, but also the method of fastening the parts and the dimensions of each element.
The photo above is a clear example of a horizontal stove. The diagram of the firebox with a remote water tank is shown separately. A foundation is provided for the finished product. You need to make a distance of 20 cm from the wall.
Here the operation of a horizontal furnace, the flow of fire and flue gases is schematically shown. The water tank is connected and fixed to the top of the wall.
Here is a drawing of a pipe stove from different angles with the chimney pipe exposed. In the part of the ceiling, the wall where the chimney will go out onto the street, you need to make a thickening of 12 cm. The protrusion of the pipe above the roof is at least 50 cm.
Here is a stove with horizontal fuel loading. Total height - 800 mm, length - 900 mm, width - 600 mm. For a stable position, metal legs are welded at the bottom. The stones are placed on top of the grate. It is permissible to connect a heat exchanger to such a design.
Here is a schematic principle of operation of a vertical stove made of a metal pipe with an attached oil (exhaust) tank. Quite a complex option to make at home. You shouldn't start assembling it without experience.
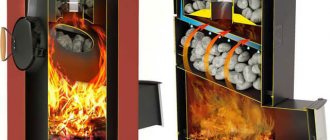
Option for a sauna boiler with horizontal loading of firewood. The arrows show the direction of movement of hot gases. To increase heat transfer, craftsmen recommend covering the unit with brick. In this case, the heating of the room will be more uniform.
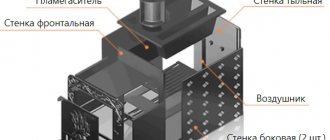
Tube stove made of thick steel. The diagram shows the general dimensions of the device, the key elements and the principle of their connection are shown separately.
Tiles for cladding
An ancient method of tiling is laying tiles. This finishing of the sauna stove portal and its surfaces gives the structure an unusual and rather original appearance. As a result of tile cladding, the stove in the room becomes a separate element of the interior.
Only a master can perform this reliable and durable finish. As a result, the stove structure has a higher degree of heat transfer compared to the use of other finishing materials.
Among the listed options for protective structures, there are no better ones. Everyone chooses an option depending on the size of their wallet. It would be a good idea to stop at finishing the surface with tiles, after preliminary thermal insulation. But in most cases, users prefer metal screens.
When arranging a bathhouse in a private house, the last option is considered the fastest and most economical. If you follow the technology when performing protective masonry, even the most budget-friendly method will be effective.
Do-it-yourself pipe stove: step-by-step instructions
Below we will analyze step by step how to make a stove yourself at home, how to weld its individual parts together, how to install and finish it.
Required materials and tools
During the work you will need the following set:
- For the firebox, water tank - a piece of pipe 500-550 mm in diameter, 8-15 mm thick, 1.5 m long.
- For a heater - a piece of pipe up to 8 mm thick, with a diameter of 310-340 mm.
- For the chimney - a piece of pipe 2-5 mm thick, with a diameter of 150 mm.
- A piece of sheet steel up to 12 mm thick.
- Factory grate or reinforcement bars to weld yourself.
- Doors for firebox, ash pan, hinges.
- Arc welding machine with electrodes or semi-automatic.
- Grinder with metal wheels and grinding attachments.
- Electric drill, other plumbing tools.
After preparing the tools, you can begin the main part of the work.
Assembly and welding
Vertical and horizontal furnaces have differences when connecting parts. Therefore, we will analyze the creation of each type separately.
Vertical ovens
For a small stove, pieces of pipe 1.5 m long are enough.
The procedure is as follows:
- We are laying out the foundation for the furnace. It must be larger than the size of the stove on each side by at least 20-30 cm. Reinforcement with reinforcement is required. The recommended height of the foundation above the floor is 20 cm (more is possible). We lay bricks on top.
- We take a piece of pipe 1 m long. At the bottom, carefully cut out a hole 50*200 mm with a grinder. The bottom should be completely flat. This part will serve as a ash pit.
- Now we need to strengthen the bottom of the firebox, which will be above the ash door. We cut a circle from a sheet of metal with a thickness of at least 12 mm. There will be a grate in the center.
- We make an indent of 50 mm from the bottom of the oven. We cut the opening for the firebox. The average door dimensions are 250*300 mm. It’s easier to buy a ready-made one and weld the hinges.
- We weld a rectangular piece of metal at the corners on top of the firebox. You will get a kind of cut-off device. The hot air that will pass between the walls of the pipe and the cut-off valve better warms up the walls of the stove.
- We place a heater on top of the firebox. The bottom will be a lattice of rods. The thickness of the rods is from 12 to 16 mm. We make an indent of up to 1 m and weld the heater to the firebox. The door for it can also be bought ready-made.
- We cover the top of the heater with an iron water tank. It can be welded from a piece of metal that is left over. A length of 1.5 m is enough. We leave a hole for the pipe, make a lid, and attach the tap.
Experts recommend not to take up a welding machine or grinder without having the skills to work with them.
Using tiles
The tiles on the stove in the bathhouse are afraid of thermal expansion, therefore, when performing work, it is important to carefully follow the technological process. The lining of the stove in the bathhouse does not tolerate negligence.
Typically, 7 types of tiles are used for cladding:
- Terracotta is a tile that has not been glazed. It consists of terracotta clay and fireclay, which are mixed in a certain ratio. Such tiles have been known for several centuries. A correctly implemented technological process greatly influences the final quality of the material. This tile can be easily recognized by its characteristic red tint.
- Clinker tiles - clay is the main raw material. The material is obtained by pressing, then it is fired at a temperature of +1200 0 C. The crystal lattice of the clay changes and the tile acquires the properties of ceramics.
- Majolica is very difficult to produce. Previously, only manual labor was used for drawing. Now there are industrial designs. The glaze on the tile is obtained by firing. Properties resemble terracotta tiles.
- Tiles are the most preferred option due to the air gap between the tiles and the oven wall. This layer works as an additional heat insulator, allowing the stove to retain heat near itself even longer.
- Porcelain tiles can also be used for lining a stove. Marble chips added during the production of porcelain stoneware give the material unique decorative properties and high strength. Due to this, porcelain tiles are rapidly gaining popularity.
- Fireclay is able to withstand direct exposure to fire. Fireclay is pressed into blanks and fired at a temperature of +1300 0 C.
- Tile - only a material with a high heat resistance coefficient can withstand temperature loads.
Instructions
Do-it-yourself tiling of a sauna stove is done as follows:
- It is necessary to properly prepare the surface. All traces of old finishes must be removed from the wall. Each seam should be selected at 10-15 mm.
- We dilute a deep penetration primer and add marble chips to it. Carefully prime the surface. Do not forget that the primer must dry (at least 24 hours).
- We stretch and fix the metal mesh using dowels. Such reinforcement will significantly increase the strength of the structure.
- The tiles should not be laid on an uneven surface. We level the wall with plaster. We recommend using stove mortar that is specifically designed for plastering stoves. The plaster must be allowed to dry for 48 hours.
- Apply the facing adhesive evenly to the entire surface of the tile. Carefully cover the surface of the stove and press lightly. The tiles can be leveled in about 10 minutes. Then the glue will set. We check the correctness of the masonry using a level. The glue layer should not exceed 1 cm. To make the seams even, we use special crosses. The thickness of the seam is 2-3 mm.
- When the glue dries, we grout the joints.