Nothing can withstand time. Even traditional Russian baths. No, they have not gone away - they just began to use much cheaper materials, but with similar performance characteristics. Surely you have already heard positive reviews from the owners of bathhouses made of foam blocks more than once: people build them themselves and note their amazing practicality and savings in the invested material resources. True, in order to get a result that is truly pleasing to the eye and heart, it is necessary to take into account all the details of the layout and draw up a high-quality project. We save your time and present in this material the best projects for building a bathhouse from foam blocks with your own hands.
Foam blocks: features and characteristics
Traditionally, a bathhouse is built from wood materials, such as timber, logs, etc. They are good for everyone, except perhaps the need for constant maintenance, since the wood begins to rot quite quickly under the influence of dampness. Without some care, a wooden bathhouse will very quickly lose its original appearance.
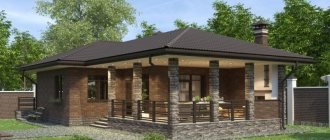
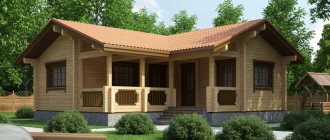
Foam block bath projects
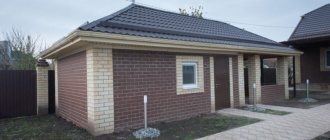
But recently, bathhouses are often built from foam blocks. This material is an excellent alternative to traditional wood, as it has a lot of advantages and in some cases even surpasses wood in its characteristics. A foam block is a block of a certain size made from foam concrete or cellular concrete . It has not been a novelty on the construction market for a long time, but previously it was used much less frequently than now, due to the fact that its main disadvantage - hygroscopicity due to high porosity - has been overcome.
Foam block
However, the presence of porosity is the main feature of such materials. Thanks to it, foam blocks have an excellent level of thermal insulation, are able to perfectly retain heat in any structure, and are not too heavy materials. The pores inside the block can have different sizes and are located randomly throughout its entire interior.
Important! Due to the presence of pores, blocks absorb water very strongly. In the summer this is not scary, but in the winter the water, freezing, expands and can damage the blocks. That is why foam block buildings, and especially bathhouses, must be carefully insulated from water. Moreover, waterproofing work is carried out both inside and outside the building.
Foam concrete - production process
Types of foam blocks
Foam blocks, depending on the manufacturing technology, may have different properties and some differences in appearance. The table below provides a description of the main varieties of this material.
Foam blocks are different
Table. Types of foam blocks.
| View | Description |
| Aerated concrete | This version of foam blocks is made from cement with the addition of aluminum powder. During the chemical reaction that occurs due to the addition of powder, pores are formed in the mixture. The future block is placed in an autoclave, where great pressure is applied to it, and the concrete hardens. The sizes of such blocks may differ from each other, this is due to the peculiarities of their manufacture. But deviations from the standards (average block dimensions 30x25x60 cm, weight - 30 kg) are, as a rule, insignificant, which makes it possible to obtain a minimal seam when laying blocks. Also, this version of foam blocks is called gas block or autoclaved foam concrete. The material is quite often used for the construction of baths and other structures. It is lightweight, conducts heat well, does not burn, and is not afraid of frost. It is also a fairly economical material and easy to process - it can be cut with a hacksaw. |
| Silica concrete | This type of block has a white color due to the addition of lime to the composition from which it is made. It is necessary to bind the mixture. This version of foam blocks has the highest hygroscopicity. There are a lot of pores in the structure of each block - 50% of the total volume. Due to the presence of a large number of voids, the blocks are very light and can be used for construction on light foundations. This material has excellent heat and sound insulation properties, so a bathhouse made from it will keep warm for a long time. |
| Foam concrete | This version of the foam block is produced in almost the same way as conventional aerated concrete, but without the effects of temperature. Concrete hardens naturally, but a special foaming agent is added to the mixture from which the block is made, after which the finished mass is poured into molds, in which it hardens naturally. |
| Sand block | These are blocks made of cement, water and sand. This is the standard mixture for creating concrete. Such blocks are economical, resistant to external factors, and environmentally friendly. They also have voids, but the blocks almost do not absorb water. The main disadvantage of the material is its low thermal conductivity, so a bathhouse made from it will have to be additionally insulated. And their mass is large, so it is not recommended to lay them on a weak foundation. |
Structural and thermal insulation block
Note that each of these types of materials is suitable for building a bathhouse for any project. It’s just that some materials need to be well protected from moisture during the construction process.
Prices for gas blocks
Gas block
Foam block bath projects
A bathhouse is not just a place where you can steam, although the steam room is perhaps the most important room in it. The bathhouse is also used to keep the body clean and for relaxation, so it must also have other rooms. That is, in one bath there must be a steam room, a wash room, and also a room where you can undress. In addition, the bathhouse can be equipped with a relaxation room, a terrace, and, if opportunities permit, even a swimming pool.
Design of a bathhouse with a relaxation room inside
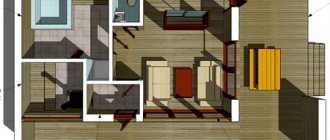
The most common version of the foam block bathhouse project has a steam room, a wash room, as well as a relaxation room, which in this version also acts as a locker room. It usually has quite large dimensions, since, in addition to hangers, it contains a table and chairs. The most budget-friendly option for a bathhouse is a 4x6 m structure. This design allows you to place a partition in the bathhouse, leaving most of the room for a dressing room and a relaxation room. The second half of the building is divided into two more parts by a second partition, and a steam room and a washing room are organized in the resulting rooms. However, the premises can be made to the size that will be more convenient and relevant - for example, make a large steam room.
Advice! Even when building a small bathhouse, it is still recommended to make a small dressing room at the entrance. This room will allow you to keep the room warm in winter.
Bathhouse project 4 by 5 meters
The stove for the sauna must be selected taking into account the size of the steam room. As for the doors, they need to be positioned so that they do not interfere with anyone and do not take up much space. It is also important to consider that the steam room and washing room should have small windows. The top edge should be level with the door lintel.
The bathhouse will be a little more spacious if you build a bathhouse according to the 6x6 project. In this case, one of the options for distributing space is as follows: 5.3 m2 is occupied by the steam room, 7 m2 by the washing room, 1.7 m2 by the locker room, and 11.2 m by the relaxation room. The bathroom occupies 1.8 m2. In the steam room you can place two shelves on which you can lie, and the stove is installed so that it can be heated from the rest room. It is important to understand that, if you wish, all projects can be remade to suit yourself.
Layout of a bathhouse made of 6 by 3 foam blocks (several projects)
You can also organize a bathhouse according to a 6x3 m project. Moreover, there are no fewer arrangement options here than in other cases.
When designing a bathhouse, it is important to understand that the steam room should be located in the farthest corner of the building , and not at the exit from the bathhouse. This is one of the most important rooms where the heat should be well maintained and maintained. But at the same time, the largest room should be the rest room, because no one will sit in the steam room for a long time. It’s nice to alternate steaming sessions with long sittings at the table in the relaxation room, so it’s best to make this room the most spacious. For the washing room, you can leave a small nook, but such that it is comfortable and not cramped to be in, and you can also install benches, place shelves for basins, etc.
Bathhouse project
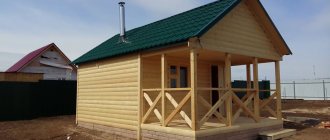
If the bathhouse has a terrace, then you can organize a barbecue area on it. Also in the summer you can relax on the installed chairs. If desired, you can make a second floor in the bathhouse.
Bathhouse project 6 by 6
In general, it is worth noting that all standard bathhouse designs are similar to each other. If you want to do something original, then you need to come up with a new project yourself or together with a specialist and bring it to life.
Video – Bathhouse project
Interior decoration
The bathhouse was built in a summer version, so insulation of the walls was not provided. Foil film with basalt fiber insulation is laid only in the ceiling part of the steam room.
Restroom
The interior decoration of the steam room was made of aspen, and the remaining surfaces, in order to save money, were sheathed with pine clapboard over timber sheathing.
She also made shelves and benches from aspen; this tree is less susceptible to rotting.
All wooden coverings were impregnated twice with a hydrophobic composition for baths and saunas.
The wall adjacent to the steam room was tiled to look like stone and covered with acrylic varnish. It turned out nice.
Instead of a door to the washing compartment, I hung a stylish curtain.
Entrance to the car wash
I used four old car tires as a well for draining water. The well was disguised with a flowerpot.
The façade was finished with textured bark beetle plaster and acrylic paint.
I made a concrete blind area around the bathhouse and laid out a path of tiles.
The base was decorated with waste artificial stone and treated with a hydrophobic compound. The area was landscaped with lawn grass.
Exterior facade decoration
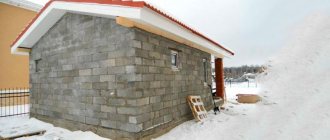
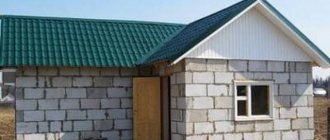
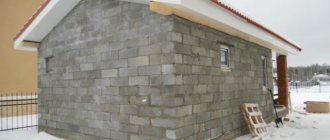
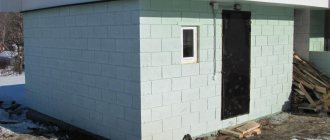
Construction of a bathhouse from foam blocks
After creating the project, you can calculate the required amount of materials and begin construction. It is important to take into account that the design of a bathhouse made of foam blocks for any of the projects is subject to certain requirements. So, as for external walls, it is better to take blocks with a thickness of about 25-30 cm for buildings in the central zone of the Russian Federation, and in the northern regions you need to take blocks with a thickness of 35 cm or more. Moreover, the lower the density of the blocks, the warmer the building will be, so this also needs to be taken into account. For partitions, you can take thinner blocks 15-20 cm thick, this will be enough.
Important! Walls made of foam blocks in every third row need to be reinforced. For this purpose, ribbed rods with a cross-section of 12 mm are used, which are laid in grooves. The groove must be located at least 3 cm from the edge of the block and have a depth of more than 12 mm.
DIY budget sauna
Insulation of the bathhouse is necessary if it needs to constantly maintain a positive temperature. Then the costs of maintaining the desired indicator will be lower. But if the bathhouse is used irregularly and periodically, then insulation can be neglected.
An important point is the hydro- and vapor barrier of the bath . Blocks can be prevented from being hygroscopic with special solutions that will help protect the material from moisture (the blocks will not absorb it). They just need to coat the walls. However, in the sink and steam room it is necessary to provide good protection from water. Vapor barrier in this case is done by laying a special film.
Bath building made of foam concrete
On a note! You can avoid impregnating the walls if you provide good ventilation in the bathhouse.
You can decorate the interior of the premises like this: cover the steam room with clapboard, make tiles in the sink. In the rest room, the walls can be decorated with wood. The main thing is not to forget about vapor barrier here too.
The roof is installed like this. First, a reinforced belt of reinforcement is made along the top row of wall blocks (with a cross-section of 8-14 mm for longitudinal reinforcement and 6-8 mm for transverse reinforcement) and filled with M200 concrete. The height of the belt should be about 20-30 cm. Then the roof is mounted on the finished armored belt.
Installation of a roof for a bathhouse
Prices for various types of timber
timber
Construction stages
Digging the trench and laying the foundation took 5 days (2 days - a technological break before laying). I protected the masonry from the penetration of moisture from the foundation with a layer of waterproofing (mine was made from roofing felt).
The top row of the foundation was leveled with curb stones. You can really handle the first stage on your own.
The foundation is ready
The next week I worked on laying walls and gables. And here you can’t do without an assistant. During the laying process, the ASG blocks were generously moistened with water, otherwise the masonry mixture would be instantly absorbed into the material.
Box with rafter system
I installed the lintels over the windows and doors from angle steel. Then he began to manufacture and install floor beams, rafter system and sheathing.
The entire tree was impregnated with a protective compound against bark beetle and rot.
The work on installing the stove, installing the chimney and laying Euro slate was completed by the end of the third week of construction.
Roof with chimney
Generalized instructions for constructing a bathhouse from foam blocks
Step 1. First of all, you need to create a bathhouse project, describing in detail all the dimensions and parameters of the structure. You should also select a suitable site on the site where the bathhouse will be built. Thus, the site, according to SNiP 30-02-97 , must be located at a distance of 1 m from the fence, 8 m from the neighbors’ house and at least 5 m from the border of the site. Also, the bath area itself must be dry.
First, a bathhouse design is drawn up
Step 2. Next, you can decide on the type of foundation and start building it. Foam concrete is lightweight, which means you can make a simple foundation (for example, a strip foundation).
Foundation arrangement
Step 3. After creation, the foundation must be covered with waterproofing, after which you can begin laying the first rows of blocks.
Laying the first rows of blocks
Step 4. The blocks need to be placed on top of each other in a checkerboard pattern, that is, so that the joints between adjacent blocks in one row do not coincide with the joints of blocks in the row below. It is recommended to fasten the blocks with special glue rather than standard cement mortar. It is important to ensure that the masonry is level and even, and do not forget about the presence of doors and windows. Every three rows the walls should be reinforced.
To fix the blocks it is better to use special glue
Step 5. When the frame of the bathhouse is ready, you can begin installing the roof. In this case, a simple gable roof is being built. The rafters rest on tie rods installed and secured to the load-bearing walls.
In this case, a simple gable roof is being erected
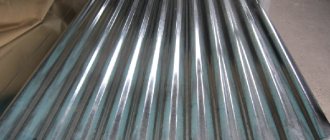
Step 6. The roof can be covered with metal tiles or corrugated sheets. The main thing is to install materials according to the rules.
Now you can start laying the roofing material
The roof is covered with corrugated sheets
Step 7. After this, you can move on to the interior decoration of the bathhouse - creating a floor, covering walls, etc. It is important not to forget to carry out waterproofing work!
Interior arrangement of the bathhouse
What happened in the end
Upon completion of construction, I can draw the following conclusions:
- ready-made country bath with an internal size of 3x4 meters;
- steam room with a volume of 6 cubic meters. meters can easily accommodate four people in the “warm up” mode, but it’s more comfortable to steam with two people;
- a spacious full-height attic allows you to dry brooms and store materials;
- bathhouse readiness time - 1.5-2 hours;
- the entire construction took 2 months;
- instead of wooden ladders in the washing compartment, I used a more practical mat made of PVC tiles;
- the wish came true, the budget was slightly exceeded.
I invite you to share your opinion about my project: What, in your opinion, could be done better? Which solutions did you like and which ones could you refuse?