The beneficial properties of a sauna for health and mood have been known to mankind for a long time. Today, visiting steam rooms is very popular among residents of our country; rarely do any events go without such gatherings. Many of us have probably thought that having our own sauna is a great idea. Planning a sauna in your home can be realized without any problems, and many examples confirm this.
3D project of a sauna with a veranda
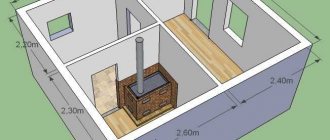
Sauna parameters
To design a typical sauna, I wanted to take a standard size. Without thinking twice, I went to the prices section on our website and calculated the average size based on the available projects. The average size was 2.45x2.17 meters. Here we take into account both saunas with wood-burning heaters and electric ones.
When drawing up a project at this stage, I am interested in the presence of openings and the thickness of the walls, as well as the height of the ceiling in the room. For a typical project, again, I will choose typical characteristics. Heater - electric (they are chosen a little more often), without a window (more often it is absent), the thickness of the wall with the doorway is 150 mm, the height of the sauna ceiling is 2.25 m (for this, the ceiling of the original room must be at least 2.35 m) .
We will assume that the partitions have not yet been erected and the doorway is being constructed in accordance with our technical specifications.
A special case is the layout of shelves in the maximum number and maximum width. Only by planning the sauna with shelves and a heater can you determine the optimal location of the door.
Because We took the “dirty” size of the room; it is necessary to take into account the thickness of the sauna frame. As a rule, these are 50 mm battens, 30 mm counter battens and 15 mm lining. The resulting cake is 95 mm thick.
Now we have data with the “net” dimensions of the sauna, so we can at the same time determine the volume of the room for selecting a heater.
Why is the project needed?
There are many people in the world who will convince you that a project is not necessary to build such a structure: a sauna is not difficult for smart builders.
Of course, the desire to minimize your costs and raise the quality and durability of the sauna to the highest level is absolutely natural. Especially if you are building the structure with your own hands.
But it’s worth thinking about the question: where, if not at the design stage, can you create several possible options for an object? The design process will allow you to choose the most optimal one in terms of costs and characteristics for implementation.
An unusual sauna is a source of pride
Sauna design includes:
- determination of maximum volumes of construction materials;
- calculation of all additional work;
- compliance with the rules referred to as sauna design standards.
The location of the heater and the configuration of the shelves
We will choose a place for the heater closer to the corner so that it does not interfere with the passage. For easy access to the shelves, it is better to place the electric heater on the opposite side of them. Because The wide wall will have an opening; we will place the heater on the short wall. Based on the size of the heater and its safe distances, you can calculate the width of the upper and lower shelves. In this sauna, along the left wall there is an upper shelf with a width of 590 mm and a lower one - 365. Along the far wall - 690 and 465, respectively. The free space allows you to make any of the shelves even wider, but I will leave these dimensions because... the result is a universal configuration of 7, 6, 5 and 4 strips. It will be comfortable for visitors with different body types and different temperature preferences. It will also be possible to steam while sitting or lying down.
The width of the shelves is calculated by the width of the strip plus 10 mm. The standard plank for sauna shelves is 90 mm. The ten-millimeter gaps are one less than the slats, hence the size. The lower shelves have the same width, with the difference that the outermost strip extends 25 mm inside under the lining.
Arrangement of bath floors
The construction of the steam room must begin with upgrading the floor. When purchasing materials for finishing, it makes no sense to overpay for their thermal insulation properties, because this will not affect the performance characteristics.
insulation of floors in a sauna
In a sauna you can find not only wooden floors.
Granite or other artificial materials are often used for finishing. Often, in order to save money, the floor in the sauna is finished with ceramic tiles with a rough surface to prevent slipping. Another option for sauna flooring is Thermowood. It withstands high temperatures and also has an “anti-slip” surface. A wooden floor requires a backing for the joists. It is best to use well-treated boards, about forty millimeters thick. They are fastened with self-tapping screws, hiding the caps flush, and covering these places with plugs.
Selecting a heater for a sauna
Harvia Moderna was chosen as the heater. This compact model hangs on the wall, has a remote control panel included and quickly warms up the sauna. Small safe distances allow it to be mounted directly on a wooden surface and next to any wooden structure. We will also provide a fence for the heater for additional safety.
When selecting the power of the heater, it is necessary to take into account not only the volume of the sheathed room, but also any stone, glass and non-insulated surfaces. In our case, we have a 7x19 dm door with a glass panel. According to the instructions for the heater, the glass area must be added by a factor of 1.2 to the existing volume. In our case, it is necessary to add 1.5 m3 to 10.1. Thus, the calculated volume of the sauna was 11.6 m3. This volume corresponds to a power of 8 kW. In practice, with reliable thermal insulation and correct ventilation, 6 kW may be sufficient. But such a solution is preferable if it is not possible to allocate more kilowatts. To save energy and quickly heat up, it is recommended to install an 8 kW model. The thermostat will turn off the heater more often, because... The temperature will stay in the sauna longer.
Need to know
When starting the design process, you should think in advance and decide on some of the features of your future sauna.
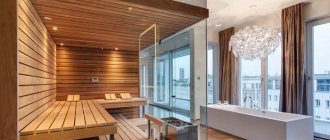
Steam room
The main room of the sauna in the country house, in the house and in the apartment is the steam room. Even when considering designs for saunas with a relaxation room, you should understand that it is the steam room that plays the most important role in this design.
The main room in the sauna is the steam room
The following parameters are considered the most optimal sizes for this room:
- Height – 2.1 m.
- Length – 2.4 m.
- Width – 2.1 m.
Note! Increasing the size of the steam room entails difficulties in maintaining the required temperature.
Oven and shelves
Visual modeling of elements according to the drawing.
Every steam room of a sauna or bathhouse certainly has a stove and shelves for lying on. To make shelves, birch wood or aspen slats are often used, which are fastened with galvanized nails. The heads of the nails must be recessed into the wood by 5-7 mm.
Structural dimensions, communications, lighting, ventilation - everything should be included in the design.
The ideal version of the steam room certainly contains two levels of shelves, but designs with one level are also quite acceptable. The width of the shelf should not exceed 0.5 m.
The distance from the top bath shelf to the ceiling must be at least 1.05 m. The shelves must be designed to be removable for drying and hygienic treatment.
The stove and shelves in the steam room are the most important thing
Both a wood-burning stove and factory-made electric stoves can be used as a stove in the steam room. Along the perimeter of the stove, which is usually located in a corner, fences made of slats and boards should be installed.
Typical project: veranda + relaxation room + steam room + shower
Ventilation
Ventilation for the steam room also plays an important role.
Such ventilation should consist of two main elements:
- Inlet opening located at a distance of 0.3 m from the floor near the stove;
- Exhaust vent located at a distance of 0.3 m from the ceiling.
Both of these openings are equipped with valves, and their area is calculated based on the area of the steam room itself.
Shower room
The shower right in the sauna is convenient and necessary. Modern designs of cottages with a sauna and a garage certainly include a shower room.
In the photo - an option for installing a shower in a sauna
The minimum size of a shower stall is 1x2.5 m. If the area of the sauna allows, then the shower room can accommodate not only the shower itself, but also shelves for bath accessories, a bench, a basin, a ladle, and tubs with cold and hot water. The area of such an extended shower can be up to 6 square meters. m.
Tip: It is more advisable to locate the shower next to the passage that leads to the steam room.
Ventilation, lighting and door
The finishing touches are to determine the height of the shelves, arrange the lamps and choose a location for the exhaust vent. Height of standard shelves: lower – 45 cm and upper – 90 cm. We will place the lamps in three corners. We will place the exhaust hole in the corner opposite from the heater. It will be located below the shelves. The ventilation valve is installed on top of the wall or in the ceiling. The inflow will be through a gap under the door 3 cm high. The heater is located near the door; it is not necessary to arrange an additional inflow under it.
The final top view drawing will look like this:
Before installing partitions, you need to determine the location and size of the doorway. The width of the opening should be 4 cm greater than the width of the door frame, and the height should be 5 cm. The opening itself is located in the middle between the bottom shelf and the heater fence.
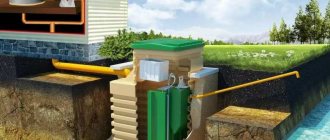
Steam room power supply
The sauna is considered a fire hazardous room, so special requirements are imposed on the electrical wiring. The wires must have heat-resistant insulation that can withstand temperatures up to 180 degrees. The use of metal hoses, corrugations and various cable channels is excluded. Also, according to the rules, it is not allowed to connect wires or install electrical fittings (switches and sockets) inside the bathhouse.
If it is possible to throw wires from the outside of the wall, you need to take advantage of it and bring the ends into the steam room directly opposite the electrical receivers. As for the power supply for the electric furnace, it is best to place it in the floor screed.
For lighting, it is necessary to provide heat-resistant lamps placed at a distance of no closer than thirty centimeters to the ceiling. Lamps installed under shelves can create a special atmosphere. Fiber optic lighting for saunas is becoming increasingly popular. In such systems, cable lines conduct light radiation rather than electrically charged particles, which makes them safer.
power supply diagram in the sauna
All electrical receivers must be connected through high-quality switching protection devices that protect the power supply system from short circuits and overvoltage. To protect people in the sauna from electric shock, it is necessary to provide residual current devices, simply RCDs. All circuit breakers and RCDs should be located in a separate panel located outside the sauna room.
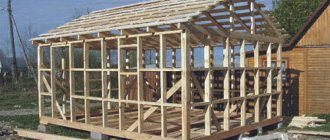
Frame
First of all, the wall frame is installed. For the sheathing, a 50x50 mm softwood timber is required. A 50 mm thick insulation will be laid here.
The pitch of the bars is set according to the standard width of the insulation - 600 mm. Where it is not possible to make exactly 600 mm, we make it smaller. We provide a ventilation duct on the wall opposite the heater. We connect it with a tee to the ventilation duct for the ventilation valve, which will be located in the ceiling. One ventilation duct is led from the tee to the shower room or dressing room (for the installation location of the ventilation valve, see the technical specifications for electrical wiring below). We install a block flush with the doorway on each side. Part No. 1 is made 100 mm shorter than part No. 2, because a ceiling beam will be installed on it (specification of Saunaflame products - at the end of the article).
For greater rigidity, the ceiling frame is made along a short wall. Part No. 3 – timber 50x100 m – is installed on the second part with the short side. The ceiling insulation is made at least 100 mm.
The ceiling counter-lattice is made in increments of no more than 600 mm from 50x30 mm timber (part No. 4). The ceiling cake also contains aluminum foil on a paper base. To complete the ceiling installation, lining is hemmed onto the counter-lattice. A hole with a diameter of 100 mm is made in the lining to install a ventilation valve, which is connected to the previously installed vent. channel in the ceiling.
Performing ventilation
Heating project
When constructing the frame, all required communications must be laid. In order to spend time in the sauna comfortably, strict requirements are applied to ventilation.
A hole is required near the stove for air to enter. A hood is mounted opposite it, from where the air enters the ventilation or directly to the street. You can make an additional hole that is opened only to ventilate the room.
Sometimes the natural passage of air masses does not occur. Installing forced ventilation helps. Capital walls must be lined, then ventilation must be installed. It must be closed with a grille, the hood must be closed with a valve. The amount of air must be adjusted by decreasing/increasing the holes.
Electrical wiring and ventilation ducts
Before laying insulation into the walls, it is necessary to remove the wires for lamps and electric heaters and provide a ventilation duct for main ventilation. The cross-section of the wire for the electric heater is selected in accordance with the power (the recommended cross-sectional area is indicated in the product data sheet). After this, you can insulate the walls and cover the insulation with aluminum foil, not forgetting to remove the ends of the wires. Scheme of technical specifications:
Thermal insulation of the steam room
Insulation should be approached with special responsibility. The rate of heating of the room and the amount of energy spent for this will depend on the correctness of the process. There should be no gaps when laying insulation - it is worth taking this into account during installation.
Sauna thermal insulation
The ceiling should be insulated carefully, because this is the place of the greatest heat loss in the sauna. Foil is placed on top of the insulation. The material connections should be secured with aluminum adhesive tape. If foil paper is not used, heat will be retained much worse, the room will cool down faster, and will not be able to reach the required temperature.
Walls
After the ceiling is hemmed and the walls are insulated, you can begin installing the wall counter-lattice. The top bar will just rest against the ceiling lining. The bottom one will be near the floor. Another plank should be opposite the future frame of the upper shelf - 855 mm to the top edge (height of the shelf minus the thickness of the plank for the shelves 25 mm and the thickness of the board on which the shelves are assembled 20 mm). The other bar is opposite the middle of the backrest. The remaining space is filled so that the counter-lattice pitch is no more than 500 mm. In our case, two more strips are added. One is between the bottom bar and the top shelf bar. The second is between the top bar and the backrest bar. We start with the wall according to type A (detail No. 5):
On the remaining walls, the spacing of the counter-lattice remains the same as on the long wall (view A). Drawing of the left wall counter-lattice (type B):
An electric heater is installed on the right wall (view B), so at the place where it is attached it is necessary to provide strips to which it will be screwed. In the instructions for the heater we find the dimensions and distances for the mounting frame:
In accordance with these dimensions, we provide a counter-lattice for the right wall (type B):
The wall in which the door will be installed (type D) must also have a stiffening frame around the perimeter of the door (parts No. 10 and No. 12), because In this place, door panels will be made from clapboard. Mounting boards for the door frame are installed in the doorway. At the top, two 100x20 mm strips are enough; along the edges, the strips (part No. 13) are installed opposite each hole in the door frame, into which it is then screwed. Unpack the door in advance and measure these distances.
Project content
Before moving on to the construction stage, you need to really rack your brains about what your sauna should be like. Of course, it must be of high quality, complying with SES standards, equipped with good equipment and ventilation.
All these and many other points should be decided at the design stage. Because there is nothing worse and more expensive than constant rework during the execution of work.
Sketch of the future building
It is important to find out what type of sauna project we are talking about. There is a so-called individual version of project documentation. It looks like a kind of instruction indicating what and how to do.
Such projects often contain only the following information:
- Construction work plan;
- Bills of Materials;
- Floor plan or building sketch.
Sauna projects prepared by specialized organizations are often entire volumes of documents containing:
- Construction plans and sections;
- Sketches of premises;
- 3D models;
- Payslips;
- Specifications of materials and equipment;
- Drawings for related sections.
Note! If the sauna requires some decorative elements and structures, the construction project development company may offer to develop a design project for your sauna.
A sauna with a swimming pool is a dream!
Door and paneling
It's time to install the door. Using parts #10 and 12 this will be easy. You already have the ceiling lined. There is a hole in the ceiling with a ventilation valve. Wires for lamps and heaters are installed in the walls. If you want to install the control panel outside the sauna, now is the time to do it (run the cable from the control panel installation location to the connection block of the heater). The temperature sensor has a wire that can be passed behind the lining or along its surface. Now is the last moment when it can be hidden. Once decisions have been made on all the wires, proceed with the installation of the lining. Make a hole in the lining where the wires exit before nailing it. You can make cutouts for the vents in advance. constant exhaust holes (see picture with parts No. 26 and 27). The door paneling is nailed last.
After all the lining is nailed down, proceed to installing the ceiling and door skirting boards. Cover the bottom vent with a wooden grille. You can also install lamps.
Advantages and disadvantages of a frame bath
Each building material has its own advantages and disadvantages that must be taken into account. Recently, frame baths have begun to become popular, so it makes sense to find out why they are better than structures made from other materials.
The advantages of such a bath:
- There is no need to make a capital foundation. The structure is lightweight, so it can be installed on a lightweight base.
The foundation for the frame structure can be lightweight
- Low cost. They are preferred by those who want to get a high-quality design for a low price.
- Possibility of production in the shortest possible time. Together with finishing and insulation work, production will take 1–2 weeks. The structure is assembled 3 times faster than stone or timber.
- Heat retention. According to these indicators, a frame building is not inferior to a log or timber structure.
- Environmental friendliness. This bathhouse is made from natural materials that are not capable of harming human health.
- Possibility of production at any time of the year. The structure can be manufactured even at a temperature of -15°C.
- Comfortable microclimate. Walls can breathe as the material will absorb and return air.
- Seismic resistance. Thanks to this quality, the bath can be made even in an earthquake-prone region. It can withstand fluctuations of up to 8 points.
However, it is important to know that a frame bath has significant disadvantages:
- Costs for insulation and finishing materials. The frame building itself is cheaper than a stone or timber steam room, but the cost increases several times during finishing and insulation work. Panels for decoration and plastering are required.
- Shrinkage. The process takes at least 2 years, and the building may sag by 10 cm. This may lead to deformation of the finishing layer. To reduce the effects of shrinkage, it is recommended to use chamber-drying materials during the construction process.
- The difficulty of choosing high-quality material for insulation. If you use budget mineral wool, the bathhouse will not be able to fully cope with its functions. The use of budget polystyrene foam is also not allowed, since the material is easily flammable.
Shelf frame
Start installing the shelf frame with the rack blanks. For this, a 50x70 mm beam is used. The figure shows the sequential installation of racks. We start with the top shelf, which runs along the entire wall, then the other top shelf.
Secure the adjacent racks with metal corners for rigidity (on the inside). Transverse and longitudinal bars 50x50 mm will connect all the racks of the upper shelves. We recommend that you do not install the bottom shelf racks until you have installed parts #16, 17, 20, and 21.
We recommend fastening the racks of the lower shelf, which are adjacent to the racks of the upper one, together. We complete the installation of the lower shelf by fastening parts No. 18, 19, 22 and 23 racks (No. 15).
The frame of the shelves is done - it's time to install the lower baseboards.
Pool Features
The choice will depend not only on wishes, but also on the type of soil on the site and the availability of communications.
Main types:
- A small bathhouse, the main purpose of which is cooling after the steam room. It is impossible to organize a swim in them, but they will not require excavation work.
- A full-fledged swimming pool, which will require its own project with soil testing and communications.
To create a large pool, it is better to hire professionals.
Shelves
The stitching between the shelf levels is where we'll start. First of all, the one opposite the entrance is mounted.
Then install the second side:
We install the end strips of the lower level according to the same principle:
|
We fasten the prepared strips for the shelves with a 20x50 mm rail with the same pitch as that chosen for the racks. Thus, these slats will cover the frame of the shelves. Top shelf layout:
Layout of the lower shelves:
Place the resulting shields on the frame. A 20x50 mm rail that holds the planks together is screwed to the frame.
Tips for choosing material
The frame should be assembled from the following parts:
- bars;
- slats for creating sheathing;
- boards for the floor base.
Instead of plank flooring, the floor base can be covered with tiles. You need to choose based on personal preferences, however, in the case of a steam room, it is recommended to give preference to wood. There will also be materials for protection. Quite often, lining is used for wall cladding.
It is recommended to cover a frame bath with wooden clapboard
To cover the structure from the outside, you can use larch lining. The inside of the building is clad with clapboard made of coniferous trees. Sheathing boards must be mounted vertically.
Excess moisture and elevated temperatures will negatively affect structural elements, so it will not be possible to do without the use of special protective materials. You can use glassine, polyethylene or roofing felt. A vapor barrier should be placed between the insulation and the sheathing. The disadvantage of roofing felt is that during the heating process it will emit an unpleasant odor. Therefore, it is not recommended to use it.
You need to pay attention to the selection of material for thermal insulation. If you choose wisely and install the insulation correctly, it will be possible to significantly reduce heat losses, as well as the cost of heating a bathhouse building.
Mineral wool is used as insulation in most cases.
A good insulation material for a frame bath is mineral wool.
A good option is to use fiberglass. In some cases, the ceiling is insulated with expanded polystyrene, and the floor base with expanded clay.
Backrests and fencing for electric heaters
The backrests are fastened to strips of the same cross-section as those chosen for the shelves and the backrests themselves. The finished shield is screwed to the wall into a pre-designed counter-lattice strip (see above). Wall (view A):
Wall (view B):
Hang the mounting frame with the electric heater. All you have to do is make a decorative fence around the electric heater. Its dimensions take into account the safe distances from the heater body to wooden structures specified in the passport:
The final touch: hang lampshades, a thermometer, a hygrometer and an hourglass. Place the stones in the oven. The sauna is ready.
Ask any questions you have in the comments.
advice, design
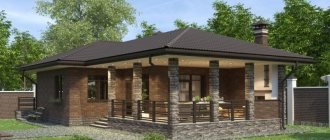
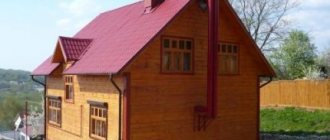
Sauna in a one-story house
The project of a one-story house with a steam room is very popular. This is not surprising, because houses are often used for relaxation from the bustle of the city, and what could be better than a sauna right in the house?
In addition, such projects usually make it possible to very effectively use the available space and rationally arrange every square meter.
Very often they build a sauna directly from the house into it. This allows you to not depend on the time of day or weather conditions, which allows you to get into the steam room at any time.
Some also add a terrace to the sauna, creating a full-fledged place to relax, where you can not only take a steam bath, but also sit in the fresh air.
Many people choose a Finnish project, where both the sauna and the house are made in the same style and resemble the national characteristics of this country. The first floor is usually decorated with wood and stone, which brings the room itself closer to nature.
Do-it-yourself sauna - step-by-step instructions.
Before starting construction, it is necessary to clear the site - remove bushes, stumps, remove debris and everything that will interfere with the foundation work.
Preparing the site for the construction of a bathhouse
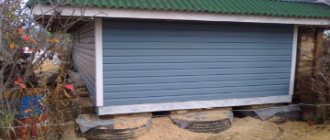
It is best to build a bathhouse made of timber on a columnar foundation, which is inexpensive and excellent for the construction of small wooden and frame buildings.
When constructing it, you first need to dig the estimated number of holes for installing supports. Their number is calculated as follows: supports must be installed in the corners of the building and at the intersections of walls, as well as with a certain step along their perimeter.
We invite you to familiarize yourself with: Technology for building a bathhouse with a large brick barbecue oven
The pitch is selected taking into account the type of soil and the estimated total weight of the structure. The depth of the holes should be 1-1.5 meters, although it may vary depending on the depth of soil freezing in a given area. To perform this type of foundation, in addition to the materials listed above, you will need asbestos-cement pipes and fittings.
At the bottom of the pit it is necessary to pour a mixture of sand and crushed stone 10-15 cm thick. Then install an asbestos-cement pipe of the required length into it, strictly vertically, and secure it. Several reinforcement bars should be placed inside the pipe.
After this, pour concrete solution into the pipe and into the free space between the walls of the pit and the pipe.
How to make a columnar foundation
After pouring the mortar, you need to wait a few days, and then lay a half-brick thick wall between the pillars.
The traditional material for the construction of bathhouse walls is timber measuring 150x150 mm. Before laying the first crown, it is imperative to put waterproofing on the foundation. The lower part of the crown must be treated with an antiseptic. Most often, the timber is laid out using the “paw” method.
Connecting a beam into a paw
The first crown must be carefully aligned according to geometric parameters - all angles must be exactly 90 degrees. After the first crown is erected, they begin laying the beams for the set of walls. When laying out the walls, you need to make openings for future doors and windows and be sure to insulate each row with the selected thermal insulation material.
To connect the crowns, dowels are used - metal or wooden pins.
After the walls are removed, the roofing is installed. Depending on the chosen roof shape, it is necessary to fix the rafters, which are attached to the upper crown with brackets.
When installing a single-pitched sloping roof, the rafters are secured either by two external or one external and one internal supports. When erecting a gable roof, it is necessary to securely support the rafters from below to the wall, and connect them together from above to form a roof ridge.
Floor beams Sheathing boards
are attached to the fixed rafters, then hydro- and vapor barrier and insulation are laid on them.
The roof installation is completed by installing the selected roofing material.
Interior decoration must begin with the installation of communications - sewerage, water supply, electricity. You should worry about sewerage even when designing and constructing the foundation.
It is necessary to dig a drainage well next to the future bathhouse, which includes a sewer pipe buried in the ground with a slope to remove wastewater from the washing compartment.
After the sewerage installation is completed, a finishing floor is made, which is made of wood or concrete. Concrete floors are more durable and are most often faced with tiles or porcelain stoneware.
If a wooden floor is chosen for interior decoration, it is usually made to leak. To do this, floor boards are nailed to the installed joists with a small gap, or a small drain hole is installed in the floor, covered with a grate.
In this case, the floor must be made with a slight slope towards the drain. Then the water that gets into the drain will be discharged through the sewer pipe into the drainage well.
After installing the sewer system, it is necessary to perform insulation, hydro- and vapor barrier of the walls and ceiling using appropriate materials, install electricity and water supply.
After installing windows and doors, then finish the room using, for example, lining.
After finishing is completed, you need to install the necessary electrical appliances.
There are a great many options for placing shelves; you just need to follow the recommended dimensions and the fact that they should be made of hardwood. The installation principle is simple - a stable frame is mounted, usually made of timber, and boards are attached to it.
The stove must be installed in full compliance with fire safety requirements. Wooden structures must be insulated from the high temperatures of the operating stove and chimney. If the furnace is heavy, it must be installed on a specially equipped foundation. This is determined on a case-by-case basis depending on the oven selected.
The stove is selected depending on the preferences of the owner. This can be a traditional wood-burning heater, a metal wood-burning or electric stove; sometimes it is advisable to choose a gas stove for a sauna.
There are many accessories for a bath.
— brooms (oak, birch and others); — containers (buckets, basins); — a wooden ladle for adding water; — wooden grates for the floor and much more.
Additional individuality can be added by the interior decoration of the premises, which remains at the discretion of the owner - here, depending on desires and financial capabilities, you can give free rein to your imagination.
It should be added that all of the listed accessories can be made independently. The bathhouse is a great place to spend time in a pleasant, friendly company or with your family. It will be much more pleasant to realize that all this was done with your own hands, including useful and necessary devices: for example, hangers, lamps or ventilation grilles.
Enjoy Your Bath!
Tags: bathhouse, estimate, drawing
« Previous entry
General layout of the bathhouse within the site
Structures must comply with key principles within the layout on the site:
- The distance from the bathhouse to the residential building must be at least 10 m. On the one hand, this is an immutable requirement of fire safety rules, on the other hand, it ensures normal smoke removal during heating of the sauna stove in various weather conditions;
- The distance from the fence to the bathhouse structure must be at least 3 m. This condition will allow fire crews to have access to the entire perimeter of the bathhouse structure during the occurrence of force majeure circumstances, in other words, a fire;
- The structure of a bathhouse located on the shore of a natural reservoir. It should be about 15 m away from it.
Advantages and disadvantages
The undeniable advantages of building frame baths are:
- Ease of construction;
- cheap design (low cost for materials);
- simplification of foundation work in comparison with other options;
- poor thermal conductivity;
- the ability to make communication channels inside the walls and not spoil the appearance;
- elimination of shrinkage;
- no need for complex construction equipment;
- environmental safety (rare for country budget buildings);
- the ability to complete all work without the involvement of specialists;
- exclusion of wet work - construction can be done in winter and even where there is no stable water supply;
- wide variety of finishing options.
11photos
But after carefully studying the reviews of owners and developers, you can immediately detect certain shortcomings. Each of them can be eliminated with timely measures, only because you need to properly understand the possible problems. Frame baths in their pure form cool quickly, and therefore an ugly fungus appears inside after a short time. To cope with this difficulty, you need to use only the highest quality insulation.
You can extend the service life of a panel bath if you impregnate all used timber and boards with special antiseptics. After 18-24 months, the shrinkage of the frame is sometimes 80-100 mm. As a result, the external and internal decoration is deformed. This risk can be reduced if you use lumber that has been kiln-dried.
Flaws
In addition to many advantages, when constructing a frame building there are also some disadvantages:
- The construction of the building itself requires little money compared to other buildings, but it requires considerable cash injections for finishing and insulation (insulation may be inexpensive, but membrane films also cost money;
- The process of closing the insulated frame should be completed within 1.5 - 2 weeks (or even faster, until the insulation gets wet and is not torn by the wind);
- The impossibility of using inexpensive cotton wool and polystyrene foam for insulation (this is a plus about environmental friendliness);
- Finishing with slabs is not recommended in most cases; a ventilated façade is needed.
High cost of finishing
As described earlier, despite the seemingly cheap construction of a bathhouse at first glance, its finishing requires significant costs. Finishing, both external and internal, is the most expensive of the entire process of building a frame bath.
Requirements for the quality of insulation
The disadvantage of the “frame” is the impossibility of using cheap materials as insulation. Only high-quality and therefore more expensive insulation options are suitable.
We also recommend reading the following materials:
- Insulation of the walls of a frame bath;
- Insulation for the walls from the inside and what kind for the steam room;
- Which insulation is better, and also about foil and foil.
Speed Requirements
The construction takes a little time from the developer, but requires proper treatment (the insulation must be closed, otherwise it will get wet - as a result, you will have to buy it a second time, since it can be easier to throw it away than to dry it).
Ventilation requirements
Ventilation is simply necessary for frame construction. Ventilation maintains the necessary microclimate in the building at any time of the year. Unlike hygroscopic wooden walls, frame walls with their vapor barrier create the effect of a “plastic bag” in the bathhouse, similar to a greenhouse or greenhouse. It quickly becomes hot, but at the same time stuffy, you can simply suffocate if there is no ventilation.
We recommend reading about ventilation: in the steam room, diagrams and design, how to do it correctly.
Vapor barrier requirements
The bathhouse requires masterful work with membrane film. If the insulation is carried out with breaks or the joints are poorly sealed, the insulation will get wet and simply stop working.
Shrinkage
The insulated frame must be “closed” within two weeks. The actual shrinkage of raw lumber or “natural moisture” may take a slightly longer period. When the frame boards dry out, construction defects may appear: cracks, film breaks, and cold bridges may appear.
Weakness to wind and snow loads
Despite the fact that the frame is resistant to seismic activity, it is weak against snow and wind loads. The consequence is that the frame should be built in certain areas of the country where these weather conditions are least likely to manifest themselves or allowances should be made for them, which will increase the cost
This disadvantage should definitely be taken into account by everyone who wants to build a frame building.
Fast cooling
Despite the fact that the frame warms up faster, it cools down no slower than its “brothers” (stone, wood), but rather even faster. The reason is the same low heat capacity. The beam, log, stone must first be heated, while the “plastic bag” of the frame does not heat up, but only the air in it heats up. But even when the furnace stops, this air cools down quickly (after all, we will do ventilation, where without it, see above), and massive traditional materials can release the accumulated heat for a long time.
When choosing, you should take this fact into account.
Bathhouse 5x8 m
The building effectively uses the first floor and allows for the addition of an attic. It can be divided into several zones, for example, a bedroom and a billiard room. You can add a balcony. However, the larger the premises and the total area, the more acute the questions arise about how to provide the premises with heat and how to waterproof them. The issue of fire safety is important. When installing a steam room, it is important to carry out all the work correctly, which will require expert advice.
Finishing
Finishing the premises inside and outside the walls can begin after covering the roof frame with a roof and installing subfloors.
Internal
The inside of the bathhouses should be decorated with clapboard. The most important thing is not to stuff it too tightly. The tree needs distance to dry out freely.
The lining must first be coated with special antiseptics, which will protect the wood from the destructive effects of moisture.
External
For exterior decoration you can use different materials:
- block house;
- metal or plastic siding;
- different types of plaster;
- clinker tiles;
- decorative brick.
The choice of decorative material depends on the wishes of the bathhouse owner and his financial capabilities.
Frame buildings are present in every modern cottage cooperative. This is due to the increasing popularity of this technology. To build a high-quality frame bathhouse, you need to understand how to build it correctly and prepare the necessary set of materials and tools.
How to choose a place to build a bathhouse.
One of the most important points is the choice of location for the future building. The location must satisfy both existing legislation and ease of use. Basic recommendations that can help you make your choice:
- if there is a body of water nearby, you should not place the bathhouse too close to it, as the building will be in danger of flooding;
- it is necessary to decide how the bathhouse will be located relative to the house: a separate building or will it be attached to it, since each option has its own positive and negative sides;
- it is believed that it is better to build a bathhouse in the backyard, in relative privacy;
- It is necessary to provide for mandatory ventilation during construction, as well as to provide for wastewater disposal;
- It is highly not recommended to determine the location next to a nearby road;
- when placing a building, it is necessary to take into account the cardinal directions and the direction of the wind: the best place is the southern part of the site, protected from the wind so that it does not disturb vacationers, it is better to have windows facing west;
- It is desirable that the bathhouse be located at some distance from other buildings, and if it is an extension to the house, it is imperative that during construction it is necessary to comply with fire safety rules, as, indeed, when constructing a separate building;
- when determining the location of the bathhouse and its size, it is necessary to observe the distances established by the rules from the boundaries of the site, so that the neighbors do not experience discomfort in the future and do not make claims to the owner;
- It is recommended to maintain a distance to the water intake (well or borehole) of no more than 20 meters.
Advantages and disadvantages
Properly using all the advantages and, if possible, leveling out the existing disadvantages - perhaps this is the main task of a person who undertakes the independent construction of a frame bathhouse. If you have studied the projects of bathhouses made of foam blocks and seen what shortcomings this material has, do not think that everything is so rosy with frame structures. Let's not mislead you: there are disadvantages in every business, and therefore the best way to deal with them is to carefully study them. Actually, let's start with them.
Flaws
- possible shrinkage of the bath over time;
- the need for high-quality insulation and the associated increase in costs;
- material and time costs for finishing - both internal and external;
- careful care and careful use.
It is no coincidence that we started with the minuses. So you will immediately see the pitfalls that the construction of a frame bath is associated with
And if, after getting to know them, they seem to you not like large cobblestones, but like small pebbles, then pay attention to the following advantages of the chosen type of construction
Advantages
- lightweight construction does not require grueling preparation of a solid foundation;
- retain heat well, but only with high-quality insulation;
- attractively cheap assembly;
- environmental friendliness and resistance to vibrations in the earth's crust;
- the ability to build a frame bathhouse in the shortest possible time, even in difficult weather conditions.
If the advantages still outweigh the possible disadvantages, and you still want to build a bathhouse of this type, then proceed to the next stage.
Project of a traditional Russian log bath
The bathhouse made of solid logs corresponds most closely to the bathhouse traditions of the Russian people. Its main types:
- Barked log. With this type of pre-treatment, only the bark is roughly removed, and not everywhere. This pre-processing method is very fast, however, it has a number of disadvantages. For example, in places where the bark has not been removed, pests usually hide, then placing such a bathhouse inside requires additional refining and finishing;
- Scraped log. This is a more in-depth, although rather primitive, type of processing, during which the top loose layer of wood, the bast, is removed with a special cutting tool. Together with it, all the flaws that are inherent in the debarked log are removed. Such structures are more susceptible to treatment with protective materials and are much more durable. They retain all the charm of a classic traditional antique bathhouse;
- Planed log. With this type of processing, it is already possible to use power tools with rotary knives, with the help of which deep layers of wood are removed. The construction scheme of which is based on the use of such material has some of the highest thermal insulation properties. In addition, planed logs respond very well to the use of protective compounds;
- Lafetted log. Two opposing edges are removed from the trunk, resulting in the formation of well-matching areas between adjacent elements. This material is distinguished by a high degree of stacking of elements during installation. It is not easy to build a bathhouse, the designs of which are based on the use of laminated logs, due to the high labor costs for preparing high-quality and well-matched sites;
- Rounded log. Has the most attractive appearance. All elements are the same, standardized sizes. In artisanal conditions, such processing is impossible to carry out, because it requires the use of rather complex industrial equipment. The surface of such material is perfectly treated with protective materials to a great depth, which ensures a long service life of such structures.
How to build a sauna at your dacha yourself.
Sometimes you really want to leave the hustle and bustle of the city and go to the country.
Silence, walks, doing your favorite things - what could be better! If comfort is provided at the dacha, you want to come again and again. One of the comfortable living conditions at the dacha is a bathhouse. Construction can, of course, be entrusted to professional builders. However, it is quite possible to build and improve a bathhouse on a summer cottage on your own. This eliminates additional expenses and allows you to carry out finishing and landscaping in full accordance with your desires and preferences.
Firstly, as with any construction, you first need to decide on the project and the materials from which the bathhouse will be built. The choice of the main material for construction depends on the geographical location and operating conditions, as well as on one’s own capabilities.
Bathhouses are made of brick, aerated concrete and other stone materials; some prefer frame bathhouses, however, many novice builders prefer to build a bathhouse from wood. This lightweight and durable material does not require a serious and expensive foundation, but has excellent characteristics. With proper care, operating the bathhouse will not cause much trouble.
And of course, preference should be given to timber - a bathhouse made of this material will retain all the advantages of a wooden structure and eliminate the problems and additional costs that may arise when building walls from logs. Building walls from timber is similar to working with a construction set - it can have different geometric dimensions and cross-sections (rectangle, square, semicircular), and also, in the case of profiled timber, there are grooves for fastening. Building from timber is easy and convenient - what could be better for a novice builder!